How to Send an SMS in FastAPI with Twilio
Time to read:
April 13, 2021
Written by
Reviewed by

Twilio is all about powering communication and doing it conveniently and fast in any language. But if you have a Python application written with the asyncio package, it may not be completely clear how to translate the examples from the documentation into non-blocking code that works well with an asynchronous loop.
In this tutorial you’ll learn how to properly deliver SMS notifications from a FastAPI application. The techniques shown here are also applicable to other asyncio frameworks.

Tutorial requirements
- Python 3.6 or newer. If your operating system does not provide a Python interpreter, you can go to python.org to download an installer.
- A Twilio account. If you are new to Twilio click here to create a free account now and receive $10 credit when you upgrade to a paid account. You can review the features and limitations of a free Twilio account.
- A smartphone with active service, to test the project.
Buy a Twilio phone number
If you haven't done so already, your first task is to purchase a Twilio phone number to send SMS from.
Log in to the Twilio Console, select Phone Numbers, and then click on the red plus sign to buy a Twilio number. Note that if you have a free account, you will be using your trial credit for this purchase.
On the “Buy a Number” page, select your country and check SMS in the “Capabilities” field. If you’d like to request a number that is local to your region, you can enter your area code in the “Number” field.
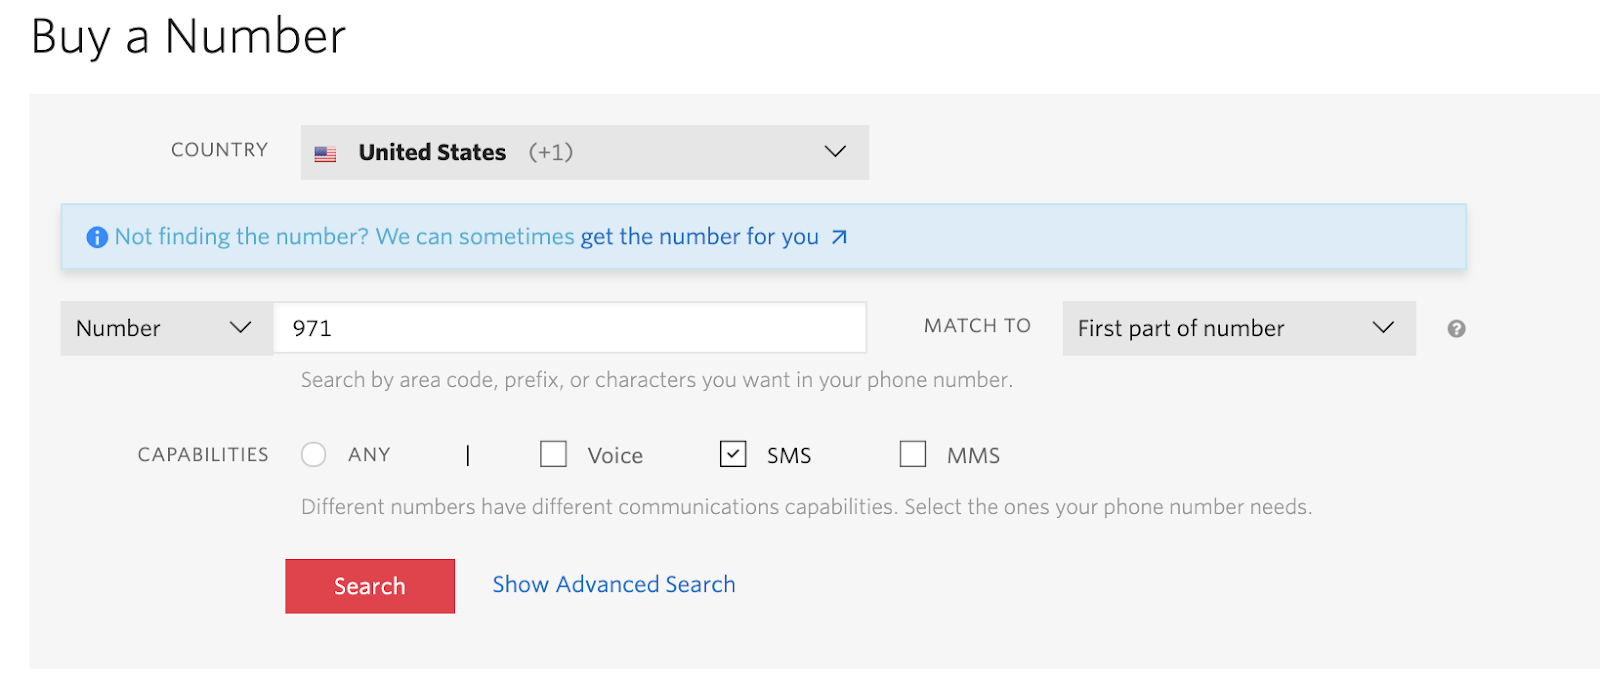
Click the “Search” button to see what numbers are available, and then click “Buy” for the number that you like from the results. After you confirm your purchase, click the “Close” button.
Project setup and configuration
In this section you are going to set up a brand new FastAPI project. To keep things nicely organized, open a terminal or command prompt, find a suitable place and create a new directory where the project you are about to create will live:
Creating a virtual environment
Following Python best practices, you are now going to create a virtual environment, where you are going to install the Python dependencies needed for this project.
If you are using a Unix or Mac OS system, open a terminal and enter the following commands:
If you are following the tutorial on Windows, enter the following commands in a command prompt window:
With the virtual environment activated, you are ready to install the Python dependencies required for this project:
The six Python packages that this project uses are:
- The FastAPI framework, to create the web application,
- python-dotenv, to import the application configuration from a .env file,
- aiofiles, to give FastAPI the ability to serve static files,
- python-multipart, to give FastAPI the ability to process form data,
- uvicorn, to serve the FastAPI application,
- and the Twilio Python Helper library, to work with the Twilio APIs.
Configure Twilio credentials and phone number
To be able to send an SMS with Twilio, the FastAPI application will need to have access to your Twilio account credentials to authenticate. Also, to send an SMS, you will need to provide a number for the sender, the Twilio number you purchased earlier.
The most secure way to define these configuration values is to set environment variables for them, and the most convenient way to manage your environment variables in a FastAPI application is to use a .env file.
Open a new file named .env (note the leading dot) in your text editor and enter the following contents in it:
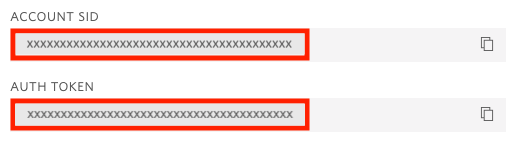
You will need to replace all the xxxxxxxxx with the correct values that apply to you. The first two variables are your Twilio “Account SID” and your “Auth Token”. You can find them in the dashboard of the Twilio Console:
The TWILIO_NUMBER variable is the phone number that you purchased above. When you enter this phone number in the .env file, use the E.164 format, which includes a plus sign and the country code. For example, a number from the United States would be given as +1aaabbbcccc, where aaa is the area code, and bbb-cccc is the local number.
To incorporate these three variables into the FastAPI application, create a file named config.py with the following contents:
FastAPI relies on the BaseSettings class from pydantic to manage its configuration. Subclasses of BaseSettings automatically import variables defined as attributes from environment variables, or directly from the .env file with its dotenv integration.
You will learn how to work with the Settings class in the next section.
Send an SMS with FastAPI
We are now ready to start coding the FastAPI application. We’ll do it in a few steps.
Base FastAPI application
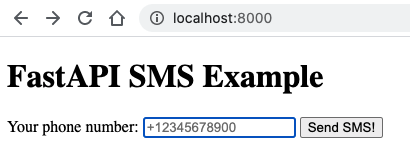
Below you can see the first iteration of our FastAPI application. This version just returns the main page, which presents a web form where the user can enter the phone number that will receive the SMS.
Open a new file named app.py in your text editor or IDE and enter this code in it:
The @app.get(‘/’) decorator defines an endpoint that is mapped to the root URL of the application. The implementation of this endpoint returns a response that is loaded from a static file named index.html.
For this endpoint to work, we now need to create the HTML file. Open a new file named index.html in your editor or IDE and enter the following HTML code in it:
Running the server
The application is incomplete, but it is functional enough to be started. Make sure you have the app.py, index.html, and .env files created earlier in your project directory, and then start the application using the following command:
Uvicorn is the recommended server to run FastAPI applications. We are starting the server with the --reload option, which will make uvicorn watch our source files and automatically restart the server when changes are made. You can leave the server running throughout the rest of the tutorial.
To make sure that your application is correct, you can open a web browser and type http://localhost:8000 in the address bar. The browser should load the main page of the application, which looks like this:
Handling form data
If you try to submit the form, FastAPI will return a “Method not allowed” error message. This is because we have not implemented the form submission endpoint yet.
If you look at the <form> element in index.html, we have defined the form with the method attribute set to post and no action attribute. This means that the form will be submitted with a POST request to the originating URL, which in this case is the root URL of the application.
The endpoint will have the following structure. You can add it at the bottom of app.py, but note the lines that start with # TODO, which indicate parts of the function that haven’t been built yet.
On this second endpoint we are using the @app.post(‘/’) decorator to define a handler for POST requests. The web form that we are using has a single field named phone, so we have that as an argument into the function. FastAPI will parse the form data and extract the value of this field passed by the client and send it to the function in this argument.
While we have the structure of the function well understood, we have some work to do to send the SMS and to return a response, so we’ll continue working on this endpoint in the following sections.
Sending the SMS
When the handle_form() function is invoked, we will have a phone number to send an SMS to. We can access the Twilio credentials and the sender’s phone number from the Settings class we wrote earlier, so at this point we have everything we need to send an SMS with Twilio.
The problem is that the Twilio helper library for Python does not support asynchronous applications. Since this library will be making network requests to Twilio servers, it will block the loop if used directly in the asynchronous function. To avoid this problem, we’ll encapsulate all the Twilio related work in a function that we’ll call send_sms(), and we’ll execute this function inside an executor to keep the async application running smoothly.
Below you can see an updated version of the handle_form() function from app.py with the logic to run the send_sms() function in an executor.
The run_in_executor() method from the asyncio loop allows you to run a blocking function in a separate thread or process so that the loop does not block. The first argument is the executor that you’d like to use, or None if you are okay using a default thread executor. The remaining arguments are the function to run and its arguments.
Let’s now have a look at the implementation of the send_sms() function. Note that this is standard synchronous code, so this function is not defined with the async keyword. Add this function to app.py:
The function creates an instance of the Twilio client object and initializes it with the Account SID and Auth Token values that come from the settings object.
Then the client.messages.create() is used to create and deliver the SMS. This function takes the from_, to and body arguments to define the sender, recipient, and body of the SMS respectively. Note that from_ is used because from is a reserved keyword in Python.
Sending a response
In the previous section, we left the handle_form() function incomplete. After the SMS is sent through the executor, the server needs to return a response. The most accepted practice when handling to a form submission is to respond with a redirect, which avoids a number of potential issues including double form submissions and confusing warnings presented to the user by the browser. This practice is known as the Post/Redirect/Get pattern, or PRG.
For this application, we can redirect to a page that indicates that the SMS has been sent successfully, and give the option to the user to send another SMS. Here is the now complete implementation of the handle_form() function. Make sure you update your version in app.py.
The response will instruct the browser to immediately redirect to the /success URL. So now we can create a handler for this URL. This handler goes at the end of app.py:
This is another short handler that renders an HTML page, just like the main one. Create a success.html file and copy the following contents to it:
This page prompts the user to check the message on their phone, and includes a link to the main page, in case the user wants to send another SMS.
Testing the application
And now we have arrived at the moment you’ve been waiting for. The application is complete and we are ready to test it out. Make sure your app.py is updated with all the functions shown above and that you have the config.py, .env, index.html, and success.html files also in your project directory.
If you left uvicorn running from the start of the tutorial, every time you’ve made an update to the source files, the server should have restarted on its own, so you are ready to go. If you are not running the server, you can start it now with the command:
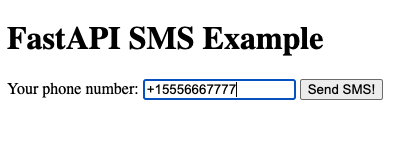
Open your web browser and navigate to http://localhost:8000. In the form, enter your personal mobile number, using the E.164 format. Click the submit button and in just a moment, you will receive the SMS on your phone!
If you are using a free Twilio account, keep in mind that the number that you use as a recipient must be verified before it can receive SMS. This requirement does not apply if you are using a paid account.
Conclusion
Congratulations on learning how to send SMS with FastAPI! As mentioned in the introduction, the techniques you learned in this article can be applied to other frameworks based on asyncio such as Quart, Sanic, and Tornado. For an in-depth discussion on working with Twilio in your asynchronous applications, check out Using the Twilio Python Helper Library in your Async Applications on this blog.
I’d love to see what you build with Twilio and asyncio!
Miguel Grinberg is a Python Developer for Technical Content at Twilio. Reach out to him at mgrinberg [at] twilio [dot] com if you have a cool Python project you’d like to share on this blog!

Related Resources
Twilio Docs
From APIs to SDKs to sample apps
API reference documentation, SDKs, helper libraries, quickstarts, and tutorials for your language and platform.
Resource Center
The latest ebooks, industry reports, and webinars
Learn from customer engagement experts to improve your own communication.
Ahoy
Twilio's developer community hub
Best practices, code samples, and inspiration to build communications and digital engagement experiences.