How to send a vCard with MMS using C# and .NET
Time to read: 8 minutes
August 01, 2022
Written by
Reviewed by

You can use the Twilio Programmable Messaging to send contact information in vCard format via MMS. If you have a business with many users and you must send contact information, you should consider sending it over MMS. You can also send vCards via WhatsApp, but using MMS will allow you to reach anyone even if they don't use WhatsApp. In this post, you will see how to generate and send vCards over MMS programmatically using C# .NET.
Prerequisites
You will need the following for your development environment:
- a .NET IDE (Visual Studio, VS Code with C# plugin, JetBrains Rider, or any editor of your choice)
- .NET 6 SDK (earlier and newer versions should work too)
- A Twilio account (try out Twilio for free)
- ngrok CLI
You can find the source code of this tutorial in this GitHub repository.
What is vCard?
vCard is a standard format for sharing contact information between people and applications. This information may include personal information, phone numbers, email addresses, employment information, and more.
It is used in mail applications such as Outlook and Gmail, in messaging systems such as MMS, WhatsApp, and Telegram, and in any system that requires the transfer of contact information.
Configure Twilio
Get your Twilio Credentials
In your Twilio account, you will need to obtain the Account SID and the Auth Token to use the Twilio SDK. You can find your Account SID and Auth Token on the home page of your Twilio console.
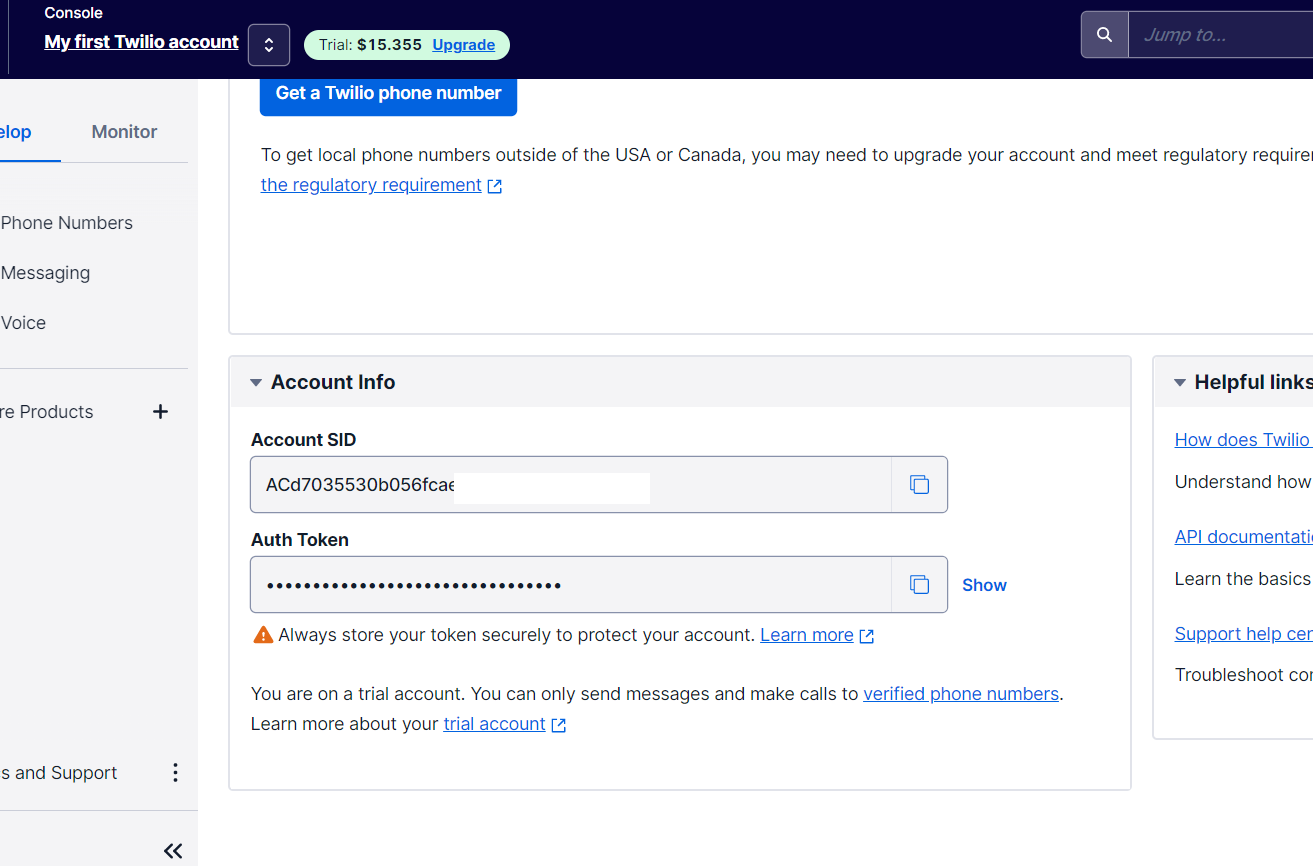
Copy them in a safe place because you will use them later.
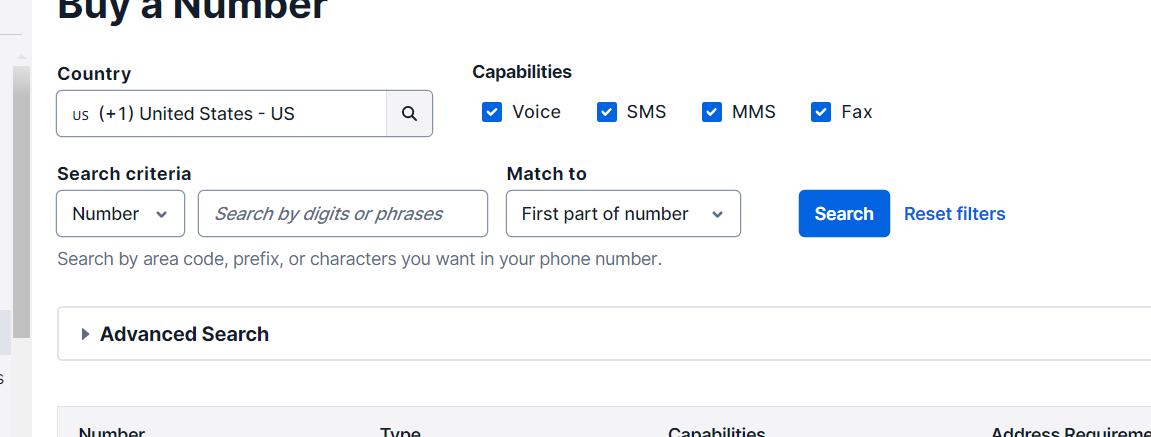
Buy a number
You'll need to have a phone number to send MMS messages.
In order to buy one, in the Twilio Console, you need to go to the left side menu, select the "Phone Numbers" option, then "Manage" to finally click "Buy a number".

In the filters on the displayed screen, select a country that has the MMS option available, for example, the USA.
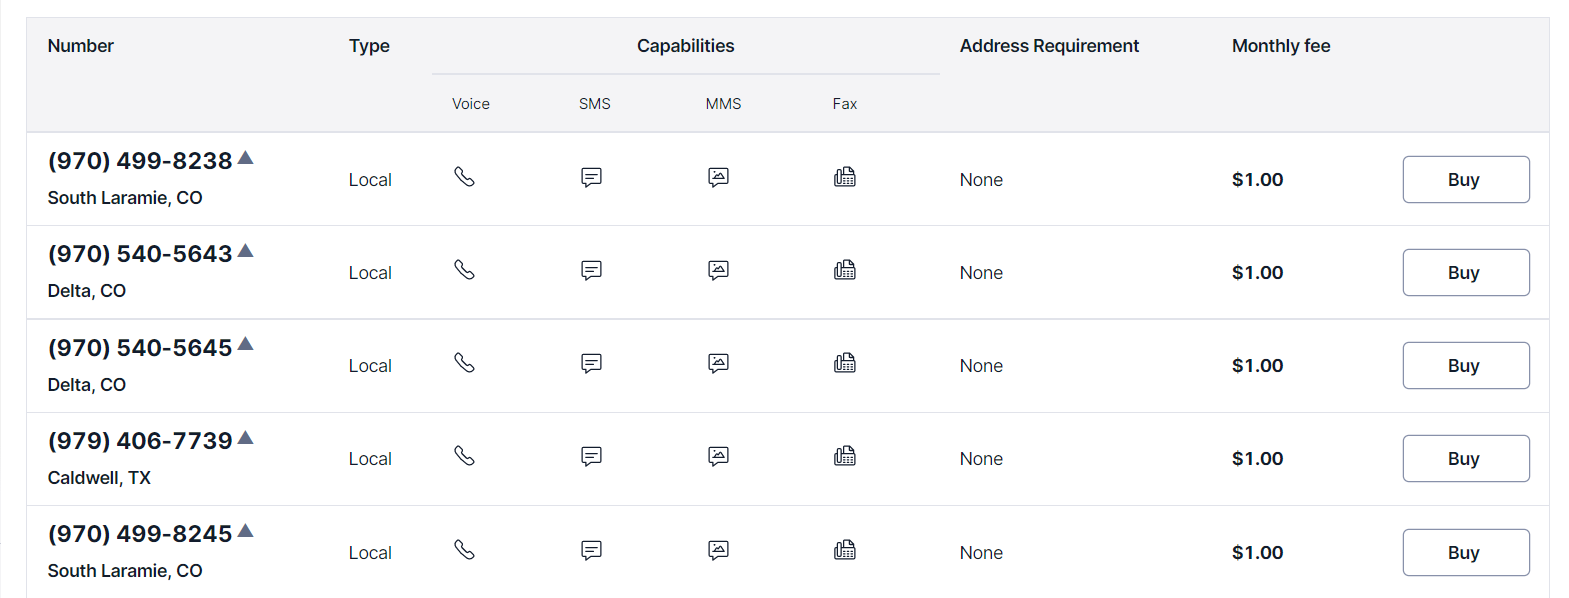
Select one of the available numbers by clicking on the "Buy" option.
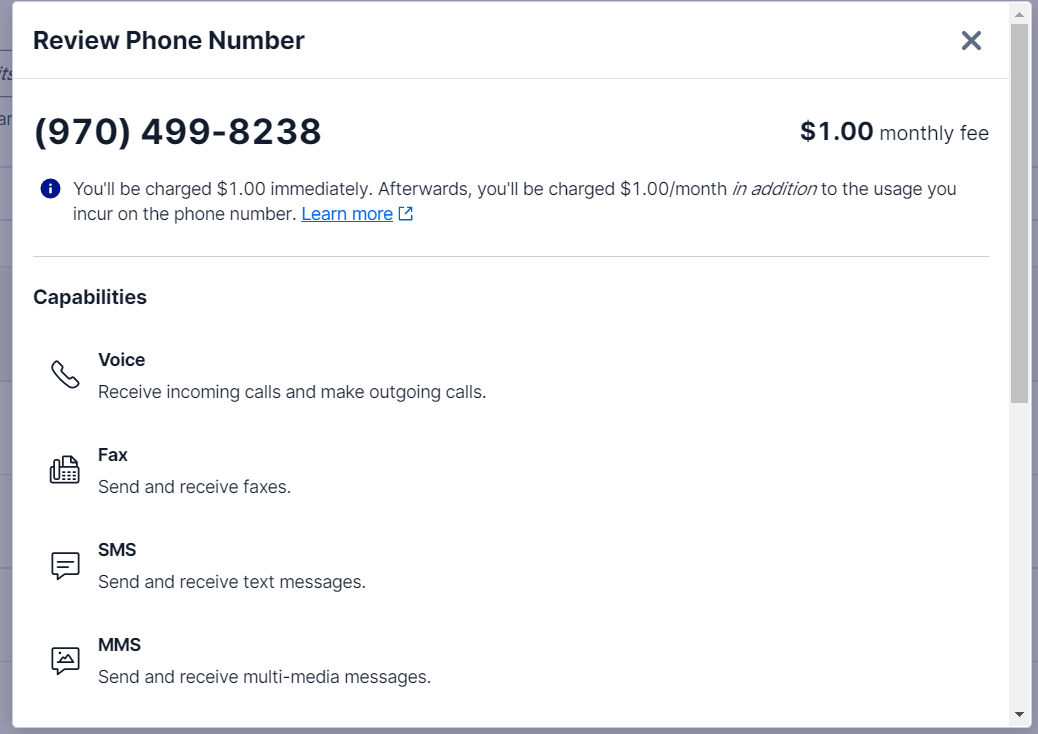
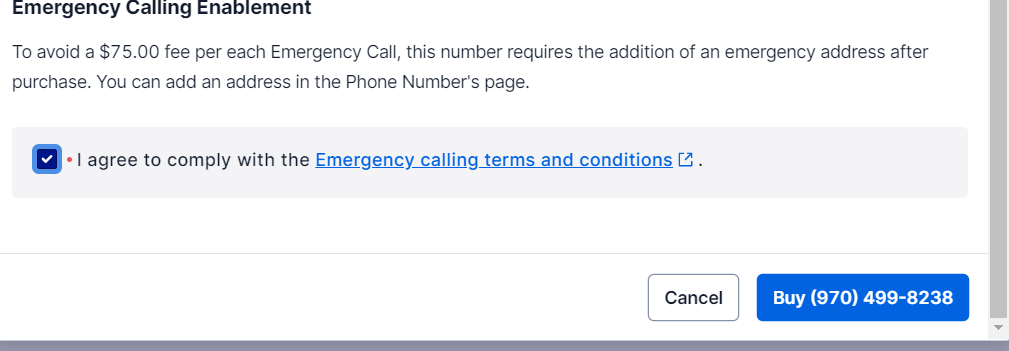
A screen will be displayed indicating the properties of your phone number before buying it. Here you can verify that the ability to send MMS is available. Finally, click on "Buy <phone number>"
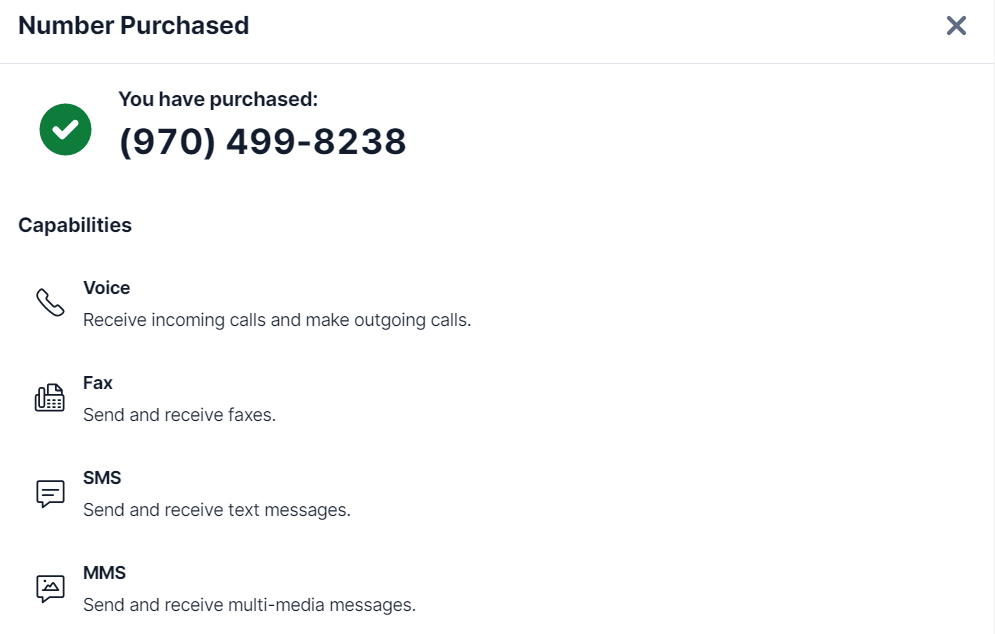
Finally, a screen will be displayed with the confirmation of your new phone number available to use.
Set up your account for Messaging Service
Next, you will need to configure the Messaging Service where you can associate your phone number with the service.
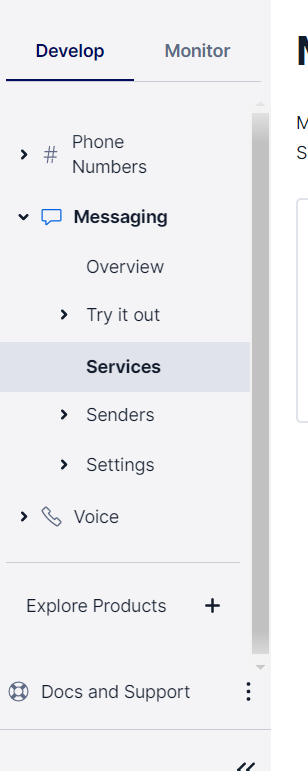
In The Twilio Console click on "Messaging" (if you don't see it, click on "Explore Products", which will display the list with the available products and there you will see "Messaging"). Then, click on "Services".
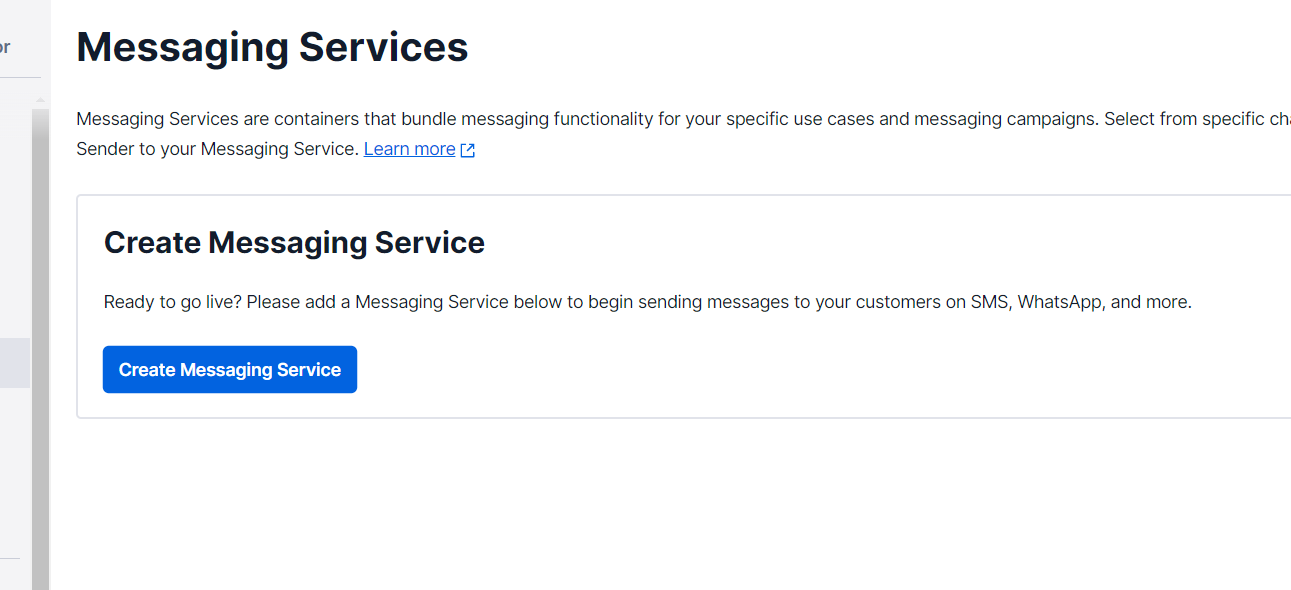
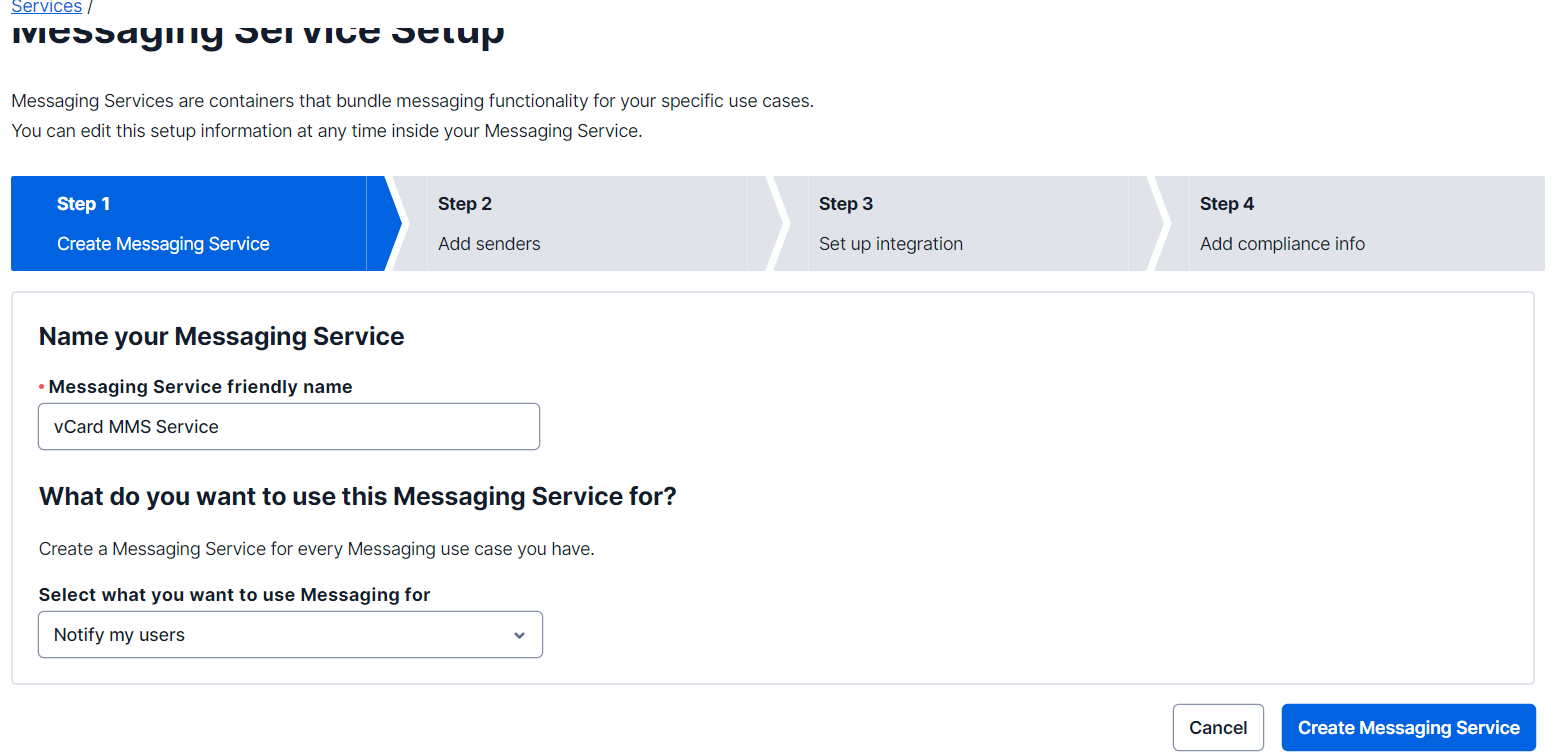
Next, on the displayed page, click the "Create Messaging Service" button to configure your service.
Enter a name that identifies what you will do with your service, select what you are going to use your service for in the available list, and finally click on "Create Messaging Service".
Your service has been created. Now it is time to configure a sender, that is, a phone number from which you will send the messages.
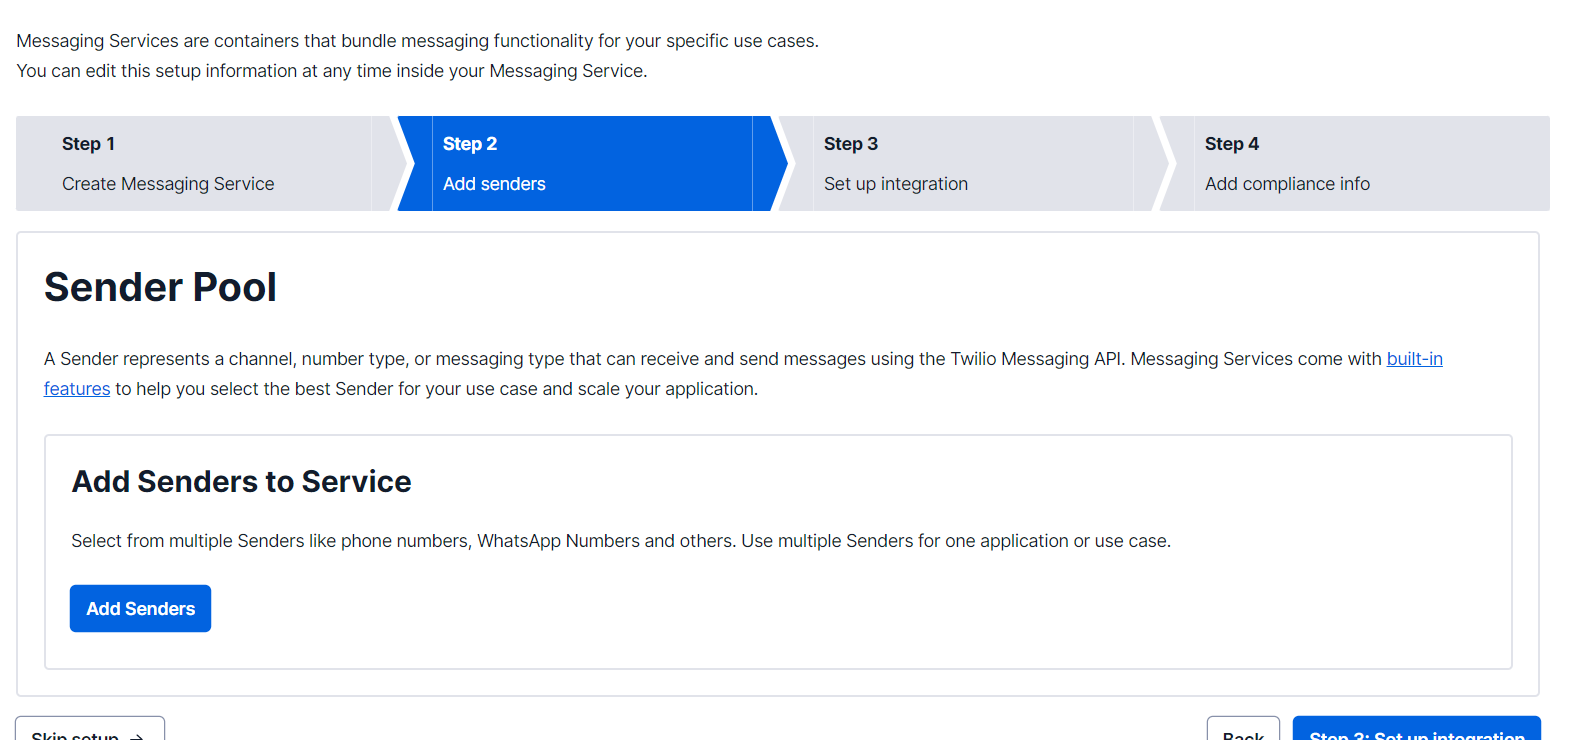
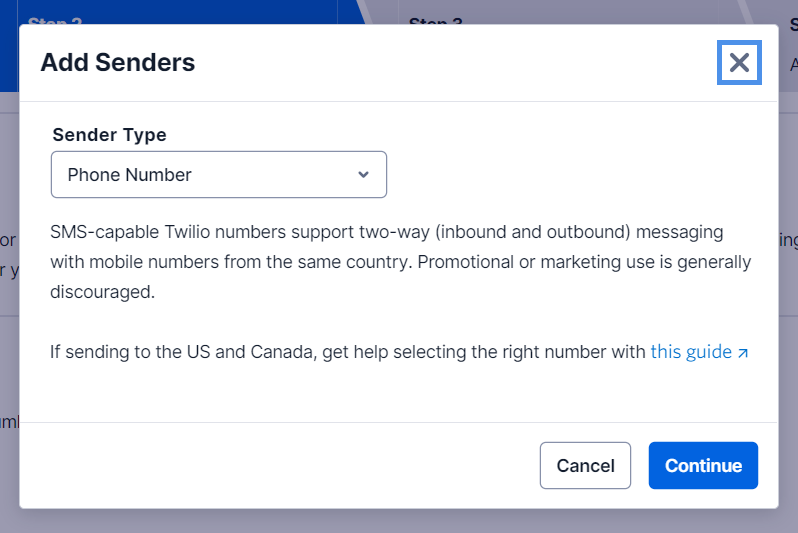
Click on the "Add Senders" button and in the modal screen that will be displayed, select the "Phone Number" option in the "Sender Type" dropdown, and finally click on "Continue".
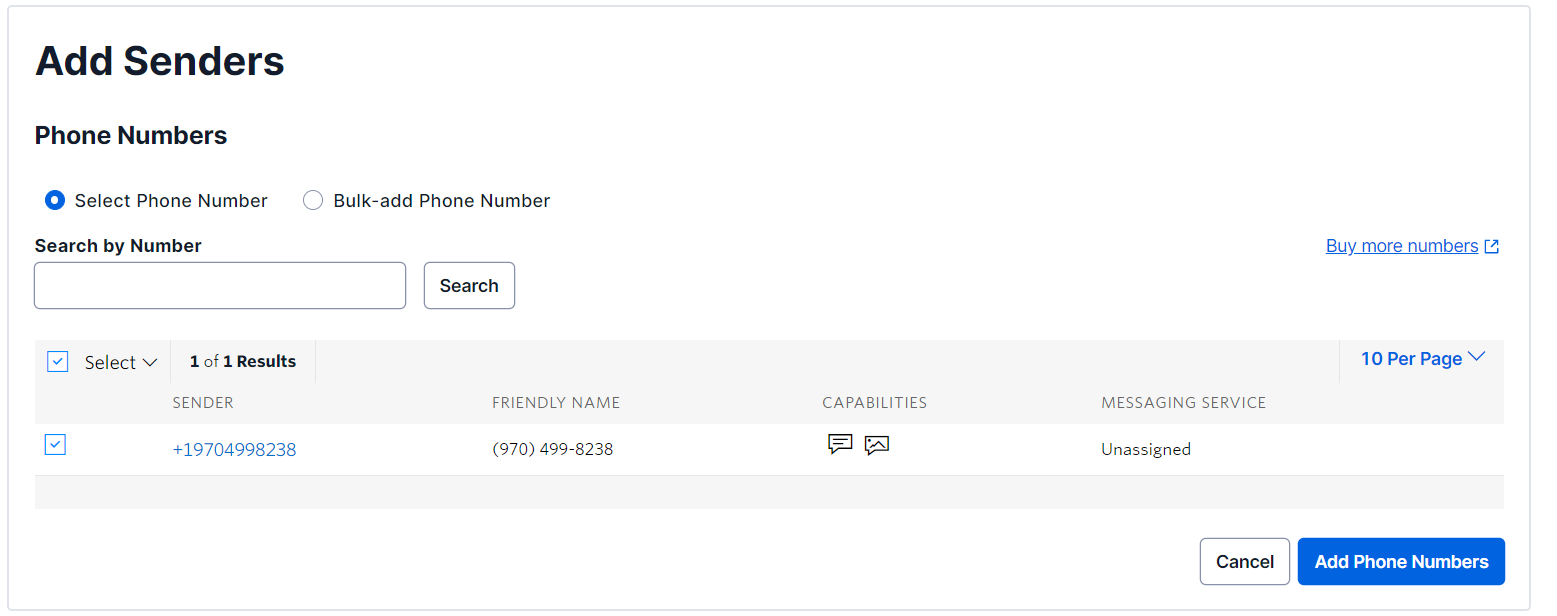
You will see the list of phone numbers available in your account (the one you just bought). Select the checkbox for that number, which appears in the first column, and then click "Add Phone Numbers".
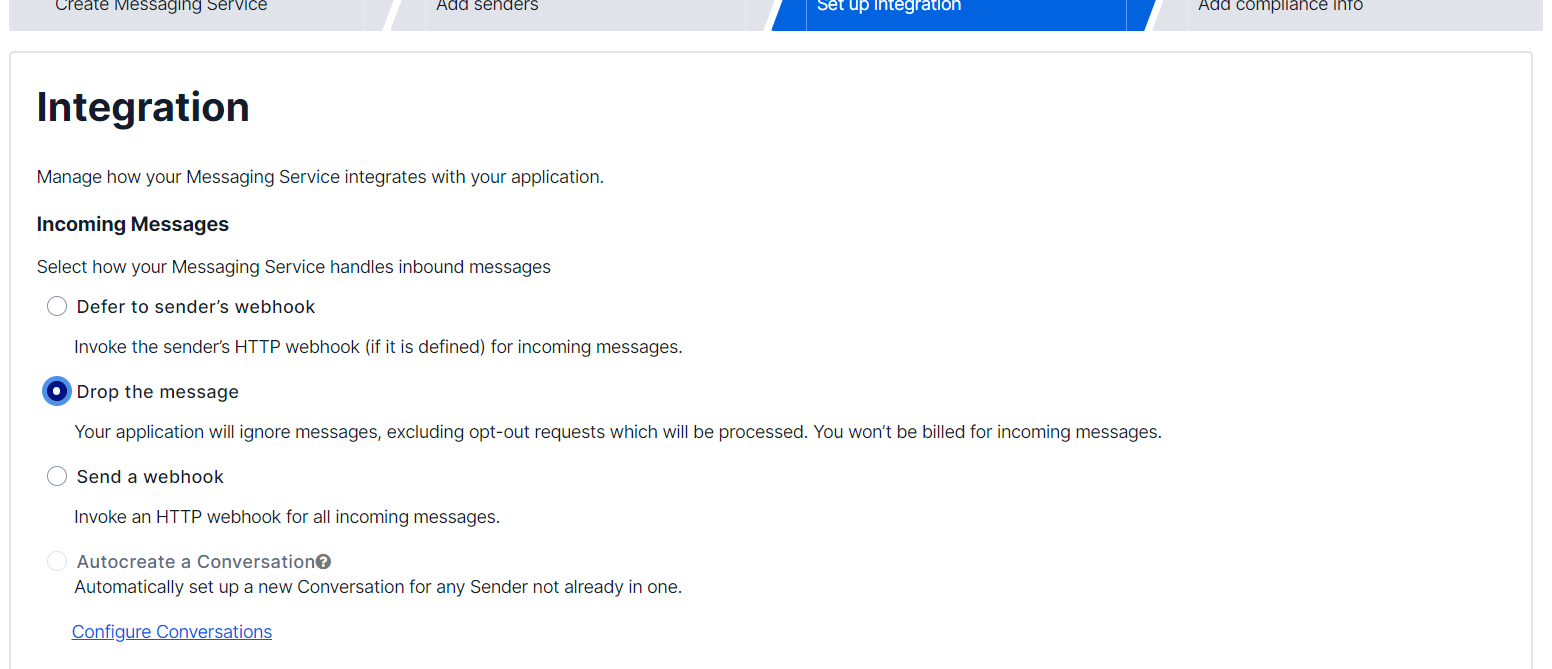
Then, click "Set up integration", where you can configure what to do with incoming messages on your senders and the maximum time your messages can be queued before not being sent (like a timeout).
Select the "Drop the message" option, since you won't be doing anything with incoming messages in this project.
Then click the "Step 4: Add compliance ratio" button.
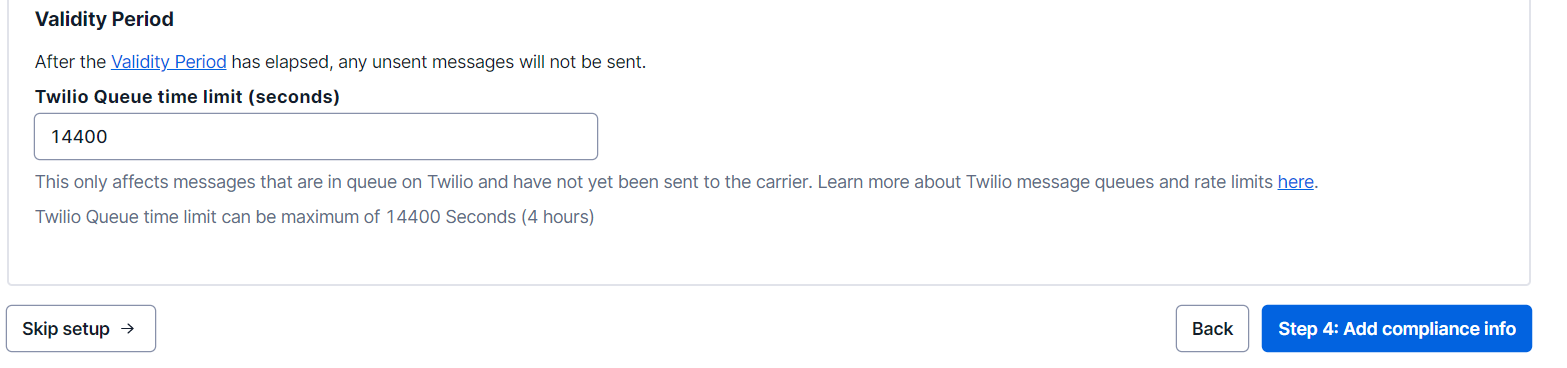
In this form, you should configure topics such as your business profile, among others, to ensure that you are making good use of messaging in your business.
In this project, you will skip this step and click "Complete Messaging Service Setup" to finish the process.

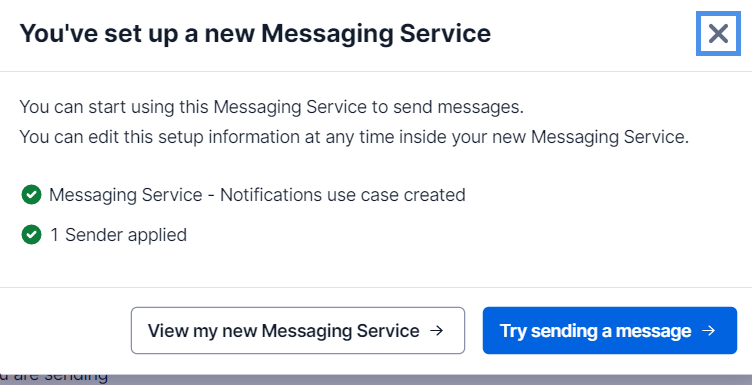
After finishing the process, a modal screen will be displayed with the confirmation of this process. Click on the "View my new Messaging Service" button.
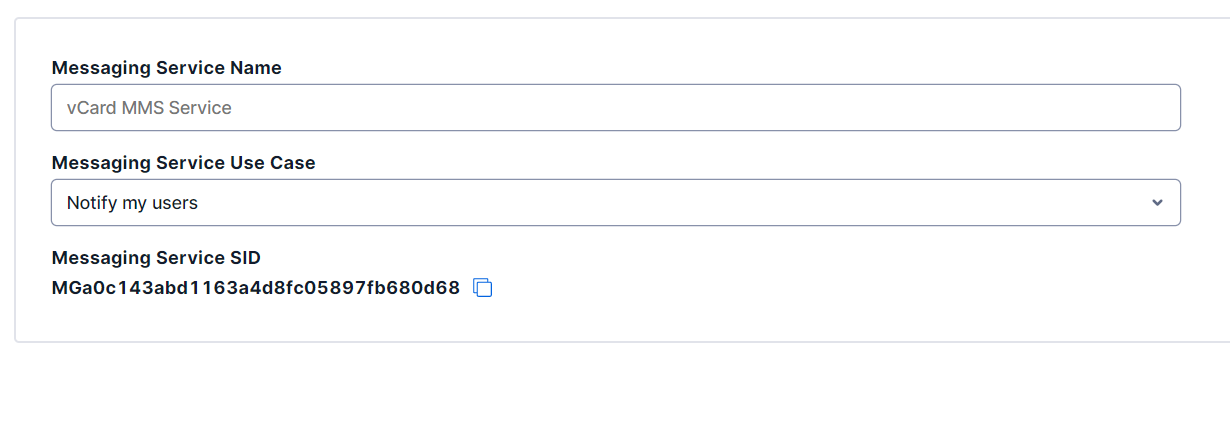
On the screen of your new service, you will see the Messaging Service SID, which you should copy, since you will use it in your code to send the MMS message.
Alright, now that you've set up your Twilio number and messaging service for your project, it's time to set up a file hosting service and your .NET project.
Create a static file host
To send vCard files through Twilio with the SDK, you need to make those files available via a public URL, and for that, you'll need to use static file hosting. For this tutorial, you are going to use ngrok to expose a local directory via a public URL.
First, create a folder where you will store the vCard files. This folder can be located anywhere on your machine.
If this is your first time using ngrok, you need to register on ngrok's website, and add the authentication token in the console as the first command:
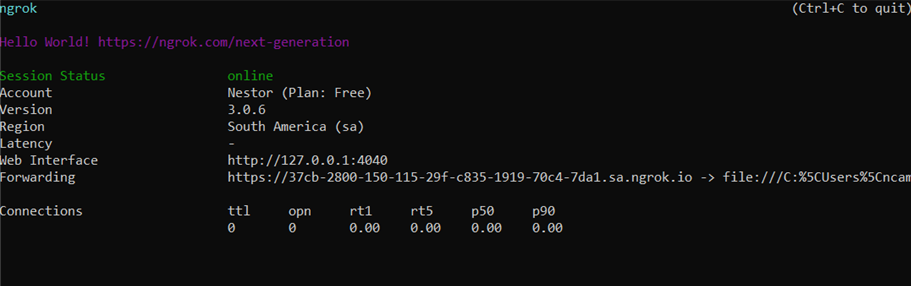
Now, run ngrok with the following command, specifying a folder path where you will save your vCard files:
Replace <folder path> with the full path to the folder where your vCard files will be located.
Copy the Forwarding HTTPS address that ngrok created for you, as you will use it in your .NET project.
Create a Console Project
You will need to create a console project using the .NET CLI. Open a console terminal and run the following commands to create a folder that will contain your project:
Next, create the project with the command below:
Add the API Key in the project
To add the Twilio Credentials into your project, you will use user secrets since it is a good option for local development that is easy to manage, more secure, and follows good development practices.
To set user secrets for your project, run the following commands at the command line inside your project's root folder:
Replace <Twilio Account SID> with the Twilio Account SID, <Twilio Auth Token> with the Auth Token, and <Twilio Messaging Service Sid> with the Messaging Service Sid you copied earlier.
To load user secrets, you must add the Microsoft.Extensions.Configuration.UserSecrets NuGet package. Add the package using the following command:
Install the Twilio and vCard libraries
You can write code to generate vCard files yourself or use an existing library that does this for you. In this tutorial, you will use vCardLib to create the vCards to share contact information.
Additionally, you will install the Twilio SDK to send MMS messages.
Configure the project
Now, in the Program.cs file, replace all existing code with the following:
The code above adds all the namespaces you'll use in the project.
Next, you are going to add the code that loads the configuration from your user secrets, where you stored the Twilio credentials. You will also add the Forwarding URL that ngrok gave you, and the full path of the folder where the vCard files will be stored.
Replace <ngrok URL> with the ngrok Forwarding URL and <full folder path> with the full path of the folder that stores the vCard files.
Create contact information with vCard
Next up, you are going to generate the contact information for a person using the vCardLib library. In the code presented below, you are adding the first name, last name, and a phone number (to which you can specify if it is a work phone, personal phone, or another). Then, you serialize the information to obtain a string with the data following the vCard standard to finally save it as a file in the corresponding folder.
Change the contact info as you wish.
What you have just done is generated a vCard file that you may have used before as a user when sending or receiving contacts on your phone. It's time to send it over MMS using the Twilio SDK.
Share contact information via MMS
To send the MMS, you have to initialize the Twilio SDK with your credentials (Account SID and Auth Token), create the message with some options, and then send it. As you can see, you will use the CreateMessageOptions class with some properties, first specifying in the constructor the destination phone number of the message. Next, configure the Body property with a text message, the MediaUrl where you specify the URL of the vCard file publicly served through ngrok, the SendAsMms to specify that it will be an MMS message, and finally the MessagingServiceSid with the identifier of the previously created Messaging Service.
Replace <to number> with your personal phone number for testing.
Also, after creating your message in Twilio, the file will be deleted as it might not be needed anymore.
Now, run your console project to send your first vCard contact with MMS:
A few seconds later, you should receive a message with a contact card.
Schedule the message
When you send messages, especially with a high volume and if users do not request it before, you must be careful not to send them outside of normal hours for your users (at night, early morning) to avoid being considered SPAM, both by your users and the mobile providers of the country where you send the messages.
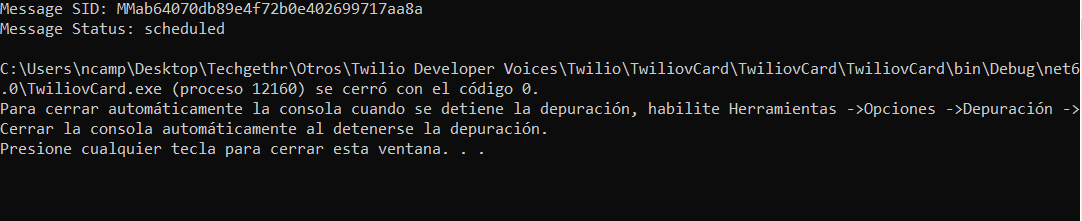
To do this, with the same CreateMessageOptions class you can specify to send the MMS later with the SendAt property. The message will be created in the Twilio API with a "scheduled" status, and Twilio will send the MMS when the specified time arrives.
You must also specify the schedule type, through the ScheduleType property.
Now run the console again. You will be able to verify that the status of the message changes from Queue to Scheduled.
Future improvements
Now you can send contact information via MMS, but you can further improve it:
- vCard is a very complete standard, the more information you add about the contacts before sending it, the easier it is for the recipient to know which means of contact to use to write or call the other person, what company they work for, and more. The vCardLib library provides you with more classes to add all that information.
- You could use a real static file host service that will scale with your application. Alternatively, you could serve your files via ASP.NET Core and validate that the HTTP request came from Twilio, and reject it if not.
- You can add webhooks in your messages to check the final status of the message (sent, rejected, with errors, etc.).
- You could poll for the status of the MMS every couple of seconds to check if the message has been sent, and then delete the vCard file.
Additional resources
Check out the following resources for more information on the topics and tools presented in this tutorial:
Twilio MMS – This page contains all the information about the requirements and benefits of using messaging over MMS with Twilio.
How to Send Scheduled SMS with C# .NET and Twilio Programmable Messaging - This post will walk you through scheduling SMS which you can also use for scheduling MMS.
Twilio SDK for C# and .NET – You can explain all the options provided by the Twilio C# SDK.
Source Code to this tutorial on GitHub - You can find the source code for this project at this GitHub repository. Use it to compare solutions if you run into any issues.
Néstor Campos is a software engineer, tech founder, and Microsoft Most Value Professional (MVP), working on different types of projects, especially with Web applications.
Related Resources
Twilio Docs
From APIs to SDKs to sample apps
API reference documentation, SDKs, helper libraries, quickstarts, and tutorials for your language and platform.
Resource Center
The latest ebooks, industry reports, and webinars
Learn from customer engagement experts to improve your own communication.
Ahoy
Twilio's developer community hub
Best practices, code samples, and inspiration to build communications and digital engagement experiences.