Serverless Twilio Webhooks on AWS with Lambda Function URLs
Time to read:
April 21, 2022
Written by
Reviewed by

Serverless platforms are ideal for the deployment of webhooks such as those used by Twilio services, as they provide flexibility and scalability without the complications involved in hosting on your own infrastructure.
In this tutorial you are going to learn how to create a Twilio SMS webhook written in Python using AWS Lambda, with its brand new function URLs feature.
Requirements
To work on this tutorial you will need the following items:
- A Python 3 interpreter compatible with AWS Lambda (as of April 2022, Python 3.6, 3.7, 3.8 or 3.9). If your operating system does not provide a Python interpreter, you can go to python.org to download an installer.
- Node.js installed on your computer. You can download a Node.js installer from the Node.js website.
- A Twilio account. If you are new to Twilio click here to create a free account now and receive $10 credit when you upgrade to a paid account. You can review the features and limitations of a free Twilio account.
- An AWS account. If you don’t have an account, you can create one for free.
- A Twilio phone number with SMS support. You can add a phone number to your Twilio account if you don’t have one yet
Create a Python webhook
To get started, open a terminal window and navigate to the place where you would like to set up your project.
Create a new directory called lambda-webhook where your project will live, and change into that directory using the following commands:
Following Python best practices, you are now going to create a virtual environment, where you are going to install the Python dependencies needed for this project.
If you are using a Unix or Mac OS system, open a terminal and enter the following commands to create and activate your virtual environment:
If you are following the tutorial on Windows, enter the following commands in a command prompt window:
Now you are ready to install the Python dependencies used by this project:
The two Python packages needed by this project are:
- The Twilio Python Helper library, to work with SMS messages.
- The Flask framework, to create the web application.
To ensure that the Python environment that will be created in AWS is identical to your local one, save the complete list of the installed dependencies to a requirements.txt file with the following command:
Then create a file called webhook.py for the SMS webhook and write the following code on it:
This short webhook application uses Flask to create a web server that listens for POST requests. Twilio will make requests to this endpoint when your Twilio phone number receives an SMS.
The function first validates that the incoming request has a valid Twilio signature, which is important to verify the legitimacy of the request. If the signature cannot be validated, the request is discarded.
If the signature is valid, then the webhook generates a TwiML response that replies to the SMS with a greeting.
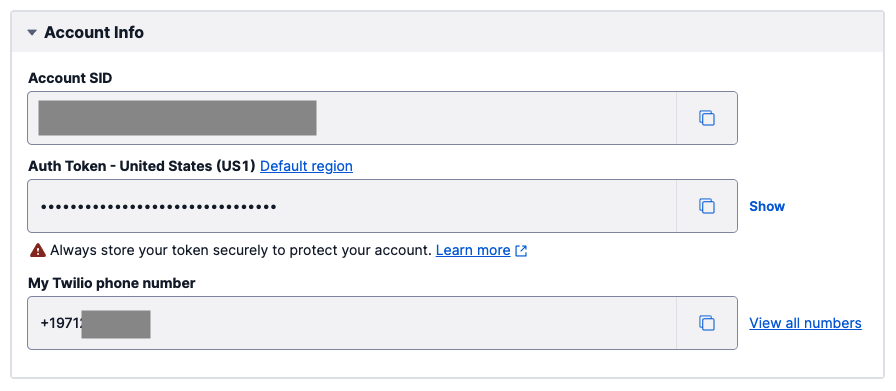
As you can see in the code above, to validate the Twilio signature, the application needs access to the Twilio Auth Token associated with your account, which it obtains from an environment variable. Go back to your terminal session and configure this variable as follows:
If you are following this tutorial on Windows, use set instead of export in your command prompt window.
You will need to replace the xxxxxxxxx placeholder in the command above with the correct value that applies to your account. You can find your Twilio Auth Token in the main dashboard of the Twilio Console, under “Account Info”:
The Python webhook is now complete. In the following sections you’ll learn how to deploy it to AWS Lambda.
Install the Serverless framework
The Serverless framework is an open-source deployment and monitoring tool for serverless functions on AWS Lambda. You are going to use it to manage and deploy our webhook application.
You can install the Serverless framework with the following command:
To ensure that you have successfully installed it, make sure you can access the sls command documentation as follows:
Create a Serverless configuration file
Deployments with the Serverless framework are managed with a configuration file called serverless.yml. Create this file in the project directory and write the following contents on it:
The provider section of the configuration file establishes AWS Lambda as the deployment platform, sets the runtime to Python 3.9, and exports the TWILIO_AUTH_TOKEN environment variable so that it is deployed along with the function.
The plugins section makes a reference to two plugins. These are Node.js packages that need to be installed. To do this, run the commands below in the project directory:
These commands will add two files to the project named package.json and package-lock.json, which track the Node.js dependencies you just installed. The actual packages are installed in the node_modules subdirectory.
The functions section of the configuration defines the actual service that will be deployed, which is composed of a single function. The handler key inside the webhook function points to the WSGI adapter provided by the Serverless WSGI plugin. The url key tells Serverless that it should provision the function with a public URL, which will be later configured on the Twilio side.
The custom section provides configuration options for the installed plugins. The WSGI plugin needs to know the location of the WSGI application callable. The Python Requirements plugin is given the location of the Python interpreter to use during the deployment. Passing python here makes the plugin use the interpreter from the activated virtual environment.
Deploy the function to AWS Lambda
Your webhook project is now complete. To be able to deploy the webhook to AWS, you need to have your AWS access key credentials installed as environment variables that the Serverless framework can access.
These variables are AWS_ACCESS_KEY and AWS_ACCESS_KEY_SECRET. If you’ve never requested these credentials from AWS, the Serverless framework documentation has detailed instructions on how to obtain them.
After you have set up your AWS access key environment variables, you can deploy your webhook with this command:
The command takes a few minutes to create a Python Lambda function and deploy it to AWS. Once the deployment completes, you will see the public URL that was assigned to the deployed webhook:
Configure the Webhook for Twilio SMS
Copy the URL shown in the endpoint line of the deploy command’s output. This is the URL assigned to your webhook.
On the Twilio Console, go to “Phone Numbers”, then “Manage” and then “Active Numbers”. Select your Twilio phone number from the list to open its configuration page.
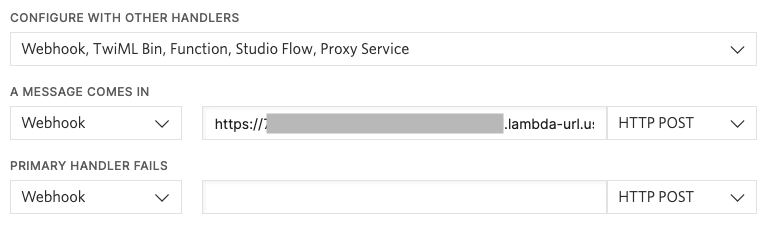
On the phone number configuration, scroll down to the “Messaging” section and paste the lambda function URL in the “A message comes in” field. Make sure the dropdown on its left is set to “Webhook” and the one on the right to “HTTP POST”.
Pick up your phone and send an SMS to your Twilio number. Twilio will deliver the message to the webhook running on AWS Lambda, which will respond to you with a greeting!

Conclusion
Production deployment of webhooks to AWS Lambda with the Serverless framework is a convenient option that has just become even more powerful with Lambda’s new function URLs. I hope you’ve found this tutorial useful and apply the techniques that you learned to your own webhooks.
I’d love to see what you build!
Miguel Grinberg is a Principal Software Engineer for Technical Content at Twilio. Reach out to him at mgrinberg [at] twilio [dot] com if you have a cool project you’d like to share on this blog!

Related Resources
Twilio Docs
From APIs to SDKs to sample apps
API reference documentation, SDKs, helper libraries, quickstarts, and tutorials for your language and platform.
Resource Center
The latest ebooks, industry reports, and webinars
Learn from customer engagement experts to improve your own communication.
Ahoy
Twilio's developer community hub
Best practices, code samples, and inspiration to build communications and digital engagement experiences.