Creating an SMS dashboard in Java with Spring Boot
Time to read: 5 minutes
March 09, 2020
Written by

SMS can provide a timely channel for critical notification messages, even when users do not have a strong internet connection. This post will walk through how to build a dashboard for sending SMS to multiple users in Java using Spring Boot and Twilio.
Development Environment and Services
- You will need Java installed. The code in this post assumes you have Java 8 or newer. For easy installation of Java versions I recommend SDKMAN!
- A Twilio account - you can create one here. Note that this link has a referral code in it which gives an extra $10 when you upgrade your account.
Setup
The quickest way to get started with a new Spring Boot application is to use the Spring Initializr.
Head to start.spring.io and for this project, leave the defaults of “Maven Project”, “Java” and Spring Boot version “2.2.5” as they are. For Project Metadata you can choose your own Group and Artifact, following the Maven naming conventions. I used lol.gilliard as the group and sms-dashboard as the artifact.
For dependencies, add Spring Web and Thymeleaf. Thymeleaf is a templating engine which will be used to create the front end.
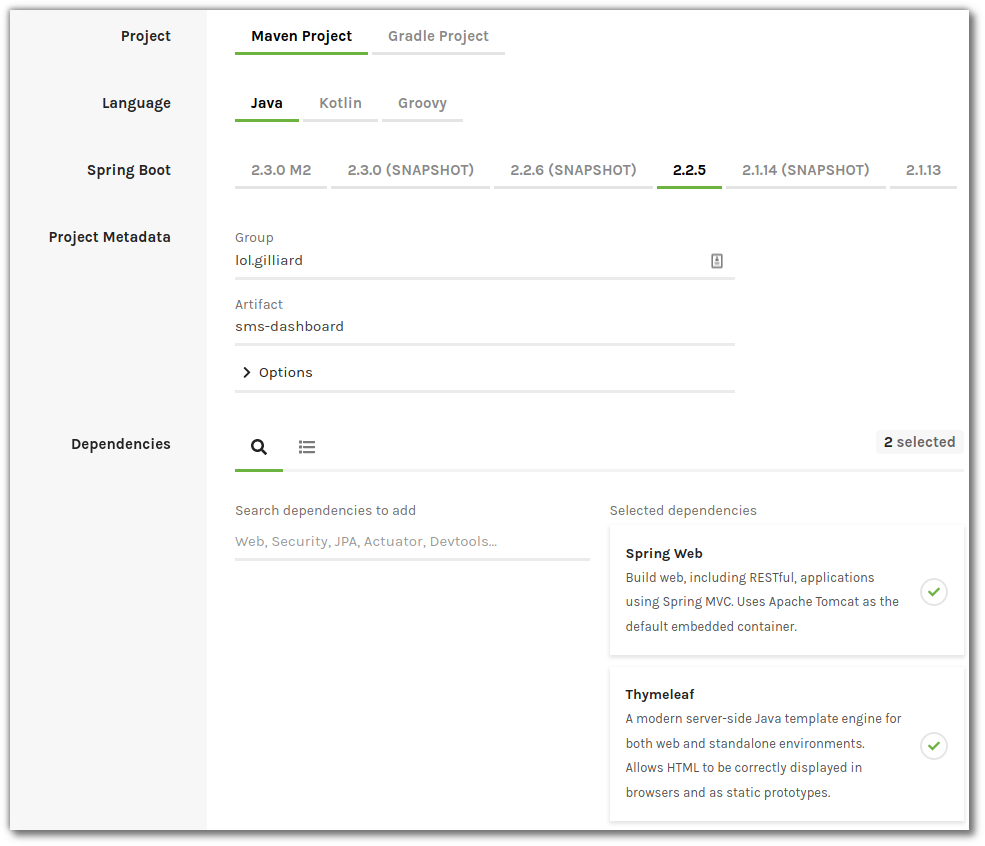
Choose “Generate” from the bottom of the page and a project template will be downloaded as a zip file. Unzip it and open the project in your favourite IDE, then you can get to coding.
Setting up the the front end
To configure Spring to serve the front end, create a class annotated with @Controller that has a method annotated with @GetMapping("/"). You should create it in the same package as the Application class which is part of the Spring Boot project template under src/main/java.
The above code is also available on GitHub.
The showDashboard method returns a ModelAndView object which is configured to show the dashboard view. Spring will attempt to find this in a file called src/main/resources/templates/dashboard.html. Create an empty file there, then copy the front end code from my example repo on GitHub.
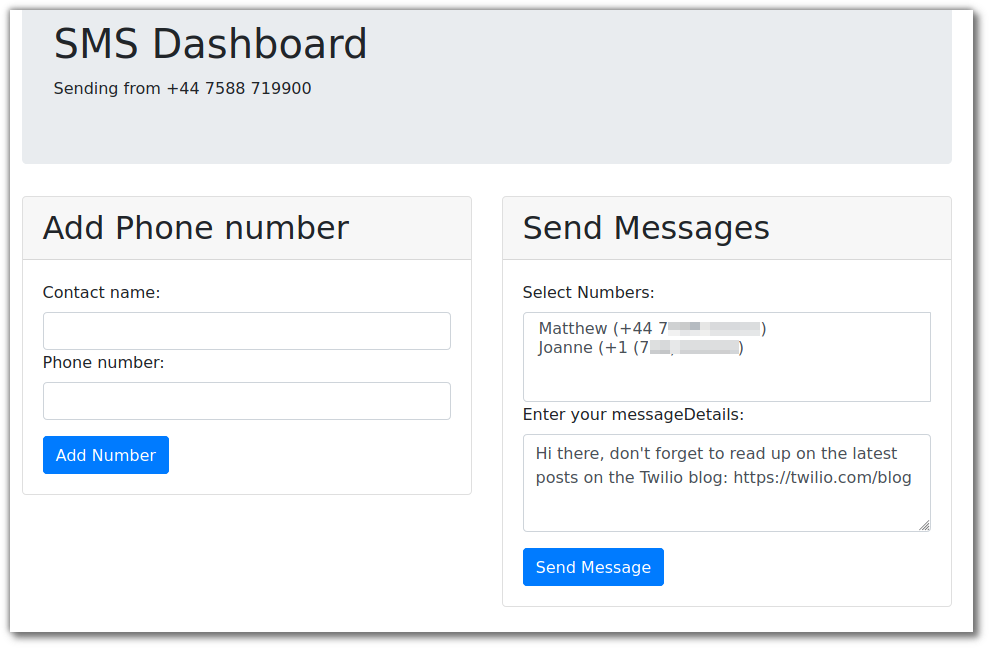
Run what you have so far with ./mvnw spring-boot:run and then browse to http://localhost:8080. Try using the dashboard, by adding a couple of contacts then selecting them, entering a message and hitting Send.
The JavaScript on that page will make an HTTP POST request to /send-message, with a request body containing a JSON object like this:
If you look in your browser’s JS console you will see this: “Error sending message”. Digging into the object that is logged after that, you’ll see this:
The problem here is that there is no implementation of that endpoint yet - and there’s no code on the server side to send messages! Don’t worry, it won’t take long to add that.
Building the Server-side code
Twilio Setup
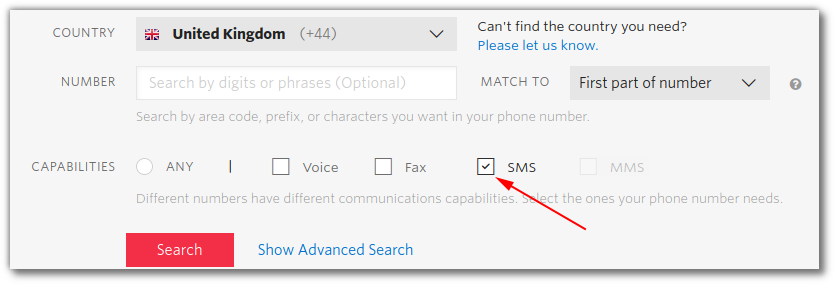
Log into your Twilio account and head over to the Phone Number Management page. Click the red + to buy a new phone number and make sure you select one with SMS capabilities.
Spring allows injecting configuration properties into code using the @Value annotation - you saw it above in the PageController. In that case the annotation was configured with a default value because there wasn’t a phone number. Now that you do have one, open the file at src/main/resources/application.properties and add:
@Value("${phoneNumber}") annotations will now pick up this value.
While here, add twilioAccountSid and twilioAuthToken properties too. These will be needed to send the messages - you can find your Account SID and AuthToken on your Twilio console. Do be careful to never share or reveal these publicly.
The last bit of setup to do here is to add the Twilio helper library to the project configuration. In pom.xml find the <dependencies> section and add:
At the time of writing, 7.47.5 is the current version. New versions are released regularly and you can always check if you’re up-to-date by looking at MvnRepository: com.twilio.sdk » twilio.
Creating a controller for sending messages
In the same place as PageController create a new class called SMSController with the following code:
The above code is also available in my example repo on GitHub.
This is all the code needed for the dashboard to work. Before trying it out, look through the code to make sure you understand what each part is for:
This inner class will be used by Spring when it needs to parse the JSON that is posted in from the dashboard. It’s convenient to use an inner class in this case, but it could equally be defined in its own file. Either way it has to be public so that Spring can find it.
Writing these classes by hand is fine for simple cases, but if you are dealing with more complex JSON I highly recommend looking at jsonschema2pojo which can create classes from example JSON and save a lot of time.
As in the PageController, this injects the value of your Twilio phone number. In this case it’s needed for the “From” value when you call the Twilio API to send the SMS.
The constructor will be called by Spring when the application starts up - Twilio.init only needs to be called once, so this is the right place to put it. The Account SID and Auth Token are injected from application.properties. @Autowired is needed when injecting @Value into constructor parameters.
Here Spring is configured to listen for POST requests on /send-messages and respond with HTTP 202 Accepted if the method completes successfully. If an exception is thrown HTTP 500 Internal Server Error will be returned and you can see the logs in the console where you ran the application.
@RequestBody instructs Spring to create an instance of the MessageDetails class we saw above from the body of incoming requests. By setting things up like this Spring can deal with JSON and your code only needs to work with Java objects.
Using the Streams API (which I wrote about before), this code goes through each number in the messageDetails and calls the Twilio API to send an SMS. After sending the message the SID is printed. You can check the status of each message in your Twilio SMS dashboard.
Making multiple requests to the Twilio API is fine for this application, but if you are sending SMS to lots of people regularly you can use a MessageService to do it in one API call.
Trying it out
Now you understand what all the code is doing, stop the application and restart with ./mvnw spring-boot:run.
Refresh the page in your browser and try it out. You will be able to add contacts and send SMS to them.

Summary
Congratulations! You’ve built a Spring Boot app for sending SMS 🎉🎉
Along the way you’ve seen how Spring can serve HTML pages, respond to HTTP requests, parse JSON. and handle configuration properties. You also saw how to use Twilio to send SMS in a few lines of Java. If you want to practise, why not extend the dashboard to show incoming SMS, or to send WhatsApp messages too?
Whatever you’re building, I’d love to hear about it. Get in touch: on Twitter I go by @MaximumGilliard, or you can email me on mgilliard@twilio.com. If you want to show something to the world then post it on the Twilio SubReddit, too.


Related Resources
Twilio Docs
From APIs to SDKs to sample apps
API reference documentation, SDKs, helper libraries, quickstarts, and tutorials for your language and platform.
Resource Center
The latest ebooks, industry reports, and webinars
Learn from customer engagement experts to improve your own communication.
Ahoy
Twilio's developer community hub
Best practices, code samples, and inspiration to build communications and digital engagement experiences.