Send SMS in Your Spring Boot App
Time to read:
January 13, 2020
Written by

In this article, you’ll learn how to use WebSocket API with Spring Boot and build a simple status delivery application at the end.
A WebSocket is a communication protocol that makes it possible to establish a two-way communication channel between a server and its client. Websockets are supported by most of the browsers that are commonly used today.
Prerequisites
First, you need to set up your Twilio account and a suitable phone number.
- If you haven't yet, sign up for a free Twilio Account
- Purchase a phone number from the Console if you don't yet have one (you'll need one with SMS capability)
Here are the steps to generate a project using Spring Initializr:
- Go to http://start.spring.io/.
- Enter Artifact’s value as websocket-callback.
- Add Websocket in the dependencies section.
- Click Generate Project to download the project.
- Extract the downloaded zip file.
- Note: You will need Java 8 or later installed and download the JDK from here.
WebSocket Configuration
The first step is to configure the WebSocket endpoint and a message broker. Create a new class called WebSocketConfig inside com.twilio.websocketcallbackpackage with the following contents:
@EnableWebSocketMessageBroker is used to enable our WebSocket server. We include the WebSocketMessageBrokerConfigurer interface and provide an implementation for some of its methods to configure the WebSocket connection.
In the first method configureMessageBroker, we’re configuring a message broker that will be used to route messages from one client to another.
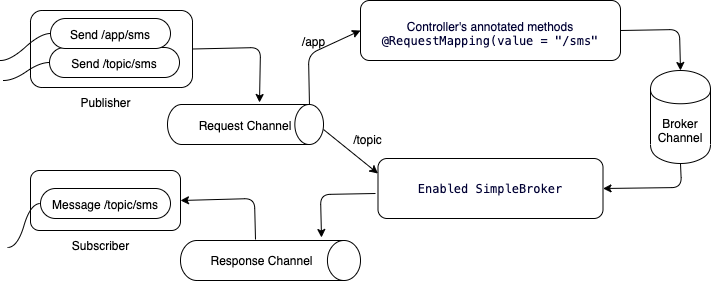
Line #15 defines the messages whose destination starts with the/topic should be routed to the message broker. The message broker broadcasts messages to all the connected clients who are subscribed to a particular topic.
Line #16 defines the messages whose destination starts with /app. After processing the message, the controller will send it to the broker channel.
In the second method registerStompEndpoints, we register a WebSocket endpoint that clients use to connect to our WebSocket server.
Notice the use of withSockJS() with the endpoint configuration. SockJS is used to enable fallback options for browsers that don’t support WebSocket.
The word STOMP in the method name shows it's a derivation of Spring framework's STOMP implementation. STOMP stands for Simple Text Oriented Messaging Protocol. It is a messaging protocol that defines the format and rules for data exchange.
Here is the pictorial representation of Web Sockets that facilitates the full-duplex communication channel:
Build with Gradle
Create a build.gradle file with the associated Twilio and WebSockets dependency libraries.
Create a resource representation class
To model the Message carrying SMS class, you can create a plain old Java object (POJO) with the to and message properties and the corresponding methods.
Create a message-handling controller
In Spring’s approach to working with STOMP messaging, STOMP messages can be routed to @Controller classes. For example, the SMSController is mapped to handle messages to destination /sms.
This controller is concise and precise, but there are plenty of processes running internally. Let's review them step-by-step.
The @RequestMapping annotation ensures that if a message is sent to the destination /sms through POST method. The content_type accepted by the consumer is set in the line consumes = MediaType.APPLICATION_JSON_VALUE.
produces = MediaType.APPLICATION_JSON_VALUE is the value that can be produced by the mapped handler. produces consists of one or more media types, one of which must be chosen via content negotiation against the "acceptable" media types of the request. Typically those are extracted from the "Accept" header but may be derived from query parameters, or somewhere else.
The payload of the message is bound to a @RequestBody SMS object, which is passed into SMSSubmit().
The broadcast to all subscribers to /topic/sms as specified in the webSocket.convertAndSend() method. This method is used to send messages to connected clients from any part of the application. Any application component can send messages to the"brokerChannel" and is done by SimpMessagingTemplate injection to send messages.
Once the message and to fields are received from the UI, these values are parsed and sent to the SMS service called send method. This will send outgoing SMS messages from your Twilio phone number to the text-capable phone number you input in the UI. Twilio sends SMS on-behalf of the actual wired phone number. With the programmable SMS, we can build logic to send SMS with a message body and the destination phone number and allow Twilio to do its magic.
Similarly, the second method smsCallback is a callback handler method that receives the callback from the Twilio endpoint. It consumes a request content-type header of type MediaType.APPLICATION_FORM_URLENCODED_VALUE and produces a negotiable mediatype of type MediaType.APPLICATION_JSON_VALUE. This mediatype is then processed by our frontend js engine. Twilio sends a callback in URL_ENCODED form values, hence they need to be formatted into a type that is easily consumable by your application.
Create a Messaging Service
A component is a unit of software that is independently replaceable and upgradeable.
Microservice architectures will use libraries, but their primary way of componentizing their software is by breaking down into services. We define libraries as components that are linked into a program and called using in-memory function calls, and services as out-of-process components which communicate with a mechanism such as a web service request, or remote procedure call. One main reason for using services as components (rather than libraries) is that services are independently deployable. In the demo application, we have a service to communicate directly with the Twilio endpoints to send or receive callback information.
Twilio suggests you never save your credentials in your development environment or project. Instead, you can save these values and retrieve them through the ./bash_profile(environment) file on your development machine, or another suitable place depending on your operating system. Spring can extract data through externalized configuration.
We have a couple of blog posts on how to link the Environment Variables and Storing Credentials.
Below is the code of this implementation:
Create a browser client
Once all the server components are established and connected, the UI can be implemented with JS client and HTML pages. Recommend placing these files under src/main/resources/static.
Create an index.html file that looks like this:
This HTML file imports the SockJS and STOMP javascript libraries that will be used to communicate with our server using STOMP over WebSocket. We’re also importing here an app.js file which contains the logic of our client application.
Let’s create that file:
Build an executable JAR
If you use Gradle, you can run the application by using ./gradlew bootRun.
Test the service
Now that the service is running, point your browser at http://localhost:8080 and click the "Send" button.
Upon opening a connection, you are asked for your to-number and message. Enter your information and click "Send". The data is sent to the server as a JSON message over STOMP. After a 1-second simulated delay, the server sends a message back with the callback status information received from Twilio.
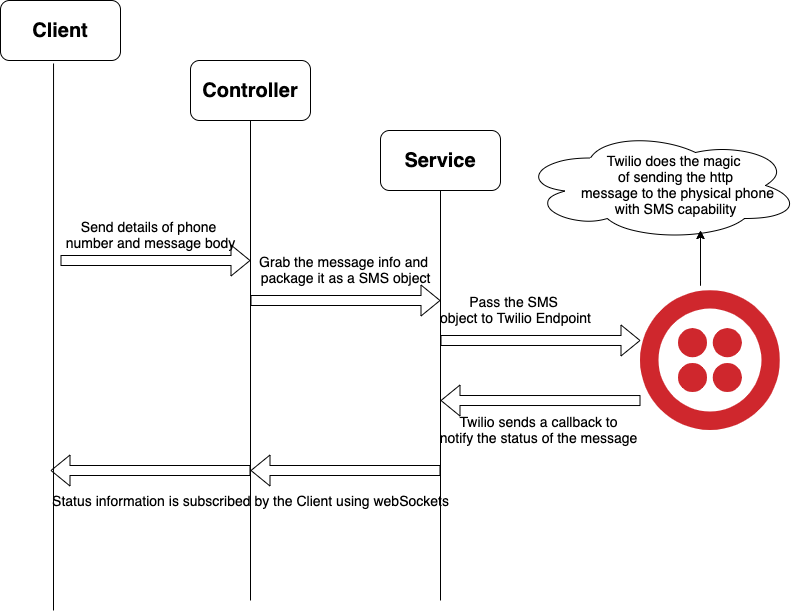
Web sequence diagram of the complete implementation
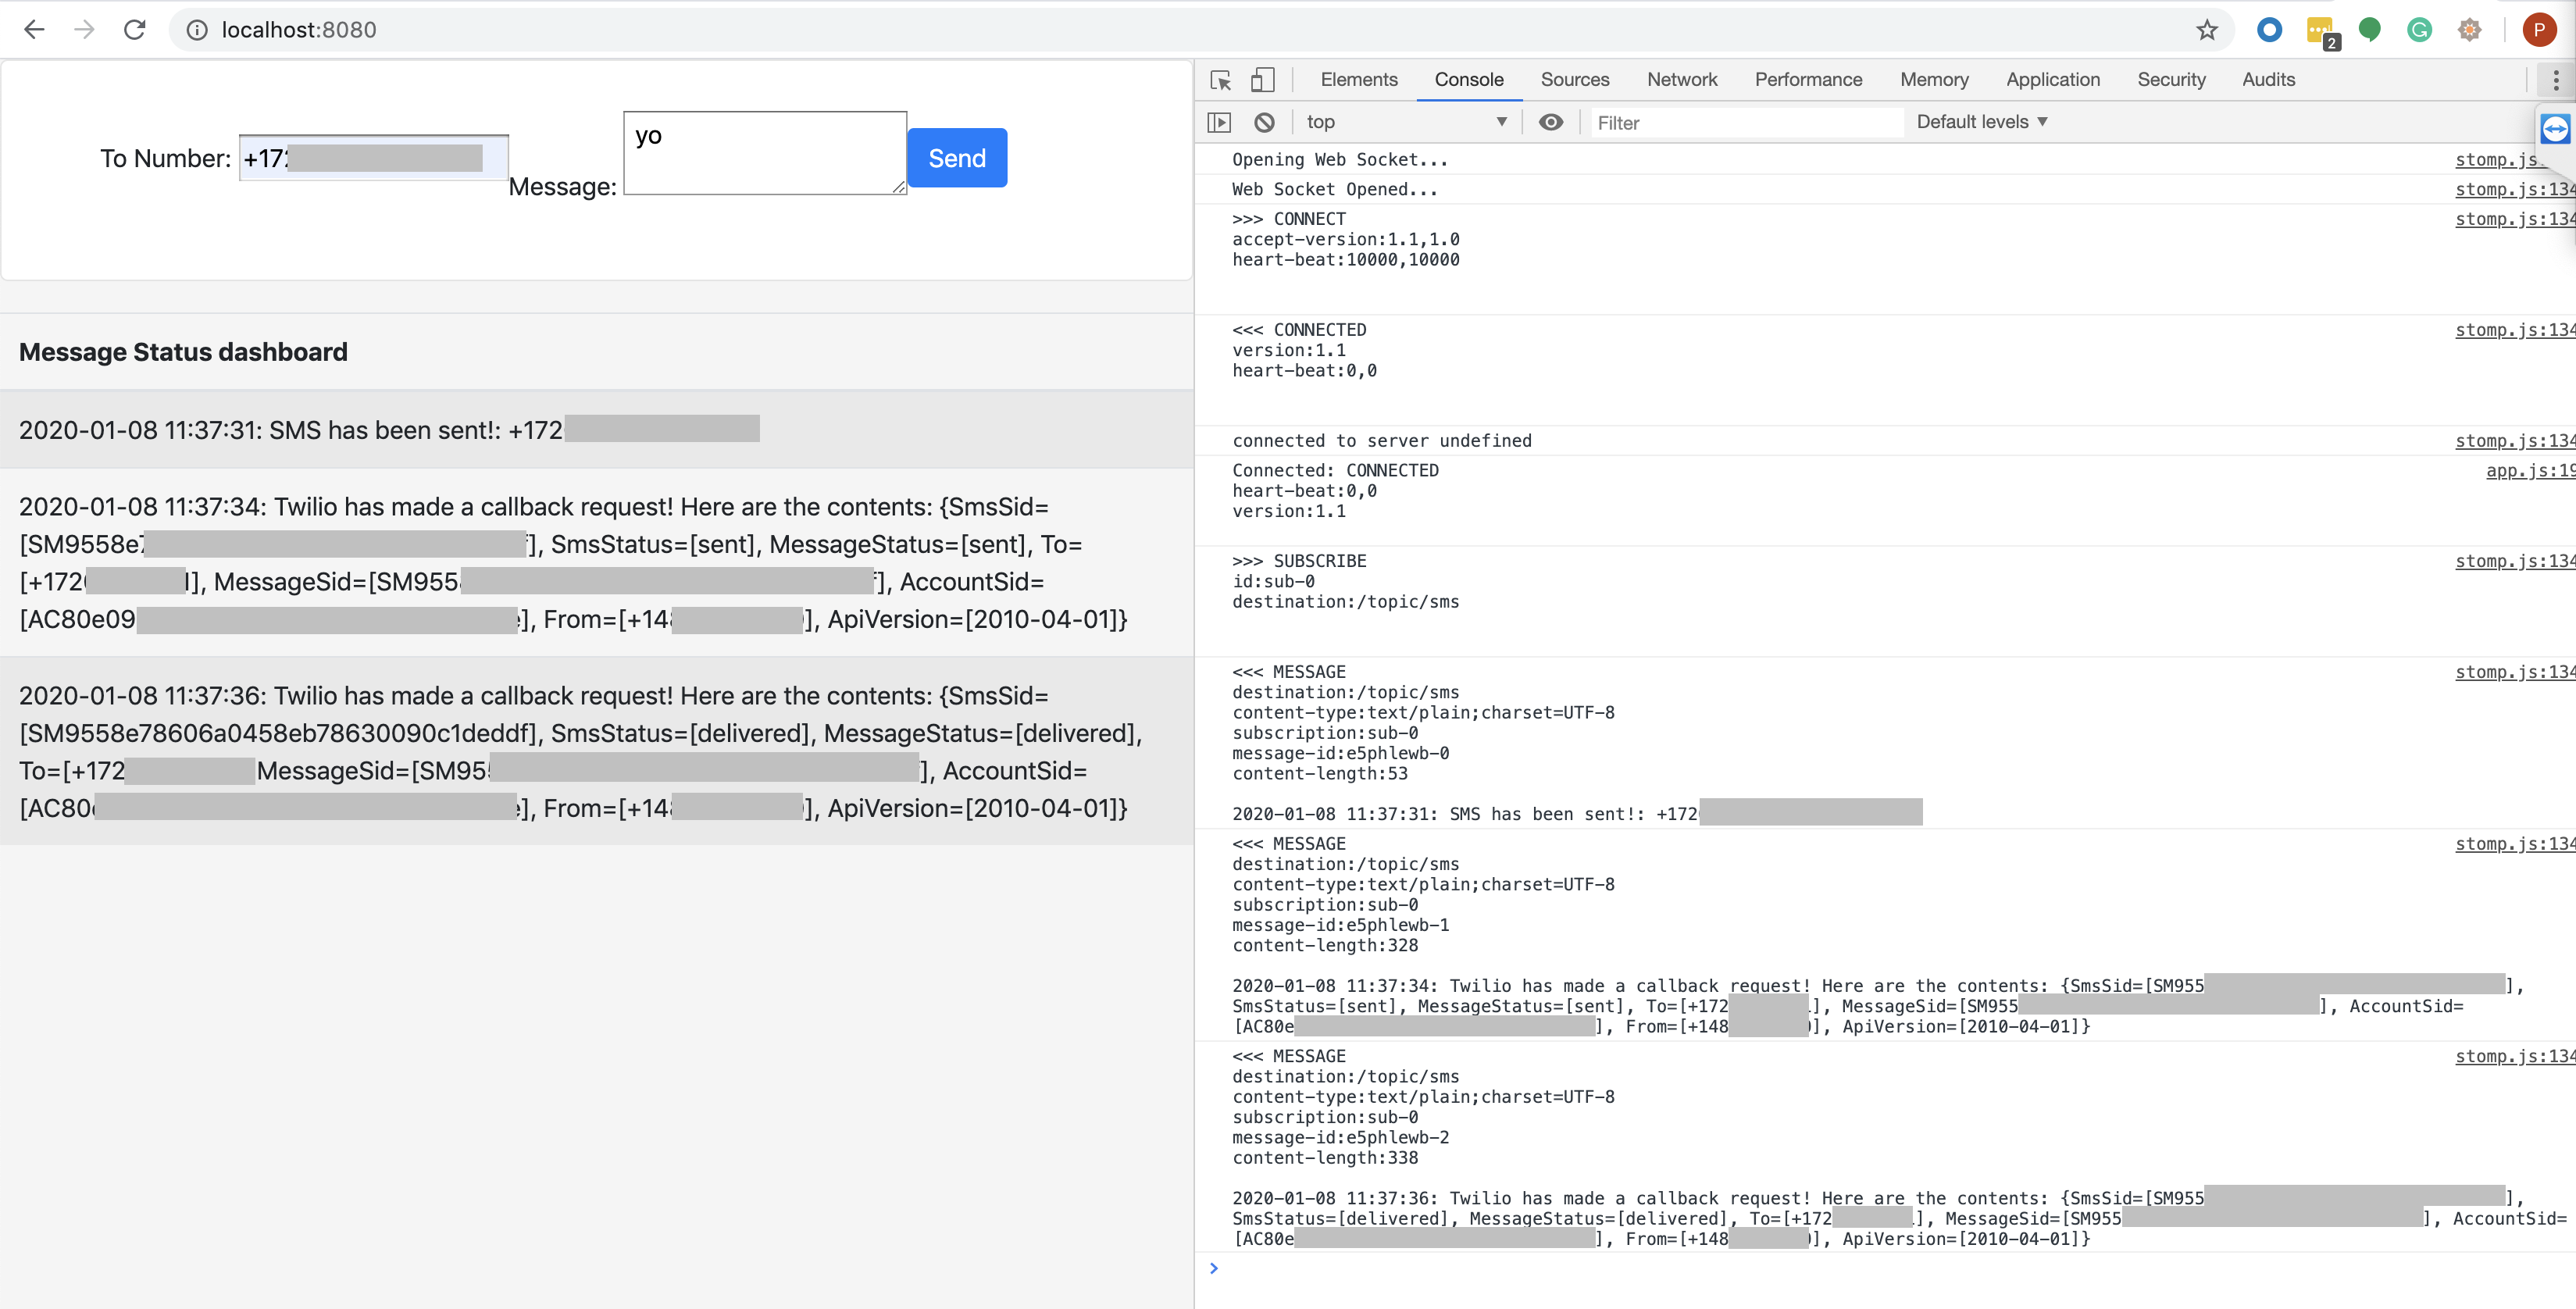
End result of the implementation
Twilio with Spring Boot and WebSockets
If all the tests worked, you now have an SMS app built with Spring Boot and WebSockets. If you want to work alongside my code, you can find my repository here.
Let me know if you get it working - we can't wait to see what you build!
Further References:
- Getting started using spring- https://spring.io/guides/gs/messaging-stomp-websocket/
- Intro to WebSockets - https://www.baeldung.com/websockets-spring
- Websocket support - https://docs.spring.io/spring-framework/docs/5.0.0.BUILD-SNAPSHOT/spring-framework-reference/html/websocket
- using STOMP and SockJS -https://stomp-js.github.io/guide/stompjs/rx-stomp/ng2-stompjs/using-stomp-with-sockjs
Pooja Srinath is a Senior Solutions Engineer at Twilio. She's focused on learning new things and building cool apps to help budding developers. She can be found at psrinath [at] twilio.com.

Related Resources
Twilio Docs
From APIs to SDKs to sample apps
API reference documentation, SDKs, helper libraries, quickstarts, and tutorials for your language and platform.
Resource Center
The latest ebooks, industry reports, and webinars
Learn from customer engagement experts to improve your own communication.
Ahoy
Twilio's developer community hub
Best practices, code samples, and inspiration to build communications and digital engagement experiences.