Take control of incoming calls with Twilio, Java and Google Sheets
Time to read:
July 03, 2020
Written by
Reviewed by

We understand how phone numbers work, don’t we? Someone calls your number and your phone rings. But wouldn't it be nice to have more control - to screen incoming calls and treat them differently depending on who is calling?

In this post I’ll show you how to set up a Twilio phone number to handle incoming calls using a Spring Boot app. Your app will look up the caller in a Google Sheet to decide what to do. There are options for blocking calls or forwarding them to other numbers. Any changes made to the Google Sheet will take effect immediately. The sheet looks like this:

Once you’ve set this up you can hand out your Twilio phone number freely, knowing that you can easily block unwanted callers, or redirect people to any other number depending on who they are.
To set this up you will need:
- A Google account
- A Twilio account
- A Java development environment
We'll set this project up in four stages:
- Fetch the code and see how it works
- Create a Google Sheet
- Configure the code to connect to your Google account
- Configure Twilio to use your code.
💼 Fetching the Java project
Start by cloning the complete project from GitHub, or downloading it.
Once you have fetched the code, open it in your IDE. This post will talk through the code and show you how to configure it to work with your Twilio and Google accounts.
📱⬌🖥️ How Twilio handles incoming calls
When a call is received to your Twilio phone number, you decide what happens next. The mechanism for this is called a Webhook: Twilio makes an HTTP request to a URL you provide and the HTTP response should contain instructions that Twilio can understand, in a type of XML that we like to call TwiML. The webhook request will have several parameters, including one called From which contains the caller’s phone number.
This project is a Spring Boot web application that can handle Twilio’s webhooks, look up the caller’s number in a Google Sheet and return the right kind of TwiML. Let's look into the code to see how that works:
🎣 The Webhook handler
Open up the WebhookHandler class and you will see this code:
The class is annotated with @RestController and the handleIncomingCall method has @RequestMapping and @ResponseBody annotations. Together these annotations tell Spring to configure an instance of this class to handle incoming HTTP requests, and to pass back whatever the method returns, with the correct content-type header.
The @RequestParam annotation on the from argument tells Spring to extract that parameter from the request and pass it as an argument to the method.
✍️ Defining Actions to generate TwiML
In the WebhookHandler, the caller’s number is passed to another method called getActionForNumber. We will look at getActionForNumber in a moment, but first have a look at what it returns: an Action. This is an interface with two implementations, so it’s either a BlockAction or a ForwardAction.
These are all defined in the project. Using BlockAction as an example, the code is:
generateTwiml uses the Twilio helper library to generate TwiML containing a <Say> verb that reads out a message and then hangs up. The content of the message is passed into the constructor. The ForwardAction is similar but has a <Dial> verb instead of a <Say>.
The Twilio helper library is a dependency in pom.xml, the Maven build file.
🤔 Creating the right Action for your caller
Now we know what an Action is and what it does, lets see how they are created. WebhookHandler has an ActionLookup instance set up to be autowired by Spring Dependency Injection:
Let's have a look inside: open the ActionLookup class in your IDE. It seems like a lot of code but much of it is error handling to determine what to do if we can’t connect to Google Sheets or if the caller’s number isn’t in the sheet. The most interesting methods are parseGoogleSheetsData and createActionMap which build up a Map from phone numbers to Actions:
In these methods, createActionMap fetches the contents of your GoogleSheet, specifying CallFilters as the name of the worksheet and asking for columns A:C. We pass the result to parseGoogleSheetsData to create an Action for each phone number in your sheet.
I found that the Streams API made this code easy to write, especially after writing Actions#create, a factory method for creating Actions.
The Sheets instance @Autowired into this class is created in GoogleSheetServiceBuilder. This is all boilerplate for authenticating with Google and not that interesting to dive into.
🎓 Code Recap
- Twilio calls your webapp passing the caller’s number as the
Fromparameter. - Spring routes this request to
WebhookHandler#handleIncomingCall - That method calls into
ActionLookupwhich fetches all the data from your Google Sheet and returns anAction. - The
Actionis either aBlockActionor aForwardAction. You could extend this to have other kinds of behaviours too, likeRecordVoicemailActionorPlayRickAstleyAction. - The
Actiongenerates TwiML which is returned to Twilio, which does the magic to the call.
Note that we fetch data from the Google Sheet on every single incoming call, which means if you update the sheet, your new behaviours will take effect immediately.
📝 Creating and linking your Google Sheet
Create a Google Sheet that looks like this:
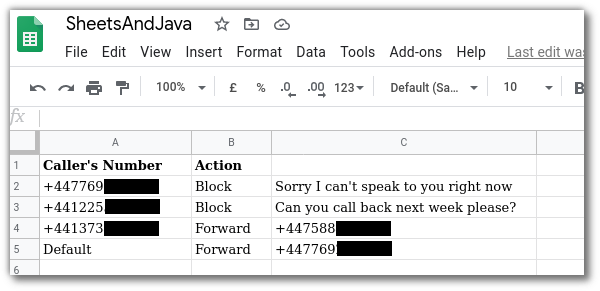
Fill in your own details for numbers and messages. You may need to prefix each phone number with a ' to prevent Sheets thinking it’s a formula. Make sure to name the sheet CallFilters in the tab at the bottom, to match the code in ActionLookup.
Next, you need to grab the Sheet ID from the URL of your Google Sheet. This is between the last 2 / characters in the URL. Here’s mine, yours will have a different ID but it’s in the same place:

The Sheet ID needs to go in the code. Copy it into src/main/resources/application.properties.
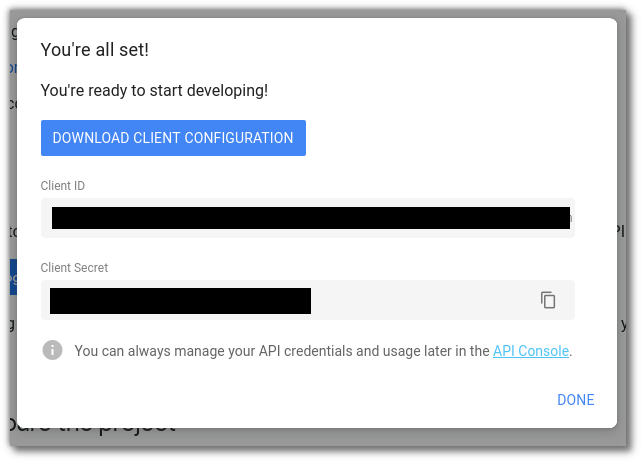
You also need to enable Google Sheets API access. Start at the Google Sheets Java Quickstart. On that page click “Enable the Google Sheets API” then on the dialog that appears choose “Desktop App” and “Create”. Download the client configuration, a file called credentials.json, and place it in your project in src/main/resources.
We also have a detailed video showing how to set up Java and Google Sheets.
🔬 Testing your setup
Before you use your app from Twilio, it’s a good idea to test that it’s working. In a terminal at the root of the project, start the app with:
You can see what TwiML gets created for different numbers by calling URLs like: http://localhost:8080/call?From=%2b447769xxxxxxx.
Test it out with a couple of different numbers, and see what happens if you pass in a number that isn’t in the sheet. (Hint: There’s a DEFAULT_ACTION specified in the Actions interface).
🏠 Using a local app for Twilio webhooks
Now the code is returning different valid TwiML depending on the From parameter, it’s time to hook it up to a real phone number. There are two parts to this:
- Making your application callable from Twilio
- Buying and configuring a Twilio phone number
📲 Making your application callable from Twilio
For the Twilio webhook call to succeed, there needs to be a public URL which your app will respond to. Localhost won’t cut it here, but luckily we have ngrok, a great tool for testing webhooks which can create temporary public URLs for your localhost applications.
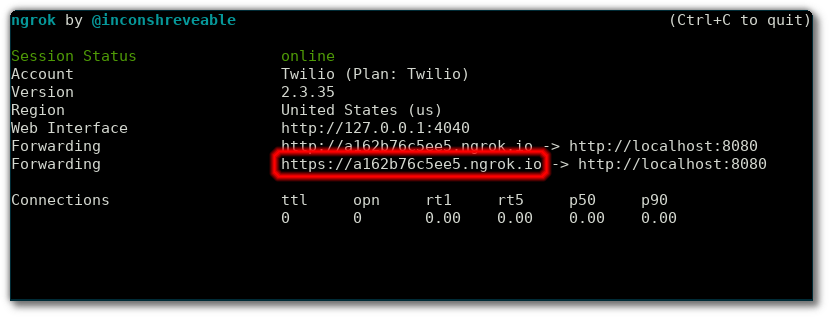
Download ngrok and create a tunnel pointing at your Spring app which runs on localhost port 8080 by running ngrok http 8080 in a terminal. Copy the https forwarding URL from the output:
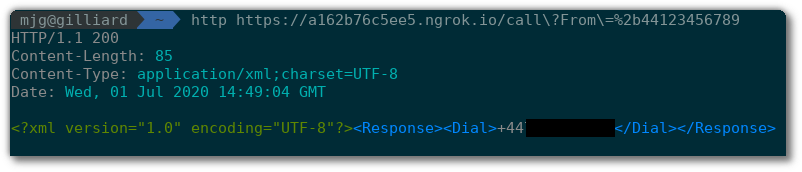
You can test that the tunnel is working by calling the same kinds of URL as before but use the ngrok forwarding URL instead of localhost:8080:
☎️ Using a real phone number
If you don’t already have a Twilio account you can create one for free, then follow the instructions to purchase your first phone number. Once you have a phone number, head to the config screen and in the “Voice & Fax” section set the action to use your ngrok URL as a webhook when a call comes in. Don’t forget to add /call to the end, but don’t worry about the From parameter - Twilio will set that for you:
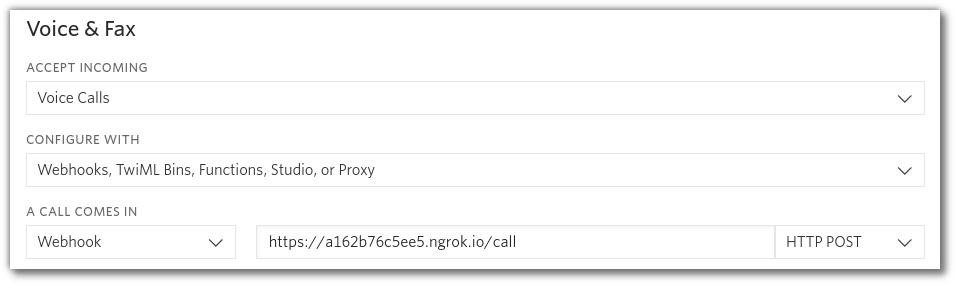
Save this config and you’re all done 📞😍
Test again, but this time by calling your Twilio phone number and you should be forwarded or blocked as defined in the sheet.
🎁 Wrapping up
This project has shown how you can work with Google Sheets from Java, and how to use that power to take control of incoming calls. Whatever you’re building with Java and Twilio I’d love to hear about it, get in touch with me at:


Related Resources
Twilio Docs
From APIs to SDKs to sample apps
API reference documentation, SDKs, helper libraries, quickstarts, and tutorials for your language and platform.
Resource Center
The latest ebooks, industry reports, and webinars
Learn from customer engagement experts to improve your own communication.
Ahoy
Twilio's developer community hub
Best practices, code samples, and inspiration to build communications and digital engagement experiences.