Twilio for .NET Developers Part 7: SMS & Voice Application Flows using ASP.NET MVC
Time to read:
February 21, 2012
Written by
This post is part of Twilio’s archive and may contain outdated information. We’re always building something new, so be sure to check out our latest posts for the most up-to-date insights.


This is a series of blog posts that introduce and walk you through using the different .NET Helper Libraries that Twilio provides.
These libraries simplify using the Twilio REST API for .NET developers, and provide as set of utilities that make it easy to work with TwiML and Twilio Client. Take a look at part one, two, three, four, five and six of the series.
Creating SMS & Voice Application Flows using ASP.NET MVC
In the last post we looked at how you can build an Interactive Voice Response (IVR) system that includes a multi-step voice call work flow by using an HTTP Handler in an ASP.NET Web Application. In this post we will look at how you can create the same IVR system using the ASP.NET MVC Framework.
Multi-step Voice Call Work Flows
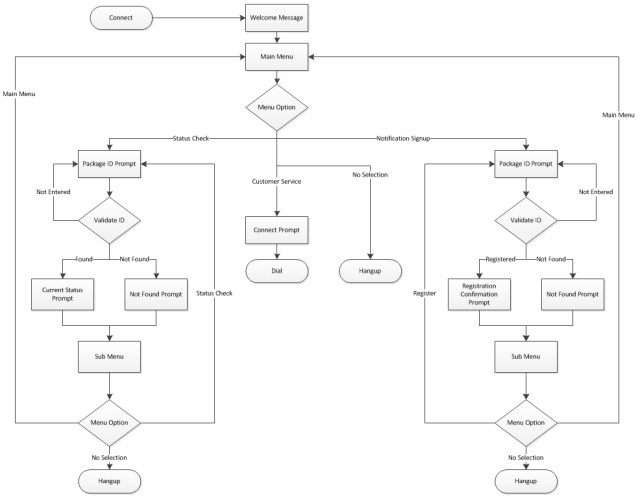
Before we get started building the application, as a reminder, lets take a look at the call flow that our application needs to be able to handle. The diagram below shows the different paths that the user can take through the call flow:
Because the call flow is the same as the one we used in the previous post, the bulk of the logic can be reused as we create the application using the ASP.NET MVC framework.
There are of course some differences. The first and probably most noticeable difference you will see in the MVC-based application is how we handle tracking our position in the call flow. In the ASP.NET Web Application we were using a single HTTP handler as our endpoint, therefore we had to use request parameters to track our location in the call flow.
ASP.NET MVC however includes a powerful routing engine that we can leverage in our application. Instead of directing each request to a single endpoint, we use the routing engine to expose different parts of the call flow logic through different URL’s. For example, we can isolate different logical steps of the call flow in multiple Action Methods, each exposed as a unique URL.
Setting up the Application
As in the last post, lets get started building the application by creating a new ASP.NET MVC Website and then configuring a Twilio number to know about the applications endpoint.
In Visual Studio create a new ASP.NET MVC 3 website. Once you have the base application created, add the Twilio REST, Twilio TwiML and Twilio MVC libraries from NuGet as was described in the Nth post of this series.
Next, right click on the projects controllers folder and add a new Controller named IvrController to the project:
We will use this Controller to handle all of the incoming requests from Twilio, process the requests based on our application logic and then return TwiML responses to Twilio.
Additionally, because we know that Action Methods in this controller will return TwiML, we can go ahead and change the class that the controller derives from to TwilioController:
By deriving from the TwilioController class we can take advantage of the TwiML method inside of our Action Methods. The TwiML method simplifies returning a TwiML result from an Action Method by converting a TwilioResponse object to an ActionResult and setting the response Content-Type to application/xml.
Now that we have our Controller created, lets configure the default route in the MVC application to use it as the default controller value:
Configuring the Routing Engine to use our Controller as the default means that we won’t have to explicitly specify the controller name in the URL’s we use to access the application. Instead the Routing engine will simply insert the default value we’ve set.
Once you have basic website set up, deploy the site to a public location on the Internet, like Windows Azure or AppHarbor.
Setting up Twilio
Now that we have a public endpoint created, let’s configure a Twilio phone number to point to that endpoint. As we showed in the last post, you can configure a Twilio number by logging into your twilio.com account, opening the account dashboard and selecting a number to configure. The figure below shows that I’ve configured my number to point to my domain.

Remember that because we set up the default route to use the IvrController controller class and Index action method by default, we don’t have to specify the URL explicitly when I configure the number.
Also remember that as was explained in the previous post, instead of purchasing and using a Twilio number, you can use the free sandbox number that is included with every Twilio account. If you decide to use the sandbox number, then callers would need to know and enter the sandbox PIN code after dialing the sandbox number. Additionally in order to send text messages you will need to verify an outgoing number with Twilio, which you can do from your account dashboard.
Call Greeting
Once we have the basic infrastructure set up we can get to work adding the work flow logic to our application. Remember that when a call is made to our number, Twilio will answer and tell our application about it by making an HTTP request to the Voice Handler URL.
Because we’ve configured our ASP.NET MVC application with default route values, that means that when Twilio makes this request, it will be routed to the IvrController class and then the Index action method.
Since we know that in our application the first thing we want users to hear when the call is answered is a greeting sound file, we can return a set of TwiML instructions from the Index action method that tell Twilio to play that sound file. Using the Twilio TwiML Library as shown below we can response with a verb which instructs Twilio to play the provided sound file:
Once we’ve created the TwiML response we need, we can call the TwiML method and pass the response to it. The TwiML method will set the HTTP response content type to “application/xml” and convert the TwilioResponse into an ActionResult which is returned as the result of the Index action method.
One additional interesting part of the Index action method is the use of the UrlHelper object. Normally you would use the UrlHelper in a MVC View to generate links to other views, but in this case, since we do not have a View, we are using the helper and a custom extension method called ContentAbsolute to resolve the location of the greeting audio file in the Controller.
Once you’ve got the Index method set up you can test the application by calling the number you configured earlier. You should hear the greeting play, then the call will end.
Main Menu
Next we want to add a menu to our application that allows users to select what they want to do. We want the menu to be separate from the greeting so that later we can allow users can return to the main menu without having to hear the greeting repeated.
Adding the menu will create a new branch in the applications work flow. Once the greeting plays, we want the application to immediately redirect to the main menu branch. To do this we can use the Redirect method to add a verb to the greeting TwiML response. The verb directs Twilio to continue processing the call using a new URL. In this case the URL we’ve provided includes the value “mainmenu” as its action parameter.
When Twilio calls the redirect URL, the MVC Routing engine will evaluate the URL and determine that it needs to execute the MainMenu method in the IvrController class. This method is shown below:
You can test the modifications to the app by dialing the phone number again. This time you should hear the greeting play, followed immediately by the main menu content.
Accepting Menu Input
Once we’ve added the main menu we need to add a way to listen for the selection that the user makes. In IVR applications users make selections by pressing the keys on their phones, which causes the device to emit a DTMF tone. By including the verb in our TwiML we can instruct Twilio to listen for DTMF tones and tell us when the user enters them. The code below shows how we can add the verb to our main menu:
Notice how we start the gather before the first call to the Say method by using the BeginGather method, then end it after the last Say using the EndGather method. By surrounding the verbs with a verb, we are telling Twilio to listen for input while each Say is executed, allowing someone to press a key to move on before the prompt finishes.
Also notice that we are using an anonymous type to set two attributes on the Gather verb. The first, the action attribute, tells Twilio what URL to request once the Gather completes. This URL is called the action handler. The second attribute tells Twilio how many digits to gather from the user before making a request to the action handler.
Based on the TwiML we are returning to Twilio, during the call if DTMF tones are detected during a , Twilio will convert the tones into the corresponding numeric values and call the action handler, passing the converted values as a request parameter named ‘Digits’. If no input is detected, then Twilio will continue to execute the remaining TwiML, in our case executing the remaining and verbs.
The URL thats been set for the Gather verbs action handler changes the action parameter to “MenuOptions” which is a new action parameter whose job it is to determine which menu option the user selected and which branch in the apps work flow to use.
The code below shows the MenuOptions action method:
Notice how the action method has a single method parameter named Digits. This parameter maps to an HTTP request parameter that Twilio sends which contains the value that Twilio gathered from the end user. Using the Digits parameter we determine which work flow branch the app should follow.
Menu Option One – Package Status
The first option in the menu allows the user to check on the status of a package. In our application, this will be implemented as a two step process. First, we need to allow the user to enter in a package ID number to get status information for. Second, we need to look up the package using the ID and tell the status to the end user.
The first step is handled by the MenuOptions action handler, which as was shown in the previous section evaluates which menu option the user selected from the main menu. If the first menu option was selected prompts the user to enter a package ID:
As before, we are defining an action handler for the Gather verb, however this time we are specifying a new action parameter value: ‘lookup’. We can now add to our Controller a new Action Method to process the package ID entered by the end user:
The Lookup action method is responsible for locating the package and returning its status to the user and executes after the user has entered their package ID.
As with the MenuOptions action method, the Lookup action method accepts a single method parameter Digits, which contains the value of the entered by the end user.
At this point our application should now allow user to hear the menu options, select the option to check the status of their package and then hear the status. You can test the application by dialing your number and pressing “1” when the main menu plays.
Menu Option Two – Package Notification
The next major option available to users in our application is to register to receive notifications via SMS when their package status changes. If you look at the application flow diagram that was shown at the beginning of this post you can probably tell that the work flow for this branch is virtually identical to the branch for checking package status, and therefore the code to add this part of the application is virtually identical to the code to check a package status.
To start we again need to add the code that handles the user selecting the option from the main menu to the MenuOptions action handler:
The verb above defines a new Register action handler, which is shown below:
As an example of how this might work in a real application, our sample uses the static Create method on the mock Notifications object to create a new notification using the package ID entered by the user and their phone number (from the ‘From’ request parameter). In a real application this notification could be saved to a database to be used by a separate monitoring application.
As with the previous sections you can test the application by calling your number. You should now be able to both check the status of an package as well as select the second menu option and register to receive status updates.
Menu Option Three – Connect to Customer Service
The last option that we are giving the users of our application is to connect to a customer service representative. To do this we want our application to call out to our customer service center and bridge the customer and agent together.
To do that our application detects the selection of the third option in the MainMenu action handler and simply returns the TwiML instructing Twilio to connect to another call
Here we are using the Dial verb to tell Twilio to create a new call to the provided number. Twilio will automatically bridge the existing call with the new call, allowing the customer to speak with an agent.
Submenus and Flow Redirects
If you look at the call flow diagram from the beginning of this post you will see that there are several places where the caller can double back on themselves to either re-enter a package ID, or to return to the main menu. The logic to do this is basically the same for both flow branches.
Lets add the menu options to the lookup branch first.
You can see that we’ve added the code to create our menu to the end of the lookup block. Again using the verb, we let the user tell us what they want to do once the lookup completes, which in this case is to either lookup another package or to return to the main menu.
In order to process their input we need to create another logic branch that will be run when the Gather completes. We indicate this new branch as we have done before, by creating a new action method named MenuRedirect, which you can see as part of the action handler URL.
Also notice that there is another segment in the action handler URL after the MenuRedirect. If you remember back at the beginning of the beginning of this post we registered a default route that looked like this:
The additional parameter in the action handler URL will get mapped to the source segment of our route. We can use this in the redirect action method in order to determine if the user is coming from the lookup branch or the register branch.
The code below shows the code we use for the redirect action method:
The logic is fairly straight forward. If the user indicates enters “1”, we determine if they are coming from the lookup branch or the register branch and use MVC’s RedirectToAction helper method to redirect the request to the appropriate action method.
If the user enters “2”, we redirect them back to the main menu action method.
Summary
As we’ve shown in this post, creating complex call flows using ASP.NET MVC is easy, but does require a bit of planning up front in order to design and implement the work flow. Once you understand the call flow, implementing the code is quite simple using the basic capabilities of ASP.NET MVC.
In the next and final post in this series we will look at some tools and techniques you can use when you run into a problem and need to debug an app that integrates with Twilio.
Catch up on the rest of the .NET Series:
Twilio for .NET Developers Part 1: Introducing the Helper Libraries
Twilio for .NET Developer Part 2: Adding Twilio Helper Libraries to your Project
Twilio for .NET Developers Part 3: Using the Twilio REST API Helper Library
Twilio for .NET Developers Part 4: Using the Twilio.TwiML Helper Library
Twilio for .NET Developers Part 5: Twilio Client, MVC and WebMatrix Helper Libraries
Twilio for .NET Developers Part 6: Creating SMS & Voice App Flows Using ASP.NET Web Forms
This series is written by Twilio Developer Evangelist Devin Rader. As a co-founder of the St. Louis .NET User Group, a current board member of the Central New Jersey .NET User Group and a former INETA board member, he’s an active supporter of the .NET developer community. He’s also the co-author or technical editor of numerous books on .NET including Wrox’s Professional Silverlight 4 and Wrox’s Professional ASP.NET 4. Follow Devin on Twitter @devinrader

Related Resources
Twilio Docs
From APIs to SDKs to sample apps
API reference documentation, SDKs, helper libraries, quickstarts, and tutorials for your language and platform.
Resource Center
The latest ebooks, industry reports, and webinars
Learn from customer engagement experts to improve your own communication.
Ahoy
Twilio's developer community hub
Best practices, code samples, and inspiration to build communications and digital engagement experiences.