Using Interfaces and Dependency Injection for Inversion of Control in ASP.NET Core 3.1 Razor Pages Projects Built with the MVVM Design Pattern
Time to read:
June 04, 2020
Written by
The Model-View-ViewModel design paradigm is useful for building web applications with ASP.NET Core Razor Pages and ASP.NET Core MVC. Entity classes, data repositories, and view models work with data contexts, data binding, validation, and features of the ASP.NET Core middleware to create a comprehensive and extensible architecture.
But it is important to use additional features of C# and the .NET Extensions APIs to prevent the structure of an MVVM web app from becoming rigid, making it difficult to modify as the requirements for the application change and grow. At the same time, you’ll also make it easier to build unit tests for your application, helping you ensure it continues to work correctly as you modify existing features and add new ones.
C# Interfaces and Dependency Injection from the .NET Extensions namespace can be used to reduce the class coupling that occurs when you use concrete types to create new instances of data repositories. It also gives you the ability to substitute a simulated data source for a repository, making it easier to create unit tests you can run automatically without connecting to an actual database.
This post will show you how to implement interfaces for data repositories and how to use those interfaces with dependency injection in an ASP.NET Core 3.1 Razor Pages web application. To make it easier for you to see the changes required and focus on how the new functionality works, the tutorial is set up so you’ll only need to code the modifications.
Prerequisites
You’ll need the following development resources to build and run the case study project:
.NET Core SDK (includes the APIs, runtime, and CLI)
Visual Studio 2019 (the Community edition is free) with the following options:
- C#
- ASP.NET and web development workload
- .NET Core cross-platform development workload
- SQL Server Express LocalDB
- GitHub Extension for Visual Studio
In addition to these tools you should have a working knowledge of C#, including classes, and some experience with HTML, CSS, and JavaScript. You should be familiar with the Visual Studio user interface.
This is an introductory level post. The code is written to highlight the topics of the post: don’t expect production-ready code that implements all the SOLID principles.
Understanding the case study
In this tutorial you’ll be working with an application you’ll clone from a GitHub repository. The repo contains a Visual Studio solution, RazorDrop, containing a C# ASP.NET Core 3.1 Razor Pages project, RazorDrop. The project structure is based on the default Razor Pages project template, and adds Entity Framework Core 3.1 with the SQL Server driver. The database structure is created and modified using EF Core Migrations in the code-first approach. The database runs in the default SQL Server instance installed with Visual Studio.
The application provides a simple user interface for creating new customer records and viewing a list of existing customers. The list of existing customers is the default Index page for the /Customers route, and customers are created with the Create page. When creating a customer, a user enters the customer name and selects the country and, optionally, the region in which the customer is located. A customer ID is generated automatically. The Index and Create pages are each bound to a view model.
The data model consists of entities for Customer, Country, and Region, with relationships between the entities defined in the model and applied to the database by EF Core. There are repositories for each entity, and the repos use the view models to provide and accept data from the Razor pages. An EF Core DbContext data context provides instructions for implementing the data model in the database and provides seed data for the Countries and Regions tables.
If you want to learn more about the case study, including how it implements the Model-View-ViewModel design paradigm, see the post:
Building Hierarchical Dropdown Lists in ASP.NET Core 3.1 Razor Pages with View Models and Ajax
It also explains how to code a widely-used user interface feature.
Setting up the Visual Studio solution
There are just a few preparatory steps required before you can get started.
Open Visual Studio and cloning the following GitHub repository to a local path where you’d like to keep the files:
When the cloning process is finished you should see the RazorDrop solution tree in the Solution Explorer panel.
Visual Studio should automatically restore the NuGet packages required by the RazorDrop project, as defined in the RazorDrop.csproj file, but if it doesn’t you can install the required NuGet packages by opening the Package Manager Console window and executing the following command:
Note that “package” is singular. Using this command without an argument will update all the packages to the latest version. You can also use the NuGet Package Manager UI to perform these tasks.
You’ll need to create the SQL Server database the application uses as a data persistence layer and seed it with data using Entity Framework Core. If you installed SQL Express 2016 LocalDB with Visual Studio 2016, which is a typical thing to do, you’ll have the necessary database engine. If not you can find it in the list of Individual components in the Visual Studio Installer (in Visual Studio: Tools > Get Tools and Features).
Unless you’re already sure of it, you can verify the name of your instance(s) of LocalDB using the SqlLocalDB Utility. Open a PowerShell or Windows Command Prompt console window and execute the following command:
The utility will return the names(s) of all the instances of LocalDB owned by the current user.
With the name of your instance of LocalDB, you can update the connection string Entity Framework Core needs to connect to the database.
Open the appsettings.json file in the RazorDrop project root and update the connection string set in the RazorDropContext element to point to the correct database server.
Open the Package Manager window and execute the following command-line instruction:
Visual Studio will build the solution and run the EF Core migrations, which will create the database in the default location for LocalDB, which is C:\Users\<users> on Windows machines. You should see the following output in the Package Manager Console if everything worked:
Verify that the database was created properly by creating a connection to the RazorDrop database in Visual Studio, SQL Server Management Studio, or LINQPad 6 and getting the list if countries with the following SQL query:
You should see two records, for Canada and the USA.
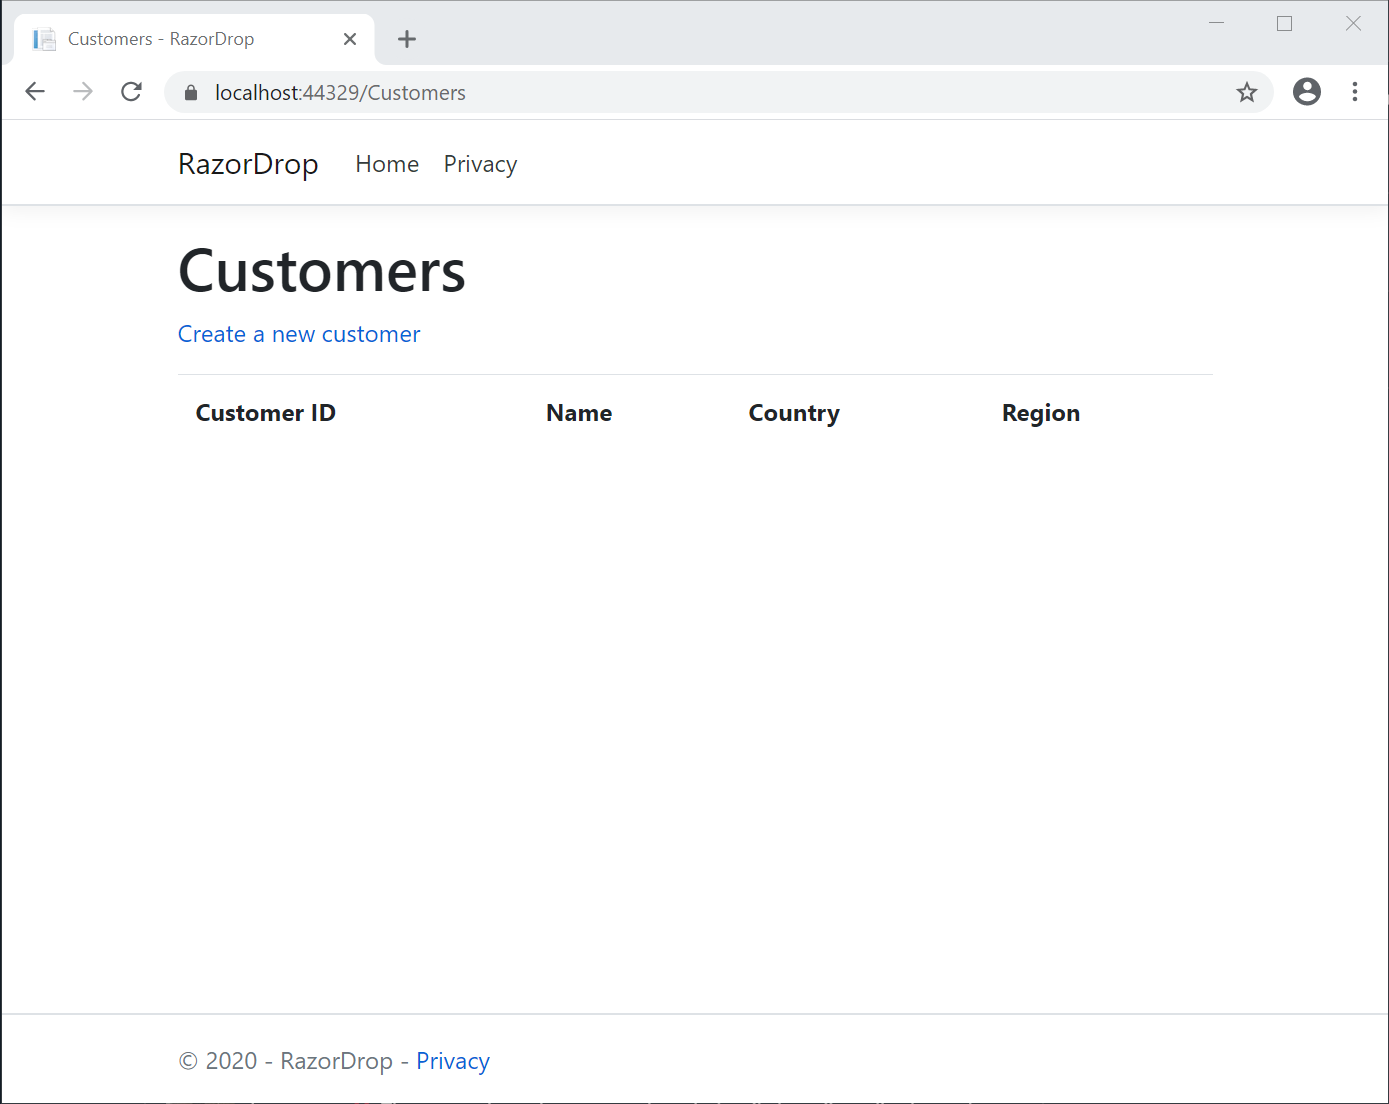
Run the RazorDrop project. When the default ASP.NET Core template home page appears in your browser, go to https://localhost:44329/Customers. (Your port number may be different.) You should see the default page for the /Customers route, Pages/Customers/Index.cshtml in the RazorDrop project. An example is shown below:
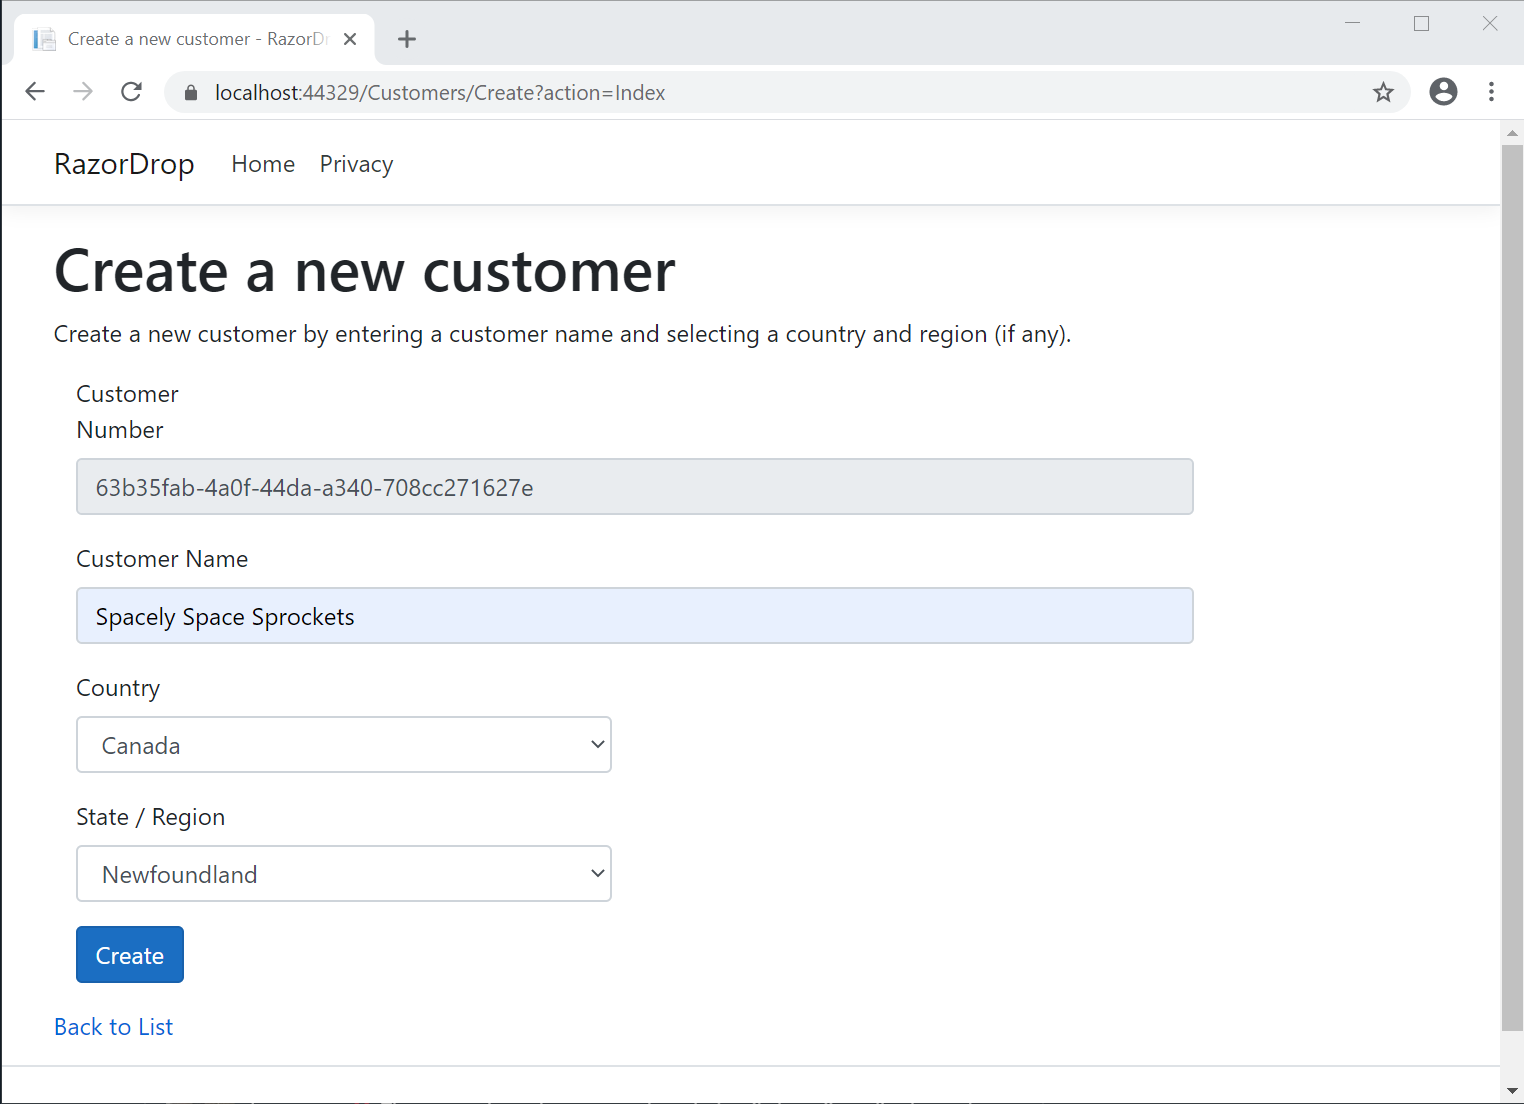
Click Create a new customer and create a new customer. As you do so you can verify the values for the Country and State/Region dropdown lists are appearing, as shown below:
Return to the previous page. You should see the new customer in the list of customers. You’ve exercised all the functionality of the application from user interface to data persistence layer.
You can stop the application now.
This is a good time to create a new branch in your local Git repository named uncoupling and switch to that branch. This way you’ll be able to switch back and forth between the new approach and the existing code.
Understanding class coupling and inversion of control
You can see a specific example of class coupling in the PageModel for the Create page. As you proceed with addressing this issue you’ll also be able to see how using the .NET dependency injection middleware helps implement inversion of control.
Open the RazorDrop/Pages/Customers/Create.cshtml.cs file.
In the list of using directives you can see that the classes in this file rely on both the RazorDrop.Data and RazorDrop.ViewModels namespaces. The first provides both the data context, RazorDropContext and the data repositories.
The view model for the CreateModel page model, CustomerEditViewModel is bound to the PageModel with the [BindProperty(SupportsGet = true)] decorator.
You can also see that the data context is provided to the class through dependency injection injection in the class constructor:
Take a look at the following method, which determines what happens when the Create page is first requested:
A new instance of CustomersRepository is instantiated using the instance of the context in the private memberfield _context as an argument. You need to inject the RazorDropContext data context into the PageModel to be able to pass it as an argument when creating a new instance of CustomersRepository.
Since there is no parameterless constructor for the DataContext class in Entity Framework Core, unlike Entity Framework 6, you need to provide the context as an argument to the repository constructor so the options object in the Startup class can be used to create an instance of the constructor.
The view model bound to the page is populated with an instance of a new customer, which includes a value for CustomerId. Then the page is rendered for the browser using the layout in Create.cshtml.
You can see a number of problems associated with having concrete classes tightly bound to each other in the project. In every class where you use a repository you also have to have an instance of the data context, RazorDropContext. Since the CreateModel doesn’t really need to know about the data context, this isn’t great for separation of concerns.
You also have to instantiate the repositories in each action method where you use them, rather than at the page model level. This isn’t the DRY-est way of doing things.
Flow of control in the program is governed by the methods of the CreateModel class and the repositories, rather than by the relationship between higher-level abstractions. This makes the structure of the program brittle and the job of modifying it more complicated.
For a deeper explanation of these points, see the Architectural principles article on docs.microsoft.com. It’s well worth the investment of time, even if you just need a refresher.
From a practical perspective, one of the most cumbersome aspects of using concrete implementations of repositories is that it makes it difficult to to create unit tests for the code that depends on them. There’s no practical way of creating a mockup that supplies the data the repository should without connecting to a data source and doing all the data manipulation the repository does. When you find errors, it helps to know they aren’t somewhere along the path from the database files to the machine running the test.
Creating interfaces for data repositories
The first step in refactoring the RazorDrop application into a more SOLID structure is to create interfaces for the repositories. This will provide an abstraction you can use in place of the concrete implementation of the class.
Open the CountriesRepository.cs file in the Data folder, then insert the following C# code above the class declaration public class CountriesRepository and inside the namespace:
In most cases you'd put interface definitions in separate class files from the concrete classes that implement them, in part because it's common for an interface to be implemented by multiple classes. You're putting them in the same file here to make it easier to see what's going on.
The concrete class `CountriesRepository` has to implement the class, so modify the beginning of the class file so it looks like this:
You’ll probably recall hearing that C# classes don’t support multiple inheritance. For example, the RazorDrop.Pages.Customers.CreateModel class inherits from the PageModel class, so it has all the (inheritable) properties and methods of the base class, but it can’t also inherit the CustomerEditViewModel class.
But classes can implement multiple interfaces and that’s one of the key architectural foundations of C# and .NET. As long as a class or struct implements all the members of an interface it fulfills the contract defined by the interface. So you can have a completely different implementation of ICountriesRepository as long as it implements the GetCountries method defined in the interface. That’s how you use interfaces with mocking frameworks to simulate the data persistence layers of applications.
The completed CountriesRepository.cs file should look like this:
If you want to learn more about how the RazorDrop repositories work, see the post mentioned above.
Open the Data/RegionsRepository.cs file and insert the following C# code above the RegionsRepository class declaration:
Then add the interface inheritance to the concrete class declaration:
Open the Data/CustomersRepository.cs file and add the following C# code above the CustomersRepository class declaration:
Add the interface inheritance to the concrete class declaration:
You can close the Countries.Repository.cs and RegionsRepository.cs files. You won’t be making any more changes to them. Leave the CustomersRepository.cs file open. You’ll be working on it when you implement dependency injection.
Implementing dependency injection
Open the Startup.cs file in the RazorDrop project root and modify the ConfigureServices method of the Startup class so it looks like the following:
The additional three lines add the repositories to the services dependency injection service collection. They’re now available to be included in other classes through dependency injection rather than direct invocation.
Return to the CustomersRepository.cs file. Now that the Countries and Regions repositories are available through dependency injection you can add use them in CustomersRepository rather than instantiating them using their concrete classes.
Add the following private member fields to the CustomersRepository class below the existing declaration for the _context variable:
Change the class constructor to inject the other repositories and assign them to the private fields by modifying the constructor so it looks like this:
When creating a new Customer with the Create page, the CustomerEditViewModel is populated with a list of Countries and their associated Regions by the CreateCustomer method. It’s currently done by creating new instances of the associated repositories, but with DI that isn’t necessary; you can use the instance created in the constructor and assigned to the private member field.
Replace the existing code for the CreateCustomer method with the following code:
While this only eliminated a couple lines of code and a couple local variables, you can see that in a complex program this technique could have a significant impact on reducing the complexity and improving the readability of the code.
That completes all the necessary work in the CustomersRepository.cs file.
Open the Index.cshtml.cs file in the Pages/Customers folder. You’ll note that the statement instantiating the repo variable is now linted. Since you’ve changed the constructor for CustomersRepository to include the other repositories through dependency injection, there is no longer a signature that matches an invocation of the constructor with just the data context.
After converting to dependency injection of CustomersRepository you won’t have to worry about passing the right number of arguments because that’s now handled where it should be: in the CustomersRepository constructor.
Replace the existing code in the IndexModel class with the following C# code:
Now the repository is added through DI and available throughout the class without requiring instantiation of local variables. When the OnGet() action method for the page requires a list of customers it just calls the appropriate method on the available instance of the repo that’s available for the class.
Open the Create.cshtml.cs file in the Pages/Customers folder. The Customers page is a bit more complex, so it will require a few more changes than the IndexModel class.
Remove the following using declaration, as it is no longer necessary:
Because you’ll be creating instances of the repositories this page model needs with dependency injection, rather than instantiating them in the class’s methods, you won’t need to inject the data context.
Replace the existing private member field declaration for _context with the following declarations:
Inject the customer and region repositories into the CreateModel class by replacing the RazorDropContext parameter with the injection syntax for both repositories and assign the parameters to the private member fields by replacing the constructor with the following code:
Now that the repositories are available through injection you don’t need to create instances of them in the action methods. Refactoring the code is simply a process of following the trail of red lint and replacing the variable declarations with statements that use the private member fields.
Replace the first two lines of the OnGet() method with the following statement:
In the OnPost() method, replace the repo variable declaration and the following line with this statement:
In the OnPostRegions action method, replace the repo declaration and the following line with this statement:
Now the CreateModel class uses the instances of the repositories provided through dependency injection.
This is a good time to build the solution and see if you missed anything. If you need help tracking down a bug, you can refer to the companion repository’s copy of Create.cshtml.cs.
Testing the completed application
Run the RazorDrop project and go to https://localhost:44329/Customers (your port number may be different). You should see the customer record(s) you created before. Click Create a new customer, add another customer, and return to the previous (default Index) page. You should see all the customers you’ve added.
If you need help debugging, the completed source code for this post is available in the uncoupling branch of the companion repository on GitHub.
Potential enhancements
There are a number of ways you can take this case study project and make it more suitable for a production environment. There are some additional parts of the application that should be completed to make it fully functional, and the existing parts can be extended to make them more complete.
Complete the CRUD (create, retrieve, update, delete) functionality for Countries, Regions, and Customers. This is a good way to become more familiar with the Razor Pages tooling in Visual Studio. Because you’d be manipulating single tables you could use the model for each entity from the Models folder and supply the RazorDropContext data context to the tooling, then let it create the page views and page models for you. This relieves you of the quotidien task of writing repository methods for all those actions, but it also relieves you of the data security and architectural benefits of isolating your data layer from your user interface interaction methods (controller methods in the MVC world, action methods in Razor Pages).
Add asynchronous functionality to the repositories and the page model action methods. The database may be somewhere in the cloud and retrieving data can be a comparatively time consuming and unreliable process. Likewise, the user experience can be improved by using asynchronous action methods in the page model.
Add error handling. There are known errors, like the referential integrity error that the SQL Server data provider will return when a user tries to delete a Country that has linked Customers, and there are unknown errors, like bugs in the code. The repositories should be able to handle SQL errors and the application should be able to present the user with meaningful information about those errors and offer ways to respond to them. The code should also be able to fail gracefully and report its problems. One way to stay on top of errors from running apps is to integrate elmah.io.
Implement I18n + L10n. Internationalization (I18n) and Localization (L10n) are not just gratuitous abbreviations; they’re ways of making your application more helpful to users around the world. The Wikipedia article Internationalization and localization provides a good introduction to the topic and Globalizing and localizing .NET applications from docs.microsoft.com will point you in the direction of relevant namespaces and tools.
Summary
Using the Model-View-ViewModel (MVVM) design pattern in ASP.NET Core 3.1 Razor Pages projects gives you an effective way of structuring the layers of your application, but using the concrete classes that implement repositories causes class coupling between in your project, making it difficult to modify and test your application as business requirements grow and new features are required. You can reduce class coupling by using C# interfaces and .NET dependency injection in your application.
This post showed you how to refactor an existing application built with MVVM so it uses interfaces and dependency injection. The completed, runnable project includes a user interface with code-behind PageModel classes with action methods, data entities, view models, data repository classes, and a database created and managed with Entity Framework Core.
Additional resources
Inversion of Control Containers and the Dependency Injection pattern – Look past the syntactic differences between C# and Java to get an authoritative explanation of the concepts from way back in 2004.
Inversion of Control Patterns for the Microsoft .NET Framework – Read more about the .NET way of doing IoC in Visual Studio Magazine.
Creating and configuring a model – docs.microsoft.com information on building and using data models with Entity Framework Core.
Twilio trial account – Sign up for a free Twilio account using this link and receive an additional $10 credit on your account.
AJ Saulsberry is a Technical Editor @Twilio. Get in touch with him if you’d like to contribute your own post on the Twilio blog to help other developers build better .NET Core software.


Related Resources
Twilio Docs
From APIs to SDKs to sample apps
API reference documentation, SDKs, helper libraries, quickstarts, and tutorials for your language and platform.
Resource Center
The latest ebooks, industry reports, and webinars
Learn from customer engagement experts to improve your own communication.
Ahoy
Twilio's developer community hub
Best practices, code samples, and inspiration to build communications and digital engagement experiences.