Creating Customer Notifications with JIRA, GreenHopper, Zapier and Twilio SMS
Time to read: 7 minutes
November 09, 2012
Written by


This is a guest post from Nicholas Muldoon, a GreenHopper & Agile Expert for Atlassian, the good people behind JIRA. Nick details how integrate webhooks in JIRA with Twilio SMS to notify customers when their service request needs attention. You can find the original post on Atlassian’s blog and follow Nicholas’ blog here.
In this article we will explore how a customer service team can resolve requests faster by updating customers of issue progress using SMS. This customer service team uses JIRA and GreenHopper to manage all customer requests, and with the introduction of Webhooks in JIRA 5.2 they have extended their workflow to integrate with a third-party SMS service.
Why SMS customers?! Instant gratification makes people happy. The faster the team can update a customer and let them know of a proposed solution, the happier the customer is. And we all want happy customers!
If you are not familiar with using JIRA and GreenHopper to manage a service desk add a calendar reminder to watch Scaling a Global Support Team to Resolve 1,500 Requests a Week Using Kanban and GreenHopper. In that presentation from Summit 2012 Chris LePetit of the Atlassian Support Team gives a great overview of how they implemented GreenHopper and Kanban for tremendous gain.
Anyway, on with the story, how did this team lower the time to resolution? Let’s take a look.
Okay, so there are a couple of moving pieces in that video. We’ve got JIRA 5.2 and GreenHopper 6, plus third-party services Zapier and Twilio:
- Zapier is the link that ties JIRA and Twilio together. You can use Zapier for any number of things as they support hundreds of applications.
- Twilio provides the SMS service. You can also use Twilio to receive SMS’s (for instance, update the issue via SMS) and Voice services.
Now, the steps to put this workflow together:
Requirements
Make sure you have JIRA 5.2 and GreenHopper 6 installed.
Sign up for trial accounts for Zapier and Twilio.
Create your first Zap
A Zap is the piece in Zapier that links JIRA to Twilio. We will create a Zap with the JIRA web hook on the left and Twilio on the right as the flow is from left to right. What we pass in on the left from JIRA will be sent through to the application on the right, Twilio.
A web hook is a URL that an application can send information to, or receive information from. With web hooks we automate the sharing of information between applications.


When you are ready press “Create the Zap”.
Congrats, your first Zap has now been created!
Create a new Webhook
Copy the web hook URL of your Zap from Zapier:


Press create and you’ve got your first JIRA web hook. Ta-da!
Set up the JIRA workflow
In this example we have four columns configured using the GreenHopper Simplified Workflow:
- incoming customer service requests show up in To Do, using a first in, first out approach to priority
- In Progress shows what the team is currently working on
- Waiting for Customer is a queue state, when a customer service representative is waiting on a response from the customer the issue lives in this column
- finally, when the work is complete it is dragged into the Done column (or the customer transitions the issue to Done on their end via the JIRA View Issue page)

If you don’t have a Waiting for Customer column on your own board then create one via Tools -> Configuration -> Columns -> Add Column. If you are not on the GreenHopper Simplified Workflow you may want to start with a sample project to test this before switching over your production workflow.
We now need to add a post-function to the JIRA workflow transition “Waiting for Customer”. Find your workflow under JIRA Administration and create a draft workflow so we can edit it.
You can see here that we are using the GreenHopper Simplified Workflow:


We now have a workflow that will call the JIRA web hook when an issue is transitioned into the Waiting for Customer column on our GreenHopper board.
Before we do that though we actually need to get the customers mobile/cell phone number so we can SMS them.
Get the customers phone number
One other piece we have to set up in JIRA is a custom field to capture the customers phone number. This is where we will send the SMS notifying the customer that their request is ready for review.
To do this go to JIRA Administration and find Custom Fields. Then create a new Custom Field of type “Text Field (<255 characters)” and add it to the Default Screen for your support project:

You can also add a description along the lines of the following: “If you would like updates on this issue delivered to your mobile/cell phone please enter it here. Use the format +COUNTRY_CODE \[AREA CODE\] NUMBER. For example, +1 415 568 7064.”
Now, when a customer creates a new issue in JIRA now we can prompt them for their phone number.

Set up Twilio
We’re coming full circle now, in the home stretch!
The next step is setting up Twilio so actually send the SMS to the customers phone number. Go to you Zap in Zapier and on the right hand side you’ll see an option to “Add Your Twilio Account”.
Zapier requires the following information from Twilio:


That’s it for the Twilio piece at this stage. Very easy, very nifty service.
Test
We now need to head back to JIRA and transition an issue into the Waiting for Customer column on the GreenHopper board. This will send some sample data through to Zapier that we will use to map fields on the JIRA issue (customer request) to the SMS message we send the customer.


We can see here the issue key, PSP-3, and other fields.
Now, here comes the really cool bit!
Compose the SMS
Since we have tested the web hook, Zapier now has some issue data from JIRA that we can use to create the SMS.
We can drag and drop fields from the JIRA issue (on the left) into the SMS that Twilio will send (on the right).

You’ll want to select your own Twilio number in the “From Number” field on the right. Then you can use the common fields below to compose the message, or choose from the long list in Zapier.
|
JIRA Issue Field
|
Example
|
Variable for SMS
|
|---|---|---|
| Issue Key | PSP-3 | {{issue__key}} |
| Summary | Help me upgrade my database | {{issue__fields__summary}} |
| Phone Number | +1 415 568 7064 | Depends on instance, looks something like {{issue__fields__customfield_10006}} |
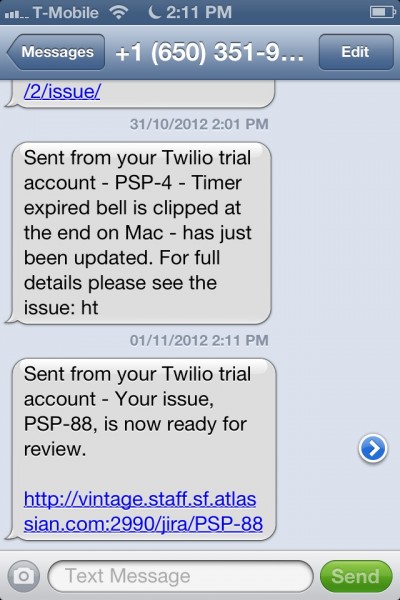
For example, your final message may look like:

It’s Alive!
The final step is to enable the Zap in Zapier and test it. Click “Enable and sync new data”.

Voila! You’re done. Your customers are now being notified immediately when their request is ready for review, helping resolve their request faster and making them a happier customer.
You can test out JIRA free for 30 days right here.
Advanced Tips
- Use a JQL validation to ensure that the Webhook is only called when the customer has entered a Phone Number. Alternatively, pull in existing customer information via the nFeed add-on for JIRA.
- For those of you that want the full service desk experience you can install the JIRA Workflow Sharing Plugin and then the IT Service Desk (ITIL) workflow bundle.

Related Resources
Twilio Docs
From APIs to SDKs to sample apps
API reference documentation, SDKs, helper libraries, quickstarts, and tutorials for your language and platform.
Resource Center
The latest ebooks, industry reports, and webinars
Learn from customer engagement experts to improve your own communication.
Ahoy
Twilio's developer community hub
Best practices, code samples, and inspiration to build communications and digital engagement experiences.