Send SMS and MMS Messages From the ESP8266 in C++

January 25, 2017
Written by
Paul Kamp
Twilion

esp8266-sms

Today we'll coax an ESP8266 to send MMS and SMS messages using C++ and the Arduino IDE.  You'll need an ESP-8266 set up for the Arduino IDE, a serial connection (most likely with a serial to USB adapter or module on-board) and a friendly open, WEP or WPA (1 or 2) wireless network.

Read on, we're going to merge the Internet of Things with the Twilio API!

Sign Into - or Sign Up For - a Twilio Account

Either create a new Twilio account (sign up for a free Twilio trial here), or sign into your existing Twilio account.

Find or Purchase a SMS (and MMS) Capable Number

For this demo, you'll either need to use an SMS and MMS enabled number you own, or purchase a new one with the necessary capabilities.  

First, enter the Twilio Console.  Second, select the hash tag/Phone Numbers ('#') section on the left side, and navigate to your current active numbers.  

Under 'Capabilities', you will see the functions you'll be able to use with your Twilio phone numbers.  For this article, you'll need numbers with either SMS or both SMS and MMS capabilities. 


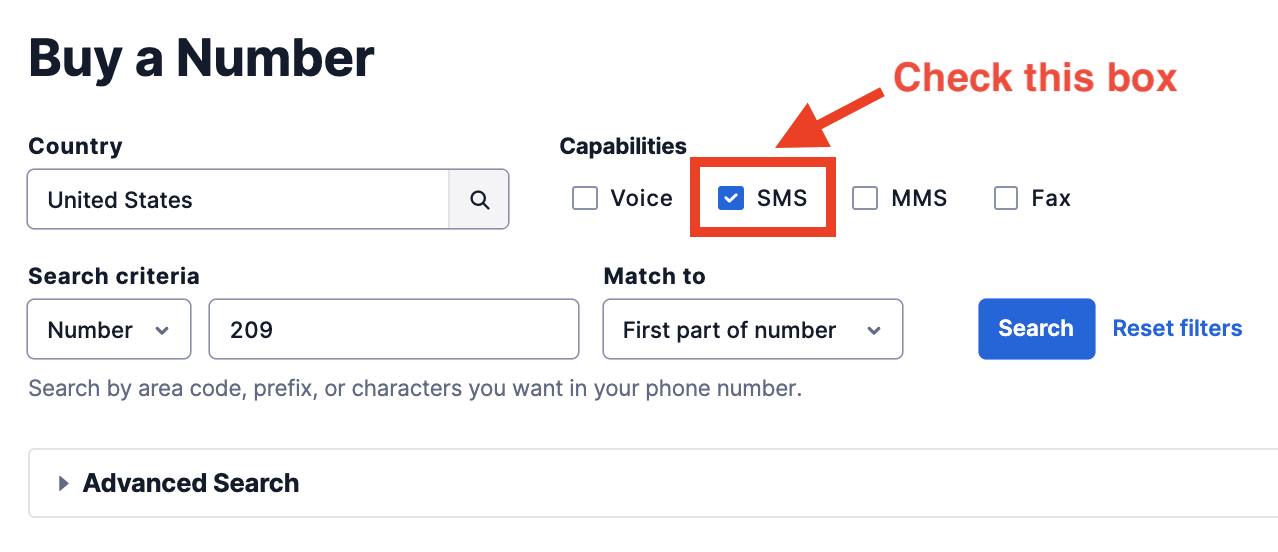
If you don't currently have a number with SMS or MMS, you'll need to purchase one.  After navigating to the 'Buy a Number' link, click the SMS - and optionally the MMS - checkbox.

Buy a Number.png


Prerequisites for This ESP8266 MMS and SMS in C++ Guide

Espressif's ESP8266, sometimes found on boards costing as little as $2, is an amazing base for your IoT project. As it boasts TLS 1.2 support, we're excited to share an example of sending messages using the ESP8266 and the Twilio API.

Hardware development introduces many more variables than software development. We'll do our best to help guide you during the setup stage.  While we unfortunately can't test every setup, please comment if you run into issues.  We - and perhaps other readers - will do our best to help break through any roadblocks.

Board Selection

While it would be impossible to enumerate every ESP8266 board variation that would work with this guide, the repository for Arduino on ESP8266 has a nice list of tested boards.  We'd suggest that you select one of those if you haven't yet picked a dev board. The ESP-8266 12-E variants such as this one work well.

When I first built this, we used a Sparkfun Thing and Sparkfun's Basic FTDI breakout for programming. The Thing overloads the DTR pin and won't work when programming and connected to the serial monitor. For most boards you don't need to touch the serial #define s in the code.

But if you do: you can disable or enable software serial by changing the #define USE_SOFTWARE_SERIAL in Twilio_ESP8266_Example.ino.

Arduino IDE

Using the Arduino IDE with the ESP8266 helps us eliminate some of the variables inherent in this type of project. The ESP-8266 Arduino tie-in includes the Xtensa gcc toolchain, provides the Arduino libraries, and makes it easy to program the ESP-8266.

If you choose to rewrite the code to forego the assumed Arduino environment (perhaps for Espressif's SDK), the most important steps will be to eliminate dependencies on Arduino Strings and making sure you connect to api.twilio.com:443 using TLS 1.2. This is beyond the scope of this guide, but please share any success you have in the comments.

Building the ESP8266 MMS and SMS Example

(Note that this project has been extended in the receiving and replying to messages from the ESP8266 guide, here)

After cloning this project from our GitHub repository, you'll have to gather some credentials before you send your first message. At the top of Twilio_ESP8266_Example.ino we set up a number of globals for connecting to your WiFi network, verifying the SHA1 signature of api.twilio.com (we will be watching for CA verification on the ESP8266), and sending messages with your Twilio account.  

Note that embedding your credentials on a hardware device is only acceptable for prototyping and when you will always retain physical possession of your device. If your device will be in the field, you must use revocable keys or other reversible authentication.

Here is the section you will need to edit:

This is a migrated tutorial. Clone the original code from https://github.com/TwilioDevEd/twilio_esp8266_arduino_example/

/*
 * Twilio SMS and MMS on ESP8266 Example.
 */

#include <ESP8266WiFi.h>
#include <WiFiClientSecure.h>
#include <ESP8266WebServer.h>

#include "twilio.hpp"

// Use software serial for debugging?
#define USE_SOFTWARE_SERIAL 0

// Print debug messages over serial?
#define USE_SERIAL 1

// Your network SSID and password
const char* ssid = "The_Sailboat";
const char* password = "club848!";

// Find the api.twilio.com SHA1 fingerprint, this one was valid as 
// of July 2020. This will change, please see 
// https://www.twilio.com/docs/sms/tutorials/how-to-send-sms-messages-esp8266-cpp
// to see how to update the fingerprint.
const char fingerprint[] = "BC B0 1A 32 80 5D E6 E4 A2 29 66 2B 08 C8 E0 4C 45 29 3F D0";

// Twilio account specific details, from https://twilio.com/console
// Please see the article: 
// https://www.twilio.com/docs/guides/receive-and-reply-sms-and-mms-messages-esp8266-c-and-ngrok

// If this device is deployed in the field you should only deploy a revocable
// key. This code is only suitable for prototyping or if you retain physical
// control of the installation.
const char* account_sid = "ACXXXXXXXXXXXXXXXXXXXXXXXXXXXXXXXXXX";
const char* auth_token = "Your AUTH TOKEN";

// Details for the SMS we'll send with Twilio.  Should be a number you own 
// (check the console, link above).
String to_number    = "+18005551212";
String from_number = "+18005551212";
String message_body    = "Hello from Twilio and the ESP8266!";

// The 'authorized number' to text the ESP8266 for our example
String master_number    = "+18005551212";

// Optional - a url to an image.  See 'MediaUrl' here: 
// https://www.twilio.com/docs/api/rest/sending-messages
String media_url = "";

// Global twilio objects
Twilio *twilio;
ESP8266WebServer twilio_server(8000);

//  Optional software serial debugging
#if USE_SOFTWARE_SERIAL == 1
#include <SoftwareSerial.h>
// You'll need to set pin numbers to match your setup if you
// do use Software Serial
extern SoftwareSerial swSer(14, 4, false, 256);
#else
#define swSer Serial
#endif

/*
 * Callback function when we hit the /message route with a webhook.
 * Use the global 'twilio_server' object to respond.
 */
 void handle_message() {
        #if USE_SERIAL == 1
        swSer.println("Incoming connection!  Printing body:");
        #endif
        bool authorized = false;
        char command = '\0';

        // Parse Twilio's request to the ESP
        for (int i = 0; i < twilio_server.args(); ++i) {
                #if USE_SERIAL == 1
                swSer.print(twilio_server.argName(i));
                swSer.print(": ");
                swSer.println(twilio_server.arg(i));
                #endif

                if (twilio_server.argName(i) == "From" and 
                    twilio_server.arg(i) == master_number) {
                    authorized = true;
                } else if (twilio_server.argName(i) == "Body") {
                        if (twilio_server.arg(i) == "?" or
                            twilio_server.arg(i) == "0" or
                            twilio_server.arg(i) == "1") {
                                command = twilio_server.arg(i)[0];
                        }
                }
        } // end for loop parsing Twilio's request

        // Logic to handle the incoming SMS
        // (Some board are active low so the light will have inverse logic)
        String response = "<?xml version=\"1.0\" encoding=\"UTF-8\"?>";
        if (command != '\0') {
                if (authorized) {
                        switch (command) {
                        case '0':
                                digitalWrite(LED_BUILTIN, LOW);
                                response += "<Response><Message>"
                                "Turning light off!"
                                "</Message></Response>";
                                break;
                        case '1':
                                digitalWrite(LED_BUILTIN, HIGH);
                                response += "<Response><Message>"
                                "Turning light on!"
                                "</Message></Response>";
                                break;
                        case '?':
                        default:
                                response += "<Response><Message>"
                                "0 - Light off, 1 - Light On, "
                                "? - Help\n"
                                "The light is currently: ";
                                response += digitalRead(LED_BUILTIN);
                                response += "</Message></Response>";
                                break;               
                        }
                } else {
                        response += "<Response><Message>"
                        "Unauthorized!"
                        "</Message></Response>";
                }

        } else {
                response += "<Response><Message>"
                "Look: a SMS response from an ESP8266!"
                "</Message></Response>";
        }

        twilio_server.send(200, "application/xml", response);
}

/*
 * Setup function for ESP8266 Twilio Example.
 * 
 * Here we connect to a friendly wireless network, set the time, instantiate 
 * our twilio object, optionally set up software serial, then send a SMS 
 * or MMS message.
 */
void setup() {
        WiFi.begin(ssid, password);
        twilio = new Twilio(account_sid, auth_token, fingerprint);

        #if USE_SERIAL == 1
        swSer.begin(115200);
        while (WiFi.status() != WL_CONNECTED) {
                delay(1000);
                swSer.print(".");
        }
        swSer.println("");
        swSer.println("Connected to WiFi, IP address: ");
        swSer.println(WiFi.localIP());
        #else
        while (WiFi.status() != WL_CONNECTED) delay(1000);
        #endif

        // Response will be filled with connection info and Twilio API responses
        // from this initial SMS send.
        String response;
        bool success = twilio->send_message(
                to_number,
                from_number,
                message_body,
                response,
                media_url
        );

        // Set up a route to /message which will be the webhook url
        twilio_server.on("/message", handle_message);
        twilio_server.begin();

        // Use LED_BUILTIN to find the LED pin and set the GPIO to output
        pinMode(LED_BUILTIN, OUTPUT);

        #if USE_SERIAL == 1
        swSer.println(response);
        #endif
}


/* 
 *  In our main loop, we listen for connections from Twilio in handleClient().
 */
void loop() {
        twilio_server.handleClient();
}

After that, building the example should be as simple as hitting the 'Upload' button in the Arduino IDE.  

If all goes well, you should get a text message with the content of the message_body variable. If all goes poorly, we've included sample code to debug with SoftwareSerial; depending on your board and setup you will likely need to change it or use the defult Serial library. Here are the first steps of an example (successful) debugging session with SoftwareSerial:

```
Connected to WiFi, IP address: 
192.168.1.155
Connecting to host api.twilio.com
Certificate fingerprints match.
Sending http POST: 
POST /2010-04-01/Accounts/ACXXXXXXXXXXXXXXXXXXXXXXXXXX/Messages HTTP/1.1
Authorization: Basic BASE64ENCODEDSTRINGHERE
Host: api.twilio.com
Cache-control: no-cache
User-Agent: ESP8266 Twilio Example
Content-Type: application/x-www-form-urlencoded
Content-Length: 72
Connection: close

To=+18005551212&From=+18005551212&Body=Hello+from+Twilio+and+the+ESP8266
```

If you are careful, the most common reason the message will fail is because the certificate is updated. This next section explains how to update the fingerprint.

Dealing with message failure

Every year, api.twilio.com refreshes its certificate – which means you have a new fingerprint to update. You can find the new fingerprint in a few ways, but two quick ones are using a browser or using openssl in the command line of a *NIX system.

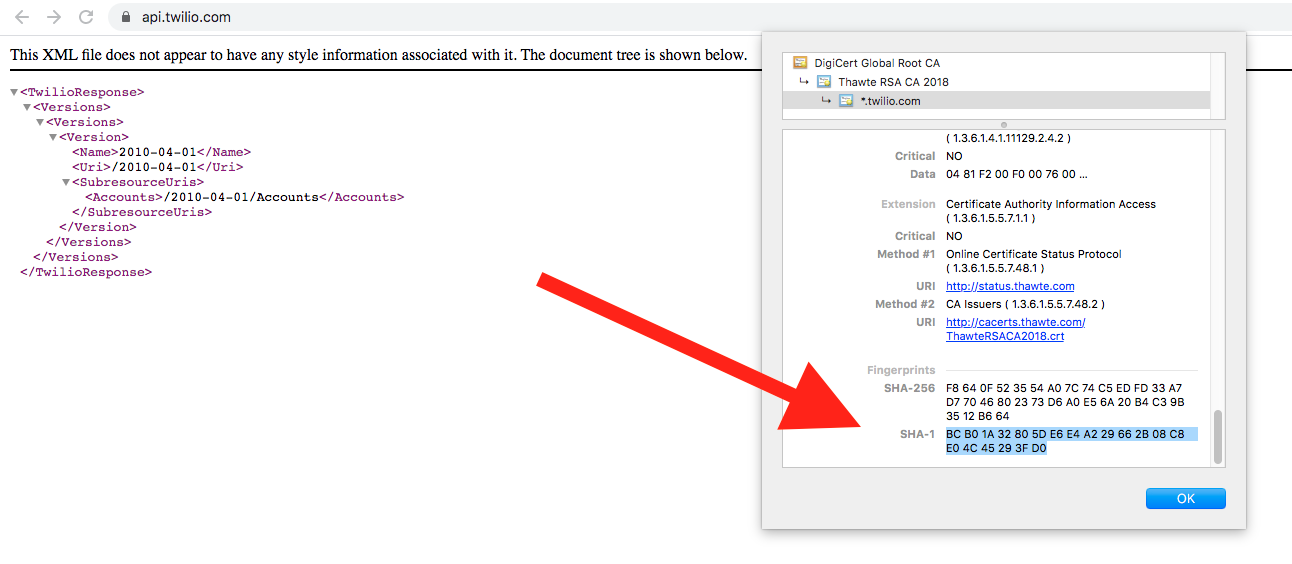
Find the api.twilio.com fingerprint from a web browser

To find the fingerprint from a web browser, from your computer or laptop visit api.twilio.com. Inspect the certificate for *.twilio.com, and scroll down to SHA-1 fingerprint.

Here is how it looks in Chrome (screenshot in July 2020):

SHA-1 fingerprint for api.twilio.com in Chrome

Copy the hex characters and add them in the const char fingerprint[] = line in the .ino file.

Find the api.twilio.com fingerprint from the command line

Alternatively, if you have openssl on your system you can get the fingerprint without opening a browser. Run the following line on the command line:

openssl s_client -connect api.twilio.com:443 < /dev/null 2>/dev/null | openssl x509 -fingerprint -noout -in /dev/stdin | sed -En "s/SHA1 Fingerprint=//p" | sed "s/:/ /g"

The result you get will look like this:

BC B0 1A 32 80 5D E6 E4 A2 29 66 2B 08 C8 E0 4C 45 29 3F D0

Copy the hex characters and add them in the const char fingerprint[] = line in the .ino file.

Sending a Message with the ESP8266

Since we'll be hitting the Twilio REST API directly, this code has some superficial similarities to our SMS in C and C++ examples. Of course, without a library like libcurl abstracting away the finer details, we have to write some lower level code. You'll note that we've included code to connect to a WiFi network and verify the SHA1 signature of api.twilio.com.

Most starkly, however, we're crafting a HTTP POST manually:

#include "twilio.hpp"

/*
 * Send a SMS or MMS with the Twilio REST API
 *
 * Inputs:
 *  - to_number : Number to send the message to
 *  - from_number : Number to send the message from
 *  - message_body : Text to send in the message (max 1600 characters)
 *  - picture_url : (Optional) URL to an image
 *
 * Outputs:
 *  - response : Connection messages and Twilio responses returned to caller
 *  - bool (method) : Whether the message send was successful
 */
bool Twilio::send_message(
        const String& to_number,
        const String& from_number,
        const String& message_body,
        String& response,
        const String& picture_url)
{
        // Check the body is less than 1600 characters in length.  see:
        // https://support.twilio.com/hc/en-us/articles/223181508-Does-Twilio-support-concatenated-SMS-messages-or-messages-over-160-characters-
        // Note this is only checking ASCII length, not UCS-2 encoding; your
        // application may need to enhance this.
        if (message_body.length() > 1600) {
                response += "Message body must be 1600 or fewer characters.";
                response += "  You are attempting to send ";
                response += message_body.length();
                response += ".\r\n";
                return false;
        }

        // URL encode our message body & picture URL to escape special chars
        // such as '&' and '='
        String encoded_body = urlencode(message_body);

        // Use WiFiClientSecure class to create TLS 1.2 connection
        WiFiClientSecure client;
        client.setFingerprint(fingerprint.c_str());
        const char* host = "api.twilio.com";
        const int   httpsPort = 443;

        // Use WiFiClientSecure class to create TLS connection
        Serial.print("connecting to ");
        Serial.println(host);
        
        Serial.printf("Using fingerprint '%s'\n", fingerprint.c_str());

        // Connect to Twilio's REST API
        response += ("Connecting to host ");
        response += host;
        response += "\r\n";
        if (!client.connect(host, httpsPort)) {
                response += ("Connection failed!\r\n");
                return false;
        }

        // Check the SHA1 Fingerprint (We will watch for CA verification)
        if (client.verify(fingerprint.c_str(), host)) {
                response += ("Certificate fingerprints match.\r\n");
        } else {
                response += ("Certificate fingerprints don't match.\r\n");
                return false;
        }

        // Attempt to send an SMS or MMS, depending on picture URL
        String post_data = "To=" + urlencode(to_number) + "&From=" + urlencode(from_number) + \
        "&Body=" + encoded_body;
        if (picture_url.length() > 0) {
                String encoded_image = urlencode(picture_url);
                post_data += "&MediaUrl=" + encoded_image;
        }

        // Construct headers and post body manually
        String auth_header = _get_auth_header(account_sid, auth_token);
        String http_request = "POST /2010-04-01/Accounts/" +
                              String(account_sid) + "/Messages HTTP/1.1\r\n" +
                              auth_header + "\r\n" + "Host: " + host + "\r\n" +
                              "Cache-control: no-cache\r\n" +
                              "User-Agent: ESP8266 Twilio Example\r\n" +
                              "Content-Type: " +
                              "application/x-www-form-urlencoded\r\n" +
                              "Content-Length: " + post_data.length() +"\r\n" +
                              "Connection: close\r\n" +
                              "\r\n" + post_data + "\r\n";

        response += ("Sending http POST: \r\n"+http_request);
        client.println(http_request);

        // Read the response into the 'response' string
        response += ("request sent");
        while (client.connected()) {
        String line = client.readStringUntil('\n');
        response += (line);
        response += ("\r\n");
        }
        response += ("closing connection");
        return true;
}

/* Private function to create a Basic Auth field and parameter */
String Twilio::_get_auth_header(const String& user, const String& password) {
        size_t toencodeLen = user.length() + password.length() + 2;
        char toencode[toencodeLen];
        memset(toencode, 0, toencodeLen);
        snprintf(
                toencode,
                toencodeLen,
                "%s:%s",
                user.c_str(),
                password.c_str()
        );

        String encoded = base64::encode((uint8_t*)toencode, toencodeLen-1);
        String encoded_string = String(encoded);
        std::string::size_type i = 0;

        // Strip newlines (after every 72 characters in spec)
        while (i < encoded_string.length()) {
                i = encoded_string.indexOf('\n', i);
                if (i == -1) {
                        break;
                }
                encoded_string.remove(i, 1);
        }
        return "Authorization: Basic " + encoded_string;
}

We also need to do a number of other things not required (or abstracted away) on the desktop. You'll note that we've included code to base64 encode your ACCOUNT_SID and AUTH_TOKEN for HTTP Basic Authentication. Additionally, we've included Steve Nelson's URL encoding and decoding functions to escape special characters in the SMS or MMS body.  Ensure that your eventual application has similar functions, and your own IoT Thing will work right the first time.

From the Internet of Things to the Pockets of Everyone with Twilio

The ESP8266 is a great chip which can act as the brain of your next IoT project, even without much external silicon. If you'd like to add telephone connectivity to your next project but a *NIX single board computer is too heavy, it's nice to know you've got alternatives.

For whatever you're building next - a monitoring tool, a must-buy wearable, a home automation product - add phone interoperability on the cheap (and with reasonable security) with ESP8266 and the Twilio API.