How to Encrypt and Decrypt Messages in Laravel
Time to read:

In today's digital world, data security is of utmost importance. Web applications often deal with sensitive information that needs to be protected from unauthorized access. Laravel, a popular PHP framework, provides convenient methods for encrypting and decrypting data using the Crypt facade. This tutorial will show you how to use the Crypt facade to secure messages in Laravel applications.
Prerequisites
To successfully run the example and perform message encryption and decryption using Laravel's Crypt facade, you need the following:
- The Laravel installer. You can refer to the Laravel documentation for detailed instructions on how to install Laravel.
- PHP 8.2
Why is encryption important?
Encryption plays an essential role in data security because it helps to protect data from unauthorized access. It works by converting data into an unreadable format, known as ciphertext, which allows only authorized users with the decryption key to convert it back into its original readable format, known as plaintext.
There are many different types of encryption algorithms, each with its own strengths and weaknesses. Some of them include:
- AES (Advanced Encryption Standard): AES is a symmetric encryption algorithm that is considered to be very secure. It is used by governments and businesses around the world to protect sensitive data.RSA (Rivest–Shamir–Adleman): RSA is an asymmetric encryption algorithm that is used for digital signatures and key exchange. SSL (Secure Sockets Layer): SSL is a cryptographic protocol that is used to secure communications over the internet. It is used by websites to protect user data, such as passwords and credit card numbers.
Laravel encryption basics
Before diving into the encryption process, it's essential to understand the basics of Laravel's encryption features and its configuration settings. Laravel supports symmetric encryption, where the same key is used for both encryption and decryption. It utilizes PHP's OpenSSL extension, making it compatible with multiple encryption algorithms like AES-256-CBC, AES-128-CBC, and more. These algorithms provide strong encryption for data protection.
Configuring encryption settings in Laravel involves updating the config/app.php file. Here, you can define the default encryption algorithm, specify the encryption key, and configure other encryption-related settings.
Overview of the Crypt facade
The Crypt facade in Laravel offers a simple and consistent API for encrypting and decrypting data. It provides a range of methods for encrypting and decrypting data, including the encrypt() and decrypt() methods. The Crypt facade uses a strong encryption algorithm, such as AES-256, to encrypt and decrypt data. This ensures that the data is protected from unauthorized access.
To use the Crypt facade, simply reference it using the Crypt alias:
Generating an encryption key
Before diving into message encryption, it is important to generate a unique encryption key. This key ensures the confidentiality and security of the encrypted data. Laravel simplifies the key generation process by providing an Artisan command. To generate an encryption key, open your terminal and run the following command:
The new encryption key is stored in the .env file. The app/config/app.php file then loads the encryption key from the .env file. of your Laravel application. If you do not run the command, Laravel will use a default encryption key. However, this default encryption key is not secure.
Encrypting a message
To encrypt a message you use the encrypt method. Let's consider an example where we want to encrypt a user's email address. Here's what the code would look like:
In the above code, we first import the Crypt facade, and then we encrypt a message using the encrypt() method. The resulting encrypted message is stored in the $encryptedMessage variable.
Decrypting a message
To decrypt an encrypted message you use the decrypt method. Following our previous example, let's decrypt the encrypted message:
In the code snippet above, we utilize the decrypt() method to decrypt the contents of the $encryptedMessage variable, resulting in the original email address stored in $decryptedMessage.
Example application: encrypting and decrypting a message
To demonstrate the usage of the Crypt facade for encrypting and decrypting messages, let's consider a simple Laravel application with a form where users can enter a message, and the application will encrypt and display the encrypted message.
Set up the project
Create a new Laravel project and change into the project by running the following commands in your terminal:
Create the encryption controller
The next step is to generate a new controller called EncryptionController by running the following command:
Once we’ve done that, open it up (app/Http/Controllers/EncryptionController.php) and replace the code with the following:
Let’s break it down and explain what it does:
- The
encrypt()method accepts aRequestobject as a parameter, which represents the incoming HTTP request, and retrieves themessageparameter from it using the call to$request->input('message'). - The retrieved message is then encrypted using the
Crypt::encrypt()method, provided by the Crypt facade. The encrypted message is assigned to the$encryptedMessagevariable. - The method then redirects back to the
'/'route usingredirect('/')and attaches the encrypted message to the session using thewith()method, making it available for display on the page. - The
decrypt()method similar to theencrypt()method accepts aRequestobject, retrieves theencrypted_messageinput, and decrypts it using theCrypt::decrypt()method.
The decrypted message is assigned to the $decryptedMessage variable, and then the method redirects back to the '/' route, attaching the decrypted message to the session.
Define the routes
Open the routes/web.php file and replace the existing code with the following:
Create the view
The last thing we’ll be doing in this example is to create our form. In the resource/view directory, create a file called encrypt.blade.php and inside it, add the following:
All done! Let’s start the Laravel application by running the following command:
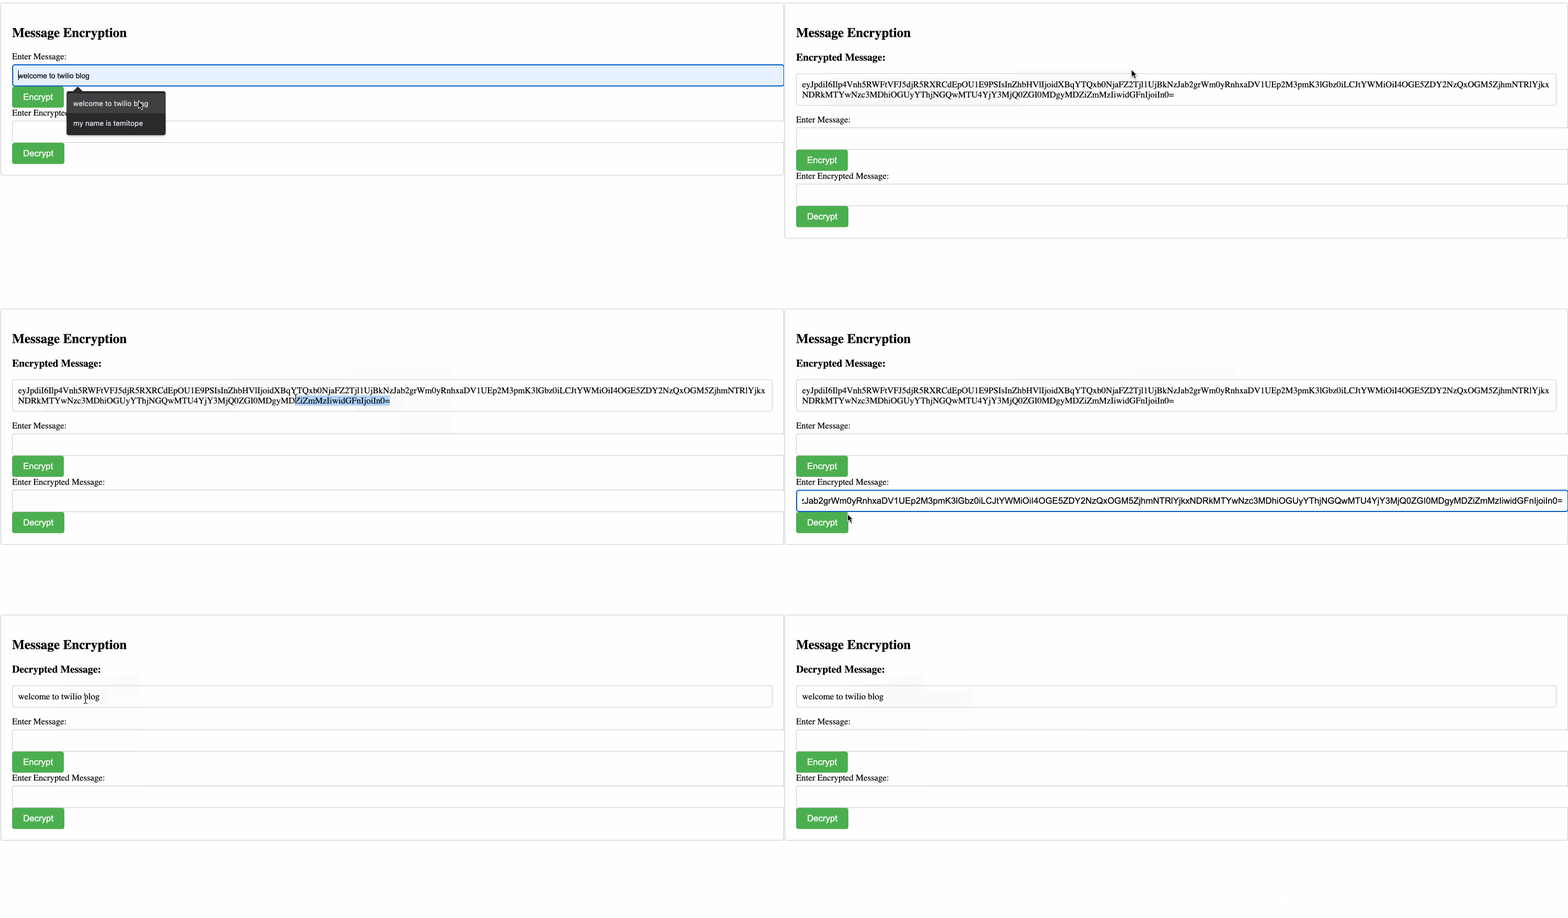
Then, open your browser and navigate to http://localhost:8000. You should see the message encryption form. Enter a message in the "Enter Message" field and click the Encrypt button. The page will refresh and you will see the encrypted message displayed. Copy the encrypted message, paste it into the "Enter Encrypted Message" field, and click the Decrypt button. The page will refresh again, and you will see the decrypted message displayed.

Congratulations! You have successfully created an application that uses the Crypt facade to encrypt and decrypt messages in Laravel.
Conclusion
Data security is critical to web application development, and Laravel provides robust encryption features to protect sensitive information. By following the steps outlined in this , you can effectively encrypt and decrypt messages in Laravel.
Remember to implement best practices, such as protecting encryption keys, using strong algorithms, and properly managing encrypted data. With Laravel's encryption capabilities, you can confidently ensure the security and integrity of your application's data.
Temitope Taiwo Oyedele is a software engineer and technical writer. He likes to write about things he’s learned and experienced.
"Privacy and Encryption" by Richard Patterson is licensed under CC BY 2.0.
Related Posts
Related Resources
Twilio Docs
From APIs to SDKs to sample apps
API reference documentation, SDKs, helper libraries, quickstarts, and tutorials for your language and platform.
Resource Center
The latest ebooks, industry reports, and webinars
Learn from customer engagement experts to improve your own communication.
Ahoy
Twilio's developer community hub
Best practices, code samples, and inspiration to build communications and digital engagement experiences.


