How to Build a Linear Regression Model Using Twilio SMS and Python
Time to read:
August 03, 2022
Written by
Reviewed by

Linear regression is a common and useful approach for modeling the relationship between a dependent variable and one or more independent variables. Its use spans many applications, such as economics, medicine, and science. Whether you're an expert in a lab or a beginner on a laptop, linear regression is a way to achieve valuable results built on relatively simple formulas.
In this tutorial, you will implement a linear regression model using Python and scikit-learn. To add more functionality, you will use Flask and Twilio's Programmable Messaging API to help you build your data and make predictions from the convenience of your phone.
Prerequisites
To continue with this tutorial, you will need:
- Python 3.10 or higher installed on your machine.
- A Twilio account. If you haven’t yet, sign up for a free Twilio trial.
- A Twilio phone number. After having an account, you will need to obtain a Twilio phone number. Learn how to search for and buy a Twilio phone number here.
- ngrok installed on your machine. ngrok is a useful tool for connecting your local server to a public URL. Sign up for a free account and learn how to install ngrok. If you aren't familiar with using ngrok, learn more about using ngrok here.
- A personal phone number to test this project.
Set up your project environment
Before you can dive into the code, you will need to set up the project environment on your computer. First, you should create a parent directory that holds the project. Open the terminal on your computer, navigate to a suitable directory for your project, type in the following command, and hit enter.
Next, you will need to have a place to store your data and model. There will only be, at most, one file for the data and one file for the model at a time, and these will be stored in the same directory. In the linear-regression-project directory, type in the following command to create a new directory named model.
As a part of good programming practices for Python, you should also create a virtual environment. If you are working on UNIX or macOS, run the following commands to create and activate a virtual environment. The first command creates the virtual environment, and the second command activates it.
However, if you are working on Windows, run these commands instead:
After activating your virtual environment, you should install some Python packages. For this tutorial, you will use the following packages:
- Flask to build your application.
- Twilio Python Helper Library to interact with Twilio APIs.
- Pickle to save and load the model.
- pandas to organize the data.
- scikit-learn to make the linear regression model.
To install these packages, run this command:
Your environment is set up. You are now ready to begin creating the application.
Create your linear regression module
First, you will create a python module to help you interact with and build your linear regression model. In the linear-regression-project directory, create a file named linregress.py.
Copy and paste the following code into linregress.py:
In the code snippet above, the necessary modules are imported, and the paths to the model and the data are defined. As defined in the paths, the data will be formatted as a CSV file, and the model will be formatted as a serialized pickle file.
Additionally, there will be three functions in linregress.py: update, makePrediction, and clearData. These functions interact with the data and model, and they each return information about the model as a string. Each function will be covered step-by-step below. However, the completed code for linregress.py can be found at the end of this section.
Define the update function
To help you build the data and model, you need to create a function that allows you to update the data and model. The expected requirements of this function are as follows:
- The function takes in a list.
- A precondition of the list is that it has at least two elements, and each element is numeric.
- The first element of the list is the dependent variable, and any following elements are independent variables.
- If the data hasn't been initialized yet, then we initialize it with the list that was passed into the function.
- The function fits and saves a linear regression model.
- The function returns a string with a confirmation that the model has been fitted and saved along with the training R2 value.
First, let's work on creating and loading the data. Copy and paste the following code in the linregress.py file, below where you defined the paths to the data and model:
In the code snippet above, there is an if-else statement that covers whether the data has been initialized yet. If the data already exists, then it can be initialized as a pandas DataFrame. Afterwards, the DataFrame is updated with the list that was passed in as a parameter (aList). Then, the updated DataFrame is saved as the data.csv file.
However, there is also the possibility that the data hasn't been initialized yet. If that is the case, then a DataFrame should be initialized with a list and a column header. So, the column header is created using list comprehension (see the section on list comprehensions in Python's docs on data structures). Then, both aList and columnHeader are passed in to initialize the DataFrame, and the DataFrame is saved as the data.csv file.
Next, you will need to fit the linear regression model and save the model. Copy and paste the following code below (and outside) the if-else block:
In the code snippet above, the model is fitted and saved, and the message for the user is returned. To make the linear regression model, the dependent and independent variables are defined by their respective columns. Then, a linear regression model is fitted. Afterwards, the model is saved using pickle, and the function returns a message saying that the model has been fitted and saved. The R2 value is returned as well to give the user an estimate of how well-fitted the model is.
Define the makePrediction and clearData functions
After the model is fitted, you are able to make a prediction. To do this, you can define a function that takes in a list and computes the predicted value. The expected requirements of this function are as follows:
- The function takes in a list.
- A precondition of the list is that it has at least one element, and each element is numeric.
- All the elements are dependent variables.
- The function loads the model and computes the predicted value.
Copy and paste the following code in the linregress.py file, below the update function:
Let's briefly go over the code snippet above. First, in order to make a prediction, the model must exist. So, the function first checks if the model exists before it can continue to make the prediction. If the model does exist, the saved model is loaded into the variable model. Then, the function checks if the size of the list matches the number of independent variables defined in the model. Finally, the prediction is computed and returned.
To add more functionality, the clearData function is defined to delete the data and model. Copy and paste the following code in linregress.py below the makePrediction function:
To avoid errors when deleting files, the file needs to exist. So, the function checks whether the path to the data exists (which also implies the path to the model exists). If it does exist, both the data and model can be safely deleted.
Completed linear regression module
You've completed coding the linear regression module. Your code should look something like this:
You can test this module out by running the functions directly. To see how you can use this module to build a linear regression model through text messages, continue to the section below.
Create your application
Here is the expected flow of the application:
- A user messages the Twilio phone number.
- The user can message a command that either appends data, makes a prediction, or clears the data.
- If the user does not enter the following commands or improperly formats a command, then a message is returned with instructions on how to format a command.
In the linear-regression-project directory, create a new file named app.py. To follow the expected flow, copy and paste the following code into app.py:
The code snippet above includes the import statements and some helper functions. The import statement on line 3 imports the module that you made in the previous section.
The validFormat function checks whether the string that is passed in is valid. These conditions must be satisfied for the string to be validly formatted.
- Each word or number is delimited by a space.
- The first word of each command must be "append", "predict", or "clear".
- The "append" command must have 2 or more numbers following it.
- The "predict" must have 1 or more numbers following it.
- The "clear" command must not have any numbers following it.
Additionally, the reply helper function is defined to make the code look neater. The function is used to create a TwiML MessagingResponse object so that the application can send a message back to the user.
Next, you need to define the "/sms" endpoint to provide the main functionality for the app. Copy and paste the rest of the code in app.py below the reply function:
In the code, the incoming message body is received from the request at the "/sms" URL. Then, the function uses the helper function validFormat to check if the incoming message is validly formatted. If it is not, then it returns instructions on how to format the command. Otherwise, depending on the incoming message, the appropriate function imported from the linregress module is used, so the user can update, predict, or clear the linear regression model.
However, the application is not quite done yet. Continue to the next section to figure out how to configure the webhook and how to run the application.
Set up the ngrok tunnel and webhook
If you were to run the program prematurely, you would not receive a message from the phone number. There are two things that need to be addressed. First, you need to connect your local server to a publicly accessible URL by opening up an ngrok tunnel to your local machine. Second, you need to connect the Twilio phone number to the application by using a webhook.
After having installed and authenticated ngrok on your machine, open another command prompt window, and run this command to open a tunnel to port 5000.
Afterwards, your command prompt should something look like this:
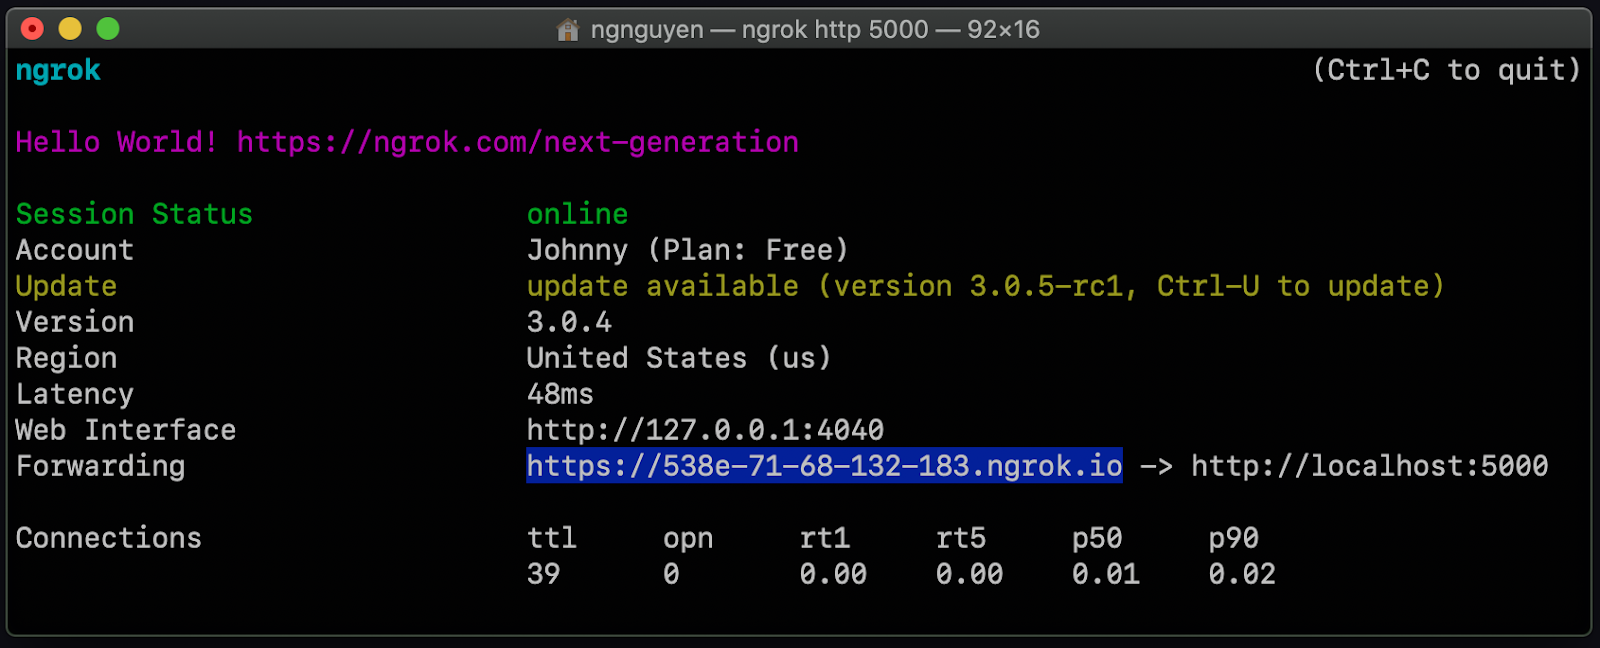
Next to the word Forwarding there should be a URL that points to https://localhost:5000. Your URL should be different than the one shown above. Copy that URL, as it will be used to set up the webhook. Leave this command prompt open.
On the left-hand side of your Twilio console, navigate to Phone Numbers > Manage > Active numbers. Clicking Active numbers will take you to the Active numbers page. Click the link for the phone number that you will be using for this application.
This will take you to the configuration page for the phone number. Scroll down to Messaging and paste the URL you copied from before to the A MESSAGE COMES IN section, and add “/sms” at the end of the URL. This is the Flask application's endpoint that the TwiML response is sent to. So your URL should be something like https://your-ngrok-url.ngrok.io/sms and should be pasted like the example below:
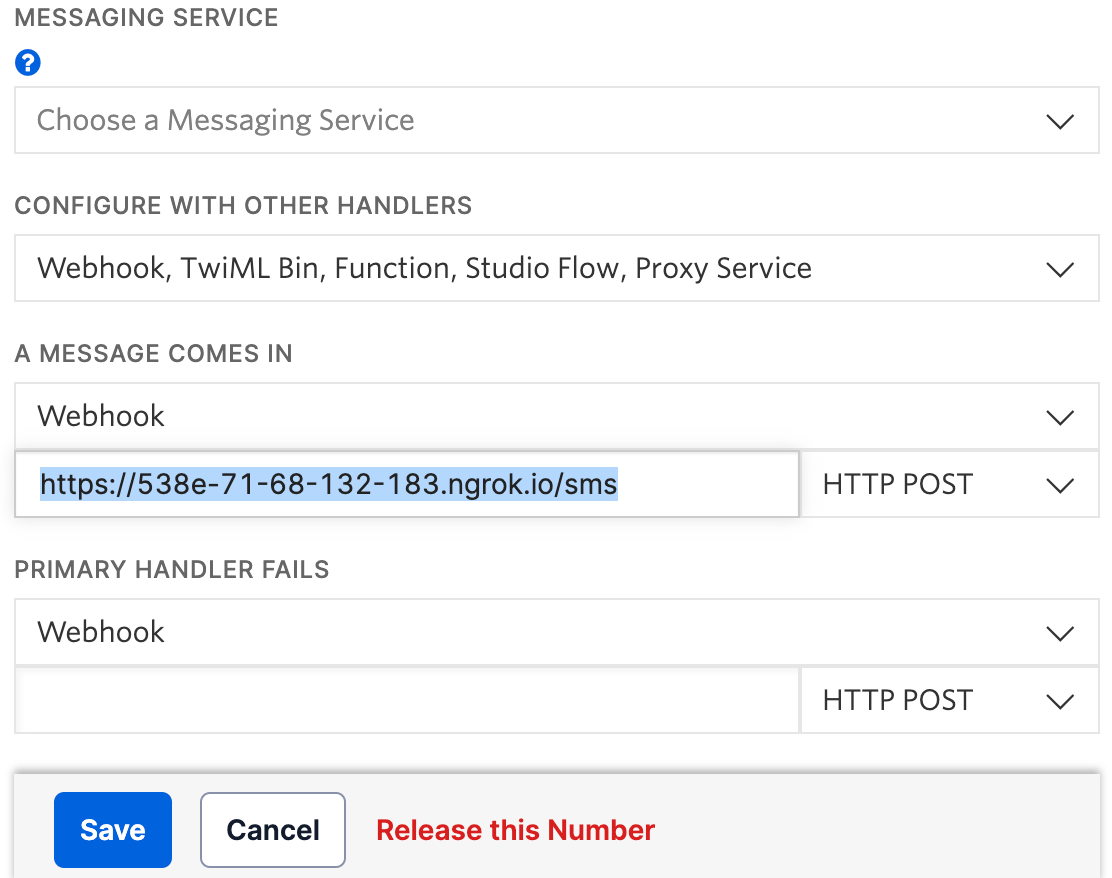
Click Save at the bottom of the page to update the number’s settings. You are now finally ready to run the application.
Run the application
To run the application, run this command in the linear-regression-project directory where the virtual environment is activated.
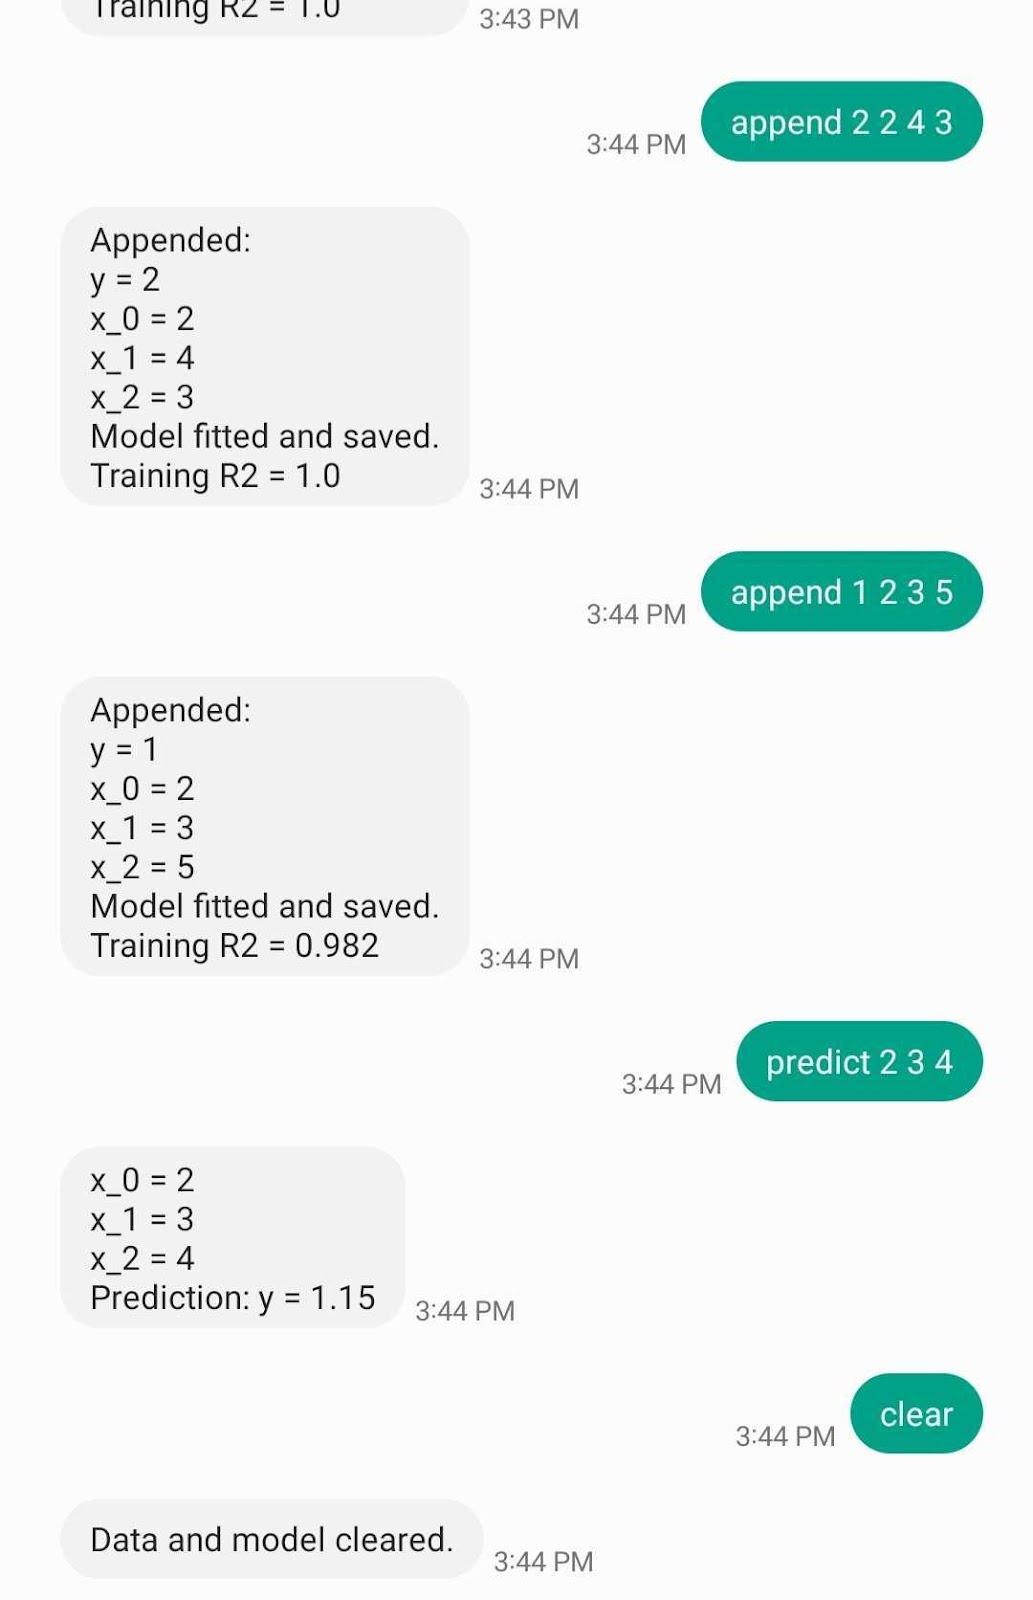
Afterwards, your application should be working properly. Whenever someone sends a text message to your Twilio phone number, the Flask application will receive a request at the /sms endpoint, and return a response depending on the user's message. Go ahead and try appending data to your linear regression model. After appending a few data points, you can make a prediction. You can use this for different applications, such as predicting rent prices or yields. Or how about doing something wacky, such as predicting the perfect watermelon based on its dimensions, density, and knock frequency? The possibilities are endless.
Conclusion
Congratulations on building an application with Twilio's Programmable Messaging API! In this tutorial, you learned how to create a linear regression Python module and used it for an SMS application that allows users to make predictions with linear regression. The application uses pandas and scikit-learn to format data and make linear regression models, being able to update, delete, and make predictions. Feel free to customize this application to your liking. For example, you could explore different types of machine learning algorithms in scikit-learn, such as a random forest regressor. Other things you could do is adapt the code for different data dimensions and type, or maybe instead of regression, you could try changing it to a classifier. Check out this list of different types of supervised learning you could perform with sci-kit learn.
Restless for more (unsupervised) learning about Twilio and Python? There's so much more you can do with Twilio and Python. To get you started, you can check out the Twilio Python Quickstart or the Twilio Python Helper Library. Even a beginner can make exciting applications using Python and Twilio SMS, such as building a sentiment analyzer for slang and emojis, learning how to forward SMS messages, or creating a travel recommendation bot.
Johnny Nguyen is an intern developer on Twilio’s Developer Voices Team. He enjoys creating fun coding projects for others to learn and enjoy. When he’s not napping or watching TikTok, he can be reached at ngnguyen [at] twilio.com.

Related Resources
Twilio Docs
From APIs to SDKs to sample apps
API reference documentation, SDKs, helper libraries, quickstarts, and tutorials for your language and platform.
Resource Center
The latest ebooks, industry reports, and webinars
Learn from customer engagement experts to improve your own communication.
Ahoy
Twilio's developer community hub
Best practices, code samples, and inspiration to build communications and digital engagement experiences.