How to Build an Interactive Voice Response System with Java Spring Boot
Time to read:
December 01, 2023
Written by
Reviewed by
In this article, you will learn how to use Twilio's Programmable Voice tools to build an IVR, or interactive voice response with speech recognition using Java and Maven.
Prerequisites
- IntelliJ IDEA Community Edition for convenient and fast Java project development work. The community edition is sufficient for this tutorial.
- Java Development Kit, Twilio Helper Library works on all versions from Java 8 up to the latest. We've used the multiline String feature from Java 15 in the code in this post, too.
- ngrok, also known as a handy utility to connect the development version of the Java application running on your system to a public URL that Twilio can connect to.
- A Twilio account. If you are new to Twilio click here to create a free account now.
- A phone capable of receiving SMS to test the project (or you can use the Twilio Dev Phone)
Set up the Project Directory
Follow the tutorial on how to start a Java Spring Boot application as a base for this project.
You can name the project after "phonetree" and create the directory structure src/main/java/com/twilio/phonetree
Create a subfolder named "ivr" on the same level as the PhonetreeApplication.java file.
Add the Twilio Dependency to the Project
Open the pom.xml file and add the following to the list of dependencies:
Create an Interactive Voice Response App
Navigate to the src/main/java/com/twilio/phonetree/ivr subfolder and create a file named IVREndpoints.java.
Start off the file with the required import statements and create a class to hold all of the endpoints for a functioning IVR:
This class is annotated with a @RestController, indicating that it will handle incoming HTTP requests and produce JSON responses.
The first endpoint that the caller will hit is /welcome which will create the Twilio Programmable Voice object. The VoiceResponse object is returned with instructions for Twilio on various actions to interact with the caller.
A new VoiceResponse.Builder() is created to build the Twilio XML response.
The gather method is used to collect user input.
The action("/menu") parameter specifies the URL to which Twilio should send the user's input.
The inputs(Gather.Input.SPEECH) indicates that the input should be collected through the caller's actual speech.
The say() function is used by Twilio to say the string message to the caller. Add the `amySay object is defined as follows:
The function currently uses the Twilio supported Amazon Polly Voice, but this can be changed to other TwiML voice attributes.
The code above will generate the following TwiML.
Build Out the IVR Menu System
Once the gather action has finished its speech recognition, Twilio makes another webhook request to /menu. In order to process the caller's response, a switch statement is used to handle each different possible case. Each case represents a different option that the caller can say out loud, and the corresponding method is called to handle that option. If none of the recognized options is found, it defaults to a welcome() method.
This switch statement processes lower case input, so the toLowerCase() function is applied to the gatheredSpeech parameter for proper input.
Copy and paste the following code below to add the `menu
The @RequestMapping annotation is used in Spring to map HTTP requests to specific methods or controllers. In this case, it indicates that this method should handle requests to the "/menu" endpoint. These methods can be called with HTTP GET or POST requests.
Allow the Caller to Respond to the IVR System
Currently the application prompts the caller to say either "collection" or "delivery" to move forward in the interactive voice response system.
Write the following code to define the functions to handle the respective cases:
However, we can spice up the IVR system by including an option to say a secret code to prompt another case.
Copy and paste the following code below to handle the case if the caller responds with "sparkles":
Use a TwiML Message Converter
Spring Web returns Java objects into JSON responses, however this project handles a lot of VoiceResponse objects, which Spring Boot is not used to handling. Thus, this article regarding how to return custom types in HTTP responses using Spring Web is here to help call the .toXml() functions to appropriately convert to TwiML.
Navigate to the TwiMLMessageConverter.java file and paste in the following code snippet:
Compile and Run the Application
If you want to double check your code matches ours, view the full code in this GitHub repository.
In your IDE, navigate to the PhonetreeApplication.java file and click on the green play button next to the public class definition and select the Run option. You can also run it in the terminal with ./mvnw spring-boot:run.
As the app is running on http://localhost:8080, expose the application to a public port such as ngrok using the command ngrok http 8080.
Ngrok is a great tool because it allows you to create a temporary public domain that redirects HTTP requests to our local port 8080. If you do not have ngrok installed, follow the instructions on this article to set up ngrok.
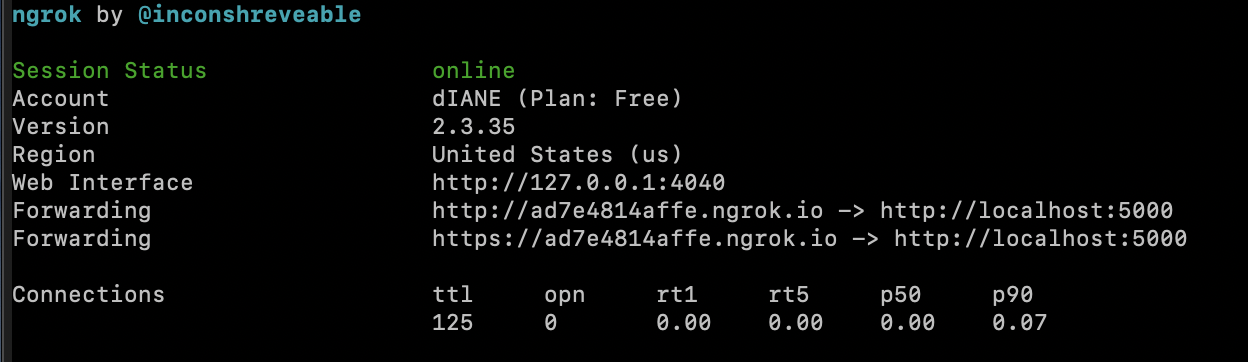
Your ngrok terminal will now look like the picture above. As you can see, there are URLs in the “Forwarding” section. These are public URLs that ngrok uses to redirect requests into our flask server.
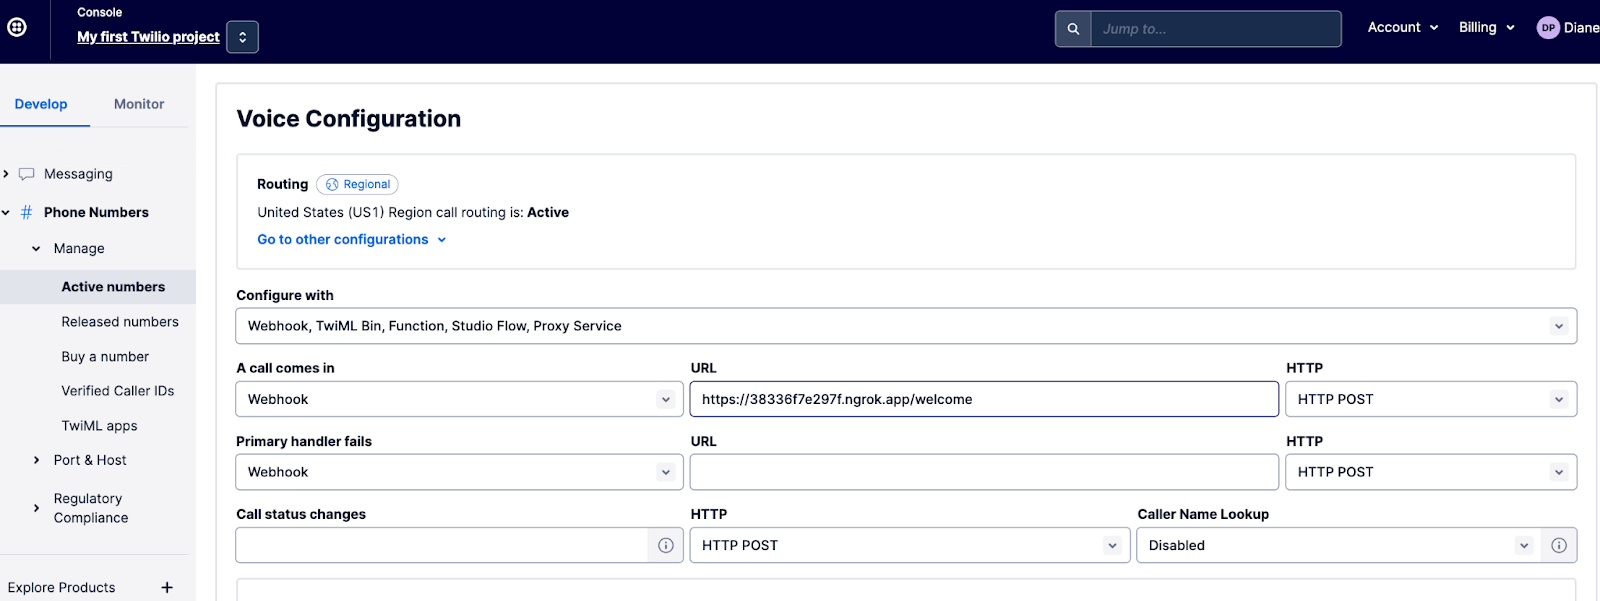
Configure Twilio Service
Go to the Twilio Console and navigate to the Phone Numbers section in order to configure the webhook.
Add the ngrok URL in the text field under the A call comes in section. Make sure the URL is in a "https://xxxx.ngrok.app/welcome" format as seen below:
Test out the Interactive Voice Response App
Grab your cellular device and dial the phone number to test out Party Cookie's hotline. It's time to fulfill your customers' sweet tooths by selling desserts to them!

What's Next for Interactive Voice Response Applications in Java?
Congratulations on building your own Party Cookie hotline!
Now that you have an IVR up and running, check out this article on how you can implement best practices for your call center.
If you are looking for a customizable product to use at scale and build faster, you can build with Flex. You can also build the IVR system with Gradle and Java Servlets instead.
For those looking to build faster with a team, consider building with Twilio Studio which requires no coding experience.
Diane Phan is a developer on the Twilio Voices team. She loves to help programmers tackle difficult challenges that might prevent them from bringing their projects to life. She can be reached at dphan [at] twilio.com or LinkedIn.
Related Posts


Related Resources
Twilio Docs
From APIs to SDKs to sample apps
API reference documentation, SDKs, helper libraries, quickstarts, and tutorials for your language and platform.
Resource Center
The latest ebooks, industry reports, and webinars
Learn from customer engagement experts to improve your own communication.
Ahoy
Twilio's developer community hub
Best practices, code samples, and inspiration to build communications and digital engagement experiences.