Building Single-Page Apps with React and Twilio Functions
Time to read:
December 08, 2020
Written by
Reviewed by

You can do all kinds of weird and wonderful things with Twilio's APIs, and if you could call those APIs from your browser you'd be able to build some awesome apps that you could use from a browser anywhere. This isn't directly possible, because the Twilio API doesn't send any CORS headers (for good reason).
A better way to use Twilio API from the browser is to implement a custom web app which accesses Twilio API. In this post I'll show how you can build such a custom web app on the Twilio Runtime platform, using Functions and Assets.
If you follow along with the code, you'll build a single-page app with a backend that is hosted on Twilio. This will let you call the Lookup API from anywhere in the world. I've chosen the Lookup API because it's relatively simple, but using the same principles you could build an app that let you use any of Twilio's APIs, and is entirely hosted by Twilio. By the way, I've also written about using the Lookup API from server-side Java code, too.
Building the Lookup App
When you create a Twilio Function Service, it is given a unique domain name. All your Functions and Assets will be callable by URLs on that domain. This means that you can serve web pages as assets and JavaScript on those pages. They will be able to call your functions without falling foul of the Same Origin Policy - so you don't need to configure Cross-Origin Resource Sharing, which can be pretty fiddly.

Setup
The Twilio Serverless Toolkit lets you build, test, and deploy Functions and Assets from your command line, taking care of a lot of the setup and configuration for you. Start by installing the Twilio CLI and Serverless Toolkit.
Now that you've got those, create a new serverless project with:
In that directory you'll see functions and assets directories. This is where you need to put the code that will be uploaded to Twilio Runtime. By using --empty in the command above, you avoided having some "hello world" files created, so these directories will indeed be empty.
Building the function
The backend for your app will be a function, so create a new file called ./functions/lookup.js.
First let's deal with credentials
Before we go any further, a note on security:
You can set environment variables for functions in the .env file. That file will already exist and have your ACCOUNT_SID and AUTH_TOKEN values. Check that those match the values from your Twilio console.
Add a new line in .env to set a PAGE_TOKEN. I will be using mjg-lookup for this post, but you should choose your own.
The first thing the function will do in all cases is check that the request contains the correct page token as seen in the code below:
The checkCredentials function will make sure that the page token exists in the environment variables, and in the request, and that their values are equal. If not then a 401/Unauthorized response is sent and execution is finished.
It's time to start the development server so you can run and test things locally. In a console window in the root of your project, run twilio serverless:start. You will leave this running the whole time you're working on the code. Test that the checkCredentials function is working as expected in a new console:
Looking good 😎
Calling the Lookup API
To call the Lookup API, you'll need:
- a Twilio client, which can be created after the credential check with
context.getTwilioClient() - the phone number to look up, which can be passed to the function in the URL or POST body and accessed as
event.phoneNumber
Pass those and the callback to a new function called doLookup by replacing callback(null, {msg:"OK"}); with:
At the end of the file, add the doLookup function:
[full content of this file on GitHub]
This function does a "carrier" lookup for the phone number, returning a 404 if the number wasn't found. There are other add-ons that you could include too, such as caller name lookup or Nomorobo Spam Score.
Test that your function is working by looking up a phone number that you know about:
Note that I've formatted the JSON response here (I like to use jq for this). In the HTTP response it will all be on one line.
This is all we need out of the function - it checks for a valid page token and calls the Lookup API. Great! Let's move on to creating a frontend web page for this function.
Building the frontend
The frontend for this app will be served from the assets directory. There will be 3 files: HTML, CSS and JavaScript. Download the HTML and CSS files into your assets directory. Now let's work on building the frontend.
Setting up the dev environment
This project will use React with a few small components, so that we can keep our codebase manageable. We'll write our JS in multiple files and use webpack with babel to build, bundle and minimize the project. There are a few steps to set up the build configuration for this, with commands that you should run in your project root:
Create an assets-src directory to hold your hand-crafted code:
mkdir assets-src
Install and configure webpack:
npm install webpack webpack-cli --save-dev- add
webpack.config.jsfrom here to your project root
In order to use jsx, install and configure babel:
npm install @babel/core babel-loader @babel/preset-env @babel/preset-react --save-dev- add
.babelrcfrom here
Add this line to the scripts section in package.json:
"build-assets": "webpack --config webpack.config.js"package.jsonshould now look like this.
You need to install React to use in the frontend, but it is not required for the backend function code. Fortunately webpack will use dependencies from devDependencies and these won't added to your function. Use --save-dev with the npm install command below:
To check that this setup is working properly, create a small React component and check that it shows on the page correctly. In assets-src/lookup.jsx copy and paste the following code:
Build the assets-src into assets/lookup-dist.js using npm run build-assets. Because you ran twilio serverless:start a while ago (and it's still running) changes will be picked up immediately so you can reload http://localhost:3000/index and see that your React component has been added to the page. It should look like this:

Building the frontend app
The app will have 3 components:
- The top-level component. You've already got this in
assets-src/lookup.jsxbut will need to modify it - A user input component, called
LookupInput. This will live inassets-src/components/LookupInput.jsx - A component to show the results, called
LookupResults. This will be inassets-src/components/LookupResults.jsx
For the top-level component, modify assets-src/lookup.jsx to look like this:
This uses the useState hook to create the application state, and also contains code to make HTTP requests to your function.
The state in this app is comprised of:
phoneNumberandpageTokenwhich are passed into theLookupInputcomponent, to be provided by the user.loading,errorandresultswhich represent the different states that the call to the Lookup API can be in. These are passed into theLookupResultscomponent.
The handleSubmit function uses the Fetch API to, err… fetch the data from our function. This is also passed into the LookupInput component and used in the form.
Let's write the LookupInput function now. In assets-src/components/LookupInput.jsx put this code:
This component binds phoneNumber and pageToken to form input elements, and calls the handleSubmit function from the top-level component on form submission.
Finally we need to write the LookupResults component. This takes the 3 possible states of the lookup result as inputs:
- loading - set to
truewhile the request is in flight - error - the function returned an error (perhaps the page token was wrong, or the phone number didn't exist?)
- results - the lookup has succeeded
In assets-src/LookupResults.jsx the code therefore looks like this:
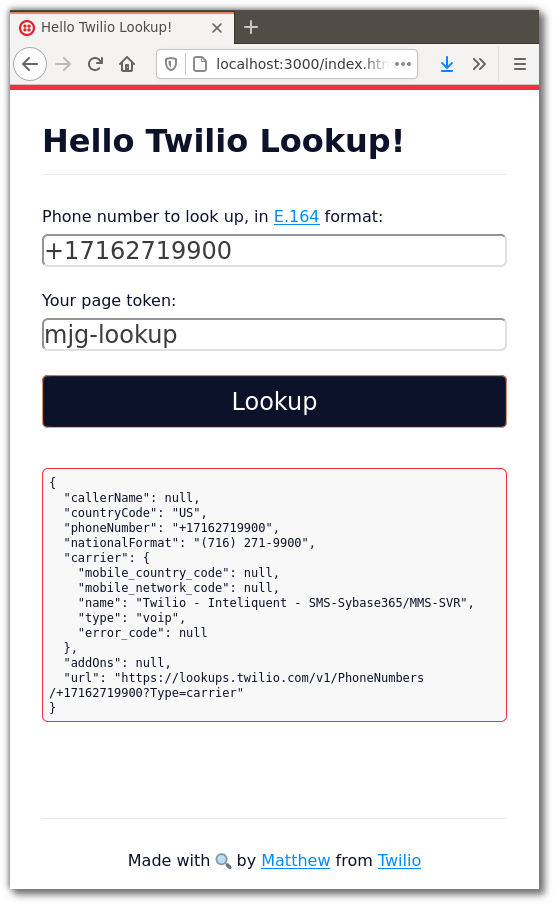
Build the frontend code again with npm run build-assets and reload http://localhost:3000/index.html to see your app in all its splendour:
Deploying the app
Feel free to play around with the code to make it look the way you want, deploy to Twilio using the command:
The output of this command includes the full URL to your index.html asset. It's now ready for you to load from your mobile or anywhere else at that URL.
Any time you make code changes you should re-run npm run build-assets then redeploy with twilio serverless:deploy.
Summing up
Twilio Functions and Assets open up a lot of interesting possibilities. Today I've shown how to build a single-page app hosted by Twilio so we can use the Lookup API on the go, and you can use this as a template to build more apps that give you access to your Twilio account from wherever you need it. I like to use this Lookup app whenever I catch a glimpse of a phone number on a TV show or in a movie.
If you're building something with Twilio Functions, I'd love to hear about it and I can't wait to see what you build. Get in touch by email or Twitter (or on any of the phone numbers in my example code 😉):


Related Resources
Twilio Docs
From APIs to SDKs to sample apps
API reference documentation, SDKs, helper libraries, quickstarts, and tutorials for your language and platform.
Resource Center
The latest ebooks, industry reports, and webinars
Learn from customer engagement experts to improve your own communication.
Ahoy
Twilio's developer community hub
Best practices, code samples, and inspiration to build communications and digital engagement experiences.