Build an SMS-Driven Bot with Node.js
Time to read:
March 08, 2018
Written by
This post is part of Twilio’s archive and may contain outdated information. We’re always building something new, so be sure to check out our latest posts for the most up-to-date insights.

At the end of October a friend and I attended a hackathon at our university. It was there that we decided to build TextEverything, a plugin-driven SMS-based bot written using Node.js. We quickly realised the potential of TextEverything and we think it’s a really easy way to quickly build functional SMS bots.
In this post you will learn how to write plugins for TextEverything to build a working Node.js SMS bot using just a few lines of code.
Get TextEverything Running
Assuming you have Node.js and npm installed, installing TextEverything on your machine should be as easy as running the following commands:
This will clone our Git repository and install the necessary packages to allow TextEverything to work.
We need to configure TextEverything so that it knows to use your Twilio account. Provided in the config directory is a file called config.example.json. Make a copy of this and call it config.json.
You’ll need a few pieces of information to fill out this file, namely your Twilio credentials and phone number. If you don’t already have a Twilio account you can create a free one here. You need to enter your AccountSid and AuthToken in their respective fields which you can find in your Twilio Console. Additionally, you’ll need to purchase a phone number and enter this into the phone_number field. This is the phone number that TextEverything will use to send and receive messages.
Your config.json file should look like this so far:
We also need to specify a list of phone numbers that TextEverything can respond to. This is just a normal JSON array, so you can add phone numbers like so:
Next, because TextEverything relies on Twilio’s webhook requests to tell it when there is a new incoming message, we need a way to give Twilio a public URL to make that request to. The easiest way to do this is by using a service called ngrok. ngrok creates a tunnel from the web server running on your local machine to a publicly accessible URL that Twilio can talk to, without the hassle of forwarding ports. Once ngrok is installed run it using the following command which tells ngrok to forward HTTP requests to the local server running on port 1337:
Once ngrok starts it will show you the randomly generated public URL it’s created for you:

Copy this URL as you’ll need it for the next two steps.
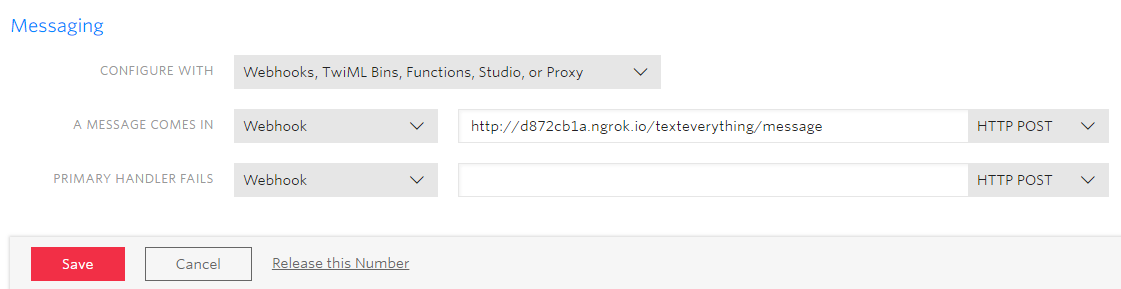
Open the phone number configuration page in the Twilio Console and then select the phone number you are using for TextEverything. Change the “Messaging -> A message comes in” webhook to point to your ngrok URL.
Last, fill in the webhook_url field in config.json to complete your configuration file:
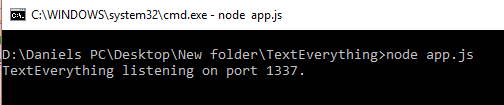
Now try running the app.
You’ll know if everything worked when the bot says it’s listening. Since there are no plugins loaded yet, the bot will reply with a default message if you send it a text.
Now you’re ready to start writing your own plugins!
Write your own plugins
First, it’s important to understand how TextEverything works under the hood. To handle the SMS side of things we’re using Twilio. Whenever a text message comes in to the configured Twilio phone number, Twilio makes a POST request to the ngrok URL we created earlier. ngrok forwards the request to a route defined in Express running on our local machine as part of the TextEverything application. This is why it is necessary to expose port 1337 to the public internet – so that Twilio can interact with TextEverything.
When TextEverything receives that POST request, a number of things happen which you can see in the diagram below:
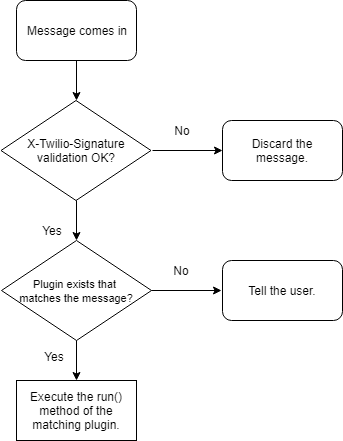
First, TextEverything ensures the request actually came from Twilio, using the X-Twilio-Signature header. If not, the request is silently discarded. Then, all .js files in the plugins directory are enumerated, and the first portion of the text message is matched against the aliases defined in each .js file. If there is a match, the run() method contained within that plugin is executed. Otherwise, TextEverything responds with an “invalid command” message.
TextEverything’s plugin system that sets it apart as an easy way to build a bot to your needs – if you can write it in JavaScript, you can trigger it with TextEverything. Testing a plugin is as simple as placing a .js file in the plugins directory and restarting the server. Your plugin should then respond to its aliases when you text the number you’ve assigned to TextEverything. Let’s make one now to try that out!
TextEverything plugins are structured like so:
Each plugin exports an object, called ‘methods’, which contains a function, ‘run’, and a ‘meta’ object containing metadata about the plugin. The ‘meta’ object should always contain a list of ‘aliases’ which act as the “trigger phrases” for your plugin, but can also contain other values if you see fit.
The entry point for plugins is always the ‘run’ function, which takes two arguments:
- ‘Request’ contains the message data that was sent by Twilio.
- ‘Response’ is the Express response object that we use to send data back to Twilio.
- The recommended way to reply over SMS is using the TwiML wrappers built into Twilio’s Node.js bindings – this adds the message to the response for you.
- You should always send a response back to Twilio, even if it’s empty, to prevent Twilio from timing out.
Here is an example of a plugin which echos back whatever the user sent it:
Sending a text message beginning with “echo”, “echoinput”, “repeat” or “simonsays” will cause this plugin’s ‘run’ function to be executed. In this case that function formats the string and asks Twilio to send it back to the user, but you could have it do anything you like.
We’ve tried to simplify the process of writing plugins and setting up TextEverything as much as possible, making it really easy for even beginners to create their own SMS bots using a comparatively small amount of code.
Configuring TextEverything plugins
It’s entirely possible that you might want plugins to have their own configurations. For example you probably want to store API keys without hardcoding them into your plugin. You can do it any way you please but the way we recommend doing it is creating a separate JSON file containing the configuration. This could look something like this:
Make sure that any config files are added to your .gitiginore file, so you don’t accidentally commit credentials to source control.
By storing this file in the ‘config’ directory you can use it in your plugin by adding this line to the top of your plugin:
As an example, if you then wished to get the consumer key from the sample file above, you would use config.twitter.consumer_key.
Conclusion: SMS Bot in Node.js with TextEverything
In this article, you learned how to create and expand upon your very own SMS texting bot in Node.js. Now that you know how to write plugins, you can customize the bot to your own needs.
You can find more extensive documentation on TextEverything at https://texteverything.net/docs. We’re still actively developing TextEverything, so the documentation will change over time.
If you want to see some example plugins, including ones we demoed at the hackathon, you can find them on our GitHub repository: https://github.com/DanielCordell/TextEverything/tree/master/example_plugins
And, if you’re looking for some inspiration, here’s some cool plugin ideas we had:
- A smart home control plugin – set your heating and toggle your lights by texting a phone number.
- A dictionary – quickly find the definition of any word by sending a quick text message.
Thanks for reading! We hope you enjoyed building your very own SMS bot. Suggestions and improvements to TextEverything are welcomed – feel free to open up issues on GitHub!
- Toby Jones (https://github.com/monotron)
- Daniel Cordell (https://github.com/DanielCordell)


Related Resources
Twilio Docs
From APIs to SDKs to sample apps
API reference documentation, SDKs, helper libraries, quickstarts, and tutorials for your language and platform.
Resource Center
The latest ebooks, industry reports, and webinars
Learn from customer engagement experts to improve your own communication.
Ahoy
Twilio's developer community hub
Best practices, code samples, and inspiration to build communications and digital engagement experiences.