A Swift Adventure: Building BasicPhone with TwilioClient
Time to read:
February 10, 2015
Written by
This post is part of Twilio’s archive and may contain outdated information. We’re always building something new, so be sure to check out our latest posts for the most up-to-date insights.

Swift is a fantastic new language from Apple that brings many great features like functional programming patterns, generics and memory management to the world of Cocoa development. My first in-depth exposure to Swift was attending CocoaConf Atlanta and seeing Daniel Steinberg give his Swift language fundamentals presentation. The programming language enthusiast in me immediately started to noodle on app ideas, but once I saw Jonathan Blocksom talk about Objective-C and Swift interoperability I knew wanted to try to build a Swift application using the Twilio Client for iOS SDK. Given that the Objective-C/Swift interoperability appeared to be very strong so my hope was that the Twilio Client for iOS library would just work.
Twilio ships a number of sample applications with the iOS SDK so as my first Swift project I decided to try to port one of them, BasicPhone, to Swift. Porting the application would give me some exposure to the Swift language and see how the new syntax mapped to Objective-C syntax. It would also let me test to see if the Objective-C interop story held up.
If you’ve not seen BasicPhone, as its name implies its a simple application that allows me to make and receive VoIP calls.
In this series of posts I’ll walk you through building BasicPhone in Swift and how you can use the existing Twilio Client for iOS SDK to create integrated voice communication experiences in your own Swift apps. In this first post we’ll start by setting up the basic pieces of any Twilio Client application, get the Swift project set up in XCode and make our first outbound phone call.
Like many of you, I’m still learning about Swift and all of its nuances. I’ve posted the code for this version of BasicPhone on GitHub and I’d love for you to take a look through it and tell me how I can improve my Swift and iOS development skills. I’m happy to accept your pull requests.
If you want to build your own Swift version of BasicPhone you’ll need a copy of XCode 6.1 or newer. You’ll also need a Twilio account. Don’t worry, trial accounts are free, so if you don’t already have one, head on over to the Twilio website and sign up.
I’ll wait here while you do it.

You’re back! Fantastic. Let’s move on to the second thing you’ll need.
TwiML and TwiML Applications
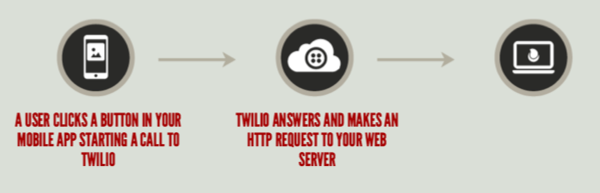
Now that you’ve got XCode and a Twilio account set up, you’re well on your way to making your first VoIP call. Let’s take a minute to understand what happens when you make a call from your iOS application to Twilio.
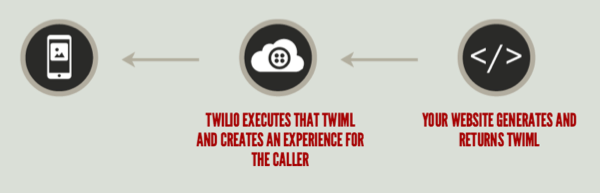
For all communication that comes into Twilio, whether voice, VoIP or Messaging, Twilio uses a set of XML commands called TwiML to provide an experience to the inbound caller, or respond to the inbound message.
Twilio gets that TwiML by making an HTTP request to a URL that you have associated with either your Twilio phone number, or in the case of a VoIP call using Twilio Client (which does not use phone numbers), a TwiML App.
Let’s configure our own TwiML App and set up the URL that will return the TwiML executed when a user connects from our iOS app into Twilio.
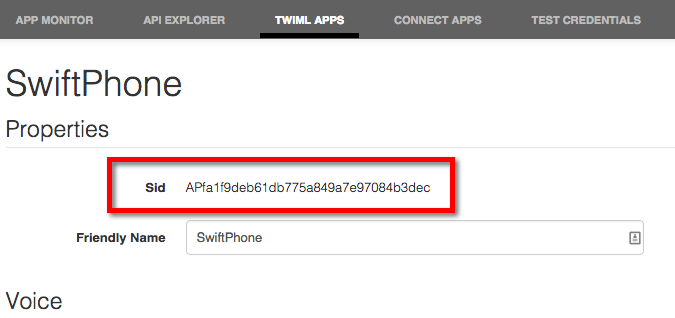
Start by logging into your Twilio account and opening the Dev Tools tab in your dashboard, and then select the TwiML Apps option:


In the form provide a Friendly Name (I’m calling mine “SwiftPhone”) and a Voice Request URL that points to an URL that will return TwiML. The URL I’m using points to a static XML file containing some very basic TwiML that I have hosted on my Digital Ocean VPS.
Awesome. You’ve got your TwiML App created so let’s head over to XCode and start building our app.
Setting up the Application
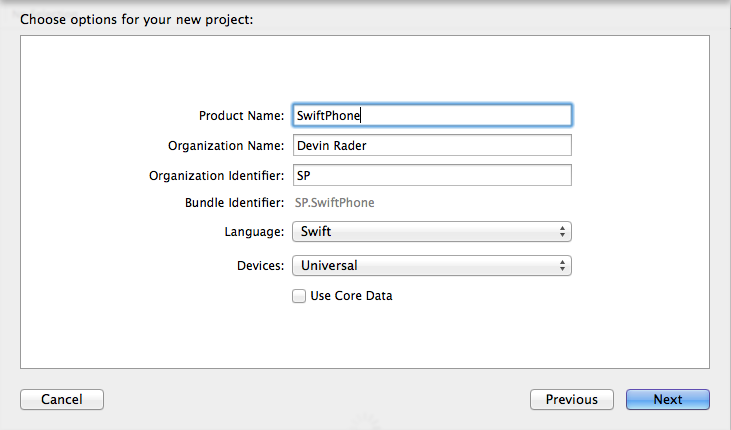
To get started building our iOS app we need to create a new project in XCode. Create a new Single View Application and make sure you select Swift as the Language option in the project options dialog:
With the project created you can add the Twilio Client for iOS SDK to it. There are two ways to add the Twilio Client SDK to the project. You can either download the SDK archive from twilio.com and follow the installation instructions in the included FAQ or you can add it using CocoaPods.
Now we need to make the Twilio Client APIs available to us as we code. In a standard Objective-C application in order to use the Twilio Client APIs you’d import the Twilio Client header into your implementation file. This is Swift though so there are no headers or implementation files. To use a native or Objective-C library in Swift you need to create a bridging header file. This file allows you make APIs in native or Objective-C headers visible to Swift.
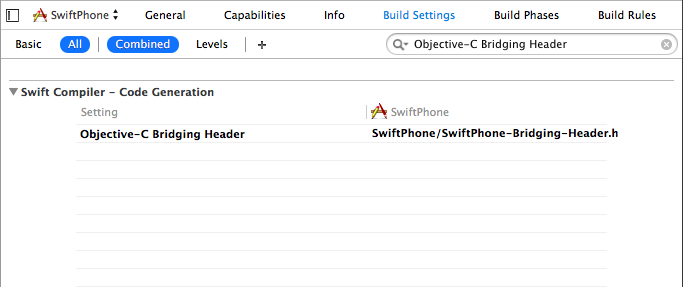
To create new bridging header file, start by adding a new header file to your project by choosing File > New > File > (iOS or OS X) > Source > Header File. When naming the header file, the convention for bridging header filename says to append ‘-Bridging-Header.h’ to the file name. Once the header is added, head over to the Target Build Settings and add the new header as an Objective-C Bridging Header:
If you want to learn more about bridging headers check out Apples iOS Developer Library.
Within the bridging header file you can import the TwilioClient header:
Now any public API’s in Twilio Client will be visible to Swift and we can begin to write code that uses them.
Lets start by creating a new Swift class named Phone. Phone will be responsible for interacting with the Twilio Client API’s. Add a new Swift file for the class by Choosing File > New > File > (iOS or OS X) > Source > Swift File and naming the file Phone.swift.
In the class we need to define two class level variables. One for the type TCDevice which represents our virtual phone and one for TCConnection which represents an active connection between the device and Twilio.
Using the ? operator, I’ve marked the variables as optional. Making them optional allows their value to remain uninitialized, or nil, because at this point we’re quite not ready to initialize them. You can learn more about optional types in Swift by checking out the Apple Developer Library.
With the project created, TwilioClient SDK added and the Phone class created, it’s a good place to check and make sure your project builds successfully. If it does then you’re ready to create a new virtual phone which we’ll do next.
Configuring Twilio Capabilities
Creating our virtual phone begins by instantiating a new instance of the TCDevice type. Doing this requires that we tell the TCDevice initializer what kind of capabilities we want this device to have. We do that by passing it a Capability Token.
A Capability Token is an encrypted string generated on the server that lets you:
- authenticate the device with Twilio
- control whether the device is allowed to make outbound or receive inbound calls
- control the length of time the device is allowed to make or accept calls
Why do we generate the capability token on the server? For a couple of reasons. First, because generating a Capability Token requires your Twilio credentials generating it on the server keeps them out of the client application where they could be easily extracted. Second, server generation prevents nefarious users from tampering with the capabilities that you want to allow their instance of Twilio Client.
To generate capability tokens I’ve built a simple Node.js application that I am hosting on my server. The app uses the express web framework and Twilio Node helper library to generate capability tokens. If you want a complete walk-through of using the the node helper library to generate capability tokens, check out my buddy Kevins awesome Introduction to Twilio Client with Node.js post.
In my application, on each request the I’m looking for two querystring parameters:
- sid – should contain the TwiML App sid that we saw earlier
- name – the unique name for this instance of Twilio Client.
The presence (or lack) of these parameters tells the Node application if it should enable outbound or inbound calling capabilities for this client.
While I chose to use the Node.js helper library, all of the Twilio helper libraries include methods for capability tokens. Additionally, because a Capability Token follows the JSON Web Token standard if you’re not using any of the languages that we provide helper libraries for, you can build an app in any language or platform that uses the JWT protocol to create tokens.
If you want to skip the whole process of building a Capability Token generating app, check out the Twilio Mobile Quickstart. This project gives you a pre-packaged application that you can easily deploy directly to Heroku via a “Deploy to Heroku” button.
With our web app set up and generating capability tokens, we’re ready to make an HTTP request from our Swift application, retrieve the capability token and initialize our virtual phone.
Initializing a Device
In our Phone class, create a new function named login. We’ll use it to let users of the class initialize the TCDevice variable we defined earlier.
In the login function we need to do two things. First we need to build a URL that we can use to request a capability token and second we need to make an HTTP request to that URL to get the token.
You could build the URL directly in the login function, but I chose to extract the functionality out into its own function named getCapabilityTokenUrl and call it from the login function.
The getCapabilityTokenUrl function assembles the sid and name querystring parameters that my Node application expects using constants defined in the class. Make sure you replace the values of those constants with your own base URL, default client name and TwiML App sid.
Next, the function combines those parameters with the base URL of my server and returns the completed URL.
With the URL built we are ready to make the HTTP request to get the Capability Token. To make that request we’ll use a helper class called SwiftRequest, a simple, Swift friendly wrapper around the Foundation Framework’s more complex HTTP API’s. Written by my fellow Twilio evangelist Ricky Robinett, go grab the source for SwiftRequest (as well as submit pull requests) from his GitHub and add it to your project in a new file named SwiftRequest.swift.
After creating an instance of the SwiftRequest class, we use its get function to make the HTTP request to the URL we generated earlier. A callback function receives the HTTP response. For now we’ll just extract the body of the HTTP response and print it to the console so we can make sure that the request did indeed return a capability token.
Awesome. We’re getting a capability token from the server and are ready to create (or reinitialize) our device.
To create a new device, we need to use the capability token to initialize an instance of the TCDevice object and assign it to the device variable we defined earlier. If we’ve created an instance previously and just want to update it with a new capability token we call the updateCapabilityToken function.
Once the TCDevice is initialized we are ready to expose what we’ve created, the ability to connect to Twilio, to other developers using our class.
In order to expose the initialization capabilities we’ve added to the Phone class to developers using it we’ll create two new functions in the Phone class. We’ll start by creating a new function named connectWithParams which will let users of our Phone class start the outbound call. Because Twilio allows us to pass parameters from the device to Twilio when starting a new call, this function accepts an option Dictionary option as a function parameter. If no Dictionary is passed to the function, a default empty instance is created.
In the connectWithParams function before we try to start the call we’ll first check to make sure that the Capability Token used to initialize our device has not expired. If it has we’ll try to reinitialize the device. With the validity of the capability token established, we call the connect function on the instance of our device, passing it the Dictionary of parameters.
Fantastic. We have the code in place that lets us start an outbound call from our app so we’re ready to put the last piece to do this: a simple UI.
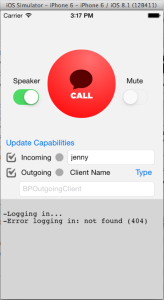
“Watson, come in the room”
For now we only want to get our application to a place where we can test making an outbound call from our Phone class, so the UI is going to exceedingly simple. Open the Main.storyboard file and drag a new button onto the UI.
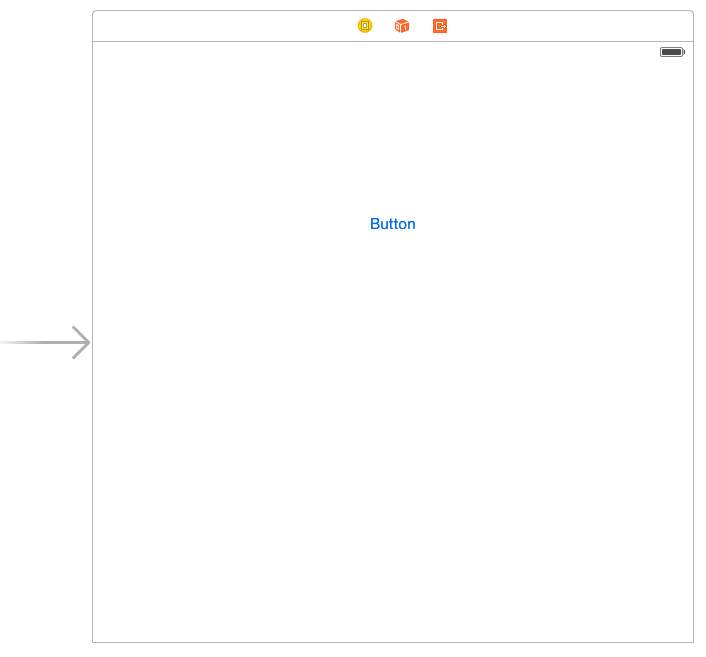
There is our initial UI. Isn’t it beautiful?
Before we leave the storyboard, go ahead and create an Action for the Button.
Great! Lets switch over to the ViewController.swift file and add the code to initialize our Phone class and call the login and connect functions.
The Phone class is initialized as a class variable named phone. When the app loads we want to immediately attempt to get a capability token and initiate the device, so the we’ll call the phones login function from the viewDidLoad function.
We only want the app to start the outbound call when the button is pressed, so we’ll call our phone instances connectWithParams function in the buttons Action function.
That’s it! Run your app and press the button and your app should start its outbound call. If you are using the TwiML I showed earlier then you should hear the dulcet tones of multiple Grammy Award winning singer/songwriter Taylor Swift hitting your ears.
Wrapping it up
Swift is a fantastic new language whose syntax and language features really appeal to me, and actively switch between Swift and other languages as I build out a full client/server application. Learning and using it has been a lot of fun for me. Additionally, the great Objective-C / Swift interoperability mean that libraries like Twilio Client generally just work.
In this first post we got the basics of our app up and running, introducing concepts like TwiML Apps and capability tokens, and built a simple application that can make an outbound phone call. You can of course find all of the source code for the application on GitHub.
In the next post we’ll add support for answering incoming phone calls to our app and show how to notify the end user of incoming calls, even when the app is running in the background.
I’d love to know what kinds of apps you’re building in Swift and how you think I can improve this initial port of the BasicPhone app. Let me know by hitting me up on Twitter @devinrader, or shoot me an email.

Related Resources
Twilio Docs
From APIs to SDKs to sample apps
API reference documentation, SDKs, helper libraries, quickstarts, and tutorials for your language and platform.
Resource Center
The latest ebooks, industry reports, and webinars
Learn from customer engagement experts to improve your own communication.
Ahoy
Twilio's developer community hub
Best practices, code samples, and inspiration to build communications and digital engagement experiences.