Hola Programmable Chat! Real time translated chat with ASP.NET, Microsoft Translator and Programmable Chat
Time to read:
December 11, 2015
Written by
This post is part of Twilio’s archive and may contain outdated information. We’re always building something new, so be sure to check out our latest posts for the most up-to-date insights.

¿Hablas español? Qu’en est-il en Français? 中文?Ao idnu Tsis tuti tu’iyia rirzyia iw inams.
Whatever your own language be it English, French, Mandarin or Sith, not being able to communicate with others because of a difference in language is a pain. While we don’t yet have protocol droids able to instantly translate 6 million languages (we don’t even have 6 million languages) translation technology, especially translation of text, has come a long way. As a developer I now have a multitude of accurate, free or low cost translation API’s that I can easily integrate into an app.
Wouldn’t it be cool if you’re favorite chat application could make it easier to converse with people who do not use your language by automatically translating your messages into their language? Or better yet, what if you could just build that chat app yourself?
In this post I’ll show you how you can do exactly that. Starting with the IP Messaging Programmable Chat Quickstart, I’ll walk through modifying that app to use Programmable Chat’s webhook capabilities and the Microsoft Translator API to automatically translate chat messages into a new language.
As always, if you are just looking to give the finished code a whirl you can grab it from Github. Otherwise, if you want to build along with me, let’s get going.
Getting Rolling
Before we jump into code we need to make sure we have access to the services we’ll use to build the app, and get the base application downloaded and running.
If you don’t already have one, start by heading over to twilio.com and signing up for a free Twilio account. A free trial account will work just fine for the app we are going to build.
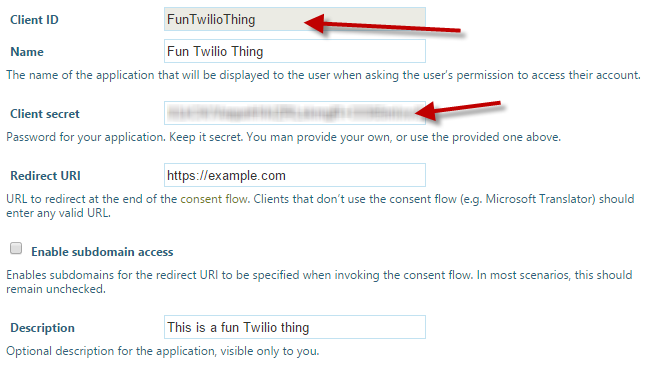
Next pop over to the Microsoft Azure Marketplace, create a new account and then subscribe to the Translation API. Make sure you also register a new application with the Marketplace in order to get your client id and client secret.
With so many translation API’s available why the Microsoft Translator API? If offers support for translating to over 50 different languages and free translation of up to 2 million characters per month, so it’s a great option for our project.
Now that we have access to Twilio and the Microsoft Translation API sorted, we’ll grab the source for the Programmable Chat starter app and get it up and running. The starter app comes in a bunch of different language and framework combinations. Since I am a .NET developer I’ll be starting with the ASP.NET MVC starter app, but feel free to choose the language you are comfortable with and follow along.
Get the starter app up and running by walking through the provided readme. Once it’s running you should have a functional chat application.
The last bit of setup we need is to do is to make sure we can access our new starter app from a public URL. You could deploy the site out to a host like a Azure Website, or use a tool like ngrok to expose your own local web server through a public URL. A developer read about the 6 most awesome reasons to use ngrok and you won’t believe what happened next!
Fantastic! Let’s push on and figure out how to take this base application and get it to translate our chat messages.
The best laid plans
Before we get started mucking with any of the starter app code, let’s take a moment to look at what happens when an Programmable Chat client sends a message to a channel and from a high level how we can use the Status Callback URL to implement translation in our app.
Typically when a message is sent from a client to a channel, Twilio relays that message to all other clients connected to the channel:
If webhook URL is configured for the Message Service Twilio will request that URL whenever that event occurs. In our case we’ll configure the OnMessageAdded webhook which tells Twilio to request a URL whenever it receives a new message, but before it relays it to the channel clients.
The webhook request is useful on a bunch of levels. It lets your server side application know both the incoming message and who sent it. It also lets that application tell Twilio if it should actually relay the new message or not.
In the animation above the example.com site is returning an HTTP 200 OK to Twilio, telling it to continue to process the message as normal. Returning an HTTP 403 Forbidden status code tells Twilio not to relay the original message.
For our application we are going to leverage the OnMessageSend webhook plus the Twilio REST API. When a new message is sent from a client we’ll use that webhook request to grab the message and send it to the Microsoft Translation API for translation. With translated text in hand along with knowledge of who sent the original message and to what channel it was posted, we’ll use the REST API to create a new message. That message will contain the translated text and we’ll post it to the channel from the user who send the original message. Finally, so that Twilio does not post both the original message and the translated message, we’ll return an HTTP 403 from our application.
Modify!
Now that we have an understanding of how we can leverage webhooks and the Twilio REST API, let’s get started building.
First we need to create an endpoint that we can point our Message Services Status Callback URL at. In the HomeController class, create a new action method named MessageAddedthat accepts three parameters, To, From and Body and prints the value of the Body parameter to the debug console:
Notice that we’ve made the action method async by marking it with the async keyword and returning a Task. This will be important later so that we can make the asynchronous HTTP request to the MIcrosoft Translator API.
With the new endpoint created, we next need to configure the OnMessageSend webhook URL with the public URL of our new endpoint.
You can configure the webhook two ways. You can update the Message Service with the webhook URL via the REST API or use the developer console:
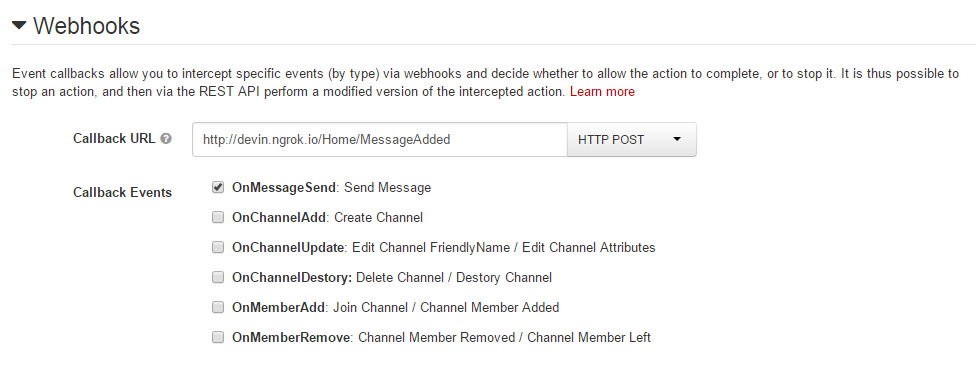
Once you’ve configured the service with a webhook, go ahead and give the app a try. Send a few messages and then check your debug console. You should see the incoming messages shown indicating that Twilio is indeed making the HTTP request to your server.
Right now our action method returns an HTTP 200 OK to Twilio. Because of this Twilio will continue processing the message, relaying it to all of the channel clients.
Try changing the action method to return an HTTP 403 Forbidden and running the application again:
This time even though you are sending messages to Twilio, because we changed the status code returned from the webhook URL you won’t see the messages delivered to the channel clients.
Awesome! Now that we’ve got our app set up to receive messages on the server we can move on to translation.
Found in Translation
Translating text using the Microsoft Translation API is a pretty straight forward. You make a simple GET request to its Translate endpoint, passing it the text you want to translate, the language of that text and the language you want to translate it to.
To authenticate with the API you need to generate an access token and provide it in the Authorization header of your GET request. Because access tokens have a time expiration we need to set up a way to automatically generate new tokens on a regular interval.
Thankfully Microsoft provides some sample code for doing this which I’ve taken and modified a bit to make it easier to use in our ASP.NET MVC application. That code ends up encapsulated in the AdmAuthentication and AdmAccessToken classes which not only create an access token, but also internally run a timer to keep that token fresh for us.
The specifics of how the AdmAuthentication and AdmAccessToken classes work internally aren’t really relevant to the app we are building in this post, but since we need to use them in our app we do need to add the source files for those classes to to our project. You can grab those source files for my modified version of the classes from the Github repo:
In order to use the AdmAccessToken you might also have to add a reference to the System.Runtime.Serialization assembly.
With the access token generator classes added to our project we now need to get an instance of the AdmAuthentication class. In the HomeController class grab the instance of AdmAuthentication in the constructor, passing in the Translators Client ID and Secret:
Make sure that you add the TranslatorClientId and TranslatorClientSecret keys to your web.config file and set their values to your Microsoft Translator API credentials.
Now that we can authenticate with the Translator API, we’re ready to to add translation to our chat app. Back inside of HomeController create a new async method named Translate that returns a string and accepts three string parameters:
- the text you want to translate
- the language to translate from and
- the language to translate to
Next, grab the access token from the AdmAuthentication instance:
With the token generated we can make an HTTP GET request to the Translate endpoint and return the resulting translated text from the method.
Finally, to translate incoming chat messages in our application call the Translate method from the MessageAdded action method. In our app we’ll test that this works by assuming that the message we want to translate is in English and that we want to translate it to Spanish:
Give the app a spin one more time. Send a message in English to the channel and check your debug console. You should see both the original message and the translated message, but again because we are returning 403 from the endpoint, nothing shows up in the channel.
To send the newly translated text to the channel we need to create a new message using the REST API. Start by installing the Twilio.IpMessaging package from NuGet. This package includes the IpMessagingClient class which gives you a C# idiomatic way of using the Twilio Programmable Chat REST API.
Create an instance of the IpMessagingClient class, providing your API Key and Secret and then call the CreateMessage method. We’ll provide the unmodified From and To parameters to the method make sure this message goes to the same channel and comes from the original sender.
Ok, give the app one more whirl and this time when you send a message, you should see the Spanish text displayed in the channel.
Hurra!

Wrapup
Language has historically been a barrier that has keep people from communicating their ideas and feeling with others. But it’s a barrier that is slowly eroding as translation becomes better and more integrated into our everyday lives.
While we are not quite at the level of C3PO, combining services like the Microsoft Translation API with Twilio Programmable Chat make it easy to integrate translation into your own applications. That’s great because if you ever find yourself chatting with Jabba the Hut, you’ll surely want to know whats hes got to say.
This post focused on the basics of getting a translation integration set up via a webhook URL, but integrating with a translation API is just one way you can use this useful feature. Other ways you could use the callback might include
- Curse word filters
- Conversation logging for regulatory compliance
- Command interpretation for injecting content into a channel
Additionally, new messages are not the only webhooks available. There are a bunch of events that Twilio will tell you about via webhooks. What interesting ways can you use those other events? I’d love to hear about it. Let me know by leaving a comment below or sending me an tweet.


Related Resources
Twilio Docs
From APIs to SDKs to sample apps
API reference documentation, SDKs, helper libraries, quickstarts, and tutorials for your language and platform.
Resource Center
The latest ebooks, industry reports, and webinars
Learn from customer engagement experts to improve your own communication.
Ahoy
Twilio's developer community hub
Best practices, code samples, and inspiration to build communications and digital engagement experiences.