Create A Family Photo Frame With Twilio, AWS, and Electric Objects
Time to read:
September 29, 2016
Written by
This post is part of Twilio’s archive and may contain outdated information. We’re always building something new, so be sure to check out our latest posts for the most up-to-date insights.

Jed Schmidt is a developer, dad, musician and all around rad dude working in New York. He graces the Twilio blog with his presence and a lovely tutorial on using Twilio, AWS and Electric Objects to create a Twilio MMS photo frame. You can watch him build the whole thing in the following video tutorial, and follow along with him in his detailed step by step instructions. Soon you’ll have a code-powered photo collage going in no time.
We’ll let Jed take it from here.
Using Twilio, AWS, and Electric Objects to create an MMS-powered family photo frame.
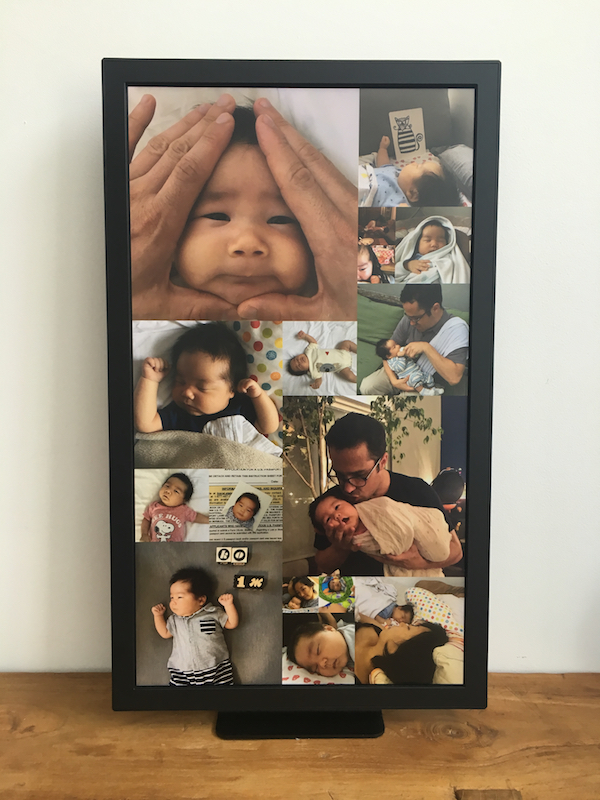
A few months ago my partner and I welcomed a pudgy baby boy named Ko into our lives. Since then it’s been amazing to see the small changes in him day by day, like when he discovered his hands, or learned how to smile. So I’ve found myself taking out my phone a lot more often, to capture as many of these moments as I can.
And of course the demands from my parents for pictures of their new grandson have been fierce. Ordinarily I’d post things like this on Facebook, but having been on the receiving end of oversharing parents there for a while now, I wanted something a little less public. Sure, I could deal with Facebook’s ever-changing twiddly permissions UI to make sure photos only went to my parents, but since we were already using iMessage to communicate, I decided to send them pictures there.
This was definitely the path of least resistance, but of course, the iMessage UI isn’t really a great way to get a snapshot of someone’s most recent pictures. So I decided to get creative, and turn my Electric Objects Digital Art Display into a collaborative family photo frame, so that my parents could see new pictures show up in their kitchen, in real time. I’ve used digital picture frames like Ceiva in the past, and they’re okay, but nothing matches the sleek finish of the Electric Objects display, or the ability to control how images are loaded and displayed. And if you get bored of family photos you can always use it to show Jenn Schiffer‘s excellent pixel art or follow Tom MacWright‘s lead and make your own animated art.
Having seen a bunch of great SMS/MMS demos from Ricky Robinett at BrooklynJS, I figured Twilio would be an easy way to pull all of the photos out of our existing iMessage group and put them on the display. So I created an app that uses AWS to glue Twilio and Electric Objects together, and put the source code on GitHub. Here’s how the whole thing works:
- I created a new Twilio phone number and added it to the existing iMessage group my family uses to communicate.
- Twilio sends all messages that arrive at this phone number to a Lambda function, via API Gateway.
- The function copies any MMS images from Twilio to an S3 bucket, then pulls the most recent images from the bucket to compose a collage, which is then saved back to the bucket.
- The function then tells Electric Objects to update the contents of my parent’s display to the URL of the collage image.
From my phone to their display, the whole process takes about 15 seconds, a nice side effect of which is I get a backup of all the photos in an S3 bucket.
Creating Your Own Collaborative Family Photo Frame
In this post, I’m going to show you how to create your own collaborative family photo frame. All you need to follow along is:
- An Electric Objects Digital Art Display. The price of the frame fluctuates quite a bit on Amazon, but can often be found around $250.
- A Twilio account that’s been upgraded with credit.
- An Amazon Web Services account.
Once you’ve got those sorted, now you’ll just need to:
- walk through the source code (optional, only if you’re interested!), and then
- follow the setup instructions for AWS and Twilio.
If you’re stuck trying to get your frame set up, please feel free to ask for help in the comments or tweet us!
Diving Into The Code
This is a walk-through of the AWS Lambda code used to build the MMS-powered family photo frame described in this post. You don’t need this to create your own frame, but it’s always good to understand the code you’ll be running. This document was generated from the source using docco.
First, let’s bring in some libraries to do the heavy lifting.
We’ll want to parse querystring payloads, make file system and process calls promise-friendly, fetch MMS image payloads from Twilio over HTTPS, store and retrieve images to and from S3, resize and compose images with ImageMagick, crop the most interesting square in an image, and finally, update our frame.
AWS Lambda ships with ImageMagick, so we’ll use that.
We’ll be reusing the same client for all S3 calls.
We’ll store the name of our frame globally for easier access.
Now, let’s define the layout of the collage.
Since the aspect ratio of the EO1 frame is 9:16, we’ll define our layout as a set of 16 squares in decreasing size from 6×6 to 1×1, and place them carefully to fill every pixel, as shown in the image below. Many thanks to Nikki Sylianteng for helping me find a layout that’s easy on the eyes!
Now we export our handler, the function that’s called whenever our AWS Lambda function is invoked. We’ll get the frame name from the function name, handle all rejected promises globally to simplify our code, and then pass the message to our onmessage listener.
When a message arrives, we’ll parse it into images. If no images exist, we’ll return early, otherwise we’ll handle each image and then create the collage.
Let’s pull the images out of the payload from the Twilio webhook. Identifiers are created by subtracting the timestamp and sequence number from an arbitrarily large integer, so that newer images will sort lexicographically before older images, allowing us to query S3 for only the most recent ones, without iterating through the whole bucket.
For each incoming image, we’ll need to fetch it from Twilio, crop it to a square, and then upload it to our S3 bucket.
We’ll pull the image as a buffer from its Twilio URL.
We’ll crop the most interesting square out of the image, resize it to 1080 pixels (the width of the display), and update the image body.
We’ll upload the image to S3.
Once all of the inbound images are processed, we’ll need to list and then download the latest ones, compose them into the collage, publish it to S3, and then tell the frame that the collage has been updated.
Let’s list the keys of the 16 most recent images in our S3 bucket.
Now let’s download all the images we need to /tmp/images, creating the directory if it doesn’t already exist.
Let’s compose the collage with ImageMagick, and then save it to /tmp. We’ll use a black background by default for missing images, and set the dimensions to 1080p portrait to match those of the frame.
Once the collage is done, we’ll publish it on S3 so that our frame can reach it.
To update our frame, we’ll need to pull the credentials from S3 and use them to log in to the Electric Objects website, and use their set_url page to point the frame to the collage URL.
Setting Up Twilio, Amazon Lambda and API Gateway
All in all this setup should take you about ten minutes. Setup is divided into four parts:
- Download the Lambda code and Electric Objects login information,
- set up an S3 bucket, IAM role, Lambda function, and API Gateway endpoint on AWS,
- set up a Twilio phone number, and point it at your API Gateway endpoint,
- send an MMS to your number to test that it works.
You can follow along to this video to complete this steps, or follow the written instructions below:
Download the lambda code
Download the Lambda code from GitHub, and save it anywhere on your computer where you can find it again.
Download and edit the Electric Objects login JSON file
- Download Electric Objects login JSON file from GitHub, and save it in the same location as above.
- Open this file in your favorite text editor, replace YOUR-ELECTRIC-OBJECTS-EMAIL-ADDRESS and YOUR-ELECTRIC-OBJECTS-PASSWORD with your Electric Objects email address and password, and then save your changes.
Create An AWS S3 Bucket
This is where you’ll store your EO1 account settings, the images coming in from Twilio, and the composited collage to be sent to the Electric Objects display.
- From the top nav of the AWS Console, choose Services, then All AWS Services, then S3.
- Click the Create bucket button.
- For Bucket Name, specify the name of your project. Here, mine is jed-family-frame.
- For Region, choose US Standard.
- Click the Create button.
- Click the Upload button.
- Click the Add Files button.
- Choose the eo-config.json file downloaded in the previous step.
- Click the Start Upload button.
- Your bucket is ready.
Create an AWS IAM role
This gives your Lambda function the permissions it needs to read from and write to the S3 bucket.
- From the top nav of the AWS Console, choose Services, then All AWS Services, then IAM.
- In the left sidebar, click the Roles button.
- Click the Create New Role button.
- For Role Name, specify the same name of your project as you did for the S3 bucket.
- Click the Select button for AWS Lambda, under AWS Service Roles.
- Select the checkboxes next to AmazonS3FullAccess and CloudWatchLogsFullAccess.
- Click the Next Step button.
- Click the Create Role button.
- Your role is ready.
Create an AWS Lambda function
- From the top nav of the AWS Console, choose Services, then All AWS Services, then Lambda.
- Click the Skip button.
- Click the Next button.
- For Name, specify the same name of your project as you did for the S3 bucket.
- For Runtime, choose Node.js 4.3.
- For Code entry type, choose Upload a .ZIP file.
- Click the Upload button and choose the lambda.zip file downloaded earlier.
- For Handler, specify index.handler.
- For Role, choose Choose an existing role.
- For Existing role, choose the name of the role you created.
- For Memory (MB), specify 1024.
- For Timeout, specify 1 min.
- For VPC, choose No VPC.
- Click the Next button.
- Click the Create function button.
- Your lambda is ready.
Create an AWS API Gateway endpoint
- From the top nav of the AWS Console, choose Services, then All AWS Services, then API Gateway.
- Click the Get Started button.
- Click the OK button.
- Select the New API radio button.
- For API name, specify the same name of your project as you did for the S3 bucket.
- Click the Create API button.
- Click the Actions… button, and then choose Create Method.
- From the select box, choose POST and then click the check button.
- For Integration type, choose the Lambda Function radio button.
- For Lambda Region, choose the region for your function, which should be us-east-1.
- For Lambda Function, specify the first character name of your function (the same name as your project), and then choose the matching function name.
- Click the Save button.
- Click OK.
- Click Integration Request.
- Under Body Mapping Templates, click the Add mapping template button,
- For Content-Type, specify application/x-www-form-urlencoded.
- Click the check button.
- Click the Yes, secure this integration button.
- For application/x-www-form-urlencoded, specify $input.json('$').
- Click the Save button.
- Click ← Method Execution button to go back.
- Click Integration Response.
- Under Body Mapping Templates, click the – button next to application/json.
- Click the Delete button.
- click the Add mapping template button.
- For Content-Type, specify application/xml.
- Click the check button.
- For application/xml, specify xml version="1.0" encoding="UTF-8"?><Response></Response>.
- Click the Save button.
- Click ← Method Execution button to go back.
- Click Method Response.
- Under Response Models for 200, click the Add response model button,
- For Content-Type, specify application/xml.
- For Model, choose Empty.
- Click the check button.
- Click the X button next to application/json to delete that content type.
- Click the Actions… button and choose Deploy API.
- For Deployment stage, choose [New Stage].
- For Stage name, specify prod.
- Click the Deploy button.
- Take note of the URL given at the top in Invoke URL. This is the URL you’ll use for your Twilio webhook.
- Your endpoint is ready.
Buy a Twilio number
- Open the Twilio Console for phone numbers.
- Click the + button.
- For COUNTRY, choose United States.
- For CAPABILITIES, select MMS.
- Click the Search button.
- Choose the number you want, and click the Buy button.
- Click the Buy This Number button.
- Click the Setup number button.
Point your Twilio number at API Gateway
- Under Messaging, for A MESSAGE COMES IN,
- Choose Webhook.
- Specify the invoke URL from your API Gateway endpoint. It should look like https://**********.execute-api.us-east-1.amazonaws.com/prod.
- Choose HTTP POST
- Click the Save button.
- Your phone number is ready.
Test your setup
Once you’ve completed the setup, take out your phone and send a photo to your Twilio phone number. Your frame should be updated with the new photo within about 15 seconds, but if it isn’t:
- Check the programmable SMS logs in your Twilio console to see that an appropriate response was returned from API Gateway.
- Check the AWS CloudWatch logs for your Lambda function to see if the function terminated successfully.
Also, to check whether your collage has been updated without checking your Electric Objects display directly, just access the collage image from your S3 bucket, in the AWS S3 console.
Related Posts
Related Resources
Twilio Docs
From APIs to SDKs to sample apps
API reference documentation, SDKs, helper libraries, quickstarts, and tutorials for your language and platform.
Resource Center
The latest ebooks, industry reports, and webinars
Learn from customer engagement experts to improve your own communication.
Ahoy
Twilio's developer community hub
Best practices, code samples, and inspiration to build communications and digital engagement experiences.