How to Add Email Notifications to Your Node.js SMS App
Time to read: 8 minutes
February 16, 2021
Written by
Reviewed by

Sending notifications from your application means you can deliver your users relevant, timely and personalised information about their accounts or activity. You may have already built SMS notifications into your application, perhaps by following this Node.js tutorial on ETA notifications, but can we improve the experience? Your customers may want to receive notifications that are easily referenceable later or choose the channel through which they receive alerts.
In this post, we will explore how email notifications can work alongside SMS notifications for account alerts, and walk through how to build them into your application using the Twilio SendGrid Email API.
What you'll need
To follow along with the code and build the application in this post you will need:
- A Twilio account (if you don't have one yet, sign up for a new Twilio account here and receive $10 credit when you upgrade)
- A Twilio SendGrid account
- In your SendGrid account you will need to have set up either single sender verification or domain authentication so that you can send emails from your own address
- Node.js installed
- We will also use MongoDB and ngrok for the application later in the post
Before we dive into the code, let's spend a moment to think about why you might want to consider email notifications for your application.
Why email notifications?
Email is the preferred communication channel for most users. In a study we found that 83% of consumers prefer to receive communications from businesses over email. Sending your users notifications over the channel they prefer is one of the best ways to make sure they appreciate those notifications.
Compared to SMS, email allows for notifications featuring a lot more detail and personality. You can brand and personalise emails, from the content and design of the email to the from address and name.

Email is also treated as the digital record of our lives. Since email notifications contain more information they are worth keeping. This enables users to search and find important information about your business relationship or transactions.
Why Twilio SendGrid?
If email notifications seem like a good idea, you might be wondering why you'd use SendGrid? The number one requirement for a notification like this is that it lands in your customer's inbox. Email deliverability is the number 1 priority at SendGrid and we work hard to provide the right infrastructure for your emails as well as the tools to manage your reputation.
Sending SMS and email notifications
Fortunately, when you are working with Twilio to send SMS notifications and SendGrid to send emails, the code is remarkably similar. Both APIs are HTTP based and have helper libraries to make calling them as straightforward as possible. Here's an example of sending an SMS with Twilio using the Node.js library:
Sending an SMS in Node.js
In this snippet we load the Twilio Node module, authenticate it with an account SID and auth token (which you can find on your Twilio console) and then define a function to send the SMS. Sending an SMS requires:
- a
fromnumber (from Twilio) - a
tonumber for the recipient - the
bodyof the message
You can get this example of sending an SMS in this GitHub gist.
There are more parameters and more to learn about sending messages which you can check out in the messaging API documentation.
Sending an email in Node.js
We can compare the above to the following example of sending an email in Node.js with SendGrid.
In this case we load the SendGrid Node.js module and authenticate it with a SendGrid API Key and define a function to send an email. Sending the email requires:
- a
fromemail address (which you have either verified with SendGrid or is from a domain you have authenticated with SendGrid) - a
toaddress for the email recipient - a
subject - the
bodyof the message
You can get this example of sending an email in this GitHub gist.
Again, there is much more to sending an email and the API documentation for sending an email will give you lots more information.
Since sending SMS and email notifications are so similar, let's look at adding email notifications to an application that already sends SMS.
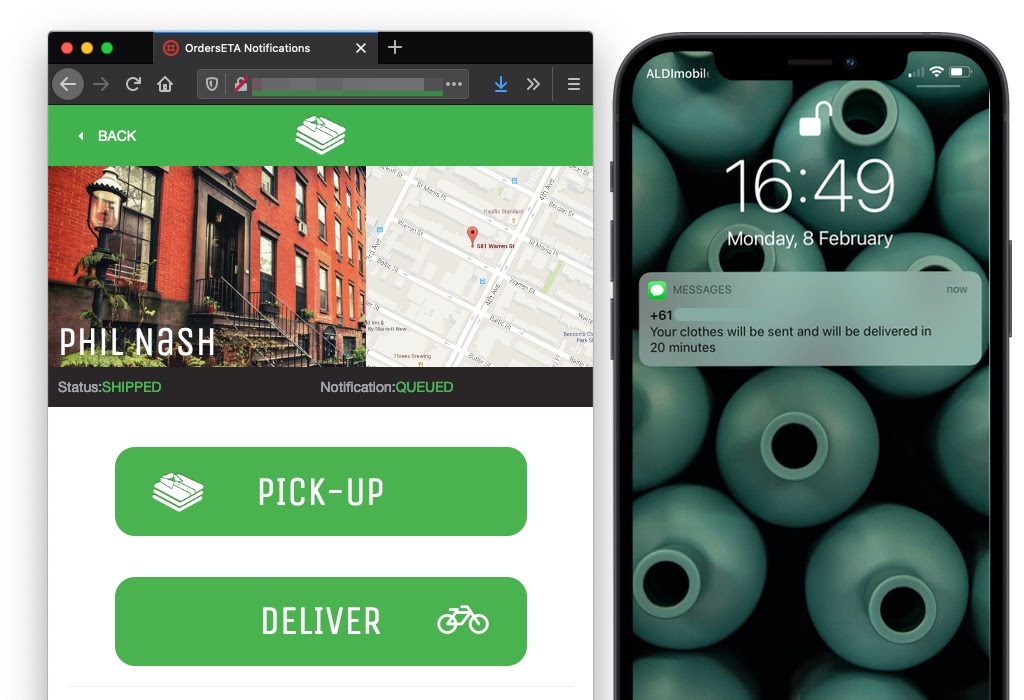
ETA Notifications by SMS and email
The application we are going to work with is the example from the Twilio tutorial on sending ETA notifications in Node.js. The application is for a hypothetical laundry service called laundr.io that implements a dashboard to send SMS notifications to customers about the status of their laundry.
The application is written in JavaScript and uses MongoDB as a data store and ngrok to create a public URL for the application so that it can receive status callback webhooks. Make sure you have both MongoDB and ngrok installed and that MongoDB is running (check the MongoDB installation instructions for how to run it on your system).
Getting set up
Let's get the application running. Download or clone the example application from GitHub:
Install the dependencies with:
Copy the .env.example file to .env:
Fill in .env with your Twilio Account Sid and Auth Token (found in your Twilio console), an SMS capable Twilio number that you own (or buy a new one) and the URI for your Mongo Database (e.g. mongodb://localhost:27017/eta-notifications-node).
We need to seed the database with some example data. First up, open seed/orders.js. You will see some example customers listed, but testing this application will be a lot easier if we use our own phone number. Update the customerPhoneNumber fields to your phone number (in e.164 format). Load the data with the command:
Now start up the application:
In another terminal window, start ngrok with:
Open up the app at the ngrok URL that is generated for you and check out the orders. You can send pick up and delivery notifications to yourself to see it working.
Now let's add email notifications to this application alongside the SMS notifications.
Sending email notifications
Open up models/order.js, this is the file where the order model is defined. In this file you can also see the sendSmsNotification method, which is the method used for sending the text message. We will add a sendEmailNotification in this file.
Before we get to that, let's install the SendGrid Node.js module. Open a terminal in the application directory and enter:
We'll need a SendGrid API key to authorise the application to send emails and an email address to use as the sender. Open your SendGrid dashboard and create a new API key with access to send emails. Open the .env file and add a new line for the API key:
Add the email address you wish to use as the sender of the email too. Remember that this email should either be verified or from a domain you have authenticated with SendGrid.
Next up we need to get these variables into the application. Open config.js and add the following lines to the bottom of the object:
Now we can get to work on the model. Head back to models/order.js and start by requiring the SendGrid Node.js module and then authorising the module with your API key
Next, we'll add a customerEmail field to the order model:
Define a new instance method on the model called sendEmailNotification. This application uses Mongoose, which makes it easy to define schemas to model application data. When adding an instance method to a model, you create a new property on the schema's methods property, like this:
The sendEmailNotification method will take one argument: the message to be sent. The other details, like the customerEmail, will come from the document itself or the config. Just like in the sendSmsNotification method, we are going to gather the details we need to send the notification and then use the helper library to dispatch the message.
For this notification we will need the to address, a from address, a subject and the text of the email. Once that data is collected, we dispatch the email with the send method.
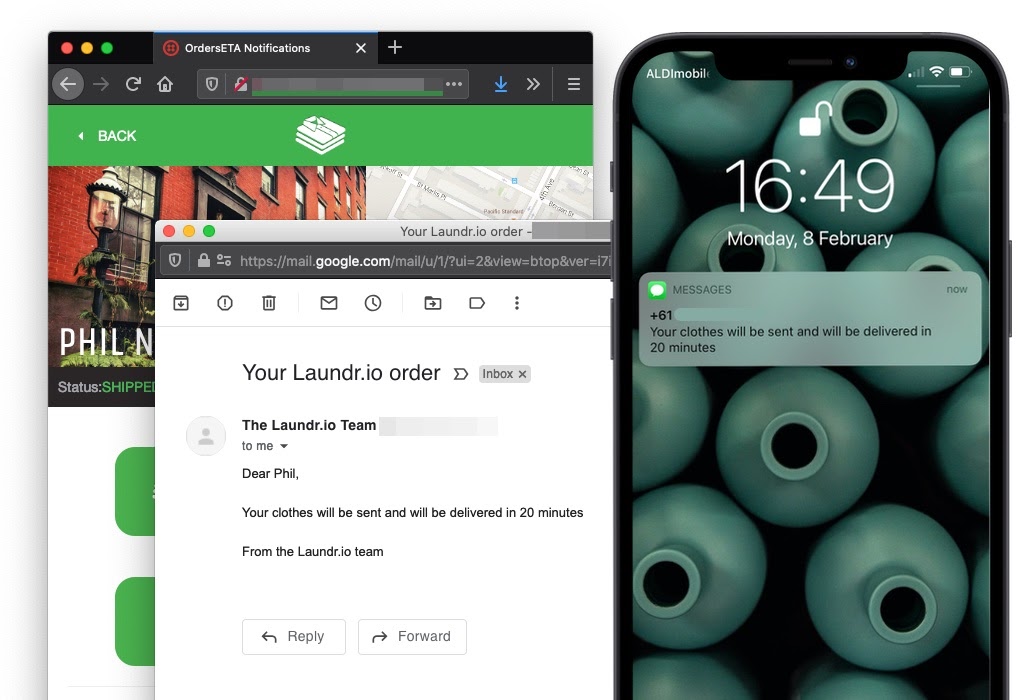
In the code above we set the to address to the customer email and the from is the email address we have verified with SendGrid. The subject is set to the text "Your Laundr.io order" but we can revisit that later. The text of the email is set to the message parameter of the function. In usage, this will be the same as the text sent out as an SMS.
Since we're working with an email and we aren't limited by stringent character limits or numbers for sender IDs like in SMS, we can expand and personalise this message. We can set the sender name as well as the email and since we have the customer name stored in the model, we can add that to the content of the message:
Let's add email addresses to our seed data now. Open seed/orders.js and add a customerEmail key to each of the order objects with your own email address.
Re-seed the database by rerunning:
The last thing we need to do is call on the sendEmailNotification method when the button in the UI is clicked. To handle that we turn to routes/orders.js. There are two routes of importance to us here, the /:orderId/pickup and /:orderId/deliver routes. In each of them an SMS notification is sent and we want to send an email notification too.
Update the /:orderId/pickup route to:
In this code, instead of just sending the message as an SMS and then redirecting to the order page, we wait for both the SMS notification and the email notification to send and then redirect.
We do the same for the /:orderId/deliver route:
Start the app again with npm start and go click on the pickup and deliver buttons for the orders. You'll get sent the SMS message and the email.
Beyond simple emails
In this example we've done the minimum to send our first email notification alongside an existing SMS notification, but there are a lot of improvements we can make.
Subject
The subject is the first part of the email your users will see, currently it is the same for both notification emails. It would be better to summarise the important information in the subject and entice your user to open the email for more detail.
Email design
Speaking of the email, it's currently a plain text email. We can add html emails by passing an html property to the options we pass to the SendGrid helper. If you don't want to control the email markup inside your application, you can set up to send email with dynamic templates instead and if you want a better looking email you could start with one of SendGrid's free email templates.
More information
We could also add more information to this email to make it more useful, such as a summary of the order and a receipt for the service. The notification can live on as a record of the transaction.
Communication preferences
Currently the app sends both an SMS message and an email notification at the same time. You could make this configurable for your users. Perhaps they only want email notifications or only SMS notifications or they want email notifications for the pick up notification, but SMS when it is delivered. Customising the customer's experience the way they want to experience your product is central to successful customer engagement.
Email tracking
The original application tracked the status of the SMS, we could add the same for email using the event webhook. With email tracking you can go further and track when the user opened the notification and whether they clicked on any links within the email. If you don't want to set up more webhooks, you can also check this out in the SendGrid email activity feed.
Add email notifications to your app now!
In this post we've seen how to send an email with SendGrid using Node.js and how similar it is to sending an SMS with Twilio. We've seen how to add email notifications to an existing application and the things we might want to consider as we build those emails.
If you would like to explore more, you can get the code for the completed application on GitHub.
I wish you well in adding email notifications to your application. If you have any questions, leave a comment or drop me an email at philnash@twilio.com.

Related Resources
Twilio Docs
From APIs to SDKs to sample apps
API reference documentation, SDKs, helper libraries, quickstarts, and tutorials for your language and platform.
Resource Center
The latest ebooks, industry reports, and webinars
Learn from customer engagement experts to improve your own communication.
Ahoy
Twilio's developer community hub
Best practices, code samples, and inspiration to build communications and digital engagement experiences.