Automated SMS Notifications with AWS Lambda, JavaScript and Twilio SMS
Time to read: 14 minutes
December 08, 2017
Written by

In this tutorial we will create a small serverless application that will allow us to receive the latest currency exchange rate from GBP to EUR in our phone through SMS.
This experiment will give you some time to learn AWS Lambda, Twilio SMS API and Fixer.io API (an open API for currency exchanges).
We will use JavaScript with Node.js as our language and framework of choice. I don’t expect you to have any prior knowledge of serverless, AWS or Twilio, but I will assume you are confident enough with Node.js to be able to make HTTP requests and to understand the asynchronous nature of the language.
By the end of this tutorial you will know how to build similar automated tasks using the Twilio APIs and how to host them as serverless Lambda Functions in AWS.
The code we are going to write in this tutorial is available on GitHub and you can use it freely as the starting point to build your next cool serverless project.
What are we going to build
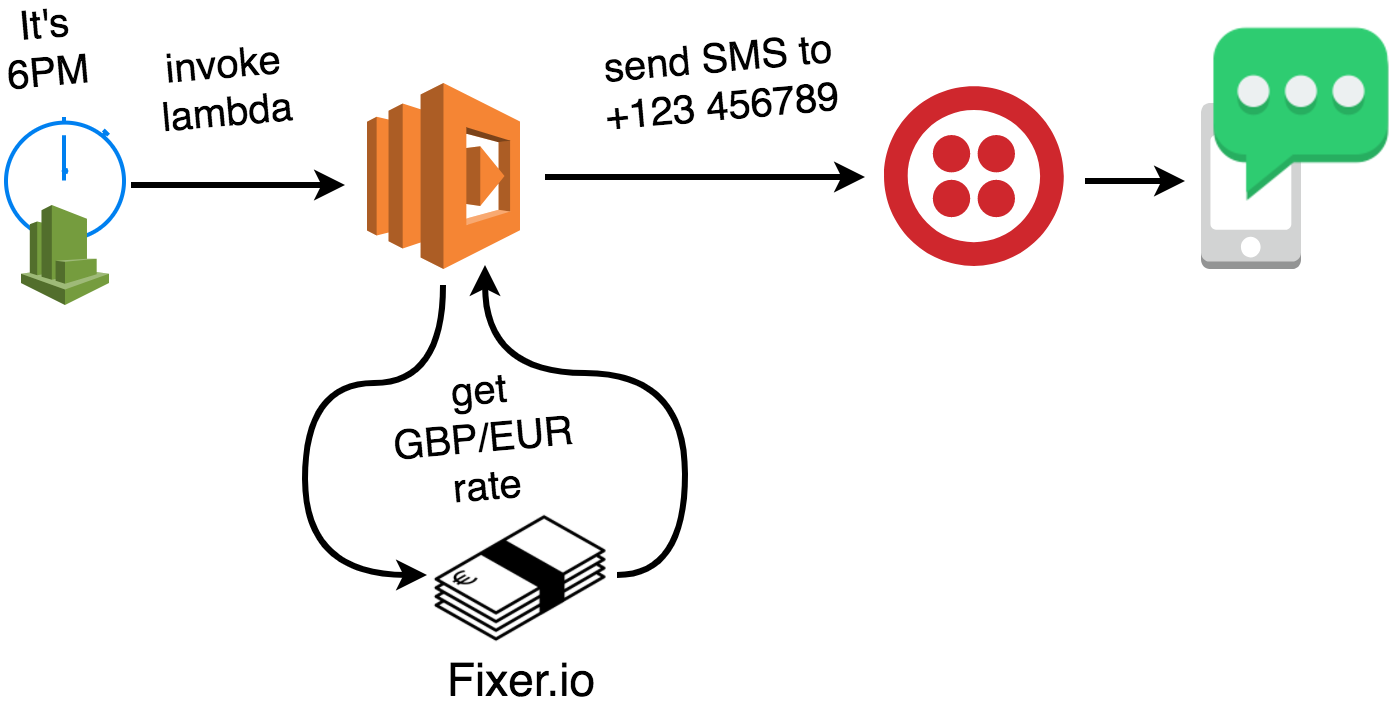
We will create a Lambda function that checks the exchange rate from GBP to EUR.
This serverless function, scheduled to run every day every day at 6PM GMT, will basically perform two separate operations:
- Get the current GPB to EUR exchange rate using Fixer.io API.
- Send the rate to a mobile phone of our choice by SMS using Twilio SMS API.
Tools Required
In order for you to be able to follow along with this tutorial, let’s make sure you have all the needed requirements:
- Node.js >= 6.10 installed in your machine
- An AWS account with enough permission to create Lambda functions
- A Twilio account with an API key and a registered phone number for SMS
You can download Node.js for any OS from the official website.
If you don’t have an AWS account, you can create one from the AWS website. During the account creation you will probably need to insert a credit card number, but don’t be scared. Since during the first year most of the services are highly discounted through the free tier program, you shouldn’t incur in any cost while coding and running the examples this tutorial. If you don’t qualify for the free tier you will still be paying pennies, more likely a fraction of a penny!
If you need a Twilio account, you can create one here.
Once you have done that you will have access to a web dashboard with all the details of your account. From this dashboard you will need to take note of your ACCOUNT SID (1) and the AUTH TOKEN (2).
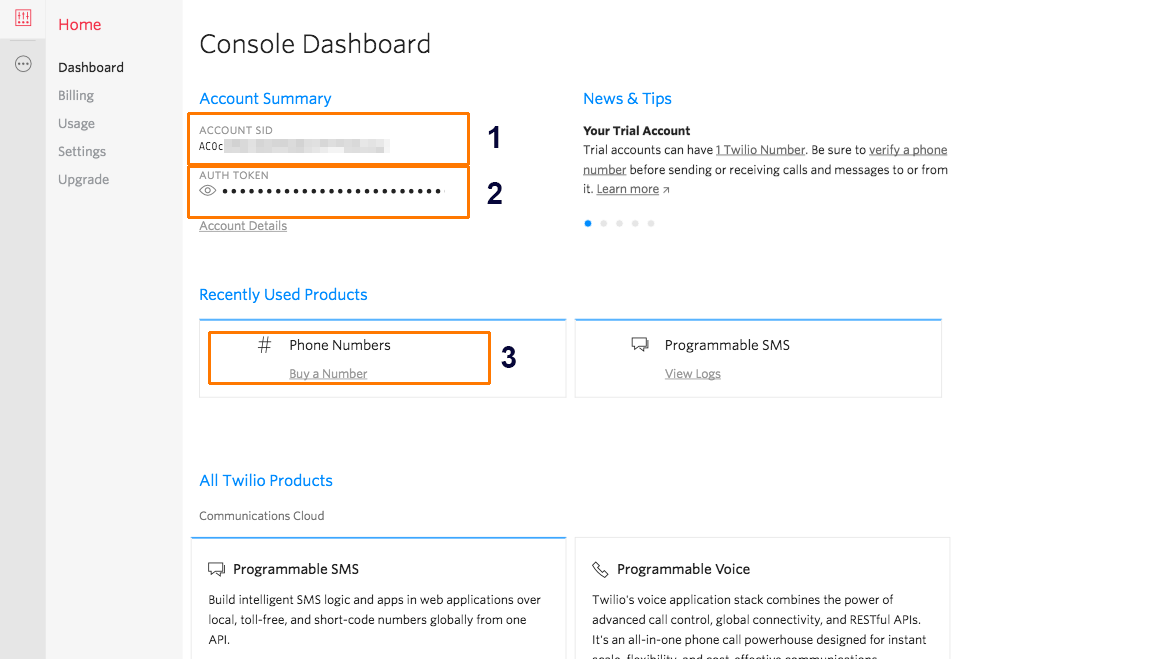
In order to send an SMS, we also need to buy a Twilio phone number. You can do this here (include link to phone numbers).
What is serverless?
Serverless is a software development architecture where servers are not explicitly provisioned by the developer.
Serverless relies on an runtime abstraction offered by a cloud provider (e.g. AWS or Google Cloud) that allows the developer to focus mainly on writing business logic code in the form of “functions”. Those functions can then be easily deployed into the cloud and they will be able to run and auto-scale without the developer having to worry about the underlying server infrastructure.
If you want to know more about serverless, you can have a look at a very streamlined article by Full Stack Python, or have a look at one of my presentations about serverless.
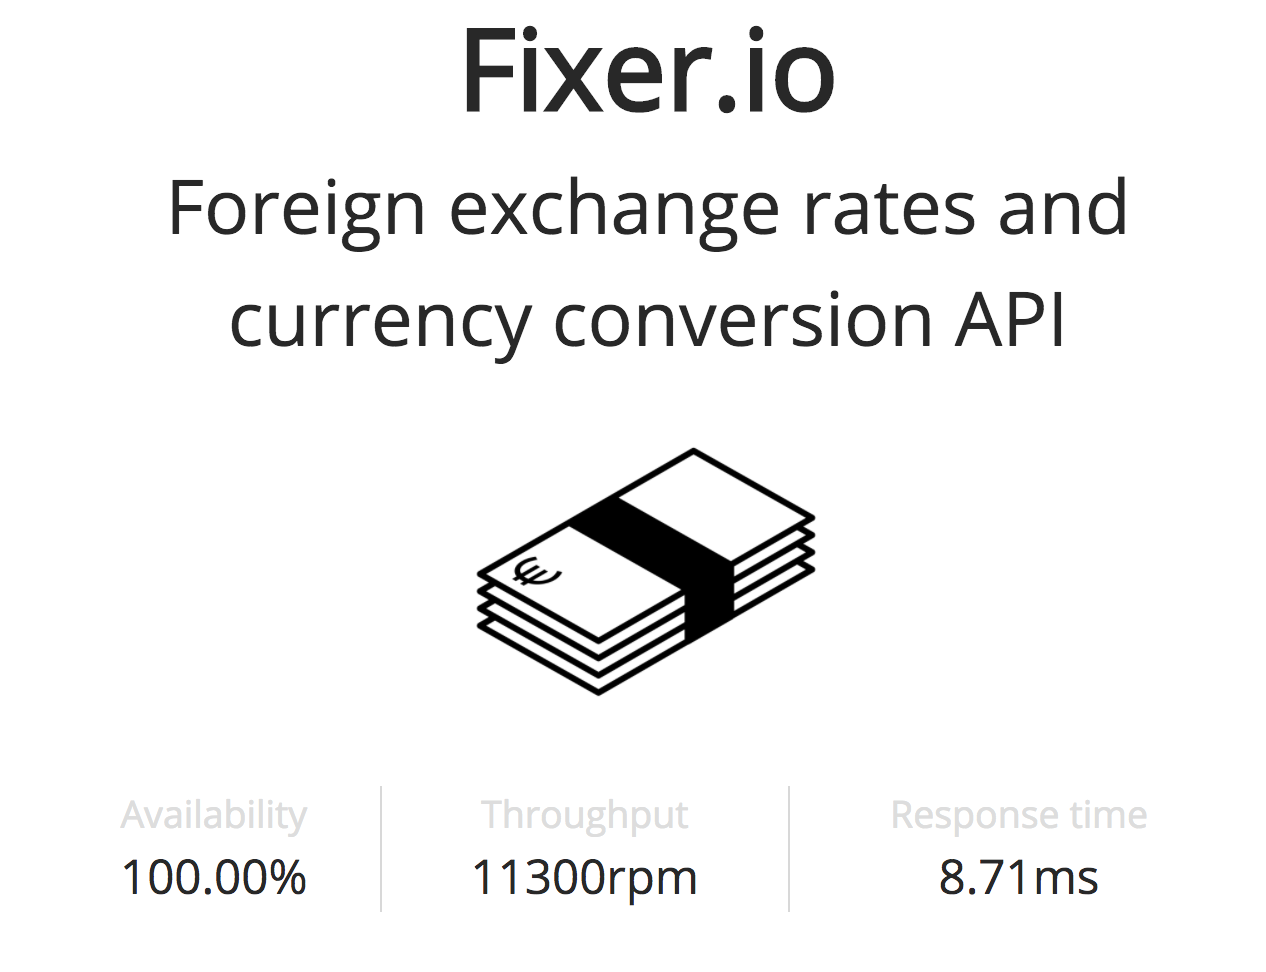
Fixer.io APIs
Fixer.io is a free and open source JSON API for current and historical foreign exchange rates as published by the European Central Bank.
With this service you can do different kinds of queries. The one we will need for this example is a simple GET request the following URL:
http://api.fixer.io/latest?symbols=EUR&base=GBP
Which will return a JSON response similar to the following one:
So, at the moment of writing, the exchange rate for GBP to EUR is about 1.10.
Try to cURL this API from the command line, experiment with changing the parameters and inspect the resulting JSON output:
Twilio SMS API
Twilio’s API lets you send an SMS message by making a POST request along with your account credentials to the following URL:
Where ${TWILIO_ACCOUNT_SID} is found on your Twilio console. This API requires you to authenticate through Basic Auth, where you pass your Twilio account SID as username and a valid Twilio API Key for that account as password.
In order to send a text successfully you need to make sure these three elements are present: :
-
From: The registered Twilio phone number that will be used to send the SMS -
To: The destination phone number that will receive the SMS -
Body: the text of the SMS (limited to 1600 characters)
More details about this API are available in the official documentation.
Let’s give this API a try:
Fill in the blanks with your parameters and run the code in your console, then check your mobile phone, if everything went fine, you should receive a new SMS shortly!
Twilio offers a Node.js helper library to handle more complex cases like querying multiple endpoints.
Node.js Lambda Function Anatomy
A Lambda Function in Node.js is just a regular JavaScript function (sometimes called a “handler”).
A valid Node.js Lambda function needs to have a predefined signature:
The three important details here are event, context and callback.
A Lambda Function is generally triggered by external events such as an API call or a cron job. You can bind a Lambda to one or more events so that every time the event happens it will trigger the execution of the Lambda code.
The event parameter will be populated with an object that describes the type of the event and provides all the relevant details (for example, what API was called and with which parameters).
Contextwill contain some details regarding the execution context (for example how long this function has been running), we generally don’t need to worry much about it unless we want to enable some advanced behaviours.
Callback is the function that the handler needs to invoke when its job is finished or when there’s an error and we need to stop the execution. Lambda functions are considered to be asynchronous functions and the callback is a common pattern in asynchronous JavaScript code to indicate the asynchronous task finished.
Check the official documentation for more details.
Making an HTTP request in Node.js
Since we will need to use REST based APIs, we will need to perform HTTP requests from Node.js. There are a number of ways and libraries to do HTTP requests in Node.js and one of my favourites is request-promise-native, a library that you can use starting from Node.js >= 4 that offers the same interface and functionalities of the famous request module, but it will expose the API as native JavaScript promises. I tend to use promises when I can because it helps making the code easier to read and understand.
With this approach, making an API request will look like the following snippet of code:
Finally, we have all the needed building blocks to start coding our Lambda Function. We will be writing it in a file called index.js.
Before writing code in this file let’s initialize a new project. We can easily do it with NPM by running:
This command will generate a new package.json file. The -y will apply the default settings without prompting questions to the user. You can remove this option if you prefer to follow a guided procedure.
Now we need to install the dependencies:
This command will install request-promise-native, the original request module (which is required by request-promise-native) and will save them to our package.json file.
Finally, let’s see the code that goes into index.js.
I will go through the code step by step, but if you prefer you can view the complete code on GitHub.
The first thing we do is to import the request-promise-native library.
Then we declare our handler function by respecting the expected signature with event, context and callback as described previously.
Inside the handler function, we define some constants that we will use as configuration in the rest of the code. Be sure to fill in all the values that are specific to your account.
At this point we are ready to perform the first API request to get the exchange rate from Fixer.io.
Since request-promise-native returns a promise, we have to write a .then and a .catch method to handle the asynchronous control flow. Inside the then we have get the response data from the API call and we can use it to extract the current exchange rate. We also log the result, which is a good debug practice.
Continuing on in the then block, we are now ready to send the exchange rate to our mobile number using the Twilio API. We do this by using again request-promise-native. This time it’s a POST request and we need to provide the authentication and SMS details as we discussed above.
Again, we have to deal with a promise, so we have to attach another then function to the chain of promises. Notice that in the previous step we used return with the result of the request. This allowed us to propagate the promise in the chain, so that we can share a single catch to handle errors and deal with every asynchronous step with dedicated then hooks. In this last then hook, we just need to log the result and invoke the callback to complete the execution of the Lambda.
At the end of the promise chain we have our generic catch hook. It will be invoked only if any of the promises in the chain rejects (fails). In this case we can only log the error and terminate the execution of the lambda by invoking the callback and propagating the error to AWS by passing it as first parameter to the callback. This will mark the execution as failed.
The last thing we need to do is to export our handler function so that it can be loaded by the AWS runtime. We name the export handler, so that we can later reference this function as index.handler.
The code is very straightforward but let’s recap what is going on in every step:
That’s all the code we need for our project. If you are curious, the code published in the GitHub repository contains some minor improvements, like passing configuration variable through environment variables and few other improvements. Feel free to check it out and don’t forget give it a star :)
Local testing with lambda-local
Before deploying this Lambda Function on AWS let’s do some testing.
There are different ways to test Lambda Functions locally. AWS recently announced the beta version of an advanced command-line tool called AWS SAM Local. This is the first official tool released to give the user a way to test Lambda Functions before deploying them in an AWS environment. I recommend checking out SAM local, but I feel it’s a little more advanced than what we can cover in this article.
So, for the purpose of this tutorial we can use an independent (and much simpler) tool called lambda-local.
This tool can be installed with NPM:
The --global flag will install the tool globally so that you can run the executable in every Lambda project.
Now create a file called event.json that contains the following content:
That’s right, just an empty object! This is because we are not using any data from the event in our Lambda. It is a scheduled execution, so we only care of having a trigger that starts the function at a given time, but we don’t need any input parameter.
Now that you have lambda-local and event.json you can trigger the execution of the Lambda Function locally by running the following command:
If everything went smoothly you should see some success output and you should have received an SMS in your mobile phone.
AWS Web Console Deployment
Log in to your AWS account through the web console and select the AWS Lambda service.
Take into account that the AWS web interface is always evolving, so the actual procedure you have to follow might be slightly different from the one illustrated next.
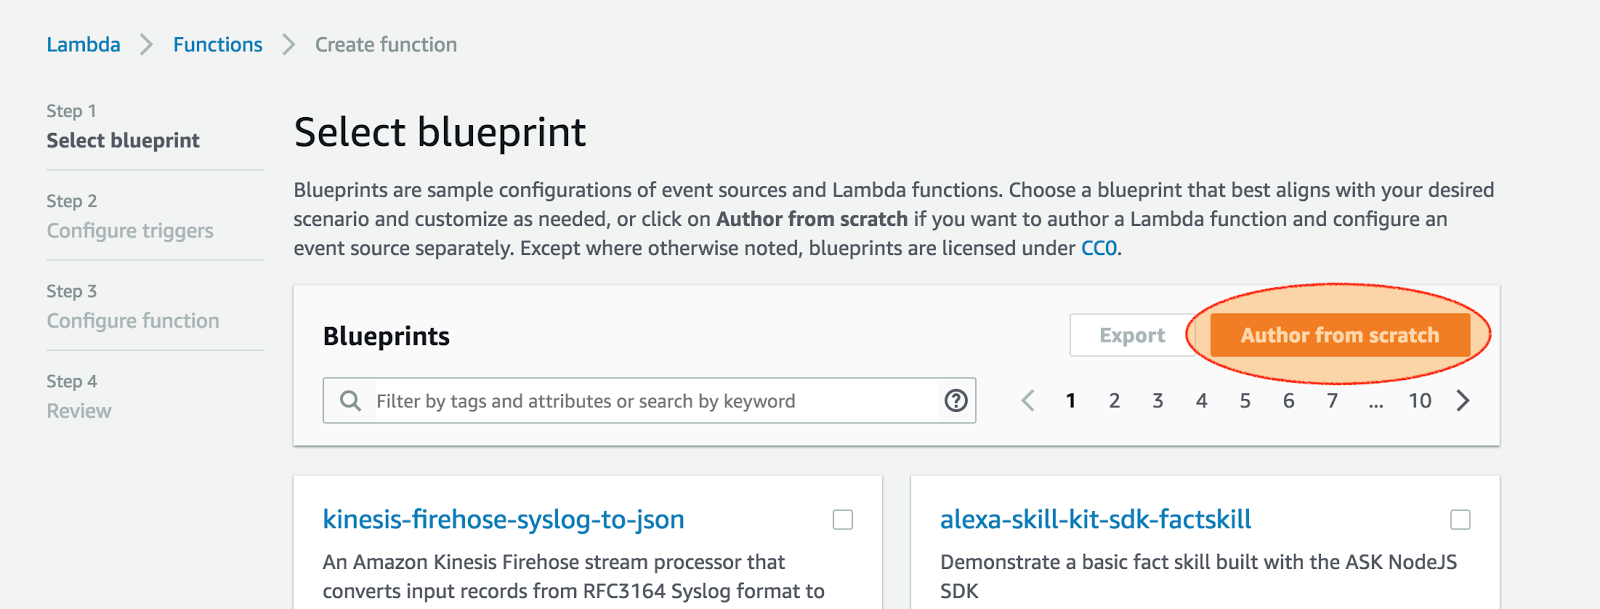
In the top right corner you should see an orange button saying “Create function”. Click it to start the guided procedure.

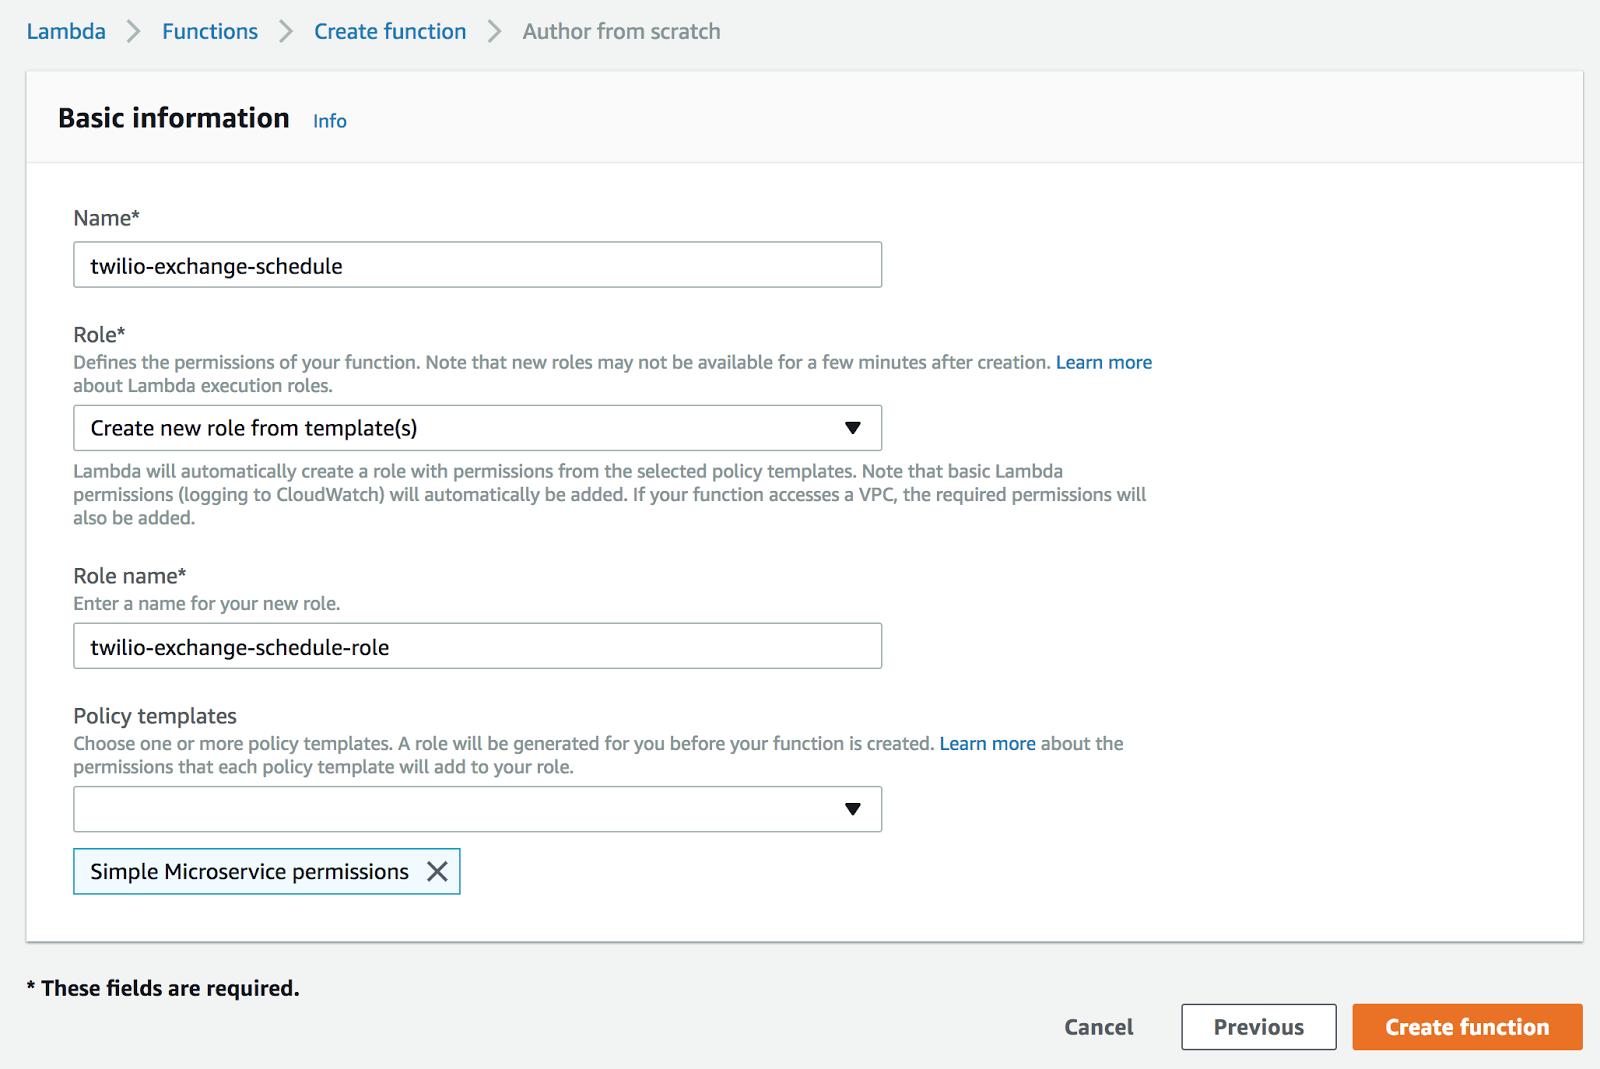
In the first phase of the Lambda creation guide you have a chance to start from a predefined blueprint. Since we have all our code written already we can go with the “Author from scratch” option in the top right corner.
At this point we need configure our Lambda Function, by giving it a name and a role. A role is a set of permissions that are required for the Lambda to access other resources in your AWS account. Our case is really simple as we don’t need to access storage services, databases, or access any other AWS service. For this reason we can select a preset called “Simple Microservice permissions” from the available Policy Templates.
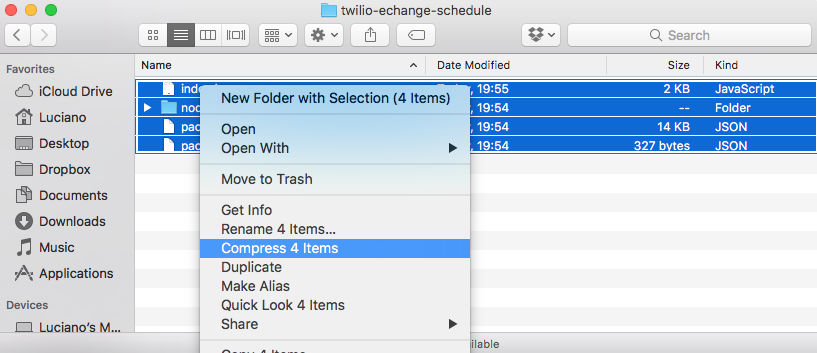
In the next phase we will need to upload our code to AWS. The code required to run our function needs to be packaged in a Zip file that contains in the main level (no nested folders) the following files:
index.jspackage.json-
package-lock.json(if you are using npm version 5 or higher) -
node_modules(the full folder that will contain request, request-promise-native and all the related dependencies)
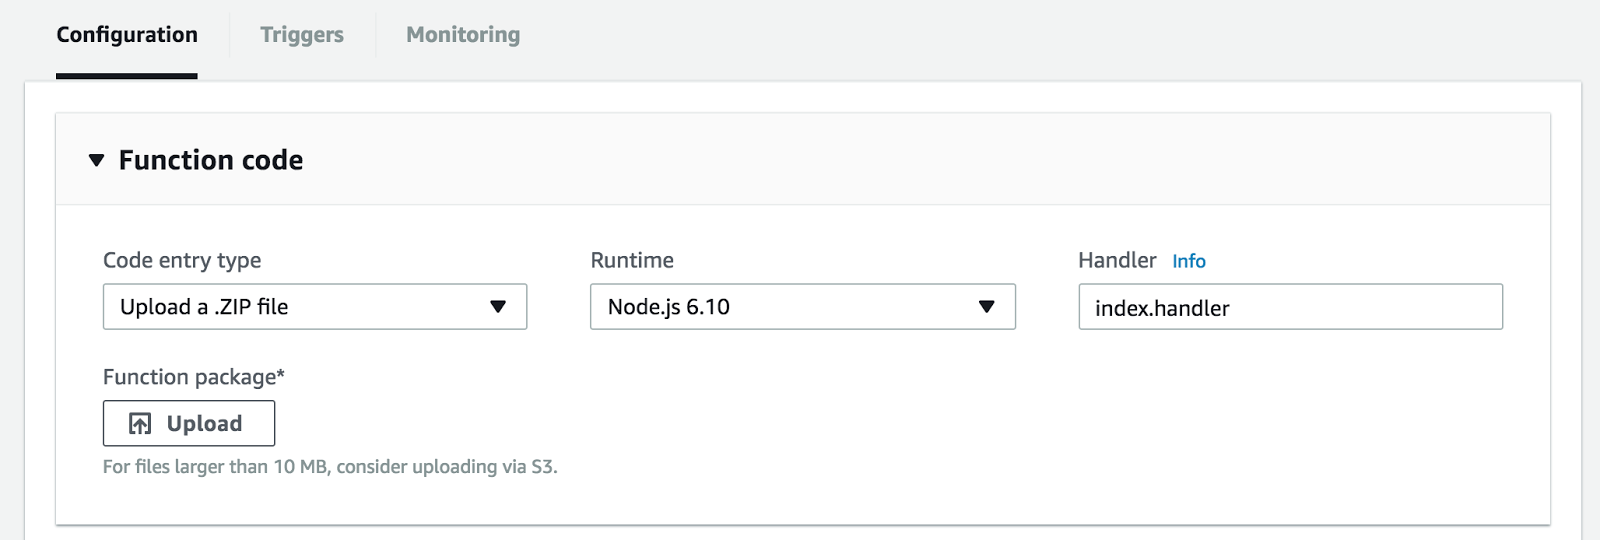
From the next dashboard screen we need to select “Upload .ZIP file” and select the file we just created containing all our code and its dependencies.
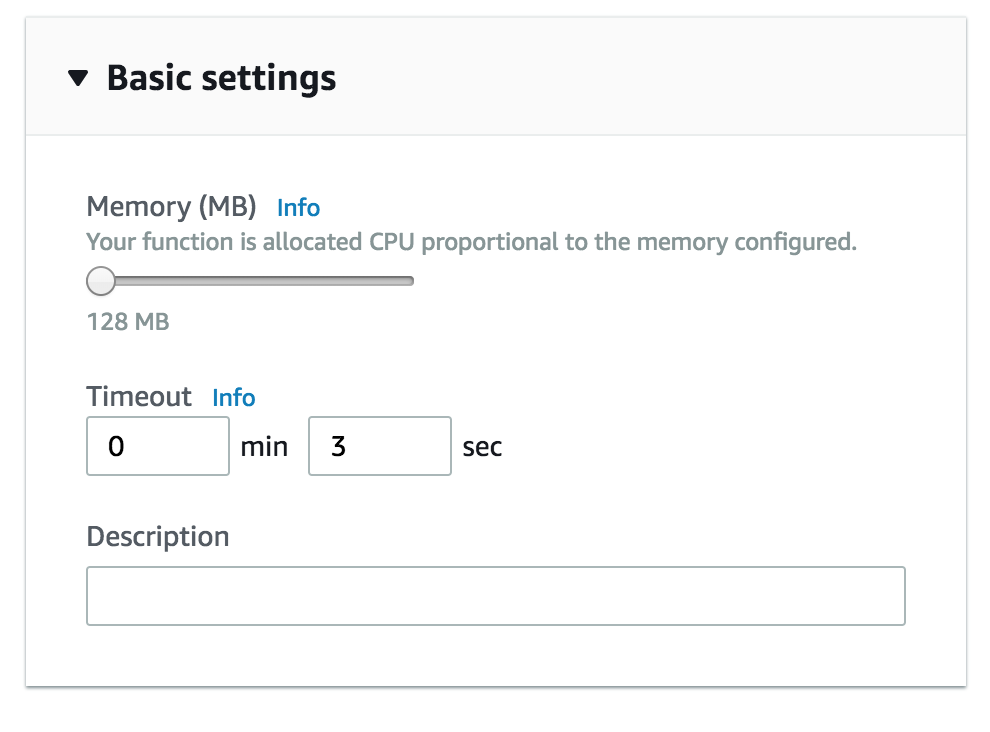
At this stage we need to scroll down a bit and open the box “Basic settings” to open the dedicated panel. In there we can change the timeout option. By default a Lambda is stopped if it runs for more than 3 seconds. We might want to extend this limit a bit more (I’d say about 10 seconds) to be sure the execution doesn’t get interrupted while still waiting for our API calls to complete.
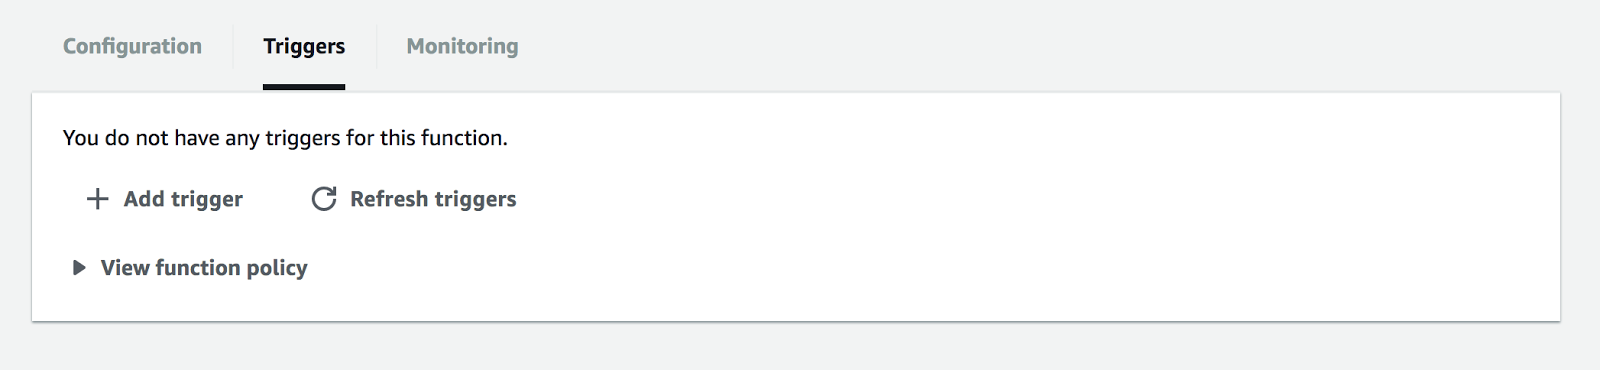
Now is time to define the trigger for the Lambda Function. To do that we have to select the tab “trigger” on the top of the section and then click on “Add trigger”.
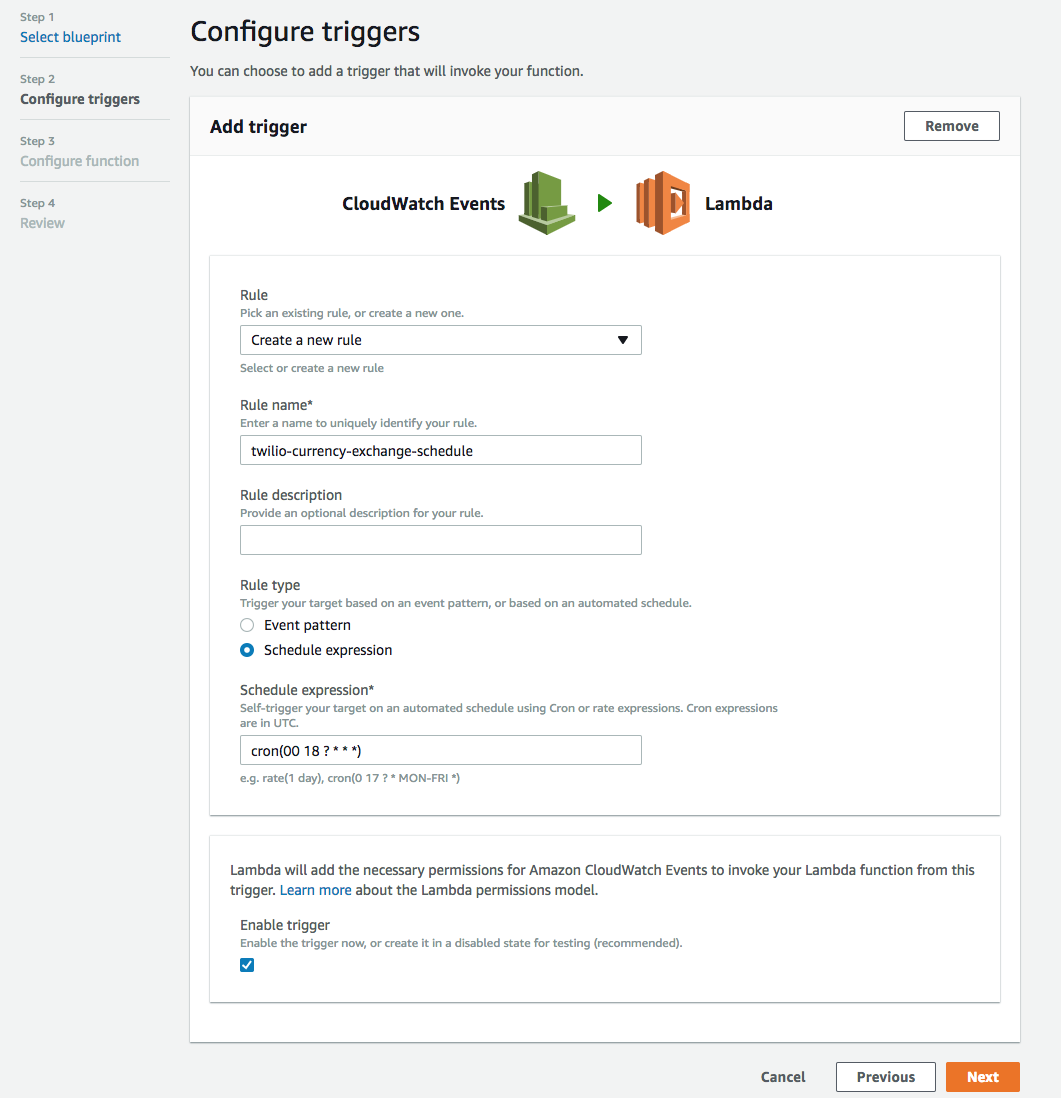
First of all, we have to select CloudWatch as a source, then “Create a new rule” and give it a name (I choose “twilio-currency-exchange-schedule”). Then we need to define an expression that determines when the scheduled event has to occur.
We are going to use the following cron expression:
This will make sure that our event is triggered once a day at 6 PM in GMT time.
If you want to learn more about cron expressions you can play a bit with crontab guru.
Finally, let’s enable the trigger by ticking the dedicated flag.
Finally you can save the configuration by clicking on the button “Save” and get ready to test the function.

Remote Testing
Our Lambda Function is now deployed and enabled in the AWS account. It will run automatically at 6PM GMT every day.

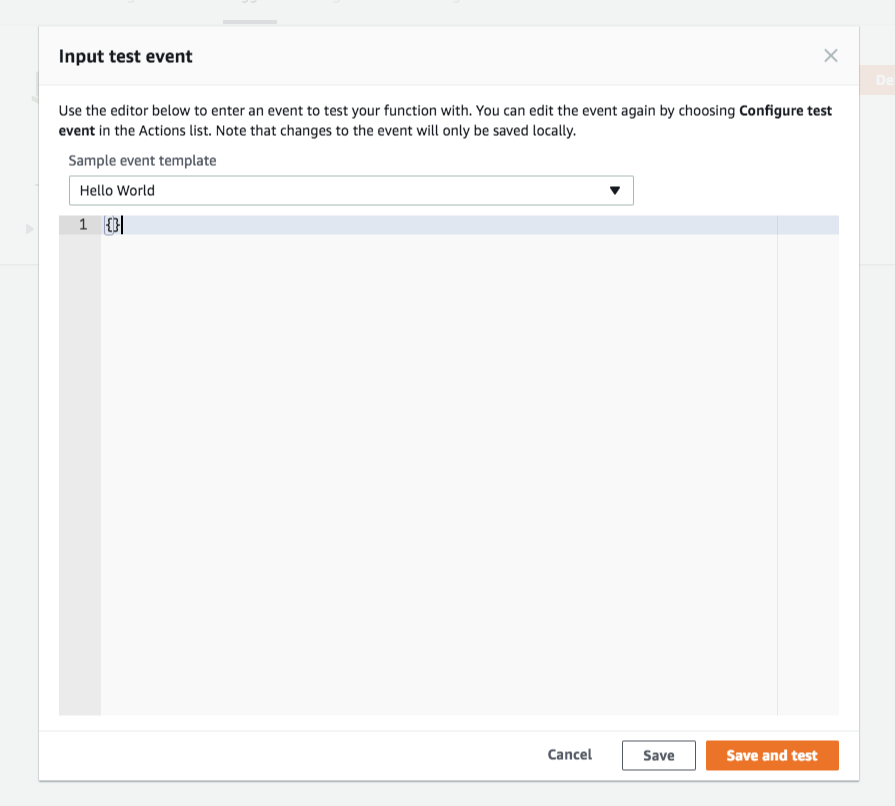
But what if we want to trigger it manually just now to see if everything works as we expect? It turns out we can do this! We just need to click on the top right button that says “Test”!
Once we do that we will be prompted to create a test event object. Similarly to what we did when we were testing the function locally, we can just specify an empty JSON object and then click “Save and test”.
If everything went as expected, after few seconds we should see a success message like the following one:
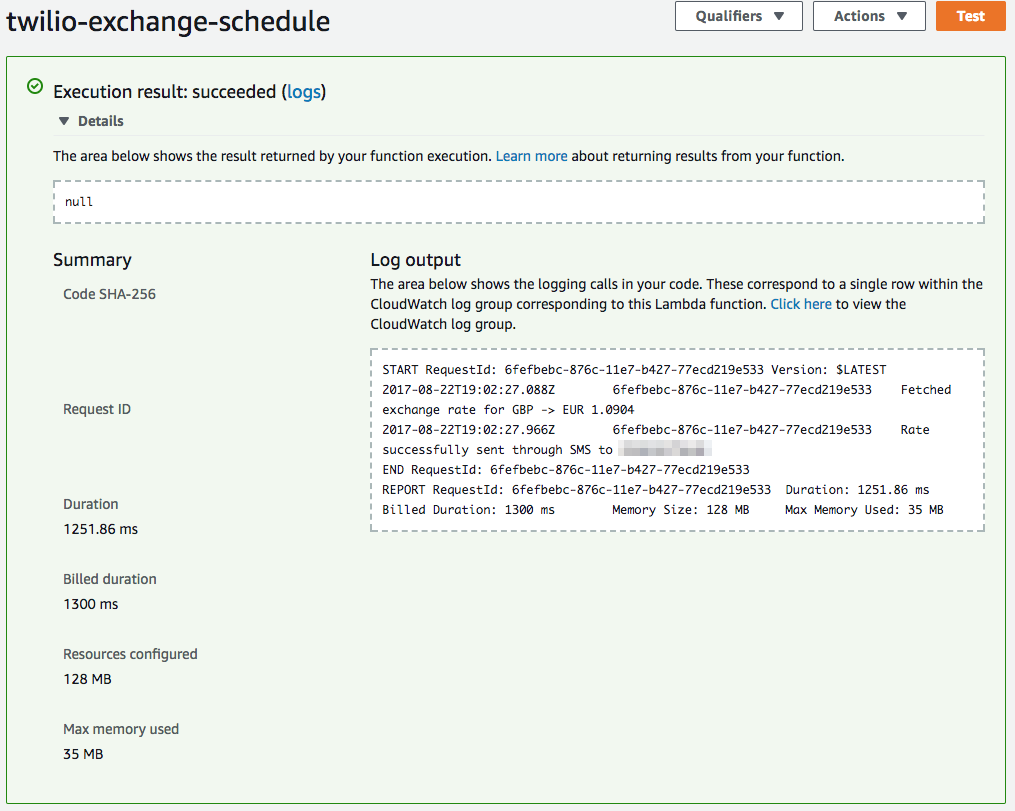
… And you should have received another SMS!
Reading the logs
What if something goes wrong and we want to understand why, or we simply want to check the logs from the latest automated executions?
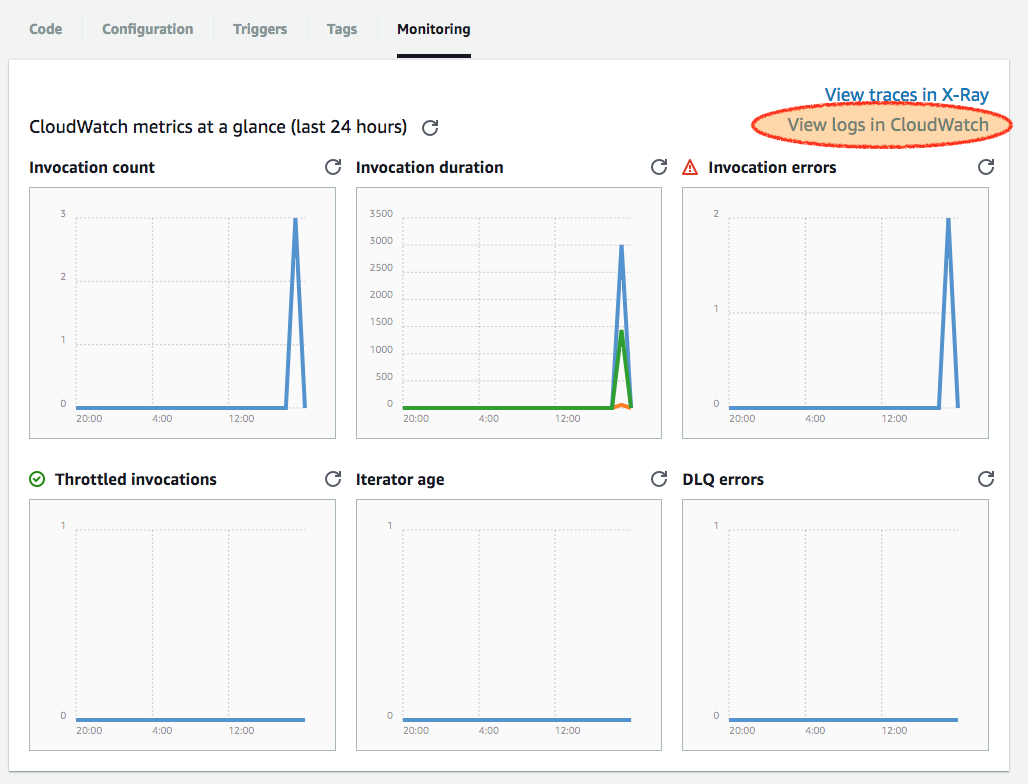
Every Lambda Function will automatically stream the output of the execution to AWS logging and monitoring service: CloudWatch. From the Lambda page in the AWS dashboard you can click on a link labelled as “View logs in CloudWatch” to jump directly to the log streams created for that function.
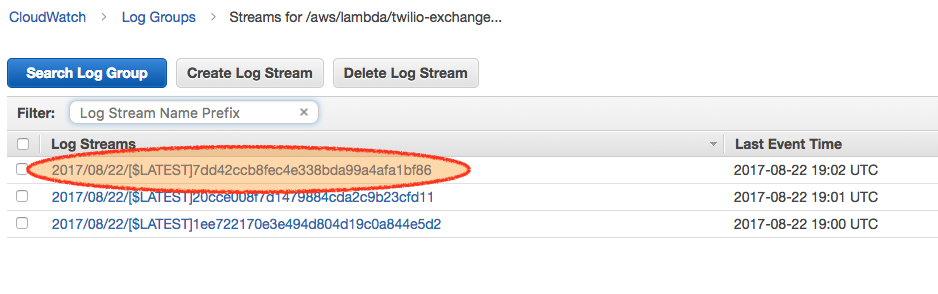
If you want to check the details of the most recent executions you will probably have the log latest log stream on top:
When you click on it you will see all the logs generated by the Lambda Function
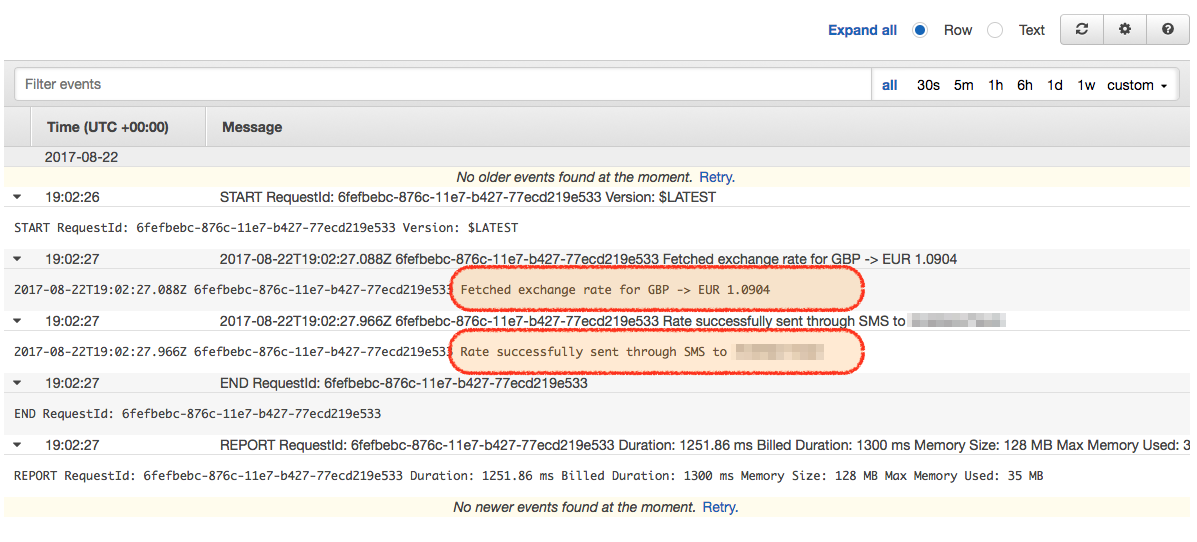
In this picture you are seeing the log from a successful execution. It the execution failed you should have seen all the details of the specific error that lead to a failure.
Recap & Ideas for other experiments
Thanks for staying with me until the end. I really hope you had fun and that you learned some new tricks that might come in handy for your next project.
At this stage, you should know what serverless is, how to write a Lambda Function in Node.js and how to test it locally and deploy it to AWS. Plus you learned a little about the Twilio API.
Why not to try to do some other serverless projects by using MMS, Fax or Voice services from Twilio? Your imagination is the limit… and sharing is caring, so remember to let me know here in the comments what are you going to build next and to share this article with your dev friends!
If you are interested in bringing serverless to your company through in-house training check out serverlesslab.com.
Finally, if you are a happy Twilio customer and you are interested in serverless functions, you might want to explore Twilio’s own serverless platform: Twilio functions.
About the Author
I’m Luciano Mammino and you can find me on twitter, github, linkedin and on my blog.
I am a software engineer born in 1987, the same year that “Super Mario Bros” was released in Europe, which, by chance is my favourite game!
I started coding early at the age of 12, hacking away with my father’s old i386 armed only with MS-DOS and the QBasic interpreter and I have been professionally a software developer for more than 10 years.
I am currently a Principal Application Engineer at Planet 9 Energy in Dublin where I have been using the Serverless paradigm for more than 1 year to power up the next-gen electricity provider for the UK market.
I am also a passionate fullstack Node.js developer and I co-authored the book “Node.js design patterns 2nd edition” (Packt). To help other full stack developers to stay up to date and motivated I recently launched Fullstack Bulletin, a semi-automated weekly newsletter, also completely open source and built on top of serverless services.

Related Resources
Twilio Docs
From APIs to SDKs to sample apps
API reference documentation, SDKs, helper libraries, quickstarts, and tutorials for your language and platform.
Resource Center
The latest ebooks, industry reports, and webinars
Learn from customer engagement experts to improve your own communication.
Ahoy
Twilio's developer community hub
Best practices, code samples, and inspiration to build communications and digital engagement experiences.