Broadcast Photos to Digital Picture Frames via SMS using AWS Lambda, Twilio and SendGrid
Time to read: 11 minutes
March 09, 2021
Written by

One way to foster engagement is to co-opt common patterns people are familiar with. When my family all received digital picture frames as another way to stay connected while we were in quarantine there was a problem: the process for sharing photos wasn’t intuitive, as it required you to draft an email with all the addresses assigned to the digital frames owned by the family, and attach your photos to it.
To improve engagement I embraced my role as family IT support and set up a texting service where images sent to a Twilio number would be broadcast to every picture frame in the family. By leveraging a pattern everyone was familiar with, sharing images via text messages, hundreds of photos have been shared of breads we have baked, babies in their daily outfits, nostalgia photos from the past and so much more!
In this tutorial I'll show how to build your own SMS digital picture frame upload service using AWS, Twilio Programmable SMS and SendGrid. Let's get to building!
Prerequisites
To complete this project you are going to need the following:
- A Twilio account. If you don't have a Twilio account you can use this link for a free $10 to get started, more than enough for this project.
- A SendGrid account. You can sign up for a SendGrid account, where you can use the free tier to get started. Once you create an account you will have to create a SendGrid API key as well.
- An AWS account.
- Docker for setting up external dependencies in our Lambda function. The instructions in this post will be using Unix. If you are on a Windows machine you will need to use WSL2 for creating your Lambda Layer.
- A digital picture frame. I'm using a Skylight Frame, but any type of digital picture frame that allows you to upload photos via email should work.
Overview
Before writing any code let’s take a high-level look at what we’re going to build together. The image below shows the flow of how a text message ends up broadcast on a digital picture frame.
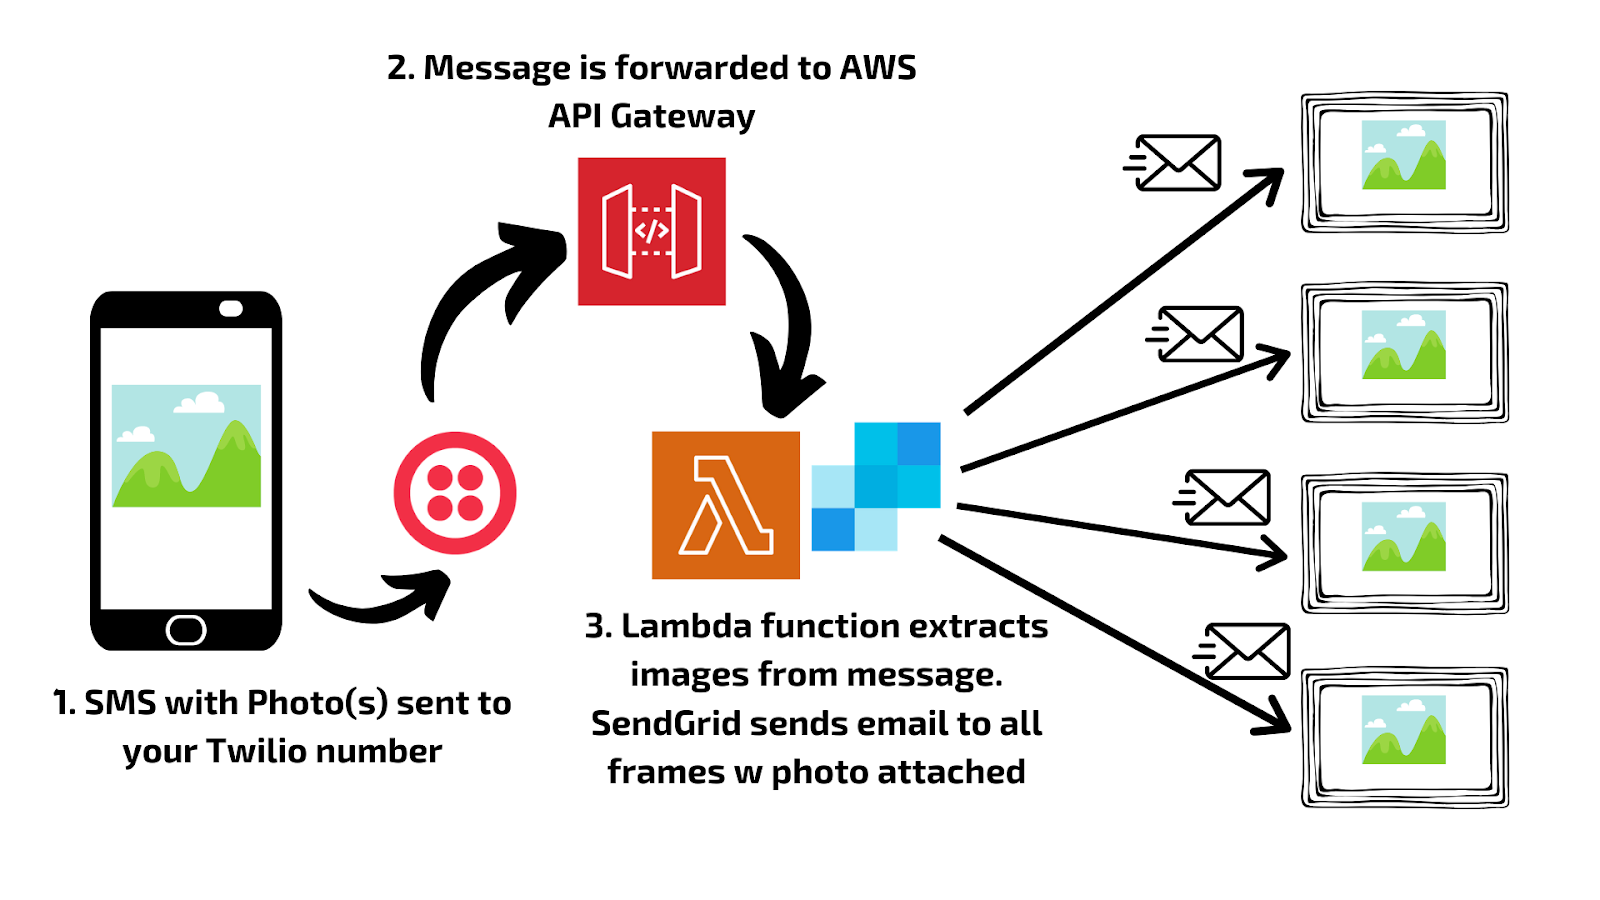
The whole process starts with having a Twilio virtual phone number. SMS messages sent to your Twilio number will be forwarded to an API built in AWS. The API will call a Lambda function where the images from SMS messages will be processed. Once the images are processed an email is created using the SendGrid API, with the images included as attachments. The email is sent to the email addresses for the picture frames you want to receive. And in a few moments they should appear on your frame!
This may sound like a lot, but don’t worry we’re going to walk through each step together! Let’s get started!
Buying a Twilio Number
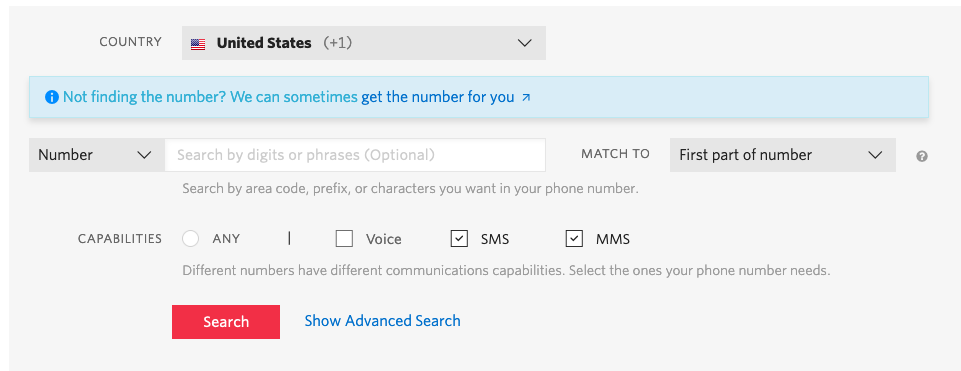
The entire process starts with having a Twilio number where photos can be texted to. If you haven’t created your Twilio account already, create one now. Log into your Twilio account and select Phone Numbers from the menu on the left. Then select the Buy a Number option.
Since we’re sending photos in this project make sure you select a number that has support for both SMS and MMS. One note, currently MMS messages are only supported for North American phone numbers by Twilio. When you find a number that meets these criteria select the phone number and click Buy.
Creating the AWS Resources
We’ll return to the phone number later. Now we're going to set up the AWS resources for the project. We are going to use an AWS Lambda serverless function to process the incoming text messages with photos to your Twilio number and then attach the photos to an email that will be sent to a list of email addresses associated with your chosen digital picture frames. We'll then setup an API Gateway to help connect our Twilio number to our Lambda function. So let's get started with our Lambda function!
Creating a Function Layer
By default AWS Lambda functions have limited functionality. For this project we're going to need access to a couple external libraries to help read the photos and send emails with SendGrid. To make this functionality available to our Lambda function we're going to create a Lambda Layer. Layers are an external set of code that are loaded along with your Lambda function that provide additional functionality.
Specifically in this project we need to create a Lambda Layer for the sendgrid and requests libraries so that they can be used by our Lambda function. One convenient method for creating a Lambda Layer is by using Docker to create a package with all the dependencies.
Open a new terminal and create a directory you will use for this project. Within that directory create a new python path where the requirements will be installed like the code below.
In the text-to-frame-layer directory create a new file requirements.txt. This file will contain a list of the external packages you will need for this project. Specifically for this project we will need the sendgrid and Python requests libraries. Inside your requirements.txt file enter the following:
Next you will need Docker to build a deployment package with those dependencies that can be uploaded to AWS. In the terminal enter the command below.
The command utilizes an image replicating the Python Lambda environment, and will install the packages to the site-packages directory you created earlier. When this command is completed you should see the site-packages directory populated with all the packages and requirements.
The directory with the requirements needs to be packaged so they can be loaded to AWS. In the terminal enter the following:
You should now have a zip file named text-to-frame-layer.zip in your local directory. Keep that handy, we’re going to finish setting up our Lambda function in the AWS console.
Writing the Lambda Function
The Lambda function will be set up using the AWS console. Log into your AWS account and select Lambda from the services menu.
Before actually writing the Lambda function let’s upload the zip file with the external dependencies to AWS. From the left hand menu select Layers and then click Create layer.
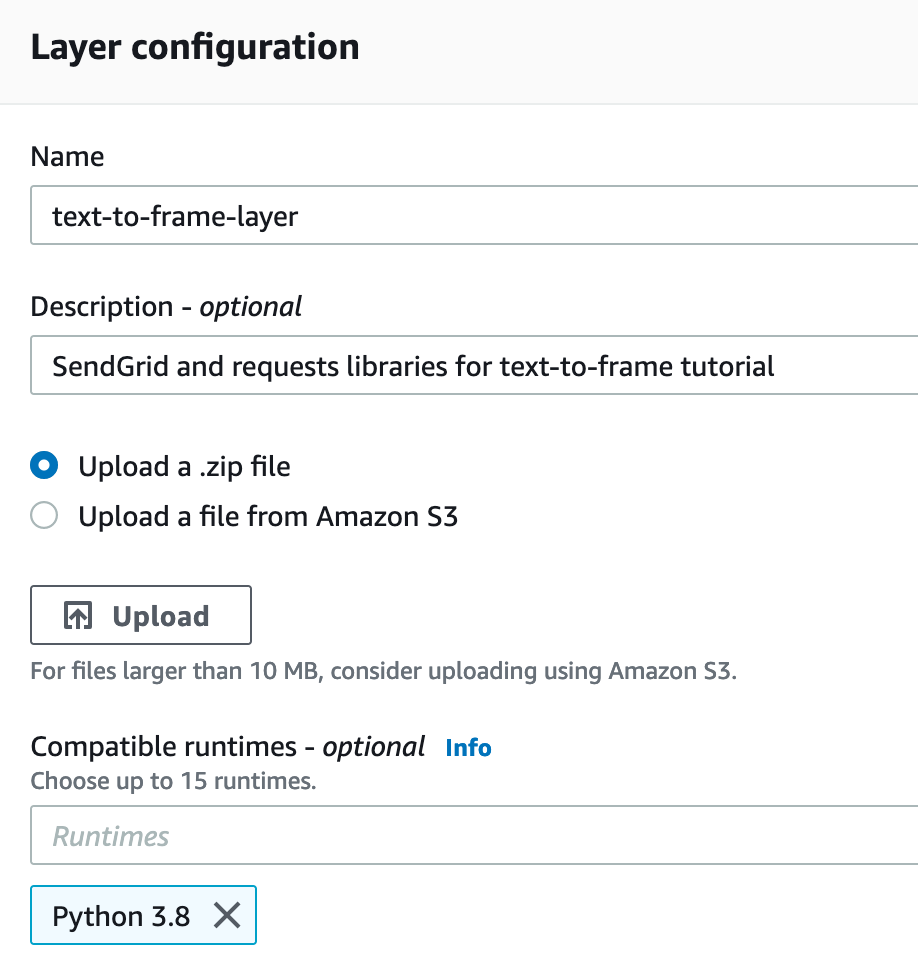
Name your layer text-to-frame-layer. Choose the Upload option and select the zip file you created earlier. From the Compatible runtimes dropdown choose the Python 3.8 option. Then click Create.
Now let’s get to writing the Lambda function code. Go back to the Lambda page and click the Create function button.
For the name of the function enter text-to-frame and from the Runtime dropdown select Python3.8. There is no need to do anything in the Permissions section. For this tutorial AWS will create a default role with basic permissions that will be sufficient. Click the Create function.
The next page allows you to manage your Lambda function. First, you need to add the Layer you created in the previous step to your function so your Lambda function can access the required external libraries.
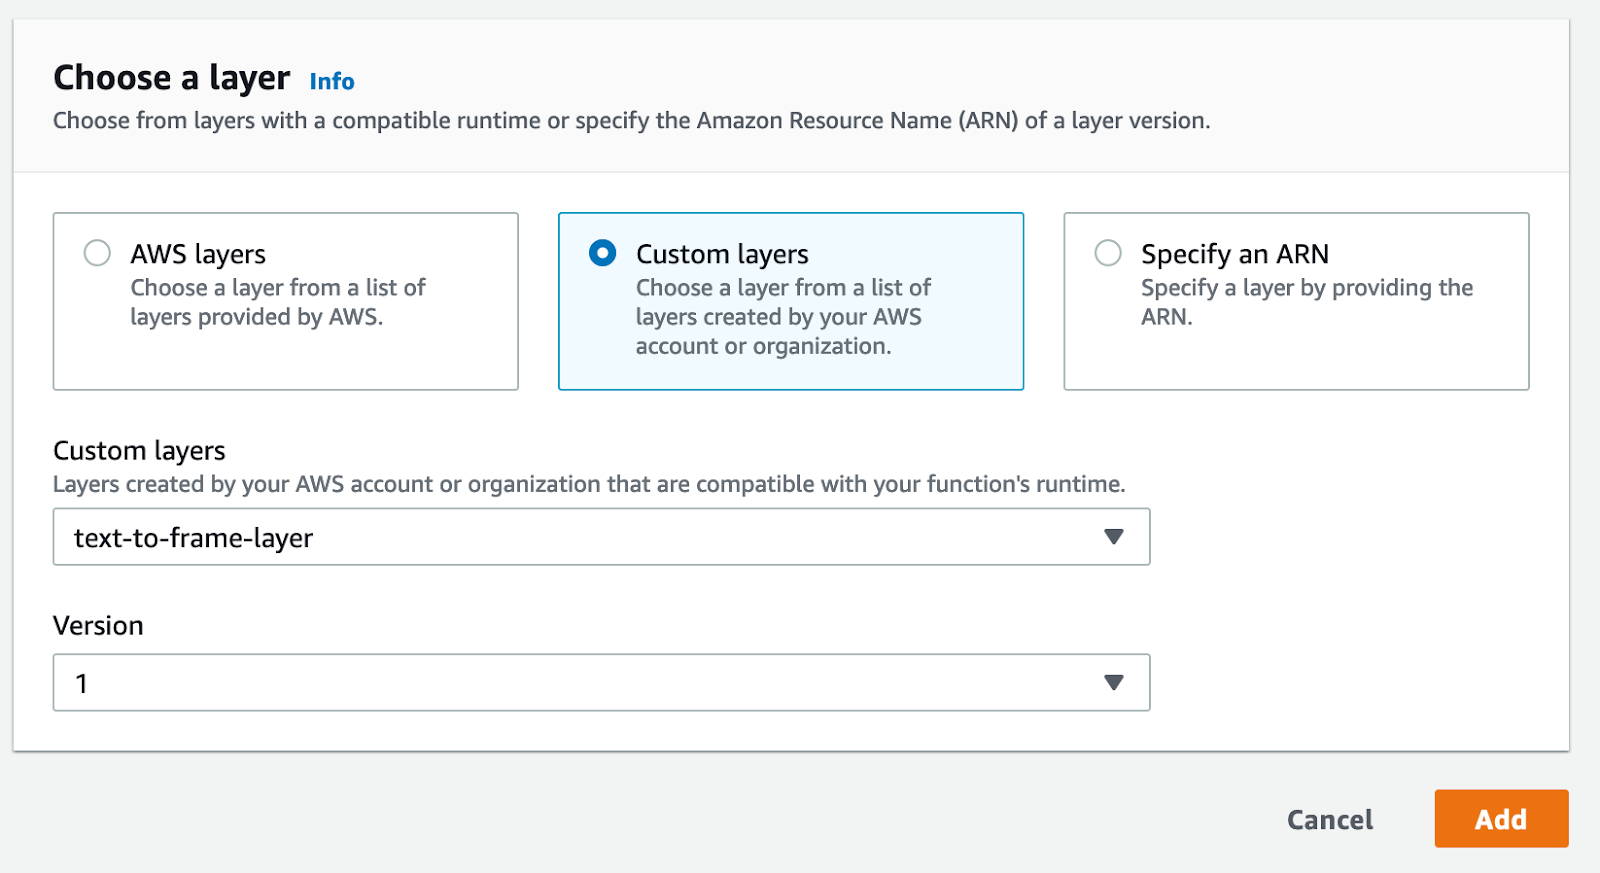
Click the Layers button beneath the box with your function name in the center of the screen. Scroll down and click the Add a layer button.

On the next screen select the Custom layers option. Then find the text-to-frame-layer option from the dropdown. From the Version dropdown select 1 and click Add.
By adding the Layer to the function the sendgrid and requests libraries are available for the function to use. With those dependencies loaded the code for the function can be written.
On the page of your Lambda function scroll down to the Code source section. In that section there is a code window. Click the lambda_function.py file in the left sidebar to open the default code template for the function. Replace the code in the window with the code below and click the Deploy button to save changes.
The code performs a few tasks. First, the NumMedia attribute of the message is checked to determine if any images are included in the message. If no image is detected then a response is returned to the sender asking them to send an image.
There is a size limit for files that can be uploaded at once. To help remain within those limits a cap of 5 photos per message is imposed. If more than 5 photos are sent a message is sent back to the user informing them of the 5 photo limit. Otherwise, let’s continue processing the images.
A SendGrid Mail object is created where you define what email address the emails will be sent from (you’ll do this in the next step!) and who to send them to. The to_emails parameter should include the list of digital frame emails you want to forward images to. You can provide these by setting the frame_recipient_emails variable near the top of the file to match the frames you want to send to.
With the Mail object created the next step is to process the images and attach them to the email. Each image is retrieved by accessing its MediaUrl attribute in the Twilio message. The image is then encoded to a bytes object. An Attachment object is created for the image with the SendGrid API, and the attachment is added to the mail message with message.add_attachment(attachment). These steps are repeated for each image sent.
After all the images are processed and attached to your email the email is sent with the SendGrid API client:
A response is sent back to the user informing them that the images were sent.
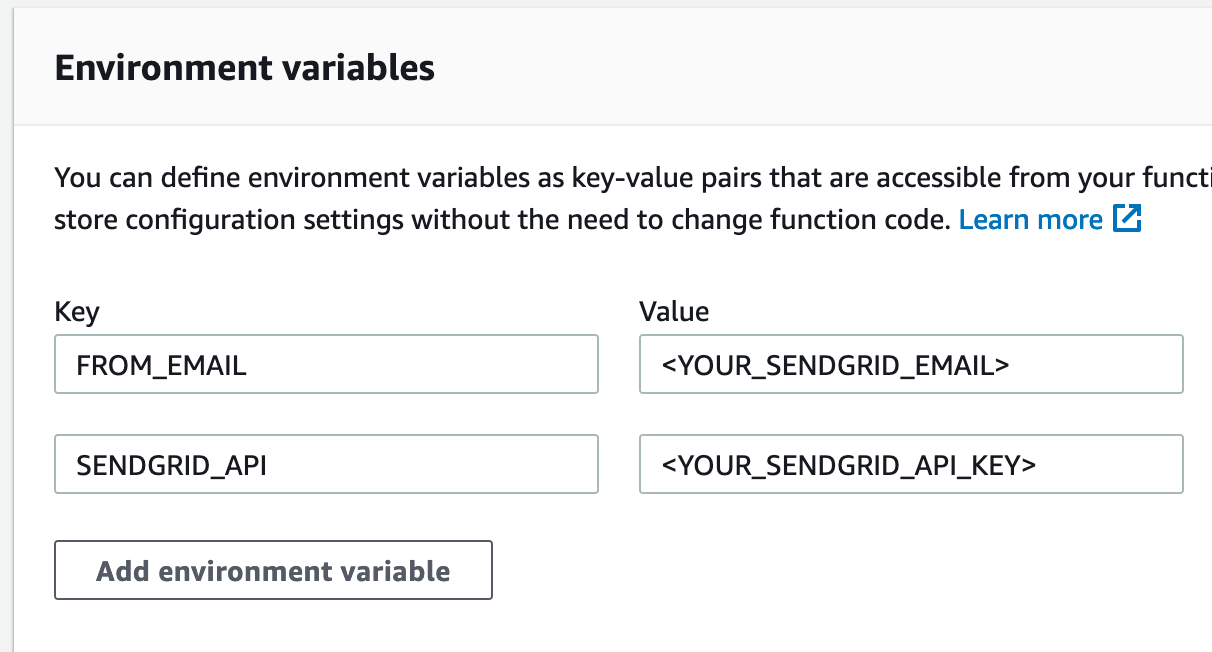
The code utilizes a coupleof environment variables: SENDGRID_API and FROM_EMAIL. Let’s make sure those get set within your Lambda environment.
Click the Configuration tab and select the Environment variables option from the list of selections on the left. section and click Edit on the right.
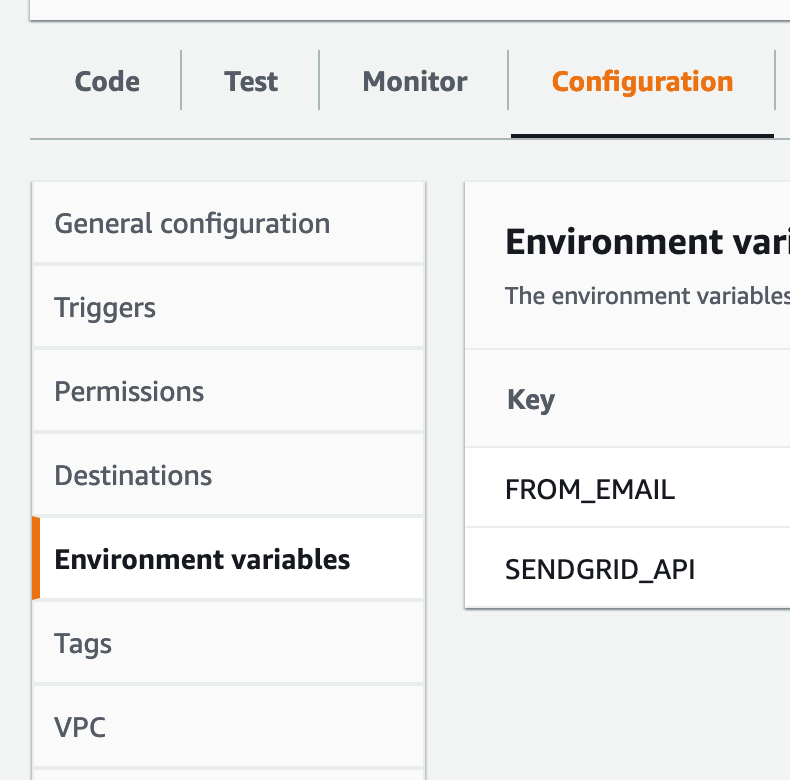
This is where you can add environmental variables to your Lambda function. Click Add environment variable. We need to add two variables to the Lambda function. The first is the SENDGRID_API key you created when you set up your Sendgrid account. If you didn't set up an API key do so now. The second variable is FROM_EMAIL, representing the email address you will send emails from. This should be the email you used when you set up your Sendgrid account.
The last configuration we need to make is increasing the time for our function. By default Lambda functions will timeout after 3 seconds. To ensure there is enough time for the Lambda function to complete its process the timeout needs to be increased to 10 seconds. From the Configuration tab select General configuration from the menu on the left and click Edit. On the next page change the Timeout setting to be 10 seconds. Click Save.
That's all the code! Let's continue the deployment by setting up an API Gateway to facilitate communication between Twilio and your Lambda function.
Setup API Gateway
API Gateway will allow Twilio to access your Lambda function. An API endpoint is going to be created that can receive an HTTP request when a message is sent to your Twilio number.
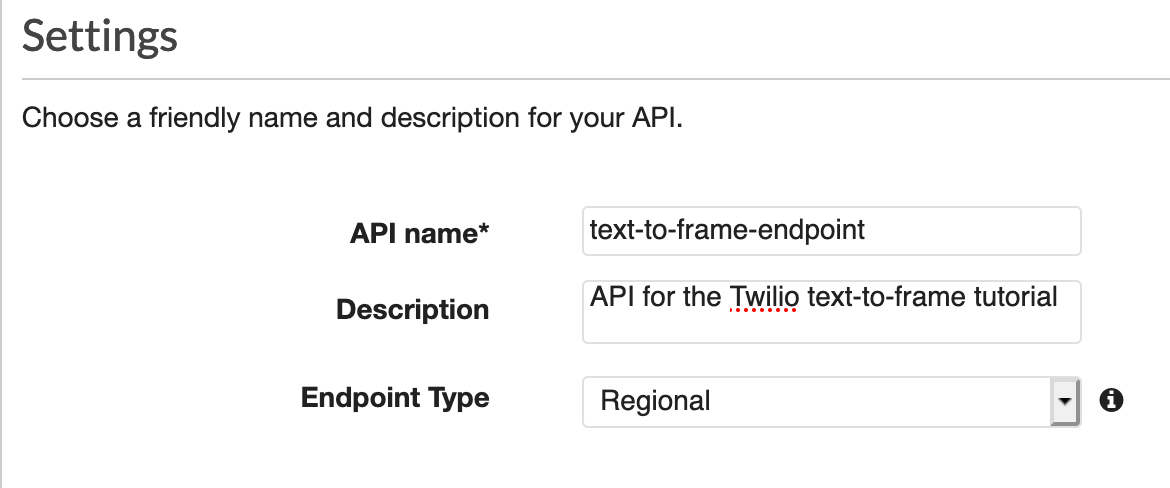
In your AWS Console select API Gateway from the Services menu. On the API Gateway page click the Create API button. Select the Rest API option.
On the next page enter text-to-frame-endpoint as the API name and click Create API.
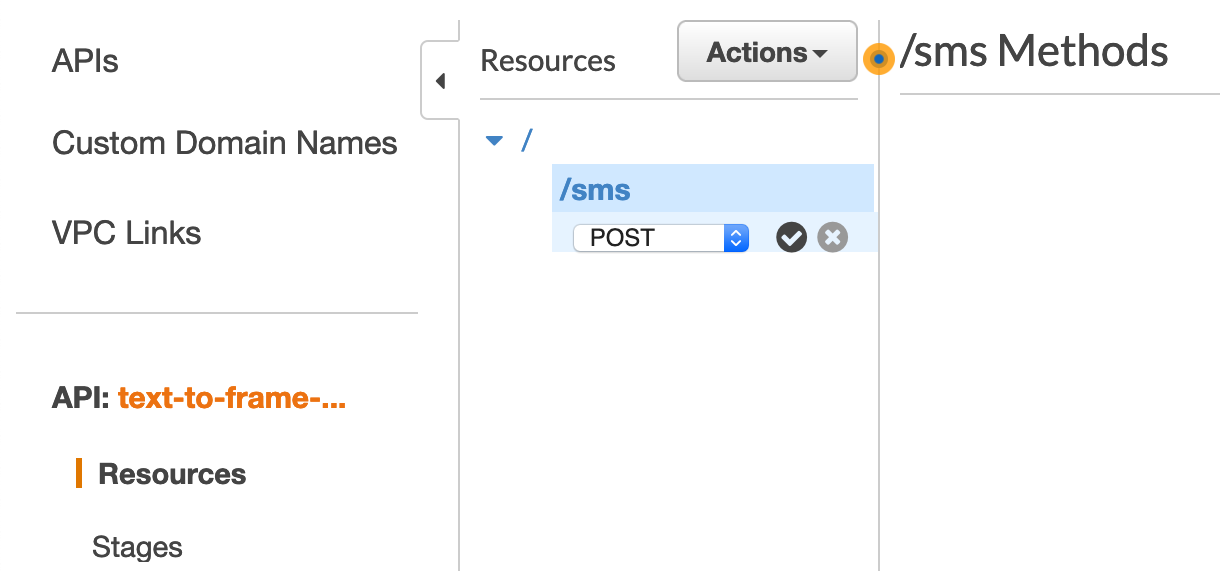
For this tutorial you're going to need one endpoint that will be linked to the Lambda function. Create that resource using the Actions dropdown by choosing the Create Resource option.
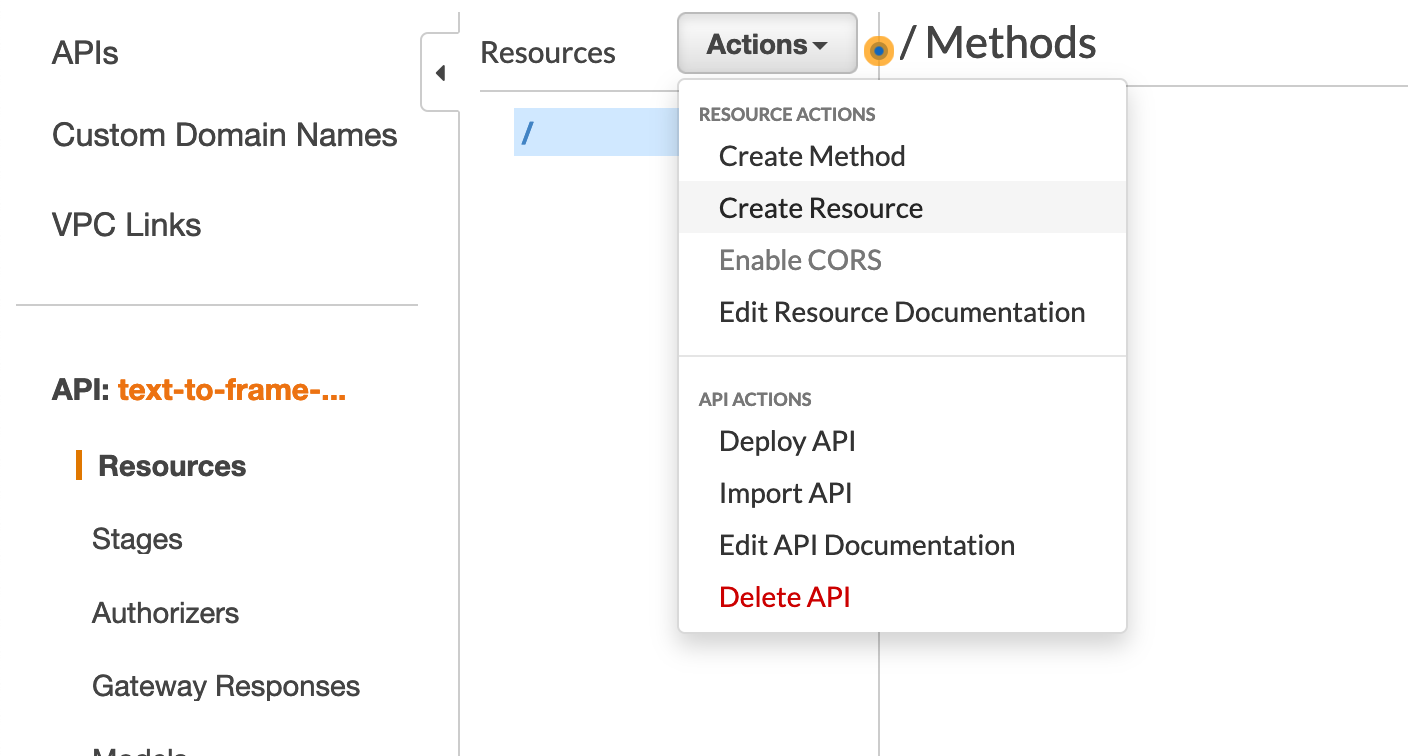
In the right panel set the Resource Name to sms. You will see the Resource Path field automatically filled with /sms. Click Create Resource.
A method needs to be created for your resource. Make sure /sms is selected in the list of Resources and then select Create Method from the Actions menu. A dropdown box will appear beneath /sms. Choose Post from that dropdown and click the checkmark.
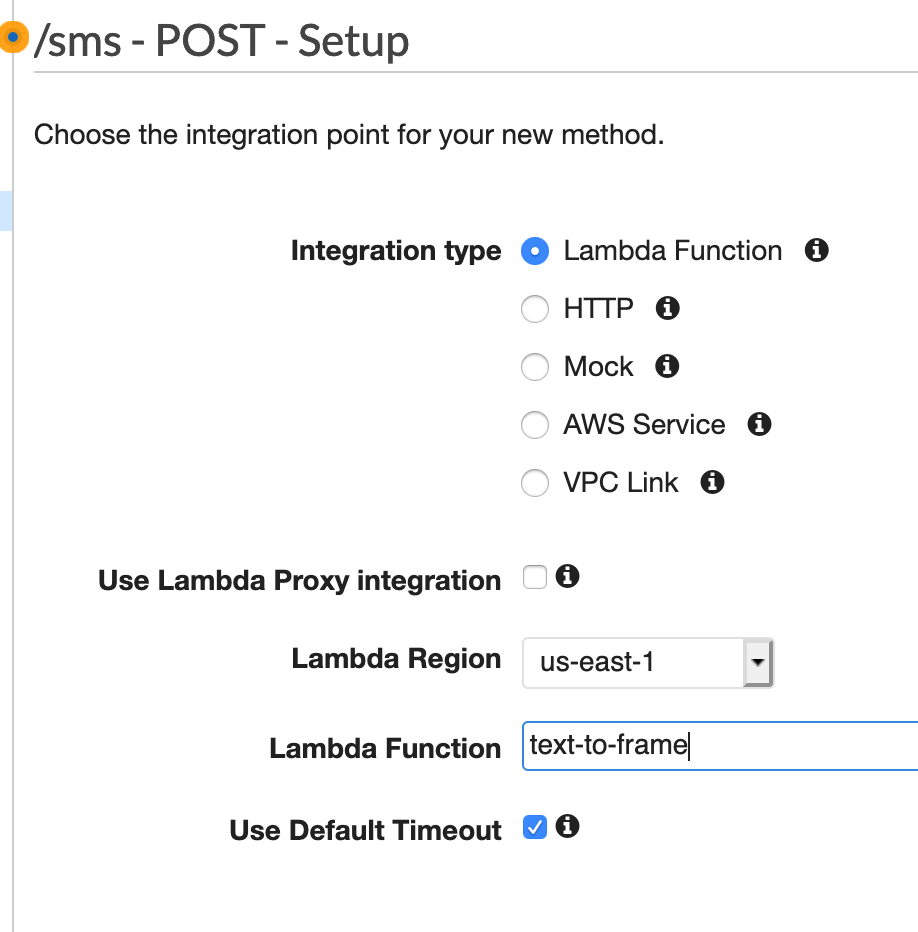
On the next screen we need to instruct the API to call our Lambda function we created. Choose Lambda Function as your Integration Type. Keep the box for proxy integration unchecked. Then select the AWS region you created your function in and type the name of the Lambda function created earlier, text-to-frame. Click Save.
Our API is now connected to the Lambda function. Before we can start using the API a few configurations need to be made for Twilio and AWS to communicate properly.
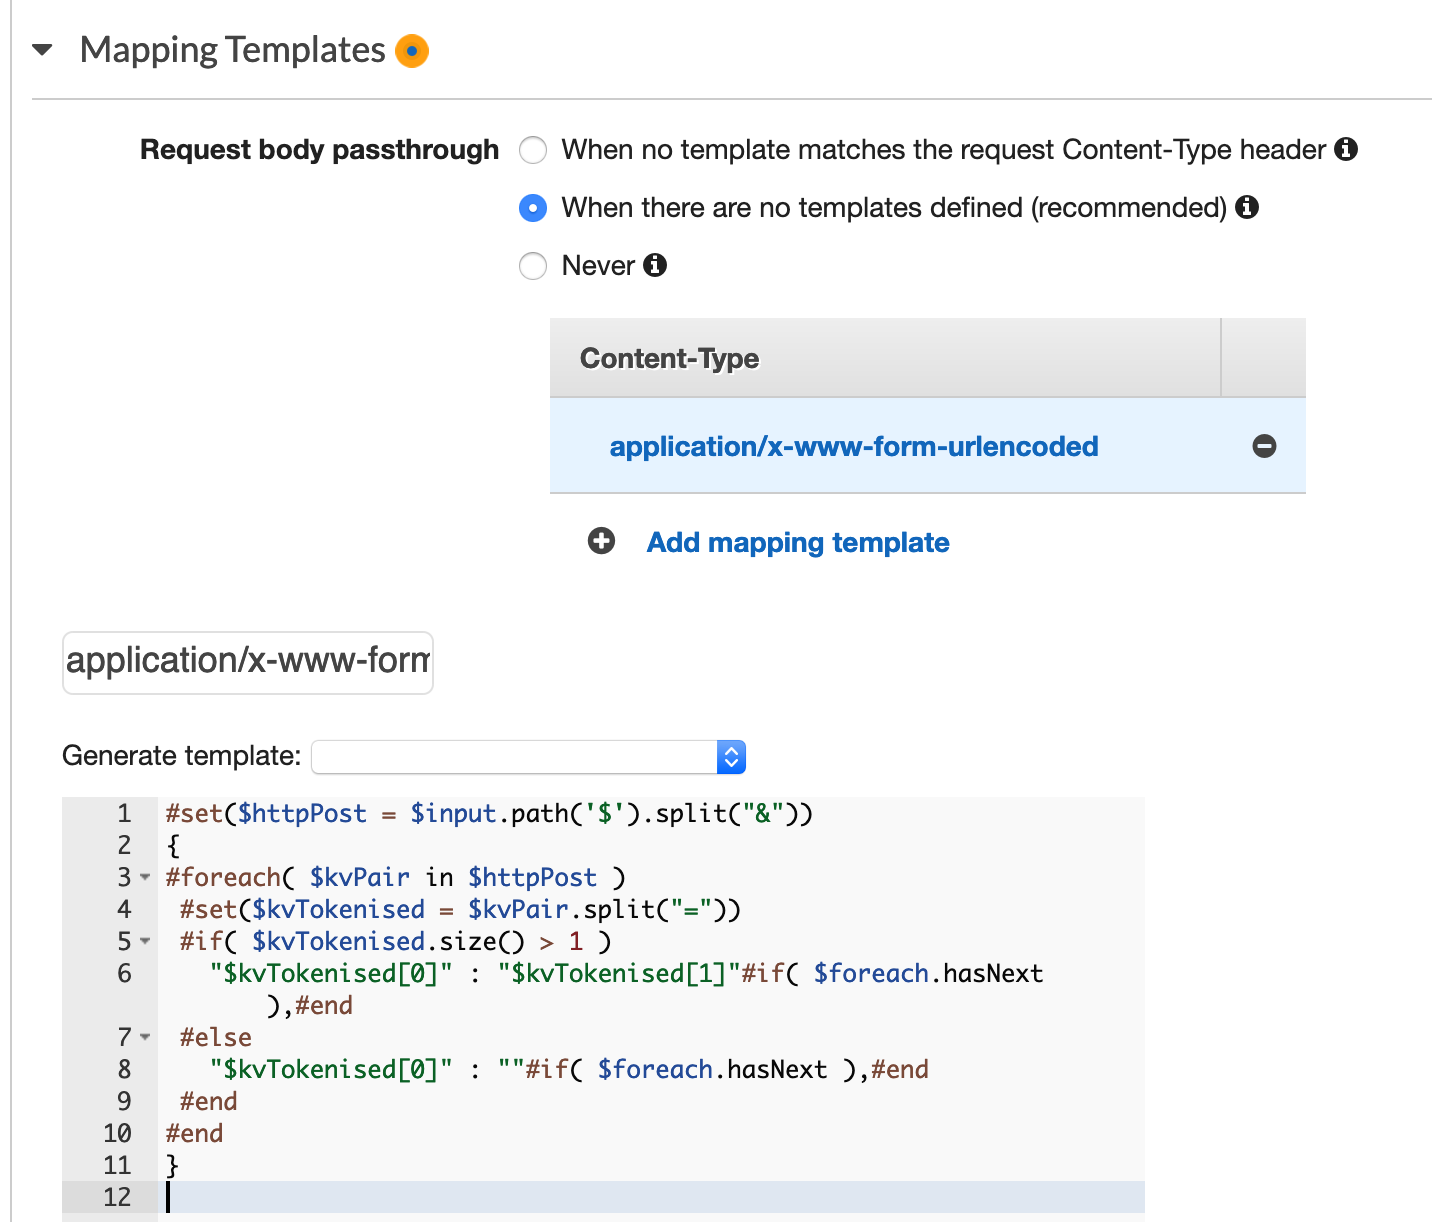
First, incoming content from Twilio needs to be converted from a application/x-www-form-urlencoded type sent by Twilio into JSON, which is expected by AWS. To do this find the Integration Request section of the API.
On the next page do the following:
- Scroll down and expand the Mapping Templates section
- Choose the "When there are no templates defined" option for the Request body passthrough
- Select Add mapping template and enter application/x-www-form-urlencoded in the textbox
- Click the small checkmark
- In the textbox below enter the following code then click the Save button. This code will split the HTTP parameters into JSON key/value pairs that can be read in our Lambda function.
When you’re done the section should look like this:
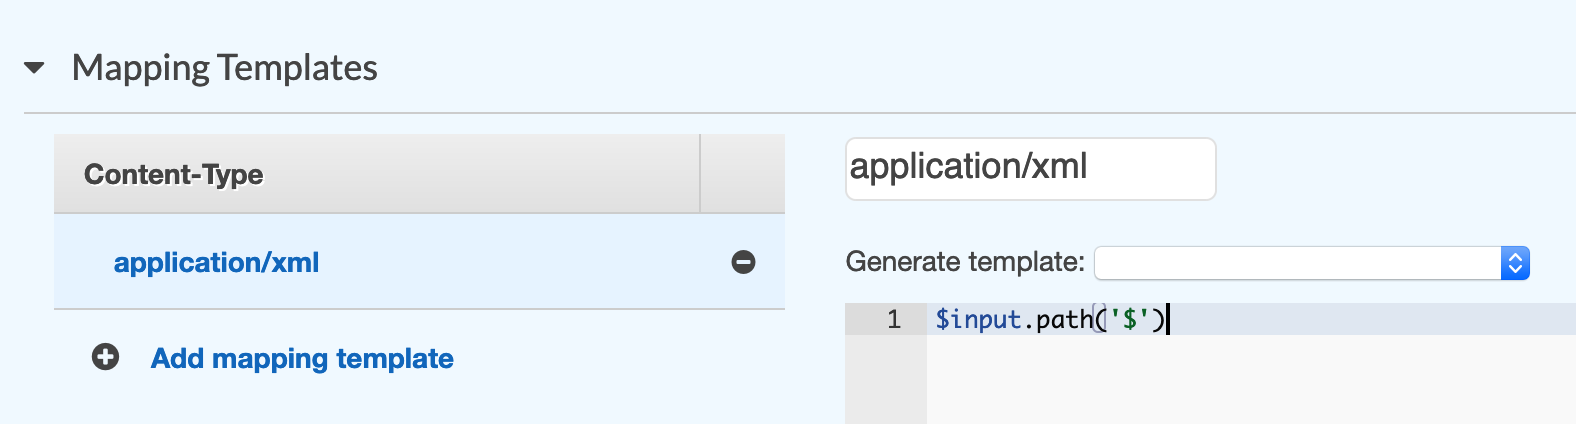
Similarly, the JSON output from the Lambda function needs to be converted into XML that is expected by Twilio. Go to the Integration Response section of the API and follow these steps:
- Expand the 200 response and then the Mapping Templates.
- If there is an application/json entry remove that entry.
- Click Add mapping template and enter application/xml then click the checkmark.
- In the textbox to the right enter the code below then click the Save button.
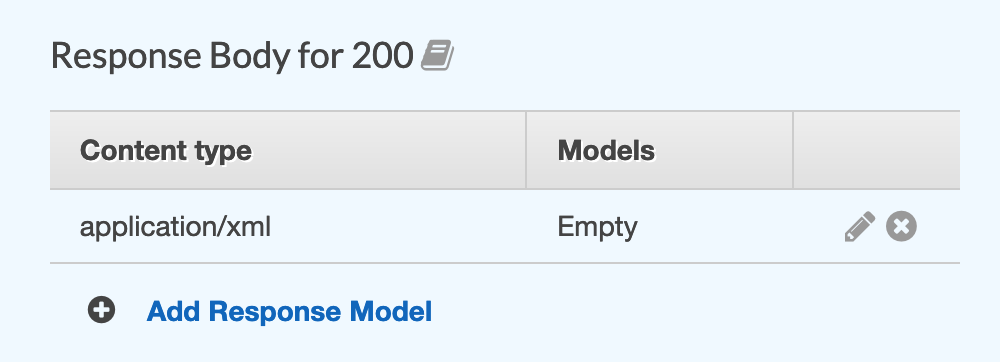
The last output configuration needs to be made in the Method Response section.
- Expand the 200 response.
- If application/json is listed under the Response Body for 200 remove that entry.
- Click Add Response Model
- Enter application/xml in the Content type field and choose an Empty model.
- Click the small check mark.
The API is ready for deployment!
From the Actions menu choose the Deploy API option.
In the popup box choose a new stage for deployment and call it prod. Click Deploy.
On the left expand the prod section and choose the sms endpoint. In the right panel there is an option for Invoke URL. Copy that URL as it will be needed in the next step.
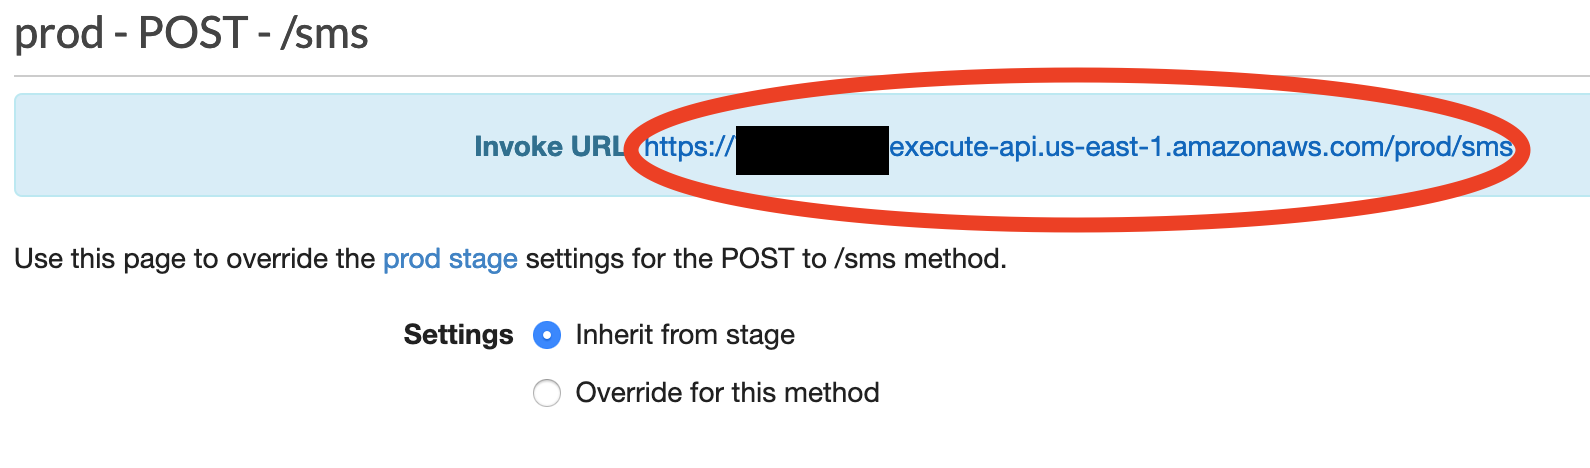
Connect Your Twilio Number to the API
The end is in sight. The last step is connecting your Twilio number to the API endpoint you created, so that incoming messages are sent to the API and can start to share photos with your friends and family!
Login to your Twilio account. If you don't have a Twilio account you will need to create one now. With this referral link you'll get $10 to get started with your account! After your account is created go back to the first step in this tutorial to purchase your Twilio phone number.
From the Twilio console select Phone Numbers from the menu on the left. Choose the phone number you purchased earlier. If you haven't purchased a number yet select Buy a Number from the menu on the left and make sure you purchase a number with SMS and MMS capability.
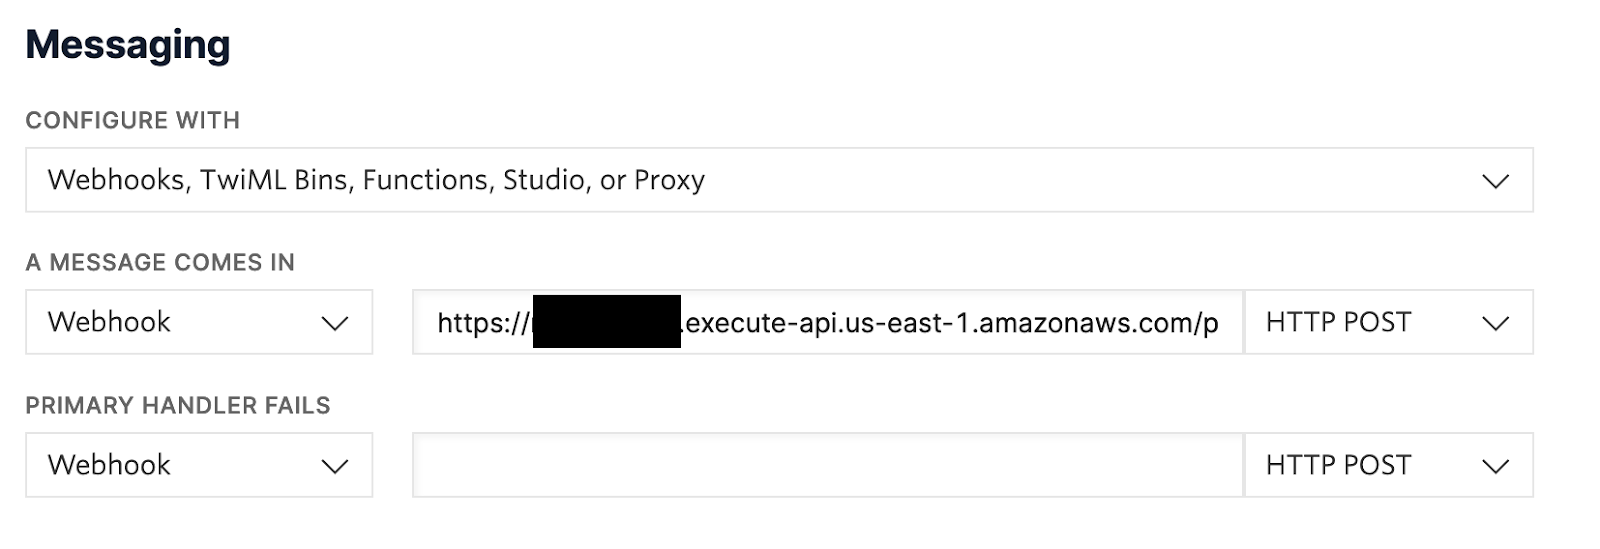
Scroll to the bottom of the page to the Messaging section. There is an option for A Message Comes In make sure Webhook is selected from the drop down.
In the text box paste in the URL for your endpoint that you copied from the API Gateway in the previous step. This will forward all incoming text messages to the API to be processed by your Lambda function.
Click the blue Save button at the bottom of the page
Share with Friends and Family
And you're done! You now have a texting service to share with your friends and family. Whenever a message with attached pictures is received on this number, the server will broadcast the photos to the list of digital picture frames!
A couple closing notes. All images sent to your Twilio number will be broadcast to the digital frames. To guard against rogue photos from being uploaded you can alter the text-to-frame Lambda function to allow upload images from an approved list of numbers by leveraging the From attribute of incoming messages. Add a list of approved numbers to your Lambda function then when a message comes in you can verify the number is allowed and continue to upload the photos. Secondly, if your digital picture frame is configured to only receive emails from specific email addresses make sure you add the SendGrid email address you used to the list of allowed addresses for your digital frame. Sign up your family members to the service by adding the frame emails to your Lambda function and then share the phone number with everyone so they can start sharing photos with each other!
Matthew Vielkind is a Solutions Engineer at Rasa. Matthew enjoys all things Python and building data products. Follow along with him @MatthewVielkind on Twitter and matty_v_codes on Twitch where he live codes his projects in public sharing what he learns along the way.

Related Resources
Twilio Docs
From APIs to SDKs to sample apps
API reference documentation, SDKs, helper libraries, quickstarts, and tutorials for your language and platform.
Resource Center
The latest ebooks, industry reports, and webinars
Learn from customer engagement experts to improve your own communication.
Ahoy
Twilio's developer community hub
Best practices, code samples, and inspiration to build communications and digital engagement experiences.