Build a SMS Chatbot With Python, Flask and Twilio
Time to read: 8 minutes
November 27, 2019
Written by

In a previous article I showed you how to build a WhatsApp chatbot with Python, Flask and Twilio. Today I’m going to use similar techniques to build a chatbot that communicates with users through text messages using Twilio’s Programmable SMS.
The chatbot that I’m going to build performs a simple analysis of what the user writes to find keywords of interest, which trigger the response of the chatbot. The two keywords in my implementation are “quote” and “cat”, which trigger responses of famous quotes and cat pictures respectively.
Below you can see the chatbot in action:
Tutorial Requirements
To follow this tutorial you need the following components:
- Python 3.6 or newer. If your operating system does not provide a Python interpreter, you can go to python.org to download an installer.
- Flask. We will create a web application that responds to incoming SMS messages with it.
- A smartphone that can send and receive SMS.
- A Twilio account. If you are new to Twilio create a free account now. You can review the features and limitations of a free Twilio account.
- ngrok. We will use this handy utility to connect the Flask application running on your system to a public URL that Twilio can connect to. This is necessary for the development version of the chatbot because your computer is likely behind a router or firewall, so it isn’t directly reachable on the Internet. If you don’t have ngrok it installed, you can download a copy for Windows, MacOS or Linux.
Configuring Twilio’s Programmable SMS for your Chatbot
Your first task is to configure a Twilio SMS-enabled phone number for the chatbot to use.
From your Twilio Console, select Phone Numbers, and then click on the red plus sign to buy a Twilio number (you will not be charged for this purchase if you are using a trial account). In the Buy a Number screen you can select your country and check SMS in the capabilities field. If you’d like to request a number from your region, you can enter your area code in the Number field.
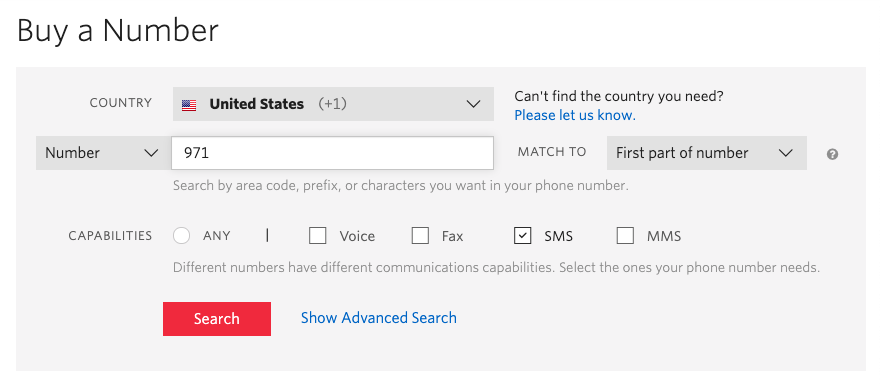
Click the Search button to see what numbers are available, and then click Buy for the number that you like from the results. After you confirm your purchase, click the “Close” button.
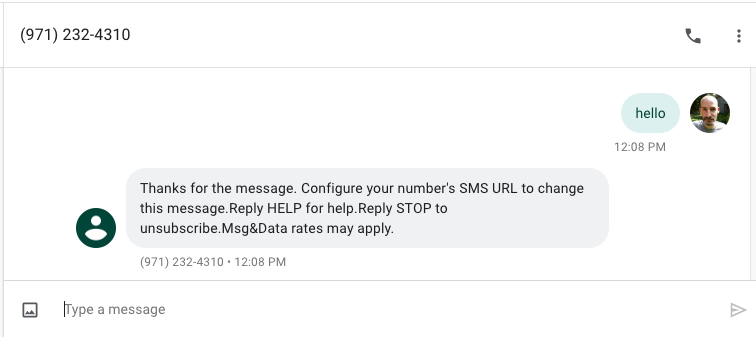
Congratulations, you now have your very own programmable phone number! Grab your smartphone and send a text message to your new number to make sure that it is working. You should receive a response instructing you to configure your number, which you will do after you have the chatbot application up and running.
Create a Python Virtual Environment
Following Python best practices, as a first step in creating the chatbot we are going to create a separate directory for the project, and inside it we are going to create a virtual environment. We then are going to install the Python packages that we need for our chatbot on it.
If you are using a Unix or Mac OS system, open a terminal and enter the following commands to do the tasks described above:
For those of you following the tutorial on Windows, enter the following commands in a command prompt window:
The last command uses pip, the Python package installer, to install the three packages that we are going to use in this project, which are:
- The Flask framework, to create the web application
- The Twilio Python Helper library, to work with the Twilio APIs
- The Requests package, to access third party APIs
For your reference, at the time this tutorial was released these were the versions of the above packages and their dependencies tested:
Create a Flask Chatbot Service
The chatbot application is going to be implemented as a Flask web service. If you have followed my WhatsApp chatbot tutorial, then you can skip this section, as the chatbot service is actually the same one that I used on that tutorial.
For this tutorial, I’m going to build an extremely simple chatbot that recognizes two keywords in messages sent by the user and reacts to them. If the user writes anything that contains the word “quote”, then the chatbot will return a random famous quote. If instead, the message has the word “cat”, then a random cat picture will be returned. If both “quote” and “cat” are present in the message, then the bot will respond with a quote and a cat picture together.
Webhook
The Twilio SMS API uses a webhook to notify an application when there is an incoming message. The automated response that you received when you texted your Twilio number actually comes from a default webhook that is installed by Twilio on your number. The chatbot application will have a new webhook that is going to replace the default one.
With the Flask framework, it is extremely easy to define a webhook. Below is a skeleton application with a webhook definition. Don’t worry about copying this code, I will first show you all the different parts of the implementation and then once you understand them I’ll show you how they are all combined into the working application.
If you are not familiar with the Flask framework, its documentation has a quick start section that should bring you up to speed quickly. If you want a more in-depth learning resource then I recommend you follow my Flask Mega-Tutorial.
The important thing to keep in mind about the code above is that the above application defines a /bot endpoint that supports POST requests. Each time an incoming message from a user is received by Twilio, they will, in turn, invoke this endpoint. The body of the function bot() is going to analyze the message sent by the user and provide the appropriate response.
Messages and Responses
The first thing we need to do in our chatbot is to obtain the message entered by the user. This message comes in the payload of the POST request with a key of ’Body’. We can access it through Flask’s request object:
Since we are going to perform some basic language analysis on this text, I have also converted the text to lowercase, so that we don’t have to worry about all the different ways a word can appear when you introduce case variations.
The response that Twilio expects from the webhook needs to be given in TwiML or Twilio Markup Language, which is an XML-based language. The Twilio helper library for Python comes with classes that make it easy to create this response without having to create XML directly. Below you can see how to create a response that includes text and media components:
Note how to return an image Twilio expects a URL that points to it instead of the actual image data.
Chatbot logic
For the actual chatbot logic, I’m going to use a very simple, yet surprisingly effective approach. What I’m going to do is search the incoming messages for the keywords ’quote’ and ’cat’. Here is the basic structure of the chatbot:
With this simple structure, we can detect references to quotes and/or cats and configure the Twilio response object accordingly. The responded boolean is useful to track the case where the message does not include any of the keywords we are looking for, and in that case, offer a generic response.
Third-Party APIs
To supply the chatbot with original quotes and cat pictures I’m going to use two publicly available APIs. For famous quotes, I’ve chosen the Quotable API from Luke Peavey. A GET request to https://api.quotable.io/random returns a random quote out of a pool of 1500 of them in JSON format.
For cat pictures, I’m going to use the Cat as a Service API from Kevin Balicot. This is an extremely simple API, the https://cataas.com/cat URL returns a different cat image every time (you can test it out by pasting this URL in the browser’s address bar and then hitting refresh to get a new cat picture). This is actually very handy because as I mentioned above, Twilio wants the image given as a URL when preparing the TwiML response.
Everything Together
Now you have seen all the aspects of the chatbot implementation, so we are ready to integrate all the pieces into the complete chatbot service. You can copy the code below into a *bot.py* file:
Testing your Python SMS Chatbot
After you copy the above code into the *bot.py* file, start the chatbot by running python bot.py, making sure you do this while the Python virtual environment is activated. The output should be something like this:
The service is now running as a private service on port 5000 inside your computer and will sit there waiting for incoming connections. To make this service reachable from the Internet we need to use ngrok.
Open a second terminal window and run ngrok http 5000 to allocate a temporary public URL that redirects HTTP requests to our local port 5000. On a Unix or Mac OS computer, you may need to use ./ngrok http 5000 if you have the ngrok executable in your current directory. The output of ngrok will be:
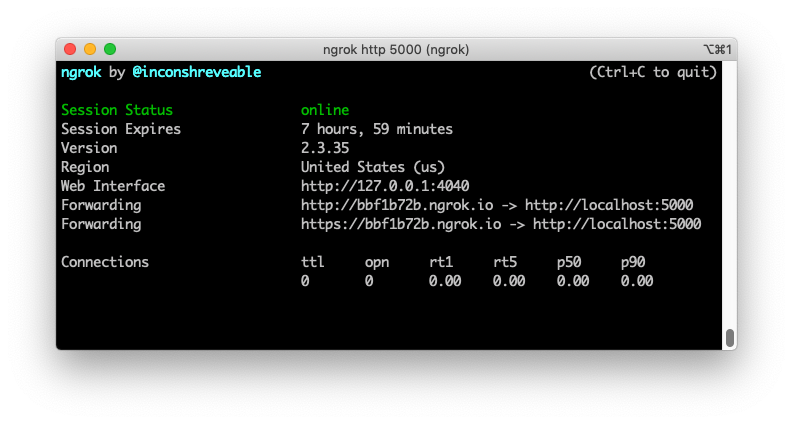
Note the lines beginning with “Forwarding”. These show the public URLs that ngrok uses to redirect requests into our service, with http:// and https:// versions. What we need to do now is tell Twilio to send incoming SMS notifications to this URL.
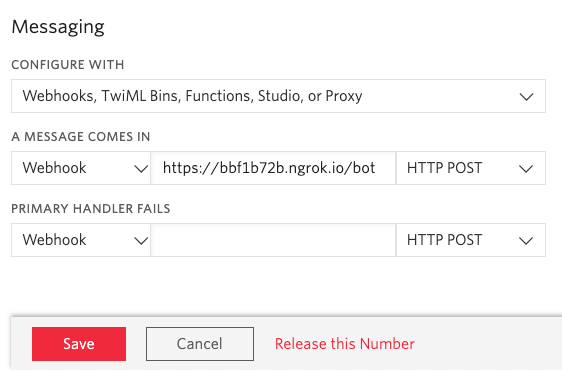
Go back to the Twilio Console, click on Phone Numbers, and then on the phone number that you purchased above. Scroll down to the “Messaging” section, copy the https:// URL from the ngrok output and then paste it on the “A message comes in” field. Recall that the chatbot is exposed under the /bot URL, so /bot needs to be appended at the end of the root ngrok URL. Make sure the request method is set to HTTP POST. Don’t forget to click the red Save button at the bottom of the page to record these changes.
Now every time you send a text message to the Twilio number, the chatbot will receive a request on the /bot URL and will produce a response based on the incoming message. You can type any sentences that you like, and each time the words “quote” and “cat” appear in messages the chatbot will invoke the third-party APIs and return some fresh content to you. In case you missed it at the top of the article, here is an example session that I held with the chatbot:

Keep in mind that when using ngrok for free there are some limitations. In particular, you cannot hold on to a ngrok URL for more than 8 hours, and the domain name that is assigned to you will be different every time you start the ngrok command. You will need to update the URL in the Twilio Console every time you restart ngrok.
Notes on Production Deployment
I thought it would be useful to end this tutorial with a list of things you will need to consider if you decide to deploy a WhatsApp chatbot for production use.
First of all, you’ve seen that when you start the Flask application there is a pretty scary warning about not using a development server for production. The web server that comes with Flask is very convenient when developing and testing an application, but it isn’t robust enough to handle the demands of production use. The two most common production-ready web servers for Python web applications are gunicorn and uWSGI, both installable on your virtual environment with pip. For example, here is how to run the chatbot with gunicorn:
Also, keep in mind that for a production deployment you will be running the service on a cloud server and not out of your own computer, so there is no need to use ngrok.
Comparing WhatsApp and SMS for Chatbots
I’ve mentioned a similar tutorial that I wrote for a WhatsApp bot a few times in this article. Since the Flask application is the same in both tutorials, it is okay to deploy a single copy of the application and configure it to be a webhook for both SMS and WhatsApp messages, so your chatbot can work with both channels simultaneously.
Conclusion
I hope this tutorial gave you a good idea of how to build a SMS chatbot. Python is actually a great choice for building chatbots because you have great options for processing natural language. If you are interested in building chatbots that are more sophisticated in terms of understanding language, I recommend that you look at the following Python projects:
I’d love to see what you build!
Miguel Grinberg is a Python Developer for Technical Content at Twilio. Reach out to him if you have a cool Python project you’d like to share on this blog!

Related Resources
Twilio Docs
From APIs to SDKs to sample apps
API reference documentation, SDKs, helper libraries, quickstarts, and tutorials for your language and platform.
Resource Center
The latest ebooks, industry reports, and webinars
Learn from customer engagement experts to improve your own communication.
Ahoy
Twilio's developer community hub
Best practices, code samples, and inspiration to build communications and digital engagement experiences.