Build an Emergency Contact Notification System with Twilio SMS

Time to read: 5 minutes
September 28, 2022
Written by
Reviewed by
September is National Disaster Preparedness Month. To help yourself stay prepared, you’ll learn how to build an app that will send an SMS to all of your emergency contacts with just one text message. If you find yourself in a difficult or emergent situation, having the ability to notify multiple people with one quick message might be able to get you help faster or reunite your family sooner.
Prerequisites
To get started with this tutorial, you’ll need the following:
- Node.js version 14.16 or above installed on your machine
- A free Twilio account
- A Twilio phone number
- The Twilio CLI installed on your machine
Build your app with Twilio Functions
Your app will run on Twilio Functions. Twilio Functions is a serverless environment that lets you deploy backend services without the overhead of setting up a server. With Twilio Functions, you can develop locally and deploy to production through the Twilio CLI.
The first step is to create a Functions Service. If you haven’t already, install the Twilio CLI using the following command:
Next, install the Twilio Serverless Toolkit plugin for the Twilio CLI:
Run the following command to login to the Twilio CLI:
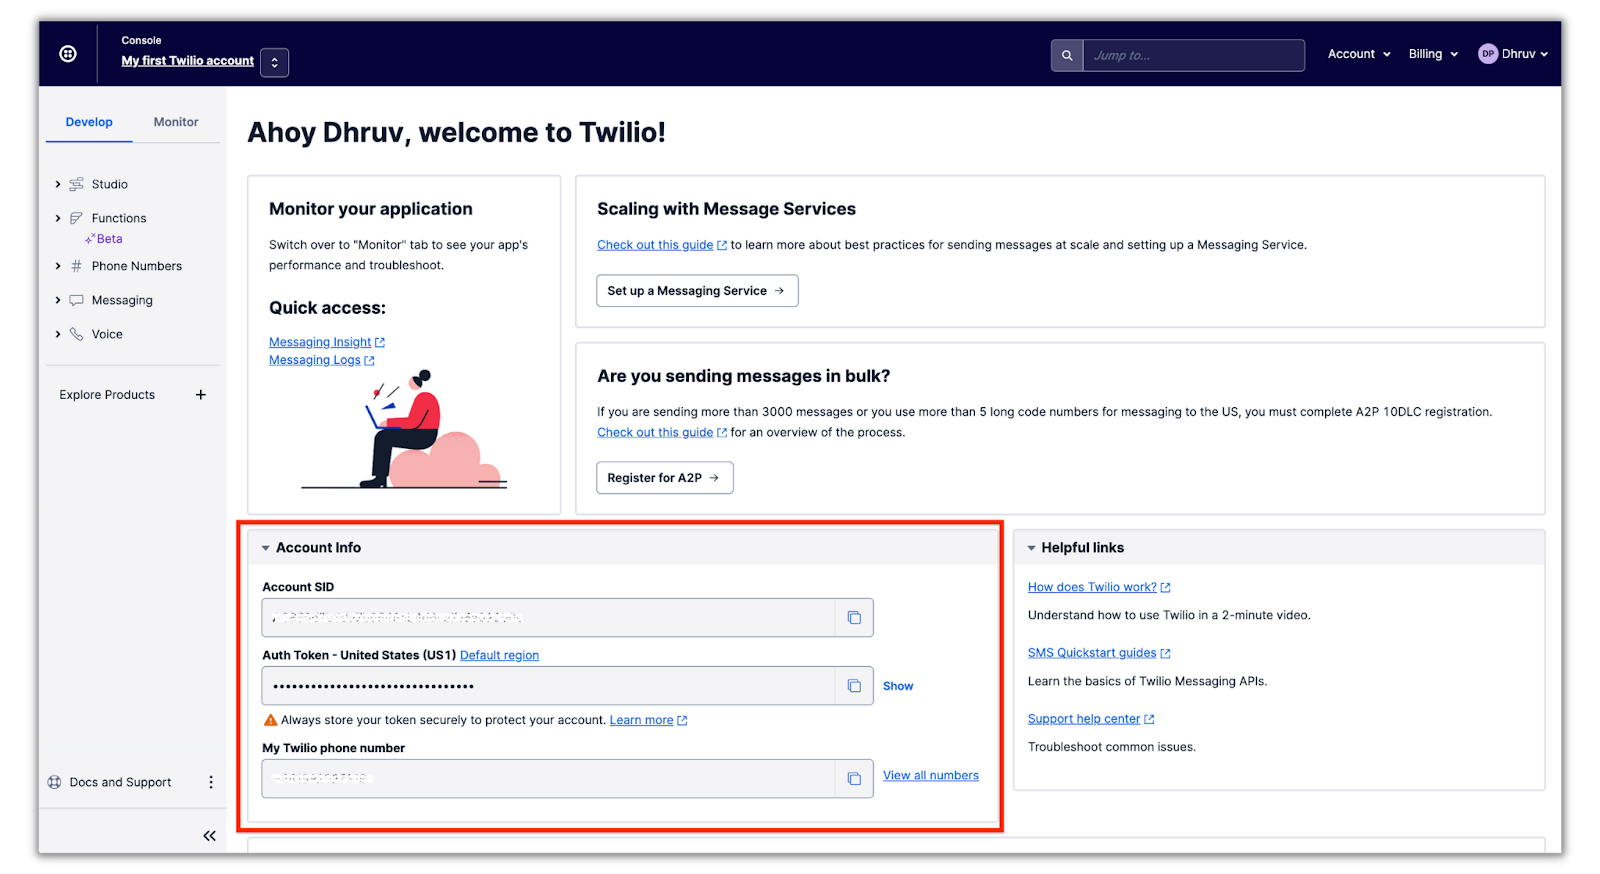
You’ll be prompted to enter your Twilio Account SID and Auth Token, which can be found in the Twilio Console:
Once you’ve entered your credentials, you’ll then be prompted with entering a shorthand identifier for your profile; feel free to enter whatever name you’d like.
Now that you have the plugin installed and you’re logged in, you can initialize a new Functions service:
This command will create a new directory on your computer called emergency-notifier. Still inside your terminal, navigate into this folder by running the following command:
Add your Twilio credentials to your environment
Using your preferred text editor, open up your project directory (emergency-notifier) and navigate to the .env file that was automatically created for you when you created the Functions Service. This file should be pre-populated with your Twilio Account SID. It may also be pre-populated with your Auth Token or have a blank variable where you can add it. Verify that both these values are present and correct. They can be found in the Twilio Console.
Create your function
Open the sub-folder emergency-notifier/functions and delete the folder's contents, but not the folder itself.
You will only need one function for this app. You’ll write the code for this function in a file called notifier.js inside the functions folder. To create this file, run the following command from your terminal or create it in your text editor:
Open your new notifier.js file. Inside, paste the following code:
This code defines your serverless function. You will add the code for your app inside this function.
Add your list of emergency contacts
The next step is to define an array with the phone numbers of your emergency contacts. To do this, add the following code inside your new function:
Remove the placeholder phone numbers, and replace them with as many comma separated phone numbers as you desire in this array. Be sure to use E.164 format for the phone numbers, and include the + at the beginning. When your app is run, every phone number in this array will be contacted with a message that you will now create.
Define your emergency message
Beneath your array of contacts, add the following code:
This code defines a message variable. The value of this variable is the text that will be sent to your emergency contacts.
You can customize this variable definition to meet your particular needs, but what I have done is first include text indicating that this is an emergency message, and that any replies will go unseen.
I’ve also built a little flexibility into this app: If I send sos to my Twilio phone number, then it will send a generic I’m experiencing an emergency message to my contacts. This is so I can quickly fire off a message if time is of the essence. But if I send any other text to my Twilio phone number, that text is what will be relayed to each of my emergency contacts after the introductory emergency message.
If you wanted to take this even further, you could customize a default message for each of your emergency contacts.
Send the SMS to each contact
Now that your contact list and message are defined, you can begin the sending process. Inside your function, beneath the existing code, add the following two lines:
The first line initiates a new Twilio Client. Twilio Functions provides a built-in client that will give you access to the many Twilio APIs. It automatically uses the credentials from your .env file to initialize the client. The second line creates an empty array called failed which will be used to keep track of any failed messages.
Beneath this code, inside your function, add the loop to send the messages:
This code loops through each of your contacts and attempts to send them your previously defined message. If there is a failure during the sending process, it will be caught in the catch block, and the phone number of the intended recipient will be added to the failed array.
Return the response
The last coding step is to define a response and return it. The body of this response will be sent back to you as a reply SMS.
Add the following code inside your function, beneath the existing code and save the file:
This code will check for any failed sending attempts, and if there are any, it will let you know which ones didn’t send. Otherwise, it will return a generic All messages sent response.
That’s it for code! The next step is to deploy your app.
Deploy your app
Back in your terminal, make sure you’re in the top level of your project (emergency-notifier) and run the following command to deploy your new Function Service:
It will take a few moments for the deployment to complete, but once it does, you’ll be presented with details about it including the URL to each of your functions (and any assets, if you had any).
With your app deployed, you can now configure your webhook to connect your app to your Twilio phone number.
Connect your Function to your phone number
In your web browser, navigate to the Phone Numbers section of the Twilio Console and then click on your phone number.
Scroll down a little farther on the page to the Messaging section, and select the following settings:
- For “Configure with” select Webhook, TwiML Bin, Function, Studio Flow, or Proxy Service.
- For “A message comes in” select Function in the left dropdown.
- For “Service” select emergency-notifier, or the name of the service you created earlier.
- For “Environment” select dev-environment.
- For “Function Path” select /notifier.
Click the Save button at the very bottom of the phone number configuration page.
To test your app, let your emergency contacts know, and then send a message to your Twilio phone number. If you don’t want to involve them yet, you can change your array of contacts to just your personal phone number, and text your Twilio phone number from a different line, or have someone else text it.
There are many ways to expand this app including custom messages, location sharing, voice calling, and more. For iPhone users, you could even create a Siri shortcut to trigger your initial sos message. I can’t wait to see what you build!
Ashley is a JavaScript Editor for the Twilio blog. To work with her and bring your technical stories to Twilio, find her at @ahl389 on Twitter. If you can’t find her there, she’s probably on a patio somewhere having a cup of coffee (or glass of wine, depending on the time).


Related Resources
Twilio Docs
From APIs to SDKs to sample apps
API reference documentation, SDKs, helper libraries, quickstarts, and tutorials for your language and platform.
Resource Center
The latest ebooks, industry reports, and webinars
Learn from customer engagement experts to improve your own communication.
Ahoy
Twilio's developer community hub
Best practices, code samples, and inspiration to build communications and digital engagement experiences.