Build a Humor Hotline with Node.js, Express, and Twilio Programmable Voice
Time to read:
September 09, 2020
Written by
Reviewed by
This post is part of Twilio’s archive and may contain outdated information. We’re always building something new, so be sure to check out our latest posts for the most up-to-date insights.

Have you ever just, like, really wanted to hear a joke? Well, even if you haven’t, now you can, all thanks to my Humor Hotline powered by Twilio Programmable Voice!
But in case you don’t like my jokes, I’ll teach you how to build your own humor hotline in this tutorial. After you finish building this JavaScript-powered voice app, you’ll be able to submit your phone number through the hotline’s website and get a phone call with a joke!
Prerequisites
This app uses the following tools and technologies:
App Overview and Set Up
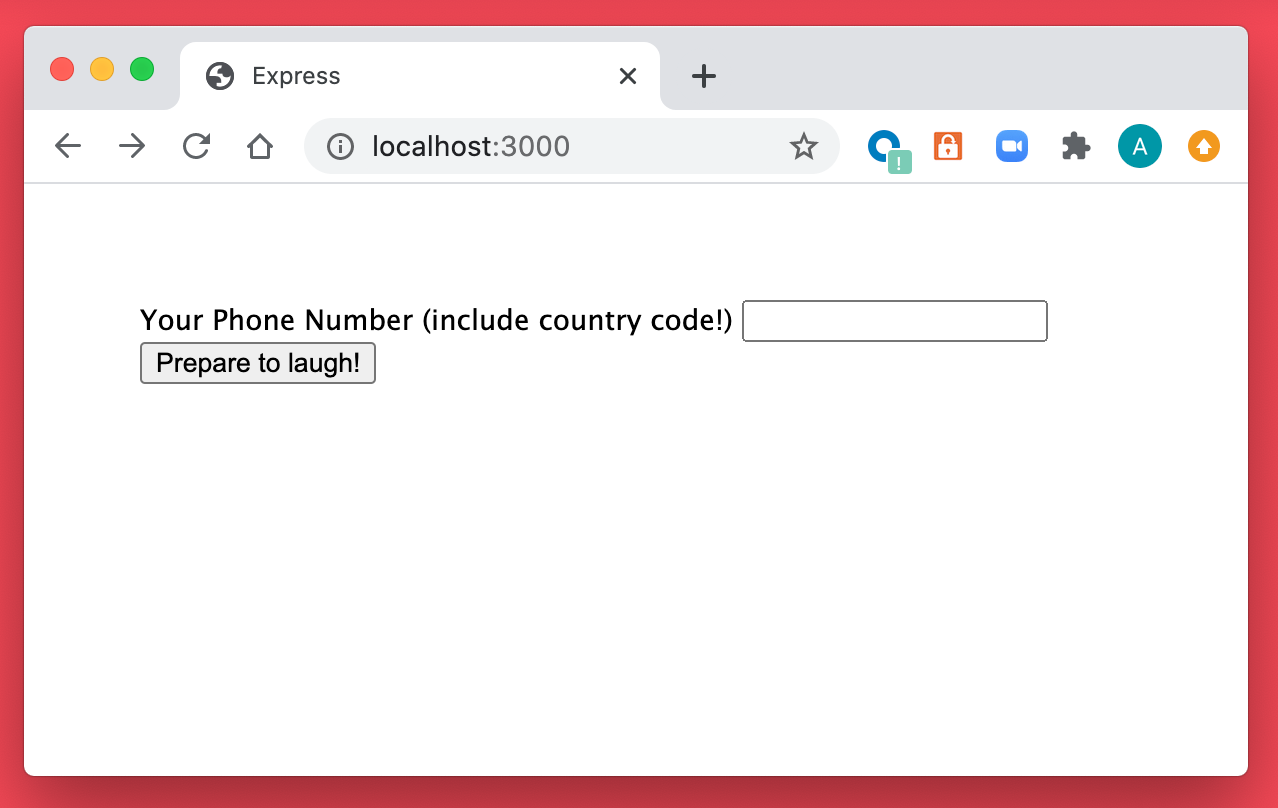
On the frontend of the app, there is a simple web form that accepts a phone number.
When the form is submitted, the data is sent via a POST request to an API endpoint you’ll soon create with Express. At this endpoint, you’ll use Twilio Programmable Voice to create and send a TwiML voice response to the number submitted through the form.
To get started, use your command prompt to install Node.js using Homebrew. If you don’t want to use Homebrew to install Node.js, check out their complete download instructions.
Once you have Node installed, express-generator will be added to the project to assist in creating a basic app skeleton. Run the following commands in your command prompt to install the package and add it to your project.
After creating the basic Express app and installing its dependencies, go ahead and install the Twilio package for Node.js and the dotenv package, which you’ll use to load your environment variables.
Creating the View
The code above created a new directory inside your parent directory called humor-hotline. This directory contains all the files for your new app.
Look inside this directory for a sub-directory called views.
Inside views there is a file called index.jade. Jade is a templating engine for Node.js that allows you to build views for your apps. It requires a special syntax that you can read more about on the Jade docs site.
Open index.jade in your favorite text editor, delete any code inside, and replace it with this:
This code creates an HTML form with one input field: a phone number field. Save and close this file, you won’t need it anymore.
If you want to see what you’ve accomplished so far, you can start your local server by running npm start in your command prompt. Once the server has started, you can view your handiwork at http://localhost:3000.
NOTE If you try to submit your form now, nothing will happen. You need to build your routes first! Head to the next section to get started.
Building the Routes
When the form in your view is submitted, it will post to a route called /humor-hotline.
This one of three routes your app requires.
The first of these routes was automatically created for you by express-generator. You can see this code by opening the index.js file found in the routes folder of your app:
This code creates the route for your home page. The highlighted line is what triggers the rendering of the template you edited in the previous step.
Below this existing route, you’ll add the following code to start building your second one: /play-game. This is the route that your form posts to.
Adding environment variables
At this point, you need to create your Twilio client. The Twilio client is responsible for providing your app with an interface to communicate with the Twilio Programmable Voice API. This step requires importing both the Twilio package and the dotenv package at the top of index.js.
In the code above, you’re importing the dotenv module in order to store your Twilio credentials in a .env file and access them securely. This takes a little more time, but can prevent you from inadvertently exposing your Twilio credentials to anyone who shouldn’t see them.
Create a file called .env in your app’s root directory. Copy and paste the following code into your .env file, taking care to replace the placeholder values with your TWILIO_ACCOUNT_SID and TWILIO_AUTH_TOKEN found in the Twilio console.
When you’re done, save and close this file. If you plan to commit your code to a version control system, be sure to add your .env file to your .gitignore.
Now that you’ve created your .env file, move back to the /humor-hotline route inside index.js. At the top of this route, add this code to create the client:
Making the call
Great work so far! With the client created, you can now begin the process of making the call to your user.
It’s important to ensure that your form only accepts the characters required for a phone number, otherwise, the app won’t be able to complete the call. To do this, we’ll need to capture and sanitize the incoming phone number. The goal is to remove any spaces or non-numeric characters from the input. This is achieved by using the .replace() method and regex.
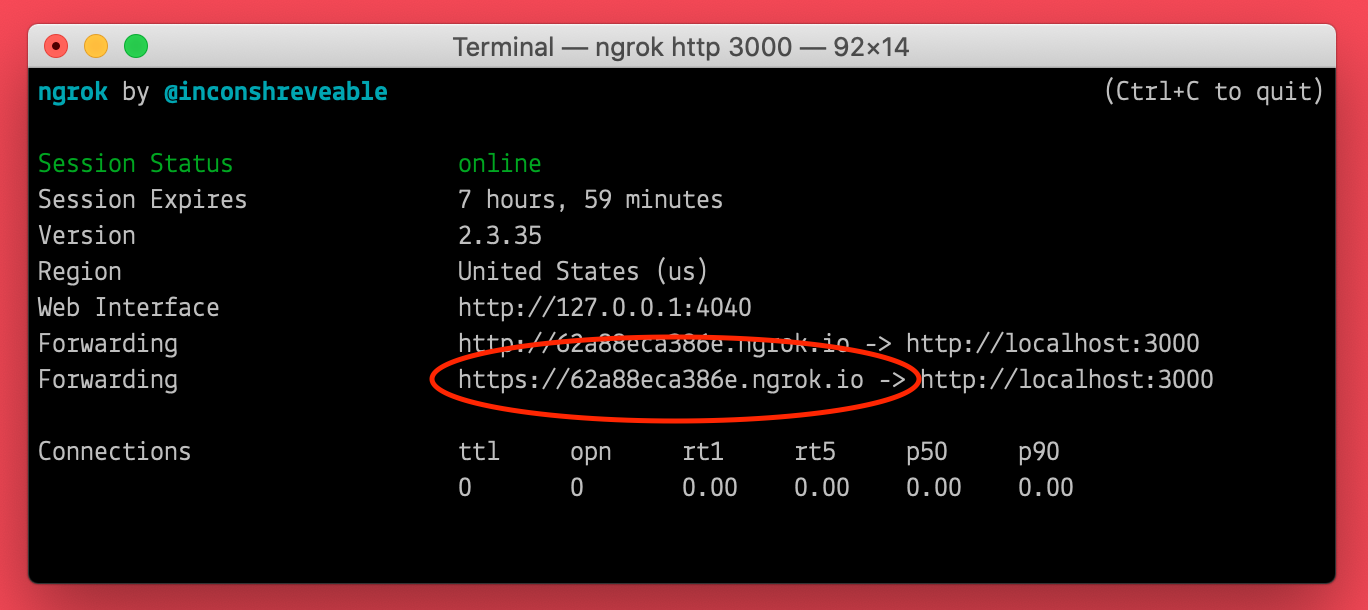
After sanitizing the incoming phone number, create a new variable called host. This variable is going to store the host URL created by ngrok.
Ngrok creates a tunnel to your local server and allows it to receive requests from the internet. Apps that are not yet deployed, or are only running locally, frequently require a service like ngrok for testing.
If you haven’t used ngrok before, see these instructions for downloading and installing ngrok. Otherwise, in a new command prompt tab or window, run the following command:
Once the tunnel has started, copy and paste the value shown for the secure Forwarding address into your host variable.
With your host variable ready for action, you can now use your Twilio client to make a call!
After copying and pasting this code into the bottom of your route, be sure to replace yournumber in the highlighted line with your Twilio phone number. Use the E.164 format.
Let’s break down what this code is doing:
The client is creating a call using the Twilio API. You’re providing a URL, a to number, and a from number.
The to number is your user’s submitted number, and the from number is your Twilio phone number.
The URL could be to an .xml file containing TwiML or it could be to another route in your app that programmatically creates a VoiceResponse (there are lots of ways to customize this response). Either way, this URL is where the magic happens.
For this tutorial, you’re going to follow the second approach.
Below the /humor-hotline route, create your third and final route, /voice-response.
This code creates an array of puns, and chooses one at random to deliver to the user. Be sure to fill this array with your own amazing jokes and keep your users coming back for more.
That’s it, let’s get laughing!
Testing the app
Back in the command prompt tab that’s running your local server, restart it by pressing ctrl + c and then running npm start again.
Visit https://localhost:3000 in your browser. Test the app by entering your personal phone number or a number where you can receive a voice call into the form field. Then click the “Prepare to laugh!” button. Within moments, you should be at your own private comedy show!
When you’re done with that, be sure to check out the Twilio blog for inspo on some more practical things you can do with Twilio’s Programmable Voice.
Ashley is a JavaScript Editor for the Twilio blog. To work with her and bring your technical stories to Twilio, find her at @ahl389 on Twitter. If you can’t find her there, she’s probably on a patio somewhere having a cup of coffee (or glass of wine, depending on the time).


Related Resources
Twilio Docs
From APIs to SDKs to sample apps
API reference documentation, SDKs, helper libraries, quickstarts, and tutorials for your language and platform.
Resource Center
The latest ebooks, industry reports, and webinars
Learn from customer engagement experts to improve your own communication.
Ahoy
Twilio's developer community hub
Best practices, code samples, and inspiration to build communications and digital engagement experiences.