How to Build a Monitoring Camera with Raspberry Pi and Twilio Programmable Video
Time to read: 7 minutes
March 31, 2023
Written by
Reviewed by

You may want to keep an eye on something when far away from it. Nowadays, monitoring cameras can help you do that, but what if you could build your own and make it accessible over the internet whenever you wanted?
In this tutorial, you will learn how to use your Raspberry Pi as a monitoring camera that you can view on a web interface by using Twilio Programmable Video and Python.
What will you build
A Raspberry Pi is a small, single-board computer that can accommodate many kinds of peripherals — devices like a mouse, display screen, keyboard, and more.
In this tutorial, we will focus on its ability to connect to a camera device, as this is what enables you to create a monitoring camera. You will connect a camera module to a Raspberry Pi and stream the video captured by this camera on the internet using Twilio Programmable Video. With this, you can easily access the camera's feed from anywhere.
How it works
The basic principle of Twilio Programmable Video can be summarized in the image below.
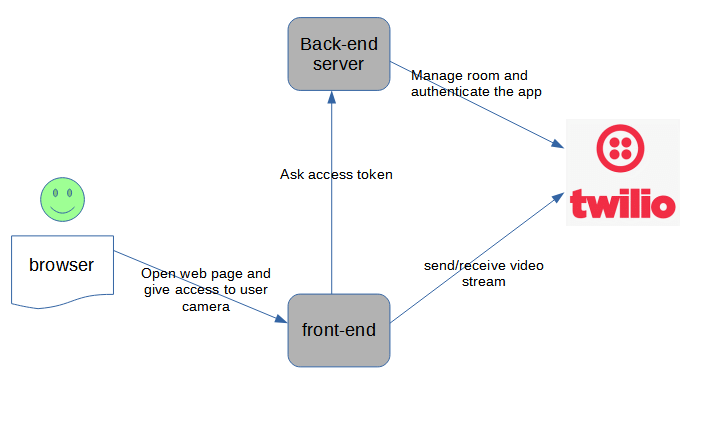
In order to send/receive video streams over the internet, a user should open a web page with a browser. This web page contacts a back-end server that provides access tokens and also manages video rooms on the Twilio server. With the access token in hand, the web page can now contact the Twilio server and request access to the corresponding room. If the token is valid, the web page can send and receive a video stream from the corresponding room.
Take a look at this article for detailed information about how Video rooms work.
The underlying complexity of this application is hidden behind the web page. All you will need to do in order to send and receive a video stream with Twilio Video is open the web page with your browser and allow the browser to use your camera.
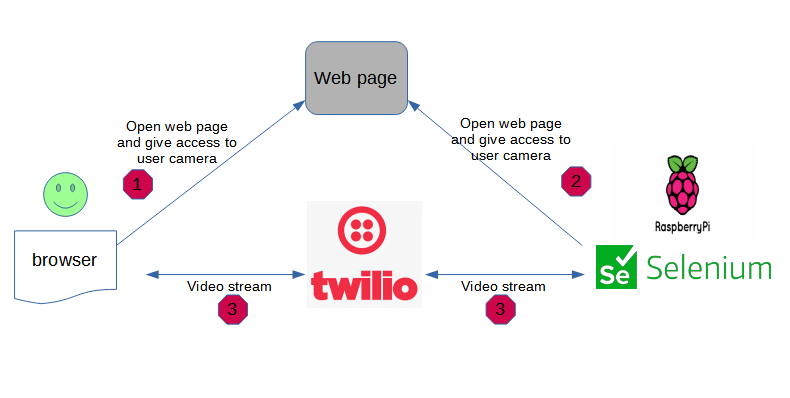
What about the Raspberry Pi?
You'll want to view the video stream from the Raspberry Pi without having to open a browser like you normally would. Here is where Selenium can help you.
Selenium is a tool for automating browsers that can simulate as if a real browser is opening a specific web page, and it supports Python.
So the way the system finally works is:
- You open a web page with your browser.
- You join a Twilio Video room.
- With an action (click on a button) on the same web page, you send a command to the Raspberry Pi to run Selenium, which also completes steps 1 and 2.
- As the Raspberry Pi also joins the video room, you can view the video stream from your Raspberry Pi.
The image below illustrates the process.
What you need
To build the system, you will need:
- One Raspberry Pi with Raspberry Pi OS Bullseye. A Raspberry Pi 3 Model B is used in this tutorial, but you can use any board model.
- Raspberry Pi Camera Board v1.3 (5MP, 1080p)
- A Twilio account: Here is a link to create an account if you don’t have one already: Twilio | Try Twilio Free.
- Ngrok. You can learn more about using Ngrok here.
Now let’s get started with building.
Connect your camera to the Raspberry Pi
Connect the hardware
First, connect the camera module to your Raspberry Pi. There is a slot where you can plug the camera module into the board. It’s marked with the word “CAMERA”. When you plug in the camera, the board should not be connected to any power source, and you should make sure that the blue side of the connector is facing the Ethernet port. It should look like the image below when connected properly.
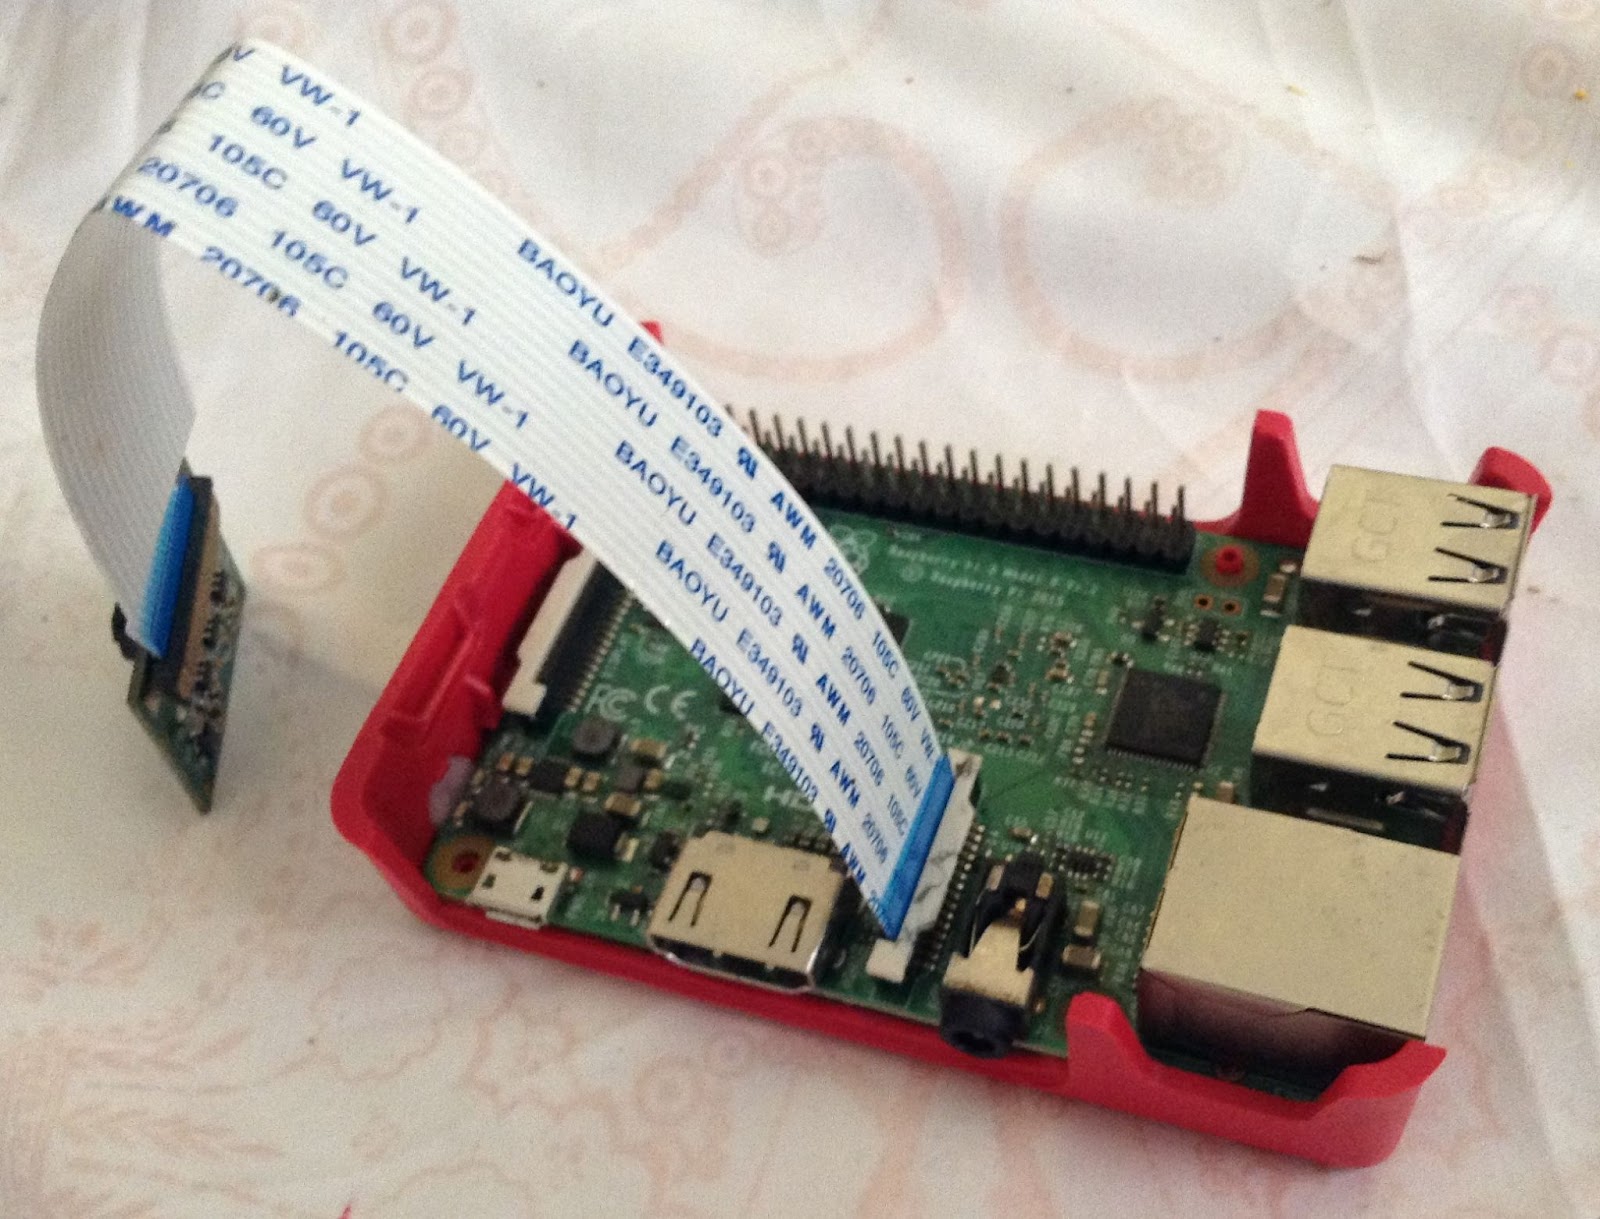
You can plug your Raspberry Pi into a power source now.
Set up your camera on the Raspberry Pi
Check if your camera is detected by the Raspberry Pi with this command:
After running the command, hopefully you see the text below:
If you get detected=1 and supported=1, the hardware part is ready.
If it’s not the case, you may change your camera setting with the following steps.
Open the file /boot/config.txt.
Add the following lines at the end. Also, make sure that all occurrences of camera_auto_detect=1 are commented out.
Then you should reboot your Raspberry Pi to make the change effective.
Now, if you run vcgencmd get_camera again, you should see that the camera is detected.
The code
The code here is greatly inspired by the official Twilio tutorial Get started with Twilio Video Parts 1 and 2. Start by cloning the code for this tutorial from the following GitHub repo: Twilio Video JavaScript SDK Tutorial for Python. You can do this with the following command:
Enter the directory of the cloned project and create a new file named .env where you can store your Twilio credentials.
Inside the .env file, add the following:
You will need to replace the placeholder text (XXXXXXX) with real values for these credentials. You can find your Account SID in the Twilio Console.
Follow this link to learn more about how to do it: Collect account values and store them in a .env file.
You should follow the instructions in the section on creating an API key as well. Once you have generated your API key and secret, you can add these to your .env file too.
Write the backend service
Let’s start by adding the code that handles the Selenium part on the Raspberry Pi.
In the root folder of the project, create and open a new file with the name rpi_join.py.
Then add the following lines to it.
import time
from pyvirtualdisplay import Display
from selenium import webdriver
from selenium.webdriver.common.by import By
from threading import Thread


def start_virtual_display():
    """ Start a virtual display to allow using chromium-browser """
    display = Display(visible=0, size=(1600, 1200))
    display.start()


def browse_room(room_name):
    """ Browser room with selenium and allow media stream"""
    options = webdriver.ChromeOptions()
    # allow access to camera device
    options.add_argument("--use-fake-ui-for-media-stream")
    driver = webdriver.Chrome('/usr/lib/chromium-browser/chromedriver', options=options)
    driver.get("http://localhost:5000")
    driver.implicitly_wait(0.5)

    text_box = driver.find_element(by=By.NAME, value="room_name")
    submit_button = driver.find_element(by=By.CSS_SELECTOR, value="button")
    text_box.send_keys(room_name)
    submit_button.click()

    print("Submit button")
    return driver


class RpiJoinThread(Thread):

    def __init__(self, room_name, event):
        super(RpiJoinThread, self).__init__()
        self.room_name = room_name
        self.event = event

    def run(self):
        start_virtual_display()
        driver = browse_room(self.room_name)
        while True:
            for log in driver.get_log('browser'):
                print(log)
            if self.event.is_set():
                break
            time.sleep(2)
The function browse_room() is the main feature in this file. It is where the Raspberry Pi joins a Twilio Video room by browsing the web page and allowing the video stream from its camera.
In order to run this function from your web application, it’s best to run it inside a thread. That’s why we have the RpiJoinThread class.
Note that you also have the function start_virtual_display() which starts a virtual display, as chromium-browser needs a monitor to run properly.
Now import the file in app.py by adding the following line at the start of app.py.
Then add a new view function in the app.py file that handles the action join_rpi. This will allow you to run the RpiJoinThread with a simple click on the web interface.
RPI_THREAD is a global variable used to make sure that we start only one Selenium browser each time.
You will also need to edit the code in the join_room() function a bit, replacing the return statement as follows:
Write the front-end code
For the front-end part, you need to add a new button that you can click to run the join_rpi() function in the back-end.
In the file templates/index.html, after the form tag, add the following button element.
Then in the file static/main.js, add an action corresponding to the click on the button “Join RPI”.
The complete code can be found in this repo.
Run the system
Install requirements
To be able to run the app, you need to install some libraries.
First, create and activate a virtual environment inside the directory of the project, using the following command.
Next, install the required Python libraries with this command:
In order to make virtualdisplay work, you may need to install xvfb as well:
Install chromium-browser
Selenium needs chromium-browser and chromium-chromedriver to browse a web page.
You can install chromium-browser with this command.
Then check the version of your chromium-browser:
The version of your chromium-browser should match the version of chromedriver.
Here is a repository where you can download chromedriver and chromium-browser.
Download the corresponding chromedriver to your chromium-browser and then install it.
At the time of writing this tutorial, the version below was what I installed. Make sure that if you are using a different version of chromium-browser that you install the correct version for when you are following this tutorial.
Note that the armhf version is what corresponds to the Raspberry Pi version.
Run the app
Now you are ready to run the app. In your terminal with the virtualenv activated, use the following command to run the web app.
Expose your app with ngrok
Ngrok is a free tool that allows you to make your web application accessible from the internet while running it locally.
Download it from the official website, and then install it with this command:
If you are running ngrok for the first time, you should create an account and get your auth token. Once you get your auth token, run the following command to add it to your configuration, replacing <token> with your auth token:
Expose your web application with ngrok by running this command:
Now, you can access your web app from the internet by using the forwarding URL shown on your ngrok console.
Test the system
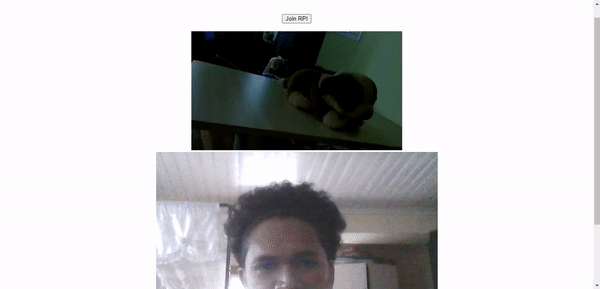
Time to check if everything works! Open the ngrok link with your favorite browser on a device that has a webcam. In the input field, enter “myroom”, and click on the button “Join room”.
Your camera video should appear on the web page. Now click on the button “Join RPI” to make the Raspberry Pi join the video room.
After that, the video from your Raspberry Pi camera should also appear on the web page, and voila! You can visualize what happens on the Raspberry Pi side.
Here is an image showing the view from a Raspberry Pi that keeps an eye on my little puppy.
About me: I’m a lead Python developer with 8 years of experience, passionate about electronics, IoT, and vintage mechanics. You can find me on Twitter or read my blog here: http://www.curiousmanjournal.ml/.

Related Resources
Twilio Docs
From APIs to SDKs to sample apps
API reference documentation, SDKs, helper libraries, quickstarts, and tutorials for your language and platform.
Resource Center
The latest ebooks, industry reports, and webinars
Learn from customer engagement experts to improve your own communication.
Ahoy
Twilio's developer community hub
Best practices, code samples, and inspiration to build communications and digital engagement experiences.