Build a Secure API in PHP Using Laravel Passport
Time to read: 9 minutes
There is no way to avoid the topic of RESTful APIs when building backend resources for a mobile application or using any of the modern JavaScript frameworks. If by chance you are unaware, an API is an interface or code in this case, that allows two software programs to communicate with each other. Notably, it does not maintain session state between requests, hence, you will need to use tokens to authenticate and authorize users of your application.
Laravel makes building such a resource easy with a predefined provision for you to secure it appropriately. This tutorial will teach you how to build and secure your Laravel back-end API using Laravel passport. When we are finished, you will have learned how to secure your new Laravel API or provide an extra layer of security to existing ones.
Prerequisites
Basic knowledge of building applications with Laravel will be of help in this tutorial. Also, you need to ensure that you have installed Composer globally to manage dependencies. Lastly, Postman will be needed to test our endpoints.
What We’ll Build
To demonstrate how to build a secure Laravel API, we’ll build an API that will be used to create a list of top tech CEOs. This application will list the following about each CEO:
- Name
- The year they became CEO
- Headquarters of their company and
- What their company does
To secure this application, we will install Laravel Passport and generate an access token for each user after authentication. This will allow such users to have access to some of the secured endpoints.
Getting Started
To begin, you can either use Composer or Laravel installer to quickly scaffold a new Laravel application on your computer. Follow the instructions here on Laravel's official website to set up the Laravel installer. Once you are done, run the following command:
To install the same application using Composer run the following command:
Depending on your preferred choice, the preceding commands will create a new folder named laravel-backend-api within the development folder, you installed Laravel and its dependencies in.
You can move into the newly created folder and run the application using the in built-in Laravel Artisan command as shown here:
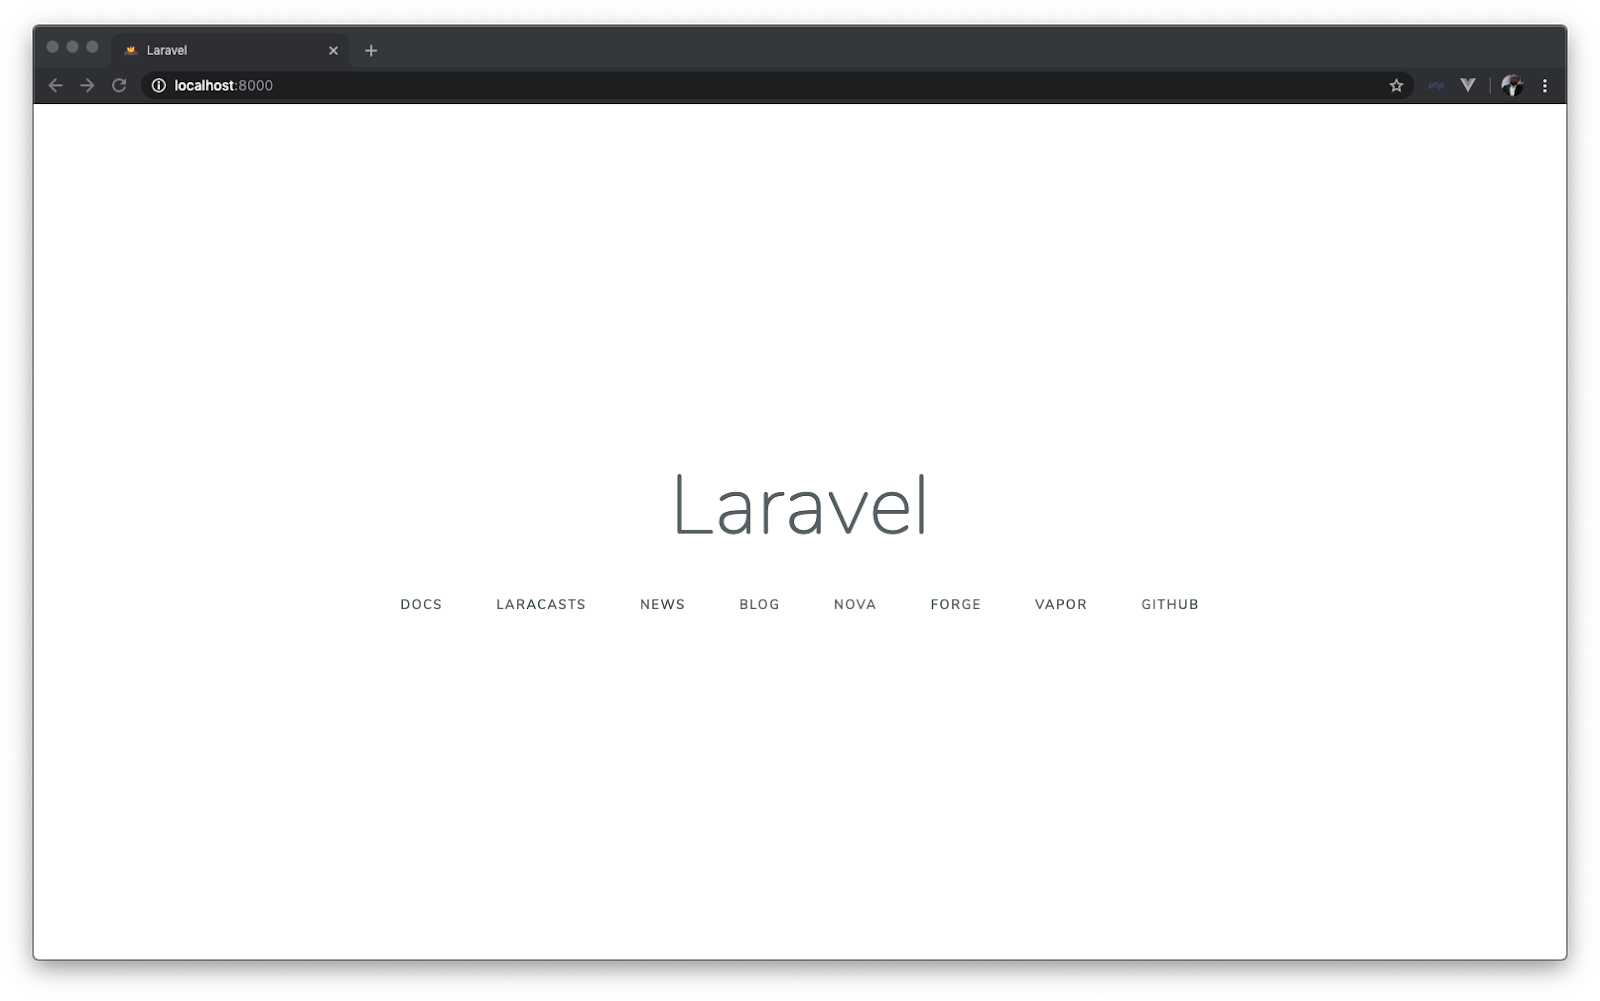
Navigate to http://localhost:8000 from your browser to view the welcome page:
Create a Database and Connect to It
Now that Laravel is installed and running, the next step is to create a connection to your database. First, ensure that you have created a database and then update the values of the following variables within the .env file:
- DB_DATABASE
- DB_USERNAME
- DB_PASSWORD
The database is all set, but before we start building our API, we need to install and configure Laravel Passport.
Install And Configure Laravel Passport
Laravel Passport provides a full 0Auth2 server implementation for Laravel applications. With it, you can easily generate a personal access token to uniquely identify a currently authenticated user. This token will then be attached to every request allowing each user access protected routes. To begin, stop the application from running by hitting CTRL + C on your computer’s keyboard and install Laravel Passport using Composer as shown here:
Once the installation is complete, a new migration file containing the tables needed to store clients and access tokens will have been generated for your application. Run the following command to migrate your database:
Next, to create the encryption keys needed to generate secured access tokens, run the command below:
Immediately after the installation process from the preceding command is finished, add the Laravel\Passport\HasApiTokens trait to your App\User model as shown here:
One of the benefits of this trait is the access to a few helper methods that your model can use to inspect the authenticated user’s token and scopes.
Now, to register the routes necessary to issue and revoke access tokens (personal and client), you will call the Passport::routes method within the boot method of your AuthServiceProvider. To do this, open the app/Providers/AuthServiceProvider file and update its content as shown below:
After registering Passport::routes(), Laravel Passport is almost ready to handle all authentication and authorization processes within your application.
Finally, for your application to be ready to use Passport’s TokenGuard
to authenticate any incoming API requests, open the config/auth configuration file and set the driver option of the api authentication guard to passport:
Create a Migration File for the Company
Every new installation of Laravel comes with a pre-generated User model and migration file. This is useful for maintaining a standard database structure for your database. Open the app/User.php file and ensure that it is similar to this:
Also for the user migration file in database/migrations/***_create_users_table.php:
The fields specified in the file above will suffice for the credentials required from the users of our application, hence there will be no need to modify it.
Next, we will use the artisan command to create a model instance and generate a database migration file for the CEO table:
The preceding command will create a model within the app directory and a new migration file in database/migrations folder. The -m option is short for --migration and it tells the artisan command to create a migration file for our model. Next, open the newly created migration file and update its content as shown here:
Here, we included name, company_name, year, company_headquarters and what_company_does fields.
Now open the app/CEO.php file and use the following content for it:
Here, we specified the attributes that should be mass assignable, as all Eloquent models protect against mass-assignment by default.
Run the migration command again to update the database with the newly created table and fields using the following command:
Now that the database is updated, we will proceed to create controllers for the application. We will also create a couple of endpoints that will handle registration, login, and creating the details of a CEO as explained earlier.
Create controllers
Controllers accept incoming HTTP requests and redirect them to the appropriate action or methods to process such requests and return the appropriate response. Since we are building an API, most of the responses will be in JSON format. This is mostly considered the standard format for RESTful APIs.
Authentication controller
We will start by using the artisan command to generate an Authentication Controller for our application. This controller will process and handle requests for registration and login for a user into the application.
This will create a new API folder within app/Http/Controllers and then creates a new file named AuthController.php within it. Open the newly created controller file and use the following content for it:
The register method above handled the registration process for users of our application. To handle validation and ensure that all the required fields for registration are filled, we used Laravel’s validation method. This validator will ensure that the name, email, password and password_confirmation fields are required and return the appropriate feedback.
Lastly, the login method ensures that the appropriate credentials are inputted before authenticating a user. If authenticated successfully, an accessToken is generated to uniquely identify the logged in user and send a JSON response. Any subsequent HTTP requests sent to a secured or protected route will require that the generated accessToken be passed as an Authorization header for the process to be successful. Otherwise, the user will receive an unauthenticated response.
Creating the CEO Controller
Here, you will use the same artisan command to automatically create a new controller. This time around we will create an API resource controller. Laravel resource controllers are controllers that handle all HTTP requests for a particular Model. In this case, we want to create a controller that will handle all requests for the CEO model, which include creating, reading, updating, and deleting. To achieve this, run the following command:
The command above will generate an API resource controller that does not include the create and edit view since we are only building APIs. Navigate to app/Http/Controllers/API/CEOController.php and update its contents as shown below:
A quick view at the code snippet above shows that we created five different methods; each housing logic to carry out a particular function. Here is an overview of what each method does:
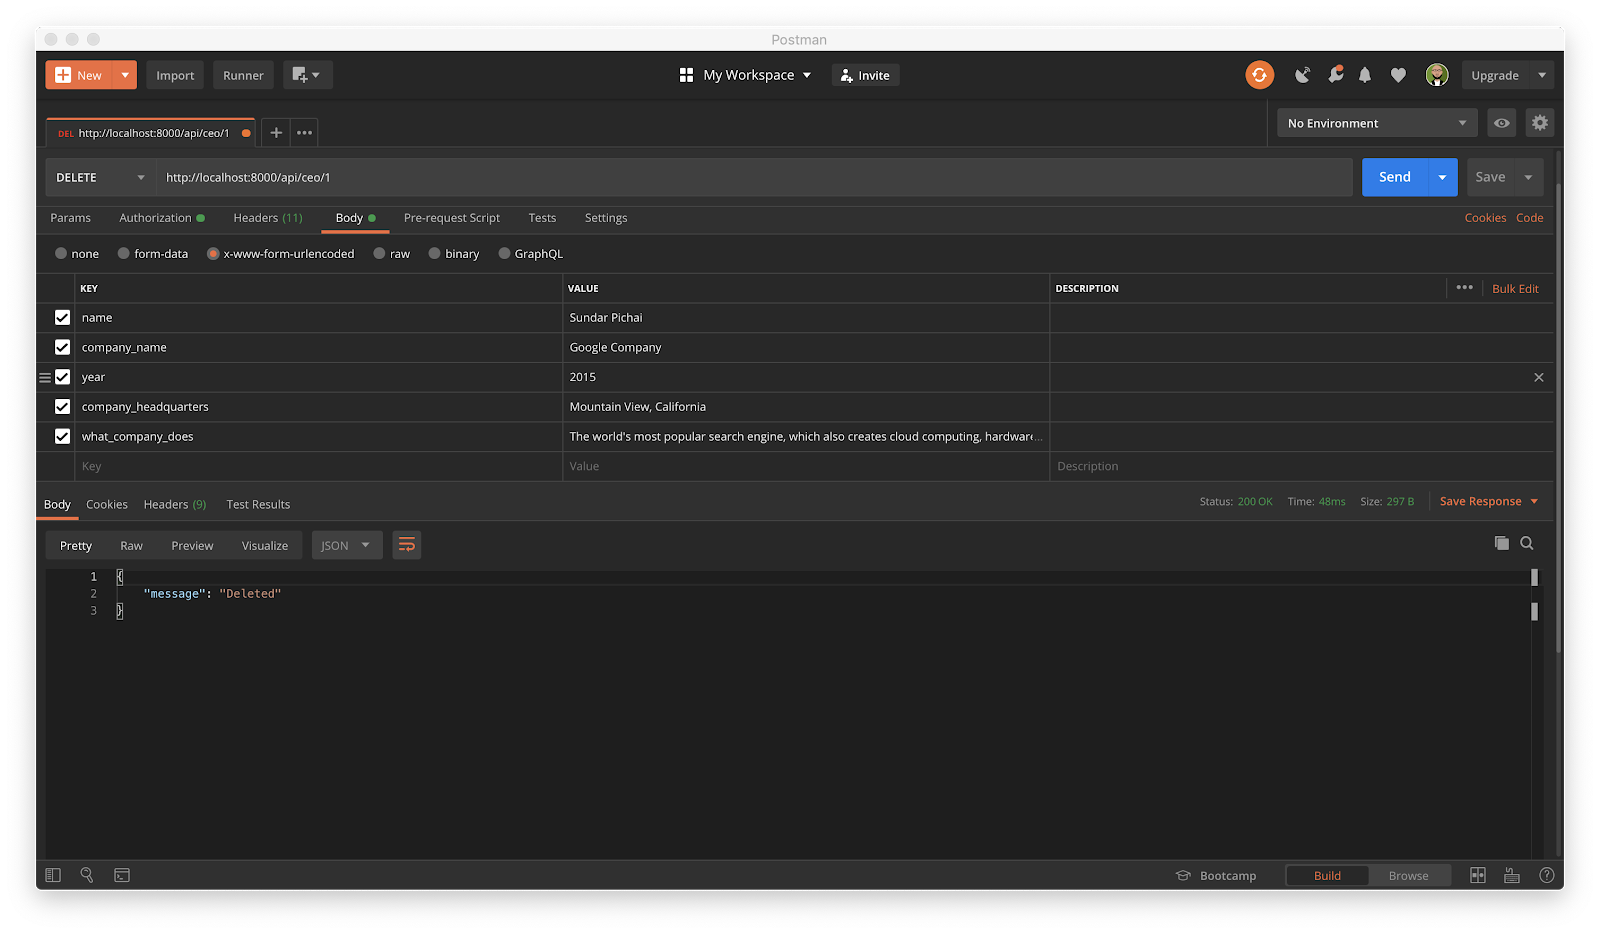
index: This method retrieves the entire list of CEOs from the database and returns it as a resource collection in a JSON structure. More details about the Laravel resource collection will be shared in the next section.store: This method receives the instance of the HTTP request to create new CEO details via dependency injection using$requestto retrieve all the values posted. It also ensures that all the required fields are not submitted as an empty request. Lastly, it returns the information of the newly created CEO details as a JSON response.show: This method uniquely identifies a particular CEO and returns the details as a JSON response.update: This receives the HTTP request and the particular item that needs to be edited as a parameter. It runs an update on the instance of the model passed into it and returns the appropriate response.`destroy: This method receives the instance of a particular item that needs to be deleted and removes it from the database.
Some methods require a specific model ID to uniquely verify an item such as show() , update(), and destroy(). One thing to note here is that we were able to inject the model instances directly. This is due to using implicit route model binding in Laravel.
Once in place, Laravel will help to inject the instance CEO into our methods and return a 404 status code if not found. This makes it very easy to use the instance of the model directly, without necessarily running a query to retrieve the model that corresponds to that ID.
You can read more about implicit route model binding here on the official documentation of Laravel.
Create a Resource
Laravel Eloquent resources allow you to convert your models and collections into JSON format. It works as a data transformation layer between the database and the controllers. This helps provide a uniform interface that can be used wherever you need it within your application. Let’s create one for our CEO model by using the following command:
This will create a new resource file named CEOResource.php within the app/Http/Resources directory. Go ahead and open the newly created file. The content will look like this:
The parent::toArray($request) inside the toArray() method will automatically convert all visible model attributes as part of the JSON response.
Gain a deeper understanding of the benefits offered by Eloquent resources here.
Update Routes File
To complete the set up of the endpoints for the methods created within our controllers, update the routes.api.php file with the following contents:
To view the entire list of the routes created for this application, run the following command from the terminal:
You will see similar contents as shown below:
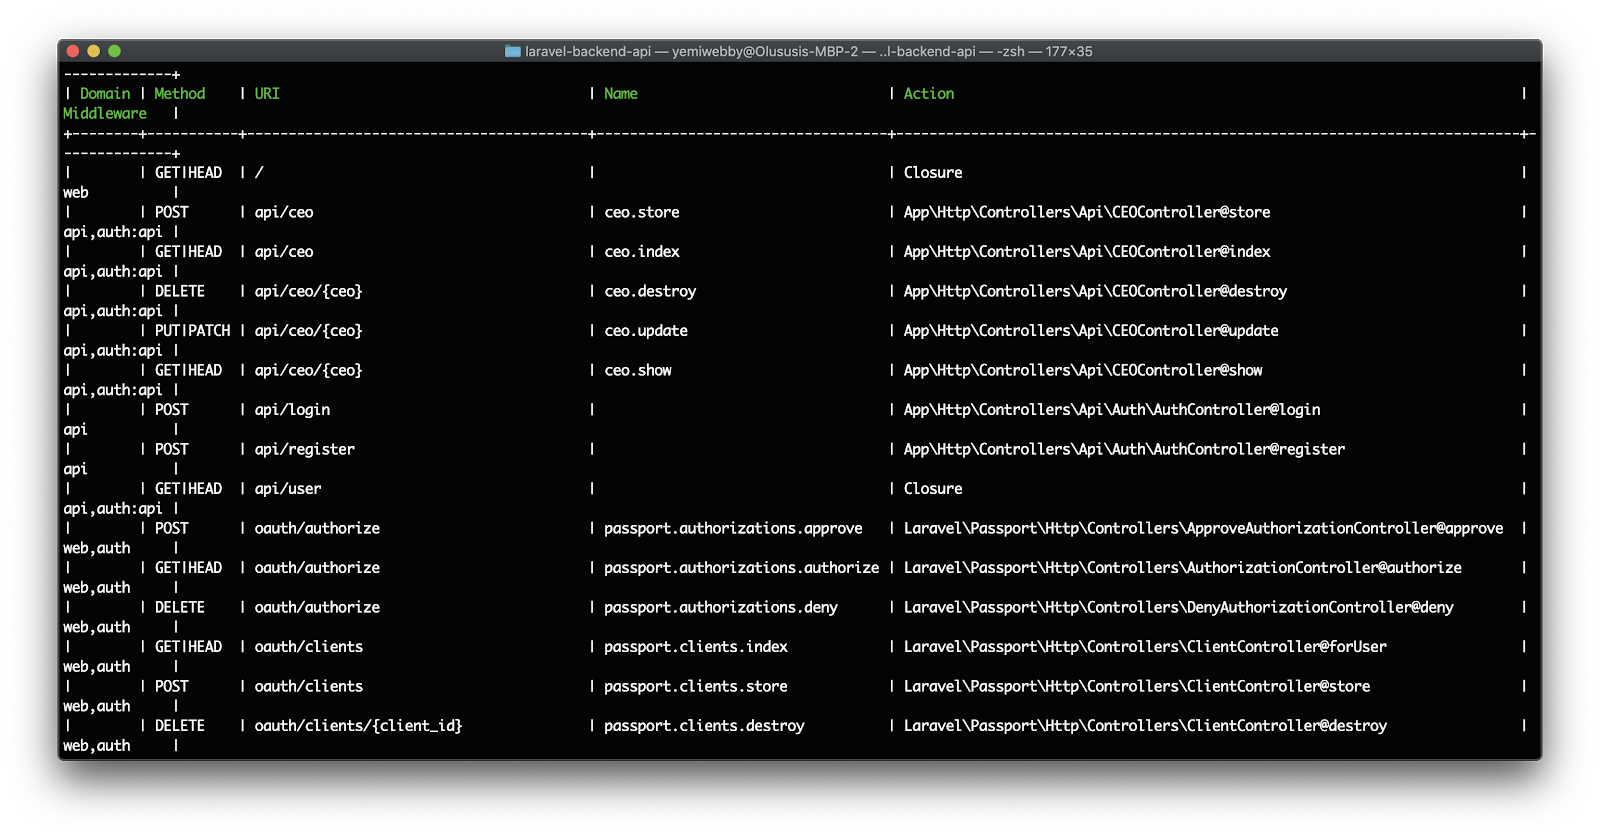
This will give you an idea of all the routes for our application.
NOTE: Please bear in mind that all the routes inside the routes/api.php file will be prefixed with /api/, hence you will need to include that when sending HTTP requests to the endpoints created earlier.
Run the Application
Now, test all the logic implemented so far by running the application with:
We will use Postman for the remainder of this tutorial to test the endpoints. Download it here if you don’t have it installed on your machine.
Register user
To register a user, send a POST HTTP request to this endpoint http://localhost:8000/api/register and input the appropriate details as shown here:
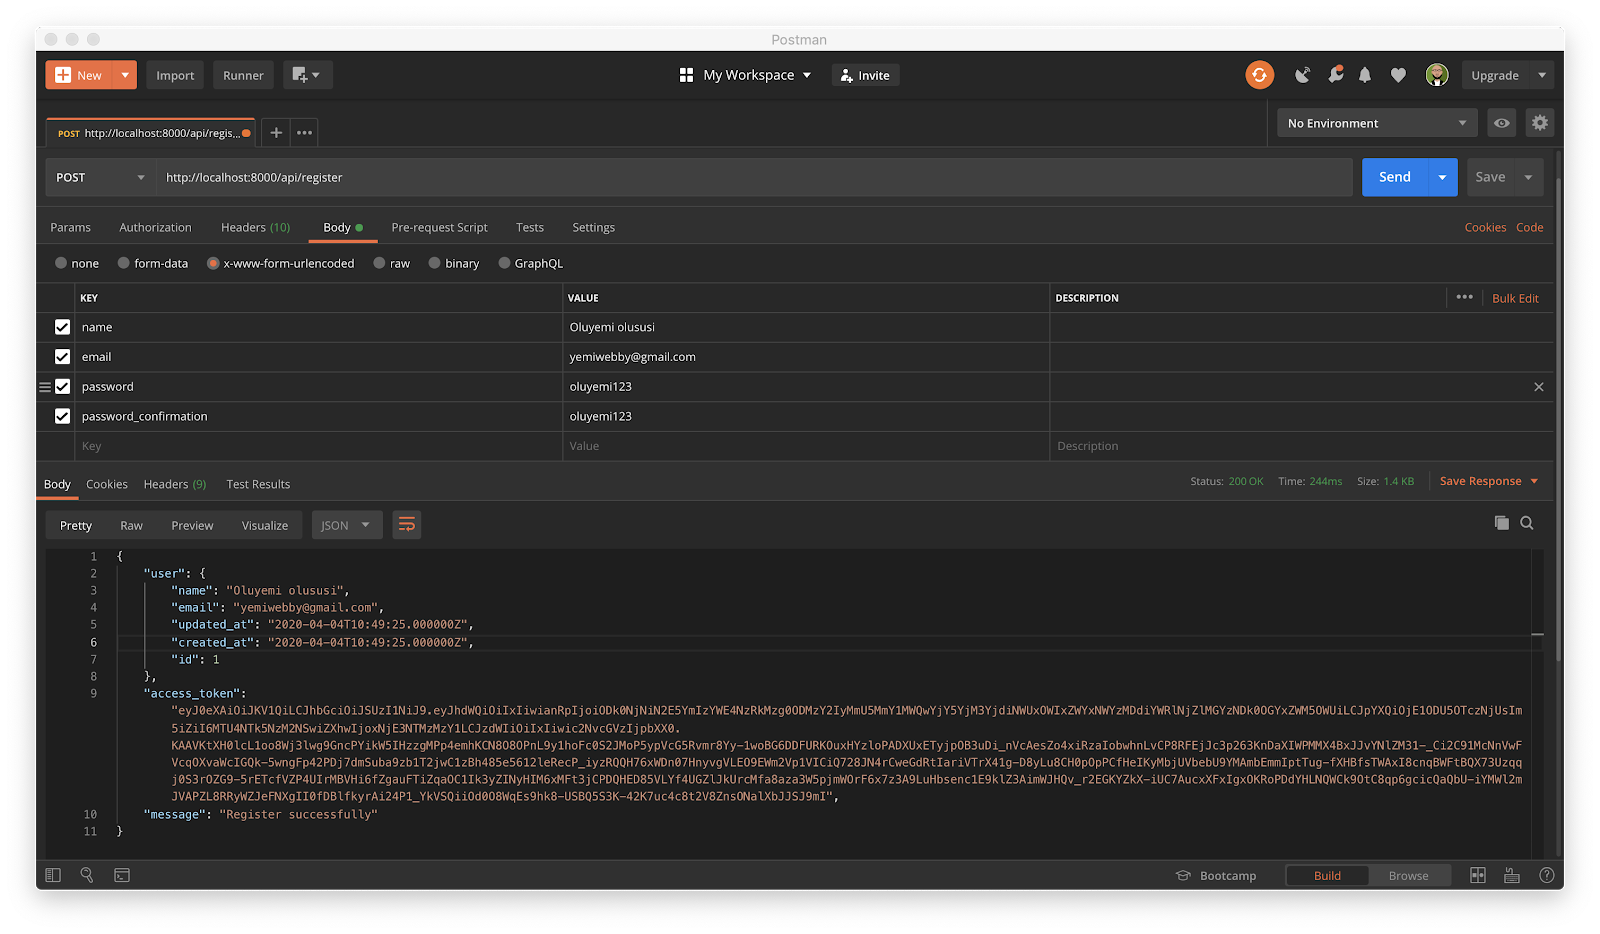
Now, your details might not be similar to this, but here is what the key and value of your requests should look like:
Login
Once the registration is successful, you can proceed to http://localhost:8000/api/login and enter your details to get authenticated:
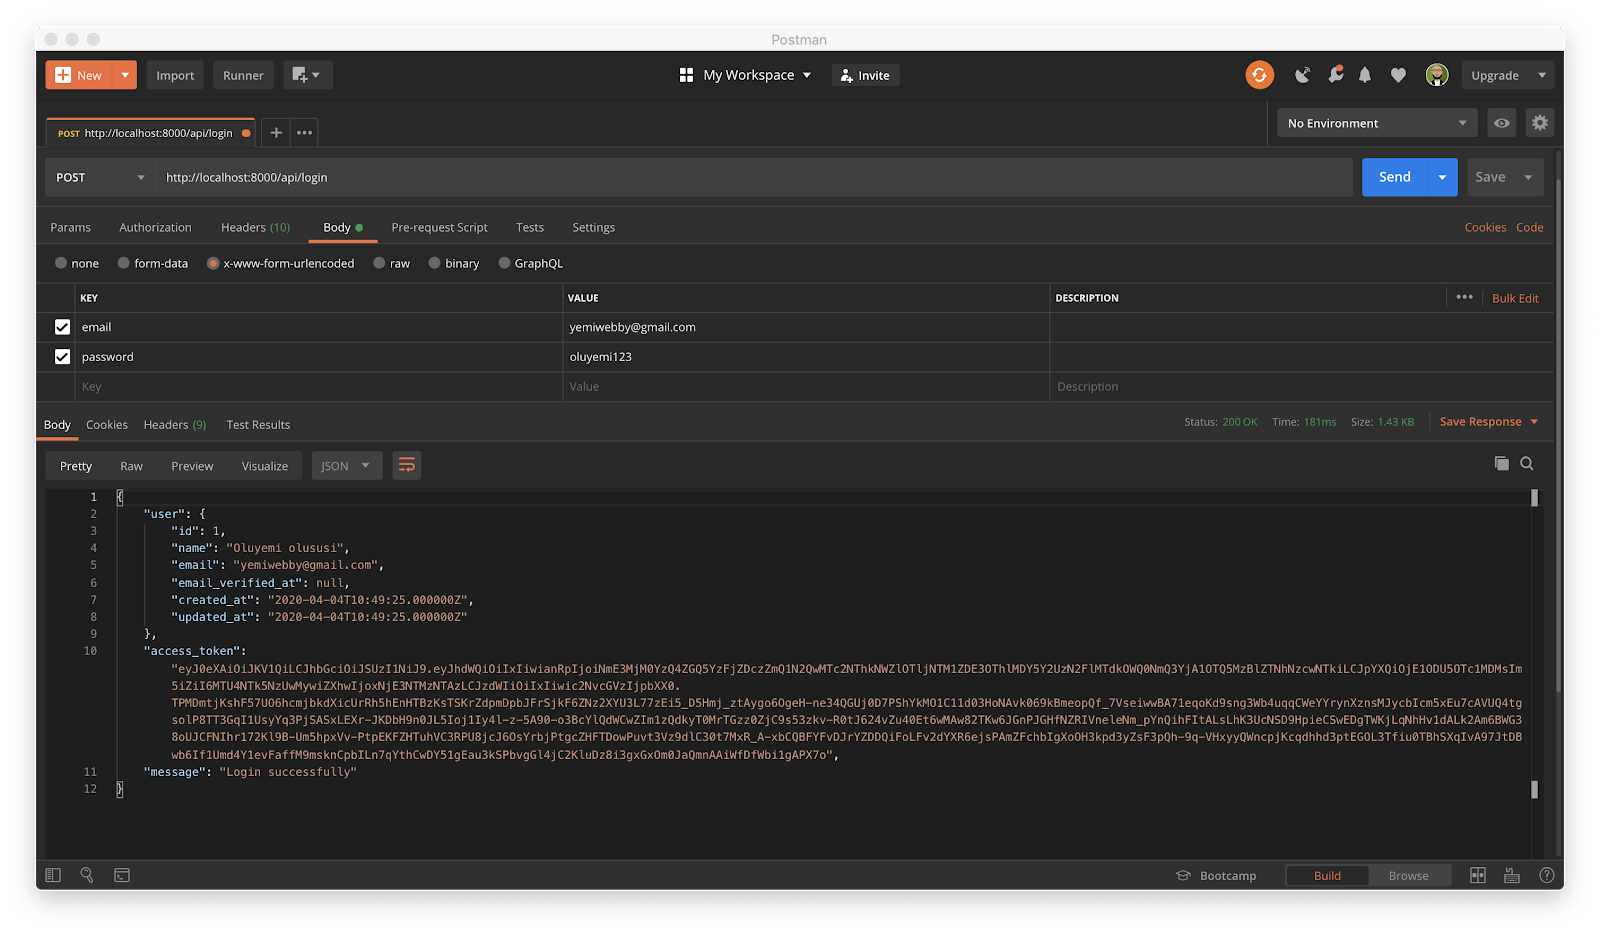
Now, assuming that you used the same key and value specified in the previous section, your request should be similar to this:
Add Bearer token
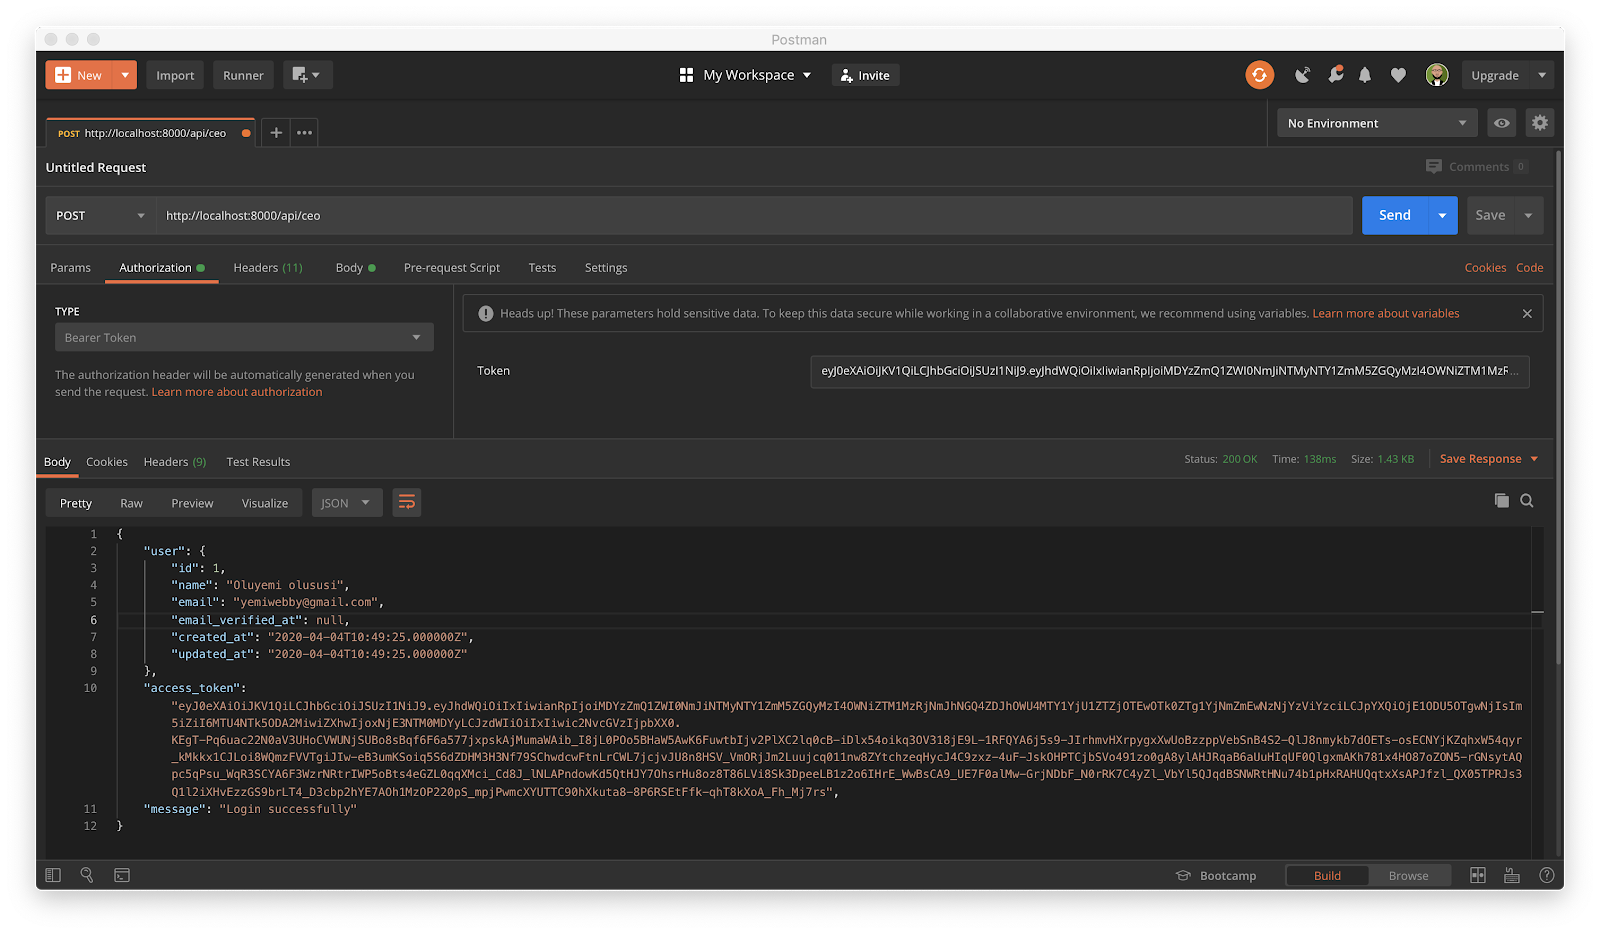
After the login, copy the value of the access_token from the response and click on the Authorization tab and select Bearer Token from the dropdown and paste the value of the access_token copied earlier:
Create CEO
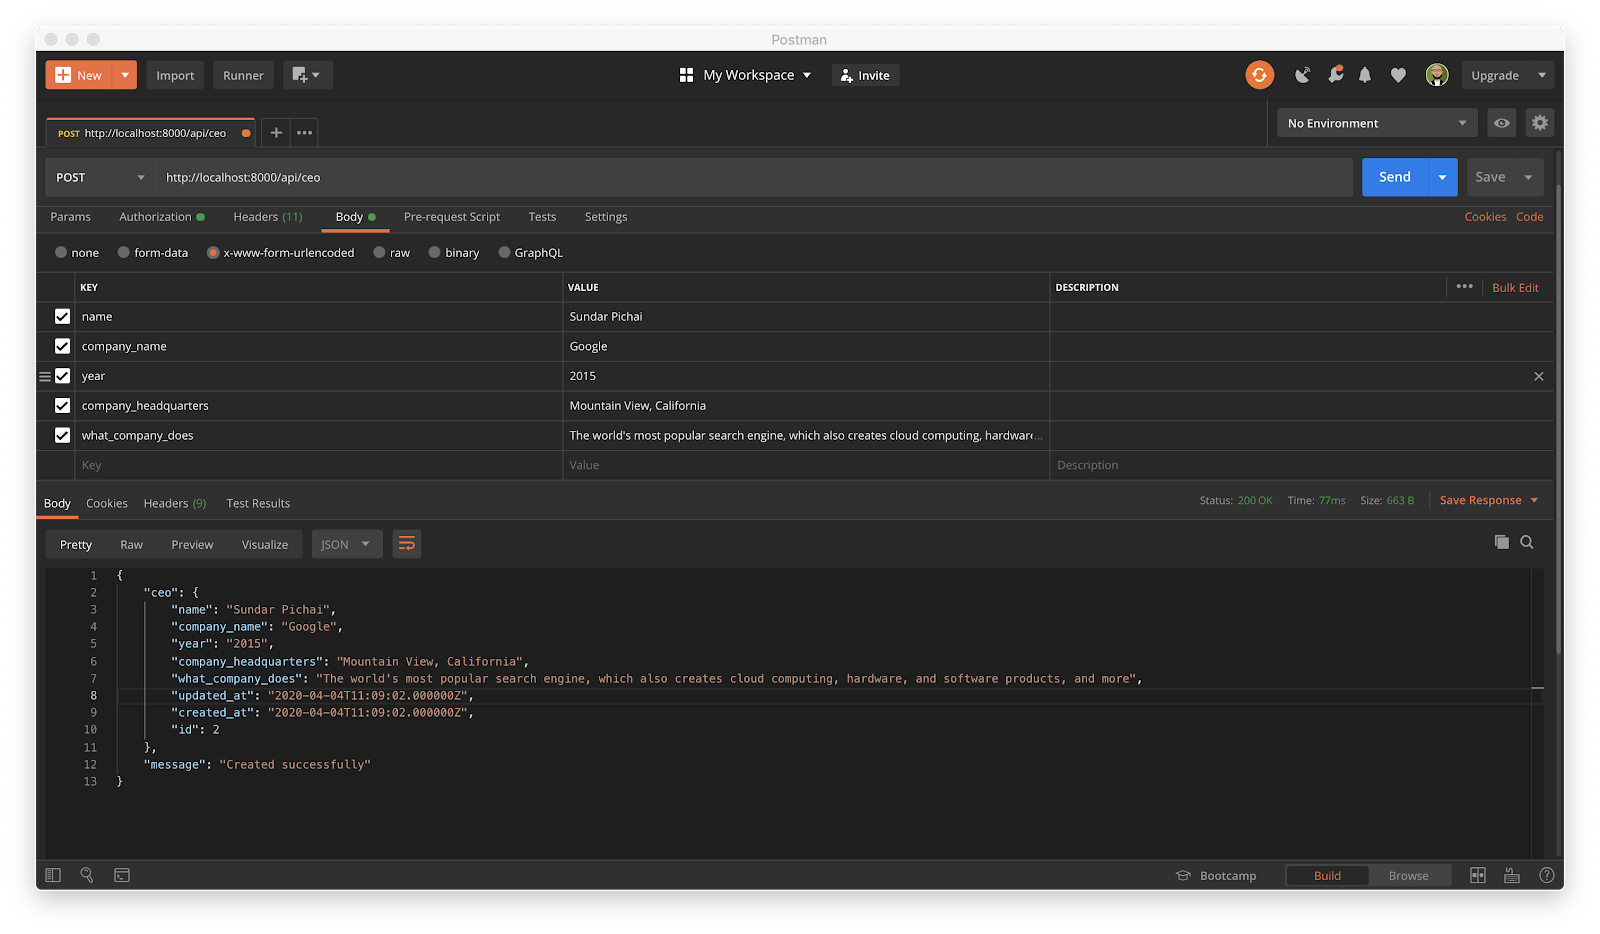
Next, create a new CEO with the details similar to the one shown below:
Fetch the list of CEOs
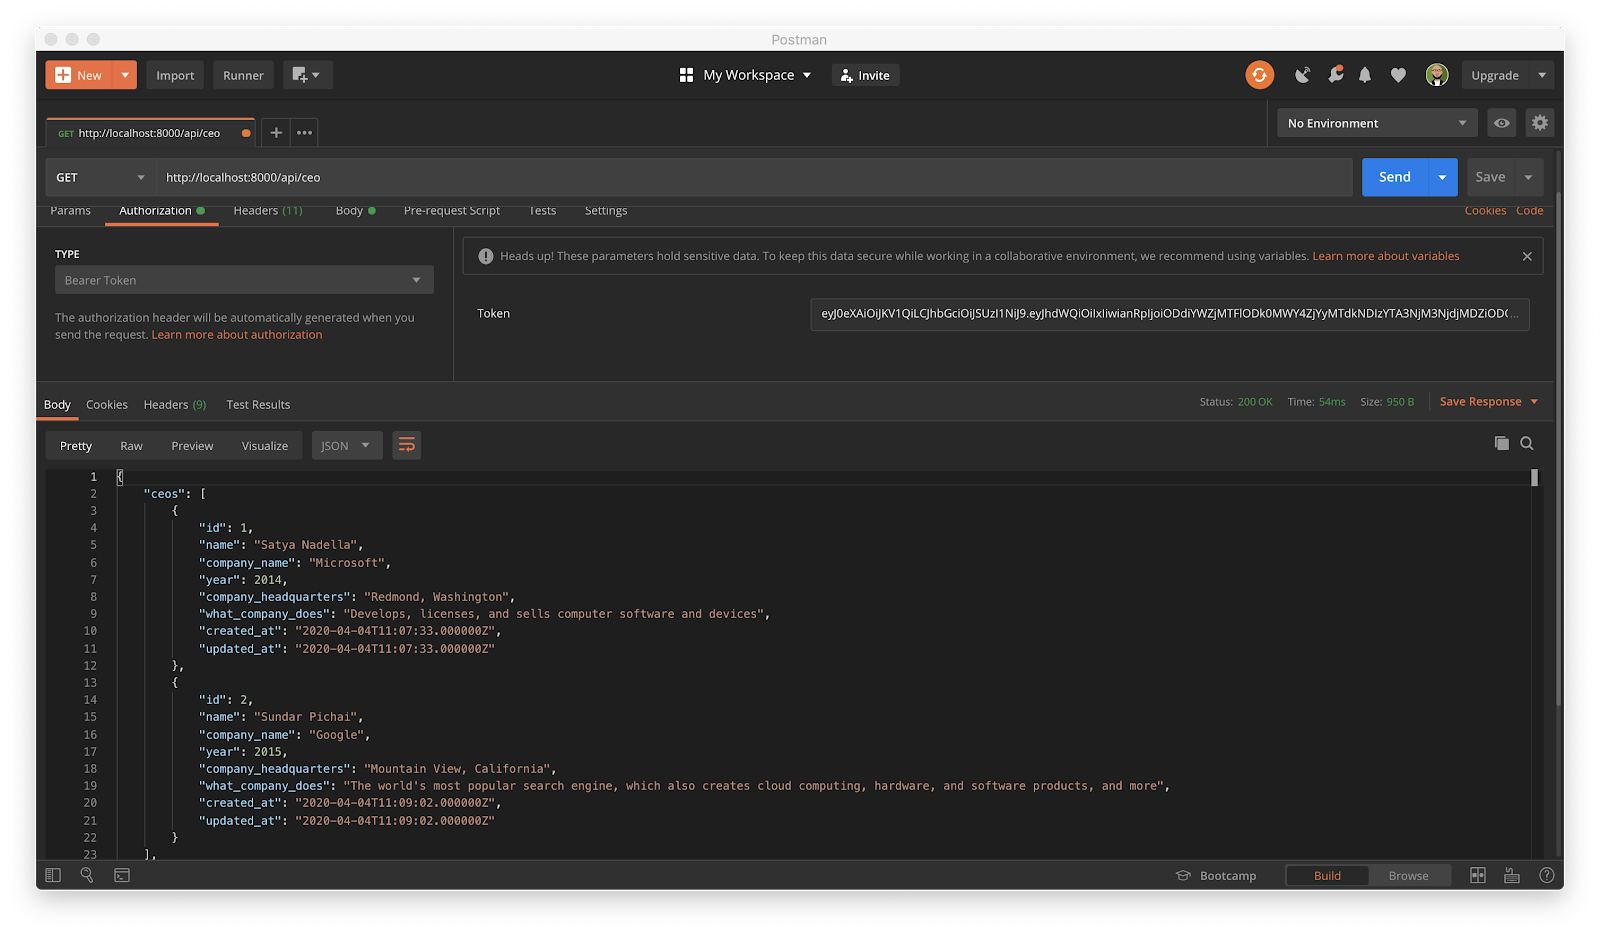
To retrieve the list of CEOs created so far, send a GET HTTP request to this endpoint http://localhost:8000/api/ceo as shown below:
Show CEO
View the details of a particular CEO by sending a GET HTTP request to this URL http://localhost:8000/api/ceo/1:
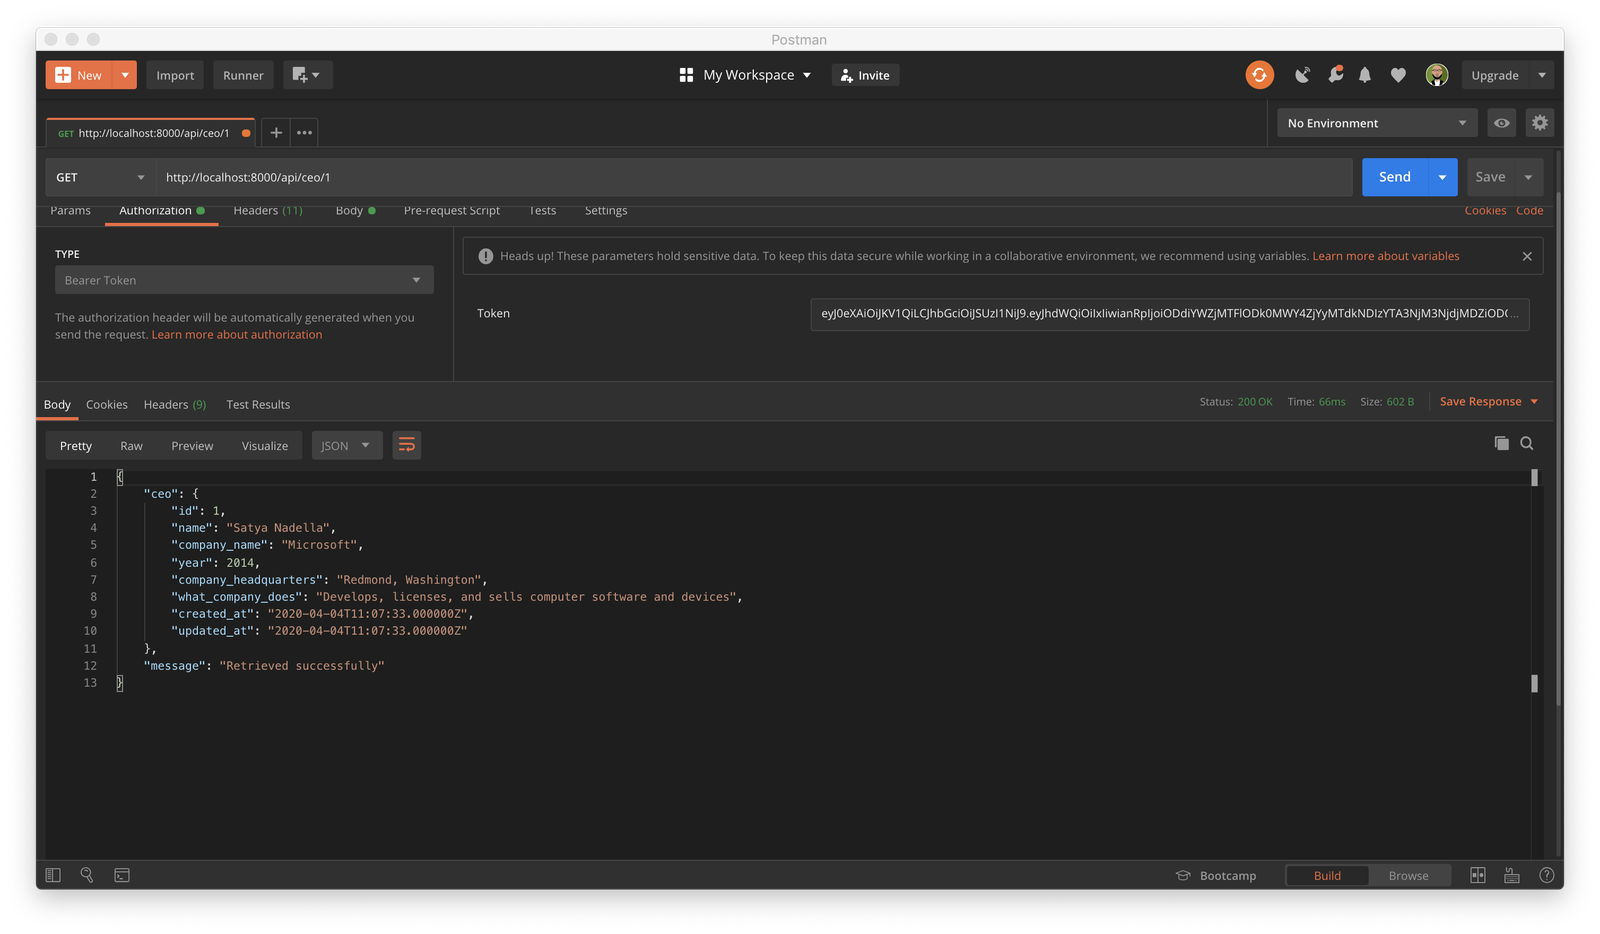
Please note that 1 is used for the endpoint here to specify the id of a particular record that needs to be retrieved from the database. You can target any record here using the id.
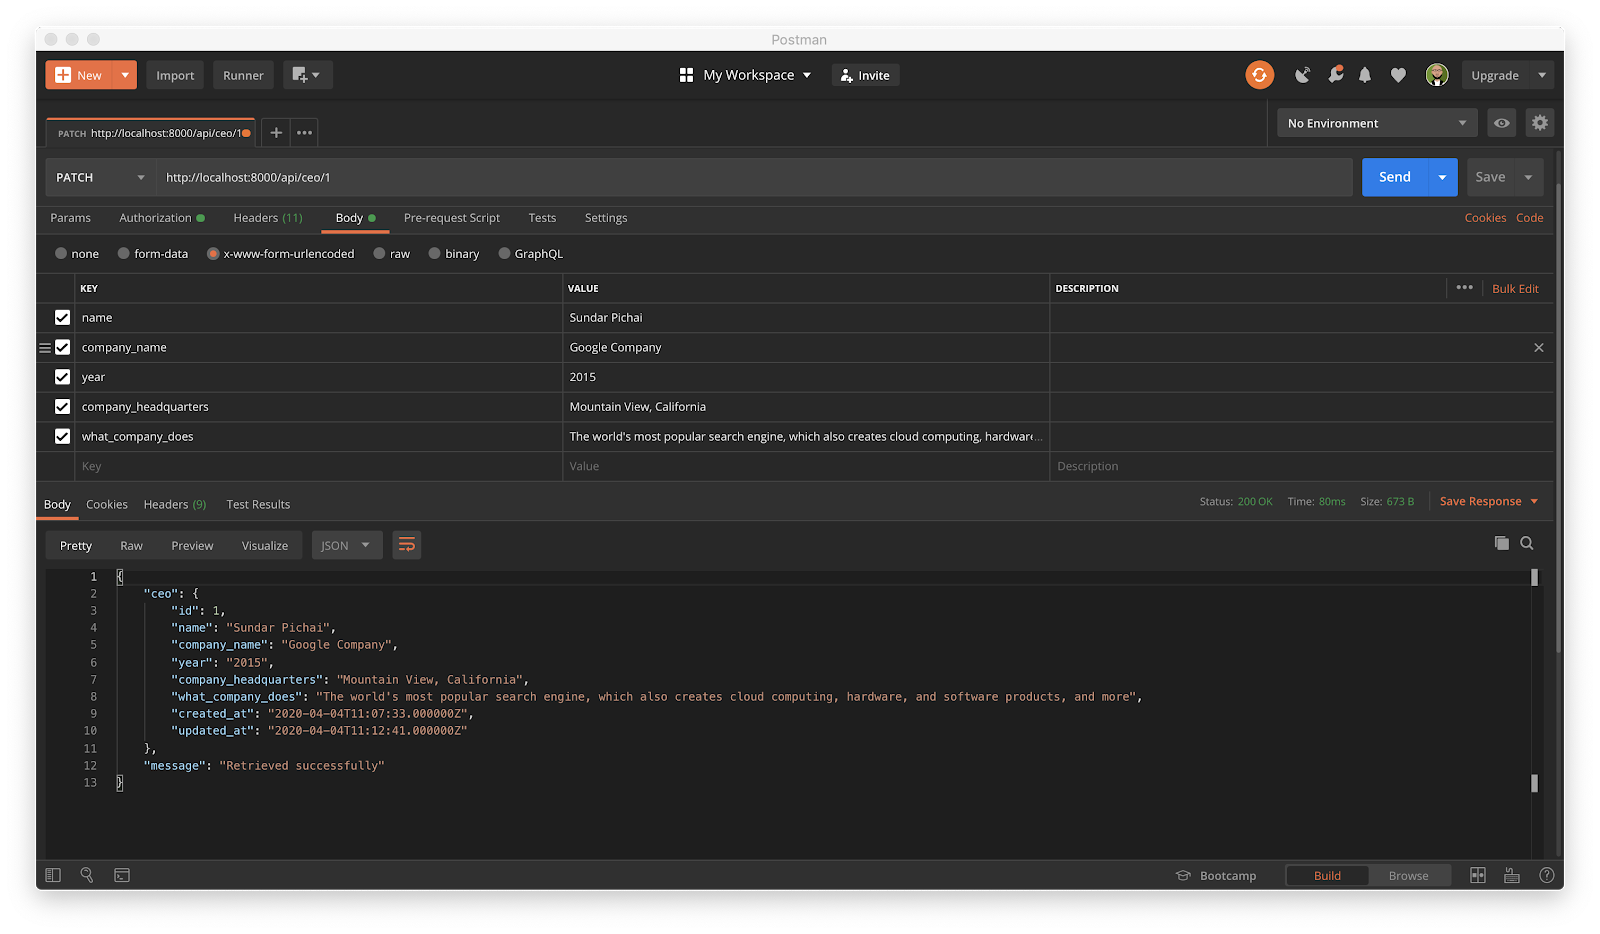
Edit CEO
Conclusion
In this tutorial, we have learned how to secure any RESTful API built with Laravel using Laravel Passport. The example created in this tutorial covers the basic CRUD (create, read, update and delete) processes required by most applications.
I hope this gives you a solid foundation that can be improved on for your existing project and new ones. Please feel free to explore the codebase of this application by downloading it here on GitHub.
For more information about Laravel and Laravel Passport, don’t hesitate to visit the official documentation.
Olususi Oluyemi is a tech enthusiast, programming freak, and a web development junkie who loves to embrace new technology.
- Twitter: https://twitter.com/yemiwebby
- GitHub: https://github.com/yemiwebby
- Website: https://yemiwebby.com.ng/
Related Posts
Related Resources
Twilio Docs
From APIs to SDKs to sample apps
API reference documentation, SDKs, helper libraries, quickstarts, and tutorials for your language and platform.
Resource Center
The latest ebooks, industry reports, and webinars
Learn from customer engagement experts to improve your own communication.
Ahoy
Twilio's developer community hub
Best practices, code samples, and inspiration to build communications and digital engagement experiences.

