SMS Forwarding and Responding Using Twilio SMS and Python
Time to read:
June 30, 2022
Written by
Reviewed by

An SMS proxy service uses an additional phone number to serve as an intermediary between two or more parties. One of the main reasons to use a proxy to forward messages is to facilitate communication without disclosing phone numbers. As a result, an SMS proxy encourages reporting, collaboration, and discussions without the risk of revealing a private phone number.
In this tutorial, you will learn how to use Twilio’s Programmable Messaging API to proxy messages. This tutorial includes 2 different iterations of the application. The first will cover how to forward an SMS message, while the second will give an example of how to respond to the message.
Prerequisites
To continue with this tutorial, you will need:
- Python 3.6 or higher installed on your machine.
- A Twilio account. If you haven’t yet, sign up for a free Twilio trial.
- ngrok installed on your machine. ngrok is a useful tool for connecting your local server to a public URL. You can sign up for a free account and learn how to install ngrok.
- Two or more phone numbers to test this project.
Obtain a Twilio Phone Number
If you haven’t obtained a phone number from Twilio already, you can buy one for your account. Even if you are on a trial account, you are given trial credit on your balance to experiment with.
First, log into your account at https://console.twilio.com/. On the left-hand side of your dashboard, navigate to Phone Numbers > Manage > Buy a number.
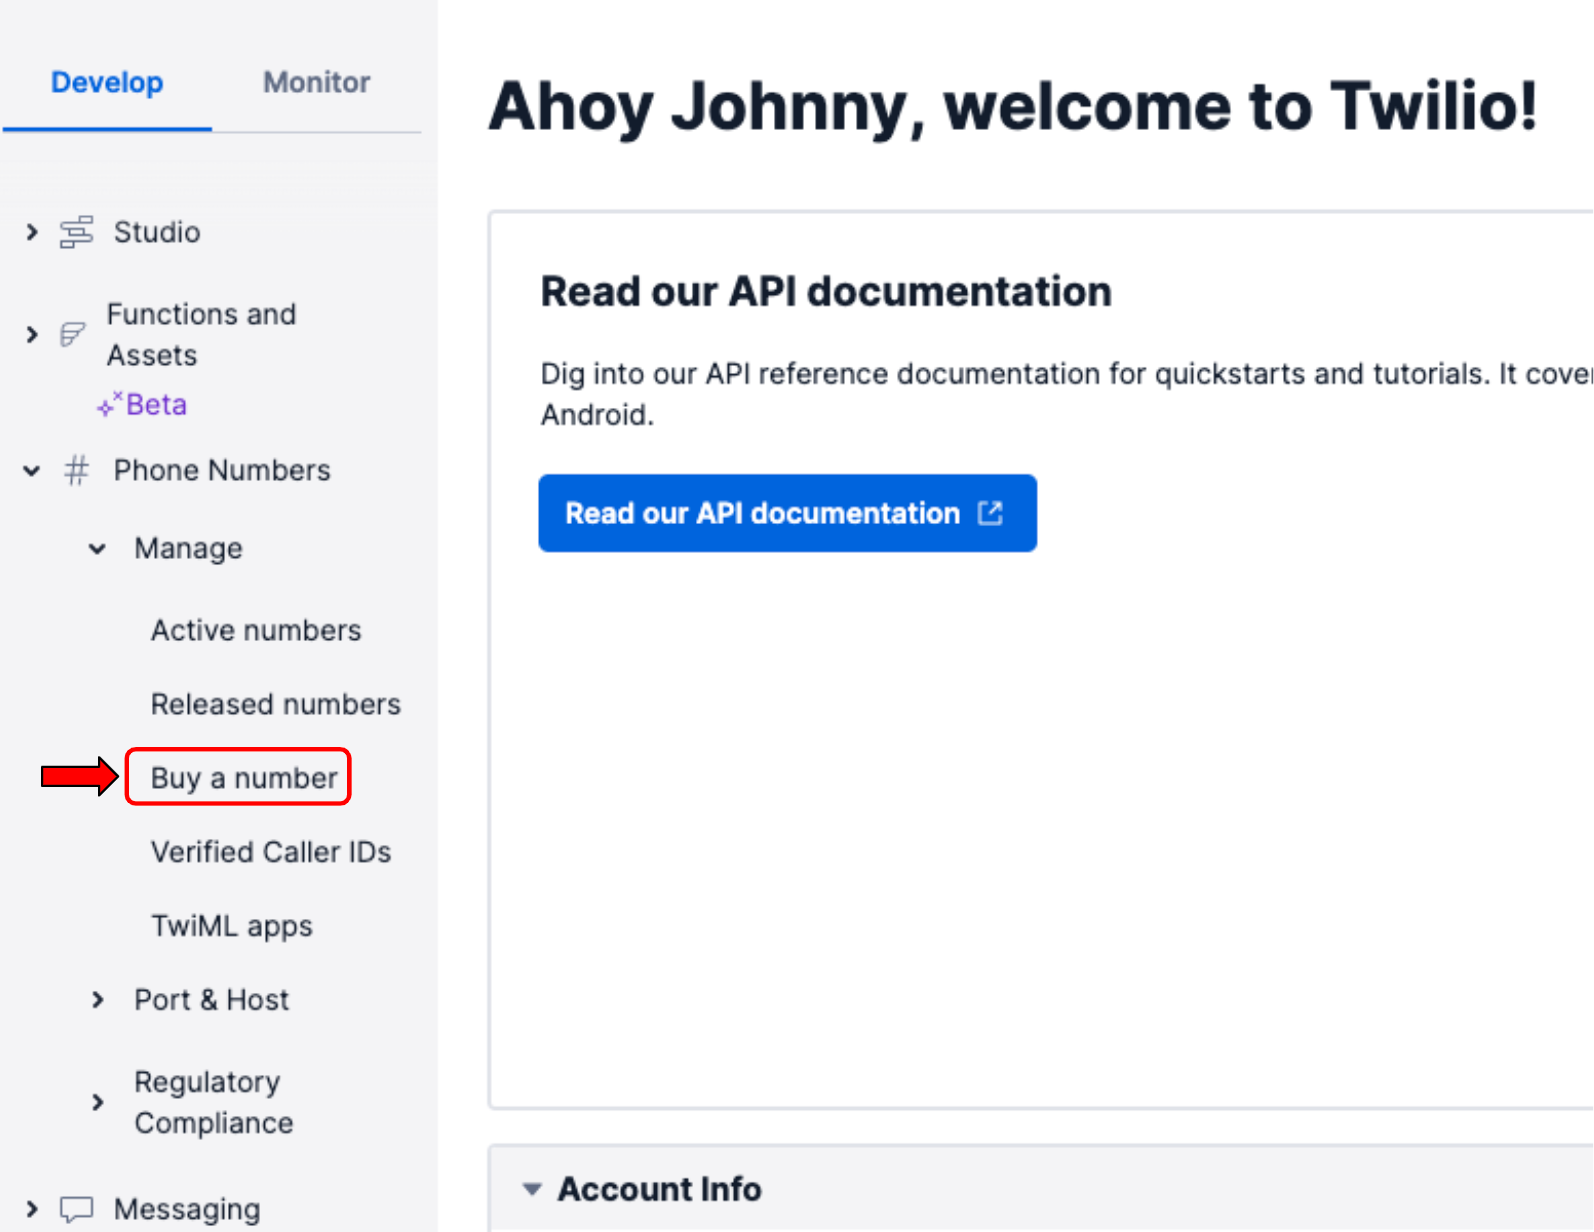
Find a suitable phone number you like on the Buy a Number page, and purchase it.
Set up your project environment
Before you can dive into the code, you will need to set up your environment. First, you should create a parent directory that holds the project. Open the terminal on your computer, navigate to a suitable directory for your project, type in the following command, and hit enter.
As a part of good practices for Python, you should also create a virtual environment. If you are working on UNIX or macOS, run the following commands to create and activate a virtual environment.
However, if you are working on Windows, run these commands instead:
After activating your virtual environment, you will install some Python packages. For this tutorial, you will use the following packages:
- Flask to build our application.
- python-dotenv to manage our environmental variables.
- Twilio Python Helper Library to interact with Twilio APIs.
To install these packages, run this command:
As another part of good programming practices, you should store sensitive information inside a secure location. To do this, you will store values in a .env file as environmental variables. In the sms-forwarding-project directory, open a new file named .env and paste the following into the file:
AGENT_NUMBER represents an agent phone number that messages will be forwarded to. Replace the "XXXXXXXXXXXXXXXX" for AGENT_NUMBER with a phone number written in E.164 format, e.g. +12131234567. For testing purposes, this could be your personal phone number.
Your environment is set up. You are now ready to begin creating the application.
Create your application
For the purpose of explanation, this tutorial will consider two distinct parties: the customers and the agent. The customer represents a person trying to reach out to the agent through the proxy phone number, and the agent is expected to reply to the customer. The customer's phone number can be revealed to the agent, while the agent's phone number is not revealed to the customer.
Forward Messages One Way
First, let’s go over the expected flow:
- The customer sends a message to a Twilio phone number.
- The message is forwarded to the agent's phone number.
Create a file named app.py in the sms-forwarding-project directory, and paste the following lines into your file:
As defined in the forward() function, the text message and phone number sent from the user are received from the request to the '/forward' URL. Then, the function creates a MessagingResponse object, formats the message, specifies the recipient as the agent, and returns the TwiML <Response> so that the agent can receive the message.
If you want to go ahead and run this iteration of code, see the sections below named Set up the ngrok tunnel and webhook and Run the application.
Proxy Messages One-to-One
To add more utility to the program, the agent should be able to respond to the customer. The application needs to keep track of the customer's number so that the agent may reply to the customer. For simplicity's sake, we will use a global variable to store the customer's number.
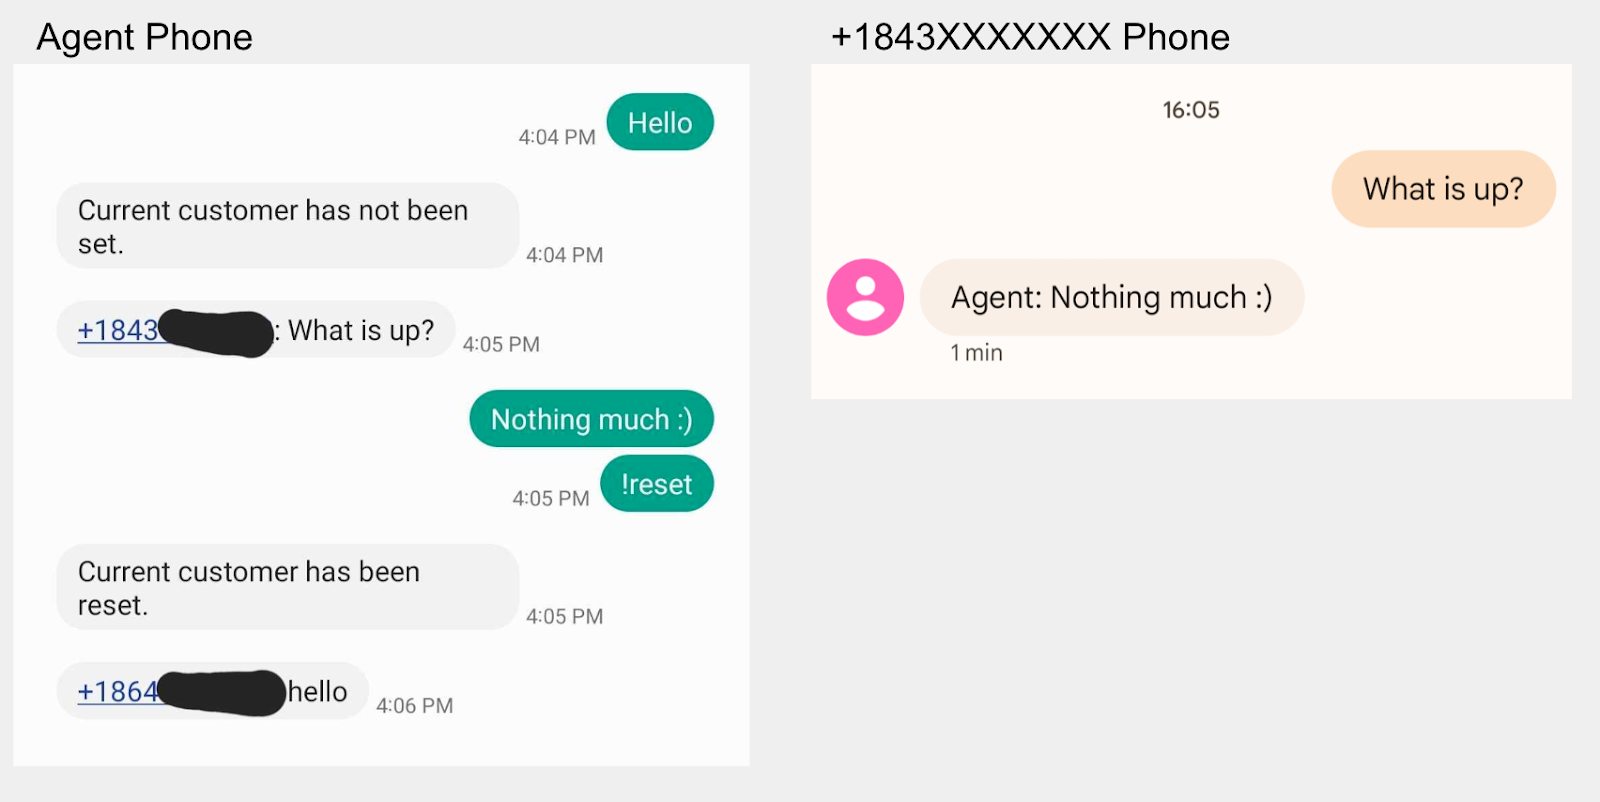
Here are the flow and requirements for this iteration:
- The customer should message first.
- If a customer sends a message to the Twilio phone number, the current customer is updated, and the message is forwarded to the agent.
- When the agent replies to the Twilio phone number, the message is forwarded to the current customer.
- If a different customer other than the current customer messages the agent, they are prompted to message again at a different time.
- The agent can reset the current customer by messaging "!reset" to the Twilio phone number.
Copy and replace the code below into app.py:
In the previous iteration of code, the agent was specified as the recipient. However, this iteration also includes the customer as a forwarding recipient. By expanding the control flow of the application, the program has more useful functionality as a proxy. And to make the code cleaner, a helper function named reply(message, recipient) is defined.
If you want to run this iteration of code, continue to the sections below named Set up the ngrok tunnel and webhook and Run the application.
Set up the ngrok tunnel and webhook
If you were to run the program prematurely, you would not receive a message from the phone number. There are two things that need to be addressed. First, you need to connect your local server to a publicly accessible URL by opening up an ngrok tunnel to your local machine. Second, you need to connect the Twilio phone number to the application by using a webhook.
After having installed ngrok on your machine, open another command prompt window, and run this command to open a tunnel to port 5000.
Afterwards, your command prompt should something look like this:

Next to the word Forwarding there should be a URL that points to https://localhost:5000. Your URL should be different than the one shown above. Copy that URL, as it will be used to set up the webhook. Leave this command prompt open.
On the left-hand side of your Twilio Console, navigate to Phone Numbers > Manage > Active numbers. Clicking Active numbers will take you to the Active numbers page. Click the link for the phone number that you will be using for this application.
This will take you to the configure page for the phone number. Scroll down to Messaging and paste the URL you copied from before to the A MESSAGE COMES IN section, and add “/forward” at the end of the URL. So your URL should be something like https://your-ngrok-url.ngrok.io/forward and should be pasted like the example below:
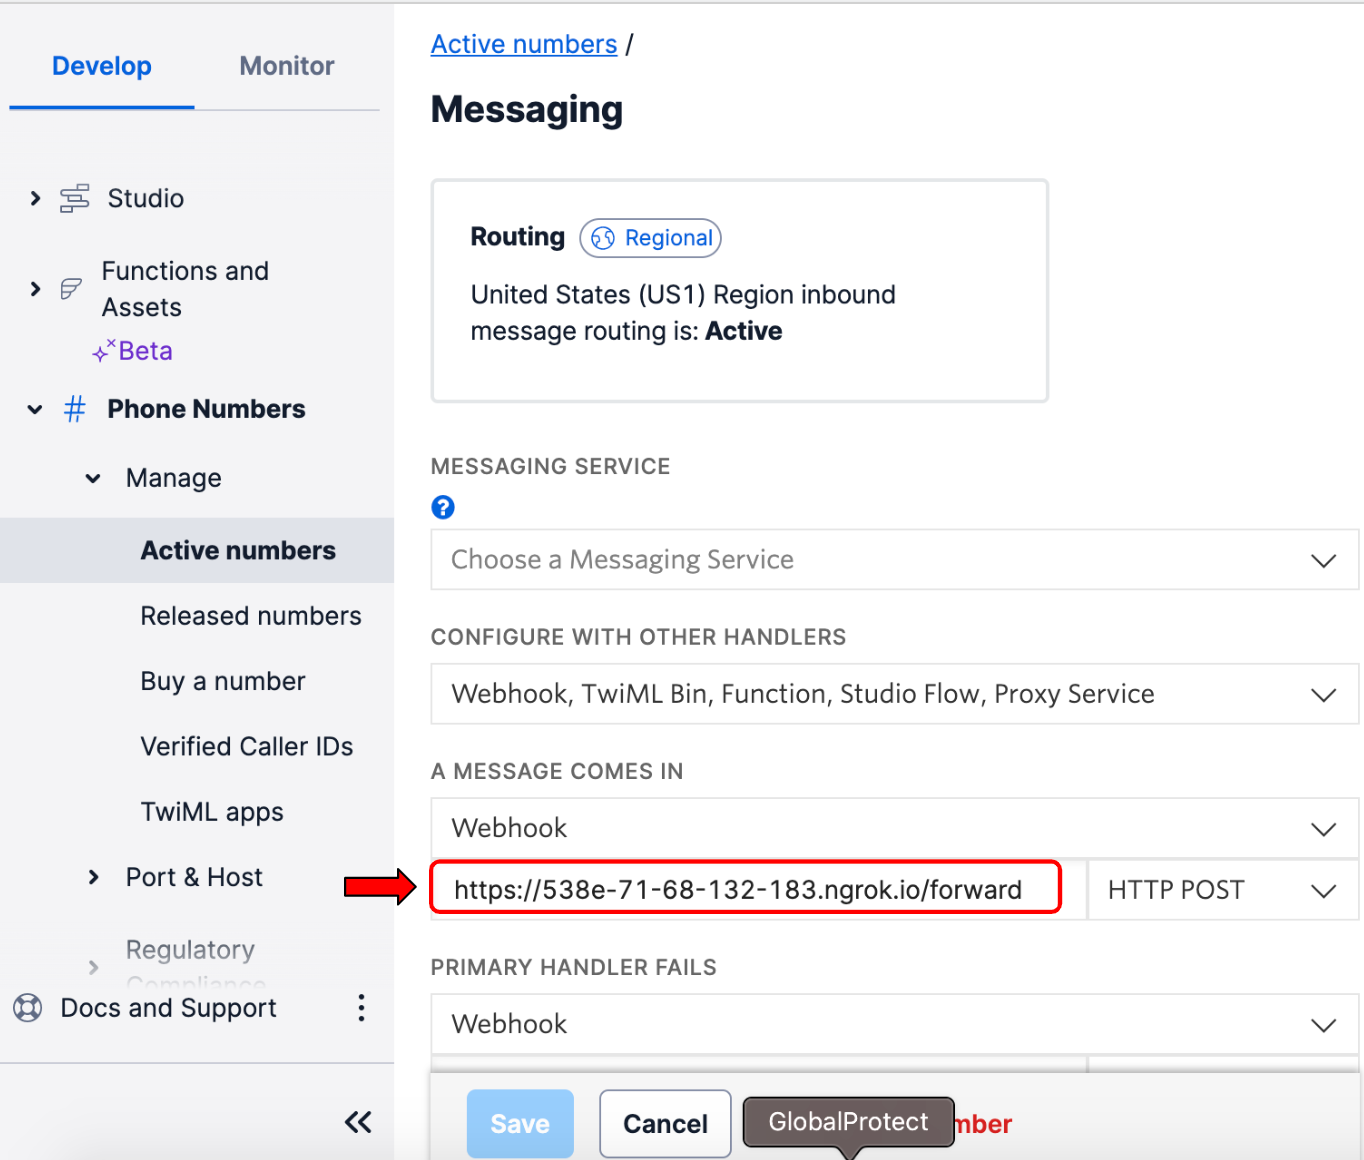
Click Save at the bottom of the page to update the number’s settings. You are now finally ready to run the application.
Run the Application
To run the application, run this command in the terminal in the sms-forwarding-project directory where the virtual environment is activated.
Afterwards, your application should be working properly. Go ahead and try it out with a friend. Get your friend to message the Twilio phone number and you should receive a message. You can also try it out with multiple friends to test out the second iteration.
If you don't have enough friends, you can buy additional phone numbers and use Twilio's API Explorer to create a message. Just fill out the To and From fields with your Twilio phone numbers, fill out the Body, and hit the Make Request button.

Conclusion
Congratulations on building an SMS proxying application! In this tutorial, you learned how to build an application that forwards messages between two parties. You implemented two different iterations of the same application. You learned how to forward a message and how to respond to the message one-to-one. Don't hesitate to personalize this application and make it your own.
Restless to build more? There's so much more you can do with Twilio and Python. To get you started, you can check out the Twilio Python Quickstart or the Twilio Python Helper Library. Even a beginner can make exciting applications using Python and Twilio SMS, such as building a sentiment analyzer for slang and emojis.
What type of projects will you build with Twilio SMS? Feel free to reach out to me at my email below. I can't wait to see what you build!
Johnny Nguyen is an intern developer on Twilio’s Developer Voices Team. He enjoys creating ironic coding projects for others to learn and enjoy. When he’s not napping or watching TikTok, he can be reached at ngnguyen [at] twilio.com.

Related Resources
Twilio Docs
From APIs to SDKs to sample apps
API reference documentation, SDKs, helper libraries, quickstarts, and tutorials for your language and platform.
Resource Center
The latest ebooks, industry reports, and webinars
Learn from customer engagement experts to improve your own communication.
Ahoy
Twilio's developer community hub
Best practices, code samples, and inspiration to build communications and digital engagement experiences.