How to build a socially distant Halloween candy dispenser
Time to read: 7 minutes
October 26, 2020
Written by
Reviewed by

For the 2020 Twilio internal Solutions Engineering Hackathon, our team set out to do the impossible (at least, by 2020 standards): save Halloween. We combined Twilio’s programmable communication channels with Electric Imp, our platform for internet connected devices, to create the ultimate Halloween candy dispenser robot.
We set out with three goals:
- The robot needed to release candy without physical human interaction.
- The robot had to be modular so we could trigger it in many ways.
- And finally, it had to be doable! None of us are IoT experts, so we needed to keep it simple.
The final product:

Candybot dressed up for Halloween
Candybot’s remote operator board, with videos of how it works
How to build a Halloween candy dispenser
In this blog post, we’ll cover the technologies used to create our robot as well as share some tips on how to make your own touchless Halloween candy dispenser. We’ll start with the dispenser and then talk about triggering using Twilio’s channels.
You will need:
Hardware: (The “T” in IoT):
- 1x Twilio Electric Imp impExplorer Kit (comes with imp001 module)
- 1x Grove 2-channel SPDT Relay
- 1x DC Linear Actuator – aka the pusher (Here’s the one we used)
- 1x Power supply for linear actuator (Here’s the one we used)
- Wires to connect power supply to relay
- Tools: Screwdriver, wire cutter, wire stripper, digital multimeter (optional)
Software:
- An Electric Imp account (see the detailed instructions link after “set up your Electric Imp Explorer” below)
- A Twilio account (If you sign up for a new account through this link, you’ll get an extra $10 in credit when you upgrade.)
Hardware: How to set up and wire your module
Our robot consists of an Electric Imp impExplorer Kit which controls an electric “pusher” that releases candy from a PVC pipe container. The Imp is addressable from the Internet, and which made it easy to use any of Twilio’s channels to trigger the cascade of candy.
In this section, we’ll walk you through building your own socially distant candy dispenser. A more in-depth discussion (as well as all of our code) is available on our GitHub.
Step 1: Set up your imp001 ImpExplorer
There are much newer options for building with Electric Imp, but for this hackathon we used a vintage module from 2012: the imp001. The initial setup for the imp001 and its shield, the ImpExplorer, are pretty easy to follow and need to be completed before you start with the rest of the build. After completing your initial setup, you’ll be able to communicate with your Imp remotely using a API endpoint.
Step 2: Set up the relay (a.k.a. “Candy Pushing Arm”)
A relay is an electrical device that completes a circuit on command. It’s often used by control electronics to trigger “on/off” states of larger systems, like a conveyer belt or an HVAC. In our case, we’re using it to control our candy pushing arm.
A complete positive circuit (+12V) for our robot means the linear actuator pushes forward, dispenses candy. A complete negative circuit (-12V), and our robot retracts to its starting position, ready to dispense the next batch.
We’ll set up our relay according the diagram below:

Connect the power supply to the relay. Our linear actuator needs 12V DC power to retract and -12V DC power to extend. Generating +12V and -12V is as simple as switching the ground and power wires of our actuator, but since we can’t manually switch them every time, we’ll split them up so that activating one relay gives a +12V output with the wires in one orientation, and the other gives -12V with the wires reversed. We can split the wires from our power supply across both relays to accomplish this, as seen in the diagram.
Connect the actuator to the relay as shown in the diagram.
Connect the Imp to the relay. Plug the Grove connector into the Electric Imp in one of the ports labeled “Grove i2c” and plug the other end into the port on the relay.
Dispenser: Getting your pushing arm to actually push Halloween candy
Our Candybot uses a straight 4” PVC pipe as a “hopper” to fill with candy and a 3 way PVC connector to dispense and push.
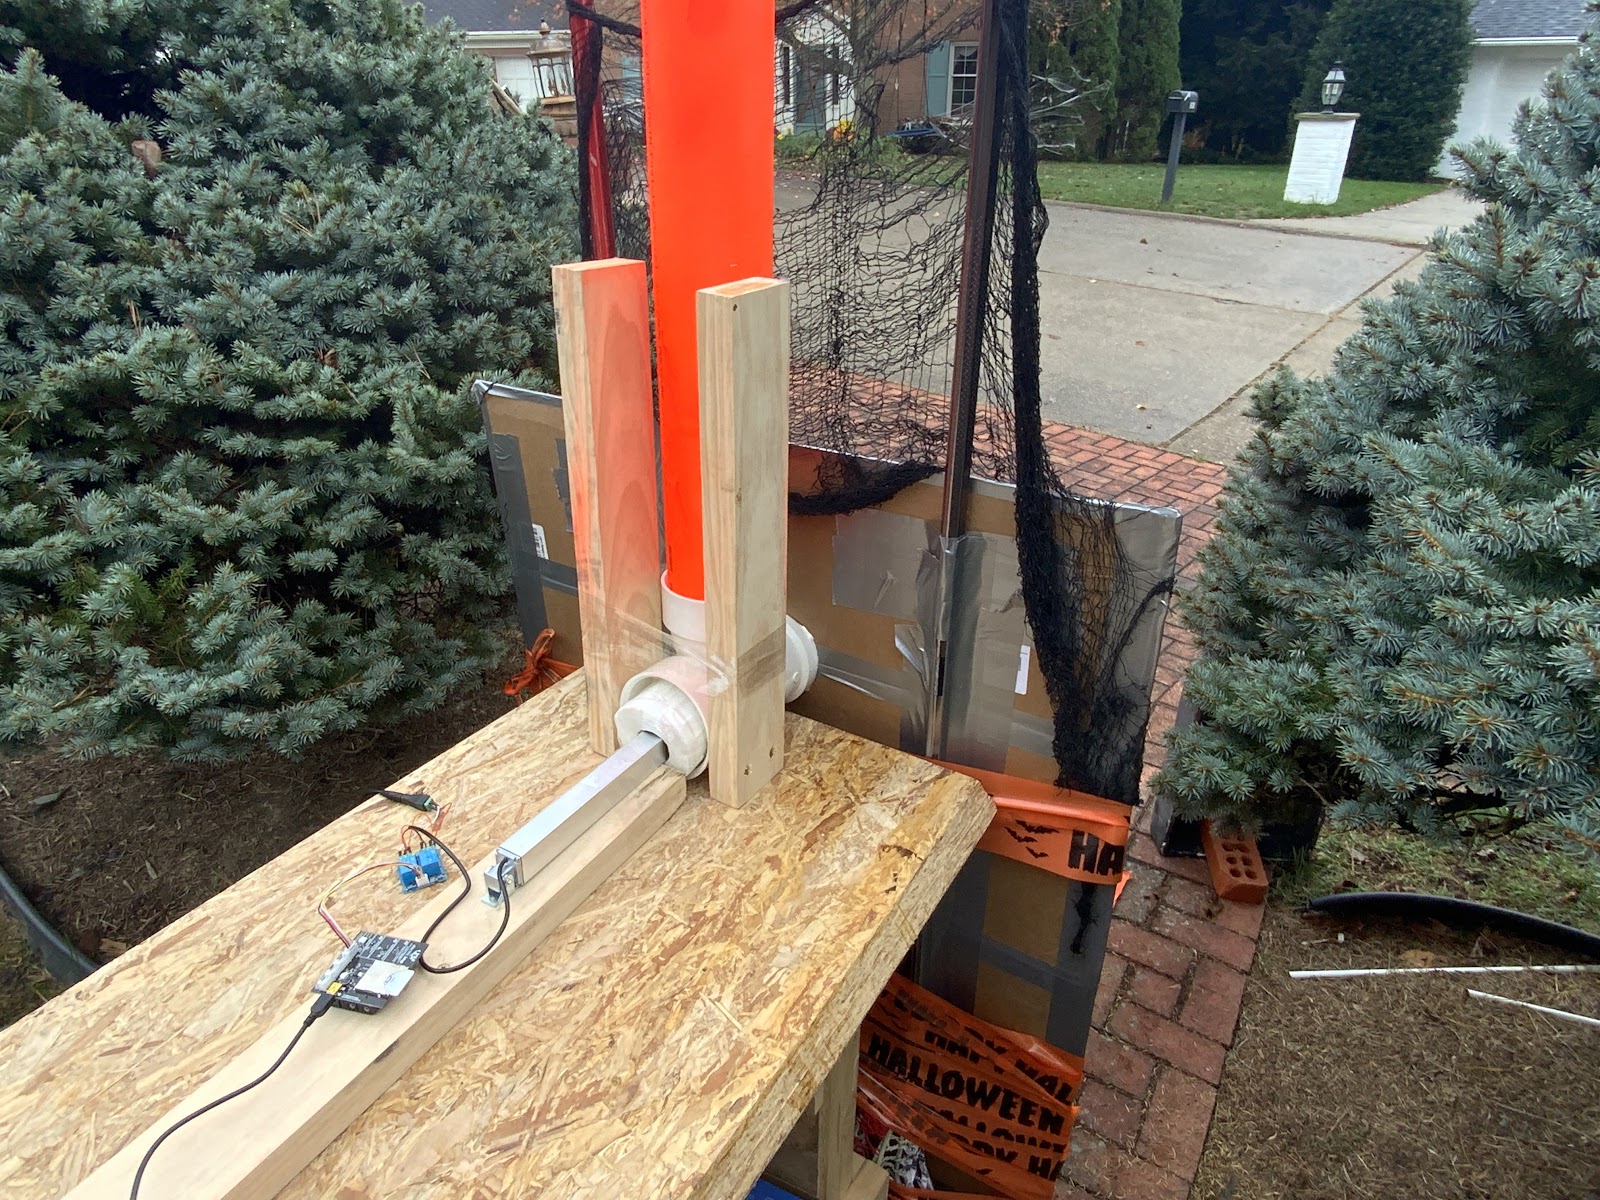
The end of the linear actuator is pretty small, so you’ll need to fix something to it to serve as your “pusher”. We chose to use a toilet paper roll since it is also 4” across and I could adjust its circumference fairly easily.
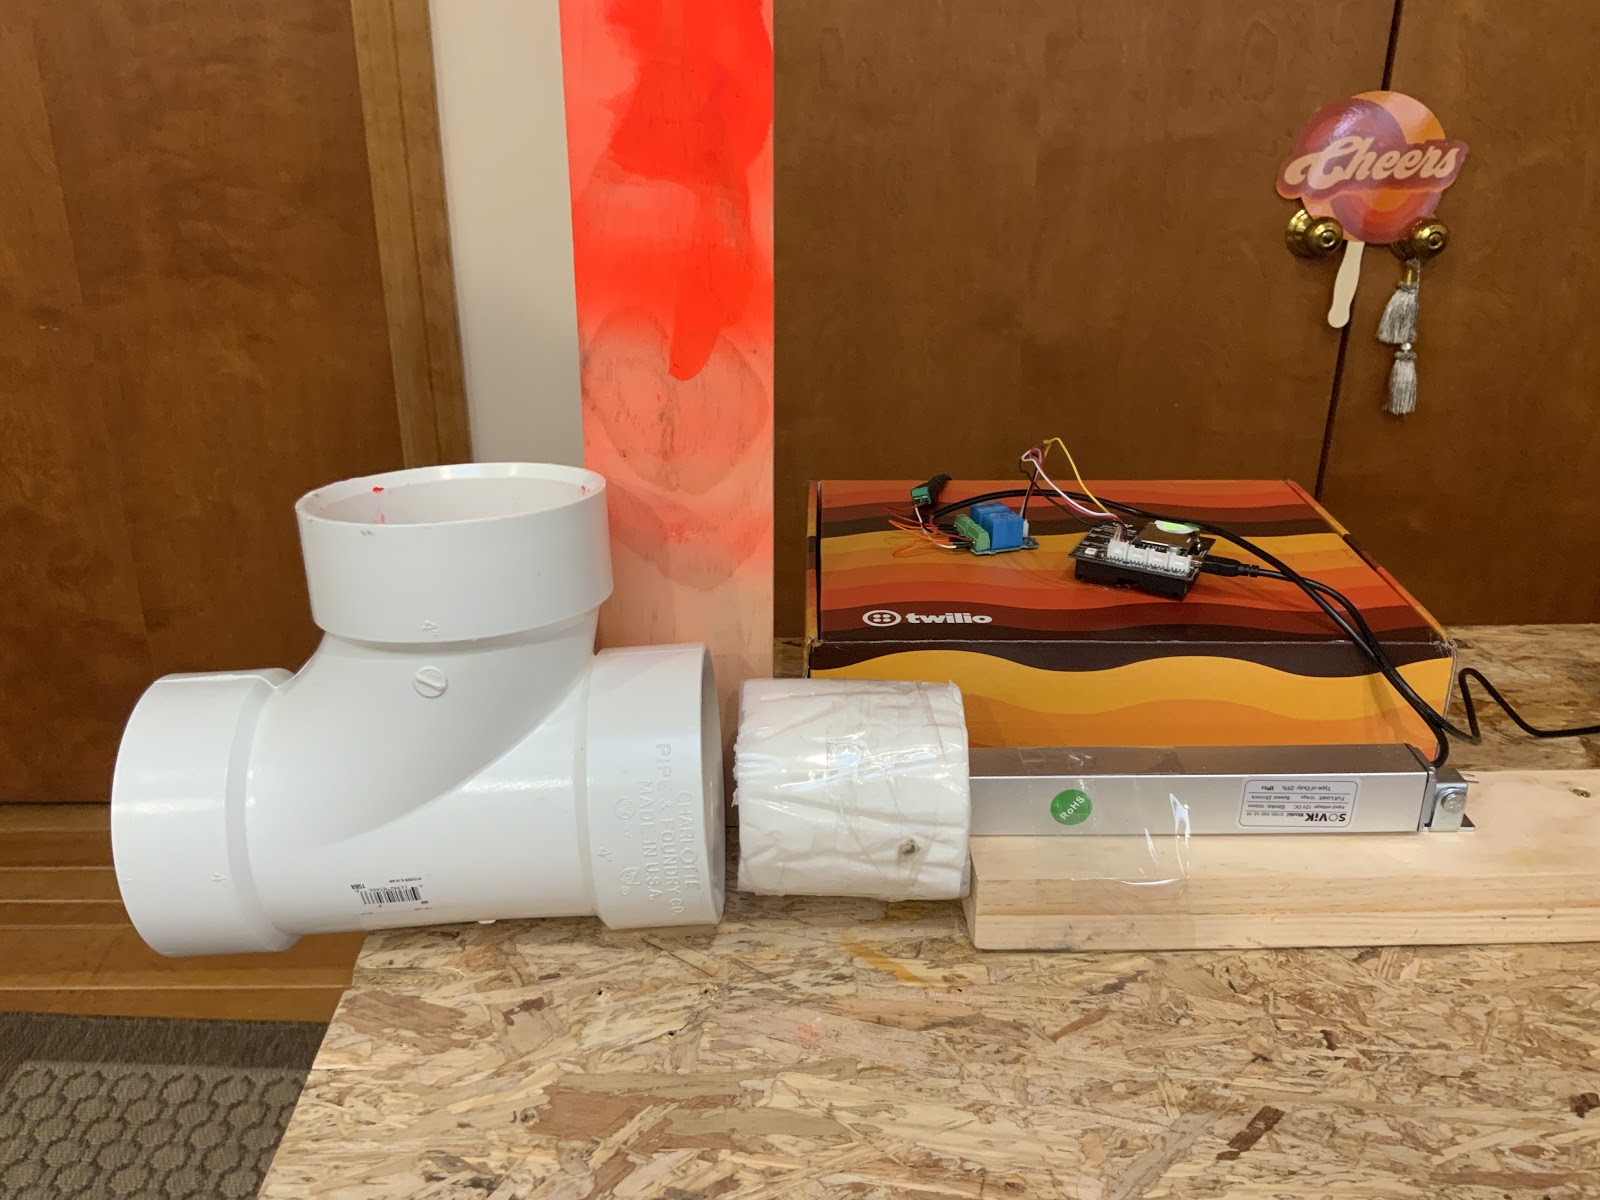
When activated, the linear actuator moves the pusher 4” forward, enough to push some candy out one end and enough to block the hopper temporarily. Then, the actuator pulls the pusher back and opens the hopper space for refill. You can play with the number of seconds / inches to push and pull. Maybe like a trick or a treat!
Software: Your Twilio-to-Device messaging back-end
Now that our candy pushing arm is ready to go, we need to write some code to tell it when to dispense candy. When working with Electric Imp, we define two sets of instructions for our IoT device: device code and agent code.
The device code lives on the Imp and tells our hardware how to behave: what to sense or what to do. We can also specify the functions we create to be accessible from the agent. Agent code programs your agent, which lives on the internet in the Electric Imp cloud. It sits between your device and the rest of the internet and serves as programmable glue to guide incoming and outgoing requests and messages to the device.
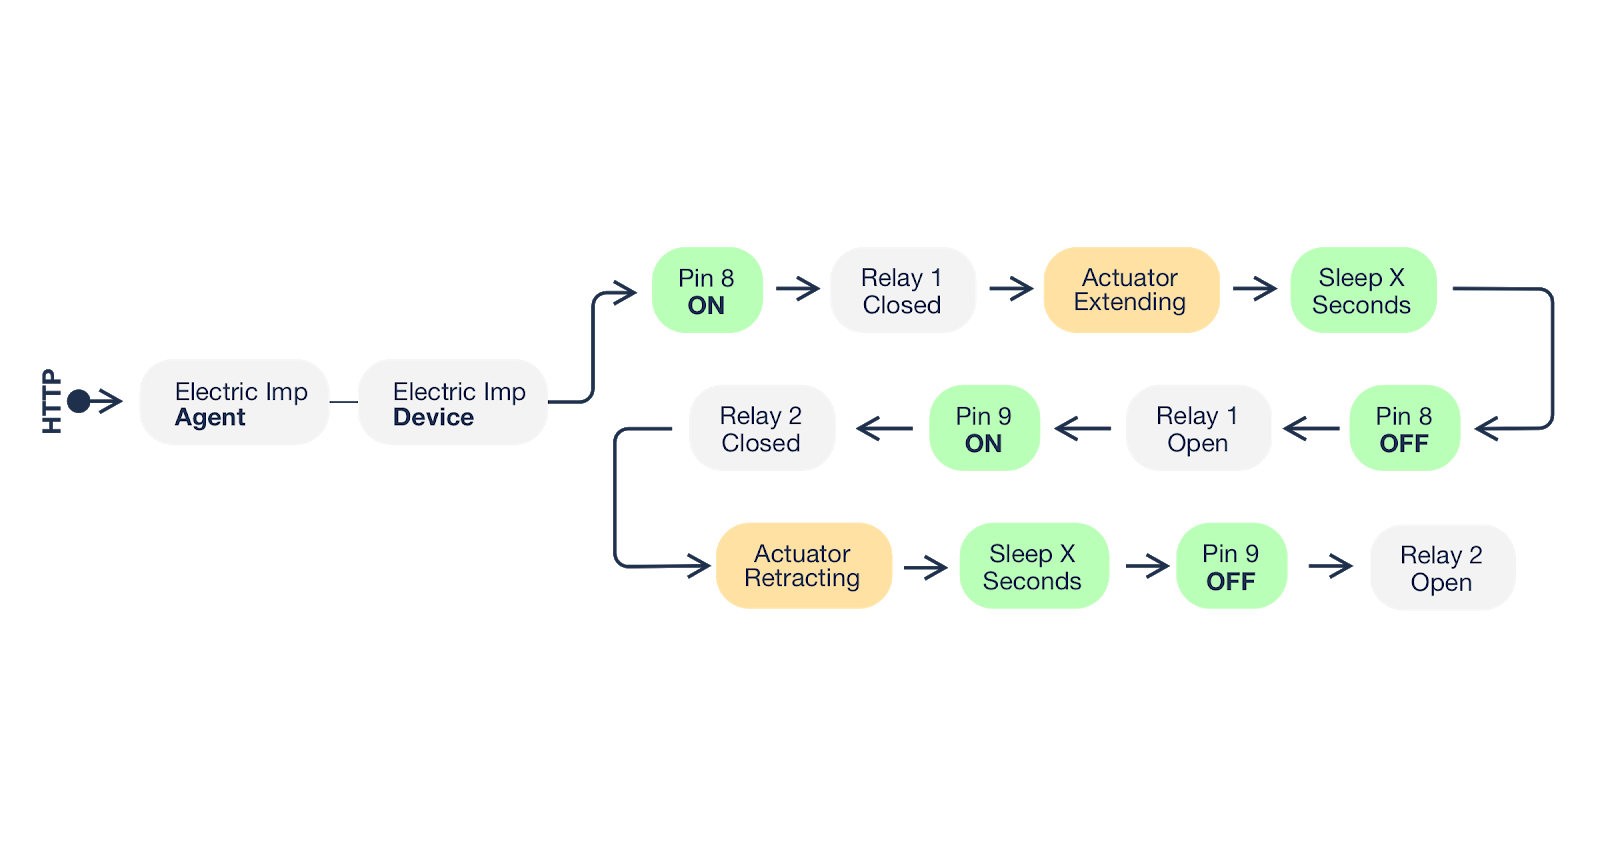
In our case, the device code handles the logic necessary to activate the relay and actuator. This code interfaces directly with pins by turning them on and off. (These simple changes to pin state are what trigger our touchless dispensing by sending the actuator forward and backwards!)
We also made our device function for setting off the relay accessible to our agent. The agent exposes an HTTP endpoint that can make the candy dispense with a simple HTTP request. Since it’s easy to trigger HTTP requests with Twilio, this setup allows us to trigger our candy dispenser from SMS, Voice, Autopilot, and more.
The code and instructions for setting up the software side of Candybot are available on GitHub. More details in the repo, but in short, you’ll need to:
- Upload code to Electric Imp by copying and pasting code from the repo into your Imp Console
- Set up a Twilio Functions service that will handle your data
- Set up some important Twilio stuff, like a Twilio phone number and TwiML Bin, so that people can contact your Candybot
- Create a Twilio Studio flow so you can visually orchestrate the triggers for your Candybot
The whole process takes about twenty minutes.
Text-to-candy setup: MMS for M&Ms
We wanted people to be able to text the dispenser and receive candy and fun GIF images through MMS. To do this, we leveraged Twilio Studio flows. Our flow accepted an SMS input and acknowledged a trick-or-treater’s initial text. Then, the flow ran a Twilio Function which randomly selects “trick” or “treat” – with a weight towards treat, of course. Based on the function response, our Studio Flow gets a signed Imp Agent URL to activate the dispenser.
Remote operator dashboard setup: Giving Candybot a voice
Some of our favorite memories of Halloween include interacting with all the trick-or-treaters, so we didn’t want to entirely miss out this year. Our second method of touchless dispensing uses a web-based portal to activate the dispenser and play soundbites for the candy-seekers.
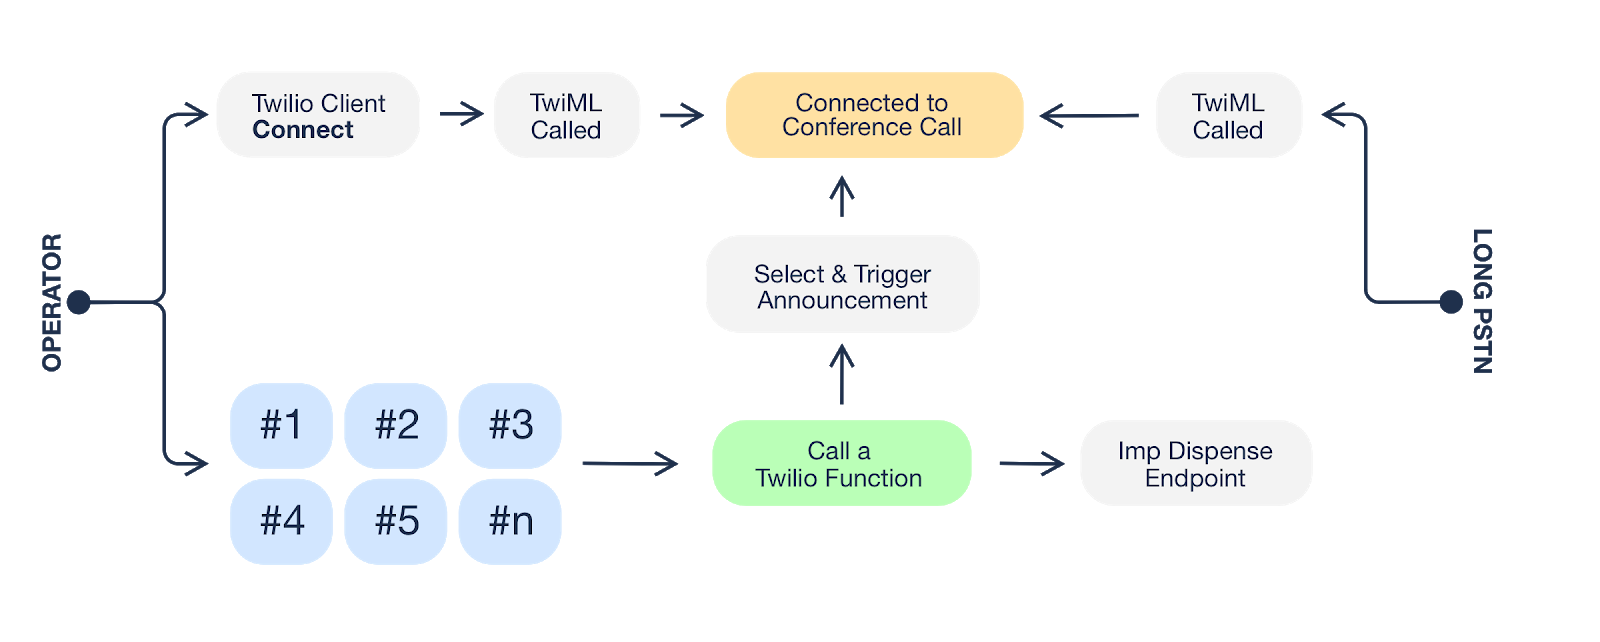
Luckily, Twilio made engagement like this pretty easy. Our website portal connected to a Twilio Conference using the Twilio Voice JS SDK. On the other end, we set an iPhone near the dispenser and connected it to the Conference by calling a Twilio number.
Now, when a trick-or-treater comes up to the dispenser, we use buttons on our web page to trigger sounds and dispensing. Basically, when a button gets clicked on the website, we make a request to a Twilio Function specifying the button type. This Function then triggers an Announcement to be played across the Conference, and also hits the Electric Imp Agent endpoint to dish out the candy. This can all be seen here:
We loved building this, and hope you do too
In just a couple days, we established multimodal input for a touchless connection between the trick-or-treater and the Halloween candy dispenser. By combining Electric Imp with other Twilio products like Voice, Messaging, Studio, and Functions, your only limit is your imagination.
While we do work for Twilio, it’s not every day we get to take a week off and hack on all of the far corners of this company. Getting to know IoT reinvigorated our interests for computer engineering, and we are excited to continue exploring the Electric Imp platform.
We hope you enjoyed the writeup and description of our hackathon project and encourage you to try it yourself! It’s very extensible, and multiple members of our team plan on reusing it as a treat dispenser for our dogs after Halloween (another blog post on that coming soon 😜)
Our full source code and instructions are available on GitHub. You can also check out this video demo of the build (and its less functional rival) below:
Ankur Kumar is a Senior Solutions Engineer at Twilio. He loves to create new Internet-based experiences and really wants to help you save halloween. Email him at ankumar@twilio.com if you need any help in setting your Candybot up.
Ankit Gupta is a Principal Solutions Engineer at Twilio, focusing on the healthcare space. His background in biomedical engineering came in handy with troubleshooting endless revisions of the relay circuit for Candybot. He is excited to see many iterations of Candybot this Halloween and in many additional practical applications beyond the holiday!
Richard Bakare is a Senior Solutions Engineer at Twilio. Richard has worked in Solution Engineering and Enterprise Architecture roles for technology companies including Twilio and Zillow/Trulia. Richard enjoys crafting custom system integrations and scalable designs for Enterprise clients.
Patrick Hundal is a Twilio solutions architect with over 20 years experience in deploying enterprise communications infrastructure and solutions. Electric Imp in combination with the Twilio platform makes IOT easy and fun to deploy. It’s time to build!


Related Resources
Twilio Docs
From APIs to SDKs to sample apps
API reference documentation, SDKs, helper libraries, quickstarts, and tutorials for your language and platform.
Resource Center
The latest ebooks, industry reports, and webinars
Learn from customer engagement experts to improve your own communication.
Ahoy
Twilio's developer community hub
Best practices, code samples, and inspiration to build communications and digital engagement experiences.