Build a WhatsApp Chatbot with PHP, Mezzio, and Twilio
Time to read: 8 minutes
July 07, 2021
Written by
Reviewed by
A chatbot is a software application that a person can have a conversation with, either in written or spoken form. That said, their capacity to have a conversation often varies greatly. For example, some chatbots can only answer quite a limited set of specific questions (sometimes in a fixed order). Others, however, use a combination of artificial intelligence (AI) and machine learning (ML) to interact almost as a human could.
In this tutorial, I'm going to show you how to build a small, simplistic chatbot using the Twilio API for WhatsApp, the Mezzio framework for PHP, and the Weather API to retrieve the current weather forecast for any city around the world.
How will the chatbot work?
Before we dive in and write code, let’s get a quick overview of how the chatbot will work. In essence, here’s the logic of the project:
- A user will send a WhatsApp message to a Twilio phone number, containing just a city name, such as Brisbane, Tokyo, or San Diego.
- Twilio will send this message to our chatbot, which will query the Weather API for the current weather report for that city.
- If the weather information is available, the chatbot will then send a nicely formatted WhatsApp message, via Twilio, back to the user. Otherwise, it will let the user know that it couldn’t retrieve any weather data.
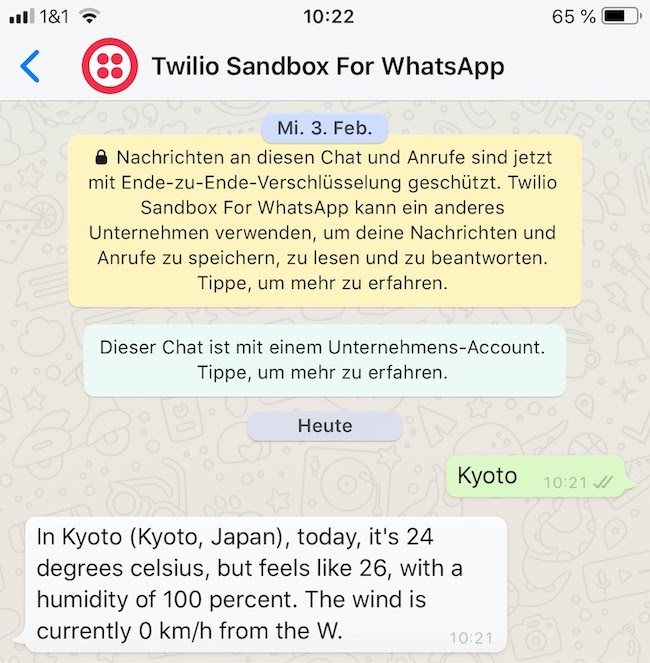
The WhatsApp message that is sent back to the user will resemble the example below. Notice that it contains the city’s name, region/state, and country, along with the current temperature, what the temperature “feels like”, the humidity level, the wind speed, and the wind direction. I’ve tried to write it in a human-like way.
There’s a bit more to how the chatbot will work, but we’ll cover that later, as we step through the code.
Tutorial Requirements
To follow this tutorial you need the following components:
- PHP 7.4
- A free Twilio account. If you are new to Twilio click here to create a free account now and receive $10 credit when you upgrade to a paid account.
- Composer installed globally
- ngrok. We will use this handy utility to connect the PHP application running on your system to a public URL that Twilio can connect to. This is necessary for the development version of the chatbot because your computer is likely behind a router or firewall, so it isn’t directly reachable on the Internet. If you don’t have ngrok installed, you can download a copy for Windows, and use macOS and Linux's package managers.
- A smartphone with an active phone number and WhatsApp installed
Configure the Twilio WhatsApp Sandbox
Before you can start building the application, you first need to configure the Twilio WhatsApp Sandbox. The sandbox simplifies the process of developing and testing your application. Once your application is complete you can request production access for your Twilio phone number, which requires approval by WhatsApp.
From your Twilio Console, click "Programmable Messaging", then click "Try it Out", and finally click "Try WhatsApp". You'll then be on the Twilio Sandbox for WhatsApp, where you'll see the sandbox number assigned to your account, and a join code.
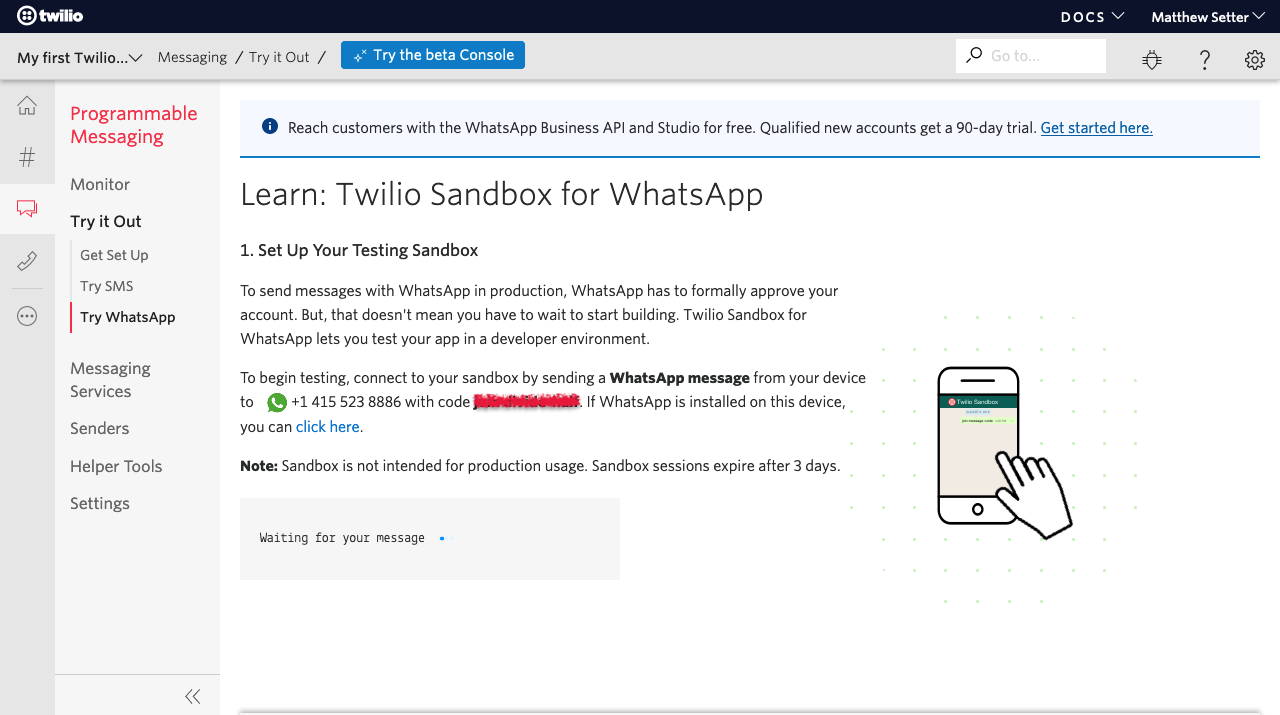
To enable the WhatsApp sandbox for your smartphone, send a WhatsApp message with the given code - beginning with the word "join", followed by a randomly generated two-word phrase- to the number assigned to your account.
Shortly afterward, you should receive a reply from Twilio indicating that your mobile number is connected to the sandbox and can start sending and receiving messages.
NOTE: This step must be repeated for any additional phones you’d like to have connected to your sandbox.
Create the PHP chatbot
Bootstrap the application
Now that we have the WhatsApp Sandbox configured and our Weather API key, let’s get in and build the chatbot. The first thing we need to do is to bootstrap the core of the application. We'll do that using the Mezzio Skeleton. I love using it because it saves so much time and effort.
Run the following commands in your terminal. These will create a base application in a new directory named whatsapp-weather-chatbot, and change into it.
The bootstrap process will ask five questions. I’ve listed them below, along with my recommended responses.
|
Question |
Recommended Answer |
|
What type of installation would you like? |
3 (Modular) |
|
Which container do you want to use for dependency injection? |
2 (laminas-servicemanager) |
|
Which router do you want to use? |
2 (FastRoute) |
|
Which template engine do you want to use? |
n |
|
Which error handler do you want to use during development? |
1 (Whoops) |
|
Please select which config file you wish to inject 'Laminas\Validator\ConfigProvider' into: |
Enter |
|
Remember this option for other packages of the same type? (Y/n) |
Y |
NOTE: If you’d like to learn more about Mezzio, check out Mezzio Essentials.
Install the required dependencies
Now that the base application’s ready, we need to install the two required dependencies:
- Twilio’s PHP SDK: So that we can communicate with Twilio.
- PHP dotenv: So that we can load credentials from the environment and not store them in code.
Run the following command to install them:
Register and load the environment variables
The next thing that we need to do is to register our sole environment variable, which is the Weather API key. To do that, create a file named .env in the root directory of the application. In there, paste the code below
Then, log in to Weather API and click “My Account” in the top right-hand corner. In the My Account Dashboard, select and copy your API key, you'll find it next to “API Key:”, and paste it into .env in place of <Your WeatherAPI API Key>.
NOTE: Be careful not to also select the text in green (“LIVE”) next to the key. I did this the first time by mistake myself.
With .env updated, enable PHP dotenv in the project so that it will read .env and load the Weather API key contained in the file into PHP’s $_ENV superglobal. To do that, navigate to public/index.php and add the code below after require 'vendor/autoload.php';.
Write the chatbot’s logic
With all of the plumbing in place, let's turn our attention to the chatbot’s logic. I’ve not included it directly in the tutorial as it’s a little lengthy and I’d prefer to step through it a piece at a time. That way, you can focus on each part in turn.
Before we do so, though, replace the code in src/App/src/Handler/HomePageHandler.php with the code on GitHub. Then, let's step through it.
At the top of HomePageHandler’s handle method is the code below.
It starts by retrieving the body of the POST request, which contains the contents of the $_POST superglobal. Twilio will send a request containing one element (Body) which contains the WhatsApp message which the user sent. So a new variable ($body) is initialized with the value of the 'Body' element.
Then, it initializes a MessagingResponse object ($response) which we'll make use of throughout the method. MessagingResponse objects simplify the process of generating TwiML Messages. If you're not familiar with TwiML (the Twilio Markup Language):
It is a set of instructions you can use to tell Twilio what to do when you receive an incoming call, SMS, or fax.
As you'll see later, it's a superset of XML. We're using TwiML to tell Twilio to send a WhatsApp message back to the user.
Next, a small utility method, getWeatherData, is called. This method queries the Weather API for weather data for the city which the user sent in their WhatsApp message. I’ve separated this functionality into a utility method just to make it a bit easier to focus on.
The method uses http_build_query to build the request’s query string ($queryString). We've only passed two arguments to the method, as Weather API only has two mandatory arguments:
key: This is your API key. We're retrieving this from PHP's$_ENVsuperglobal, which was initiated by PHP dotenv.q: This is the city that you want to retrieve weather data for.
The request URI ($requestUri) is initialized after the query string is built. This allows us to make a request to the Weather API using PHP's HTTP/S stream wrapper (through a combination of calls to fopen and stream_get_contents).
Responses, both success and failure, are in JSON format. Given that, json_decode is used to create a PHP object from the response ($weatherData), which is returned from the method.
NOTE: If you're not too familiar with PHP's streams - especially its HTTP/S stream wrapper - refer to this article about ways to make HTTP requests in PHP.
Below, you can see an example of a successful response. It contains all of the details that you'd likely expect to see, including the temperature both in Celsius and Fahrenheit, the overall weather conditions, wind speed in kilometers and miles per/hour, wind direction, air pressure, humidity level, cloud coverage, and visibility:
And the example below shows what is sent back for an unsuccessful request, such as when the city cannot be identified or weather data for that city is not available.
Regardless of the response received, the chatbot first checks if the response was unsuccessful. If so, it calls $response's message method to set the message body, initializing it to the error message that was returned from the Weather API.
An XmlResponse is then used to send back an XML response complete with a content-type header of application/xml; charset=utf-8 and the generated TwiML as the response body.
If the response was successful, however, a TwiML message is generated using sprintf to compose the string, pulling the relevant details from the returned weather data.
Below is an example of what the returned message will look like.
Start the chatbot
It's time to start the chatbot. Start the application listening on localhost, on port 8080. To simplify this process, we'll use a Composer script defined in composer.json, by running the command below:
In a separate terminal window, start ngrok, by running the command below.
NOTE: I recommend a separate terminal window as you can see what both processes are doing, which is helpful if you have to do any debugging.
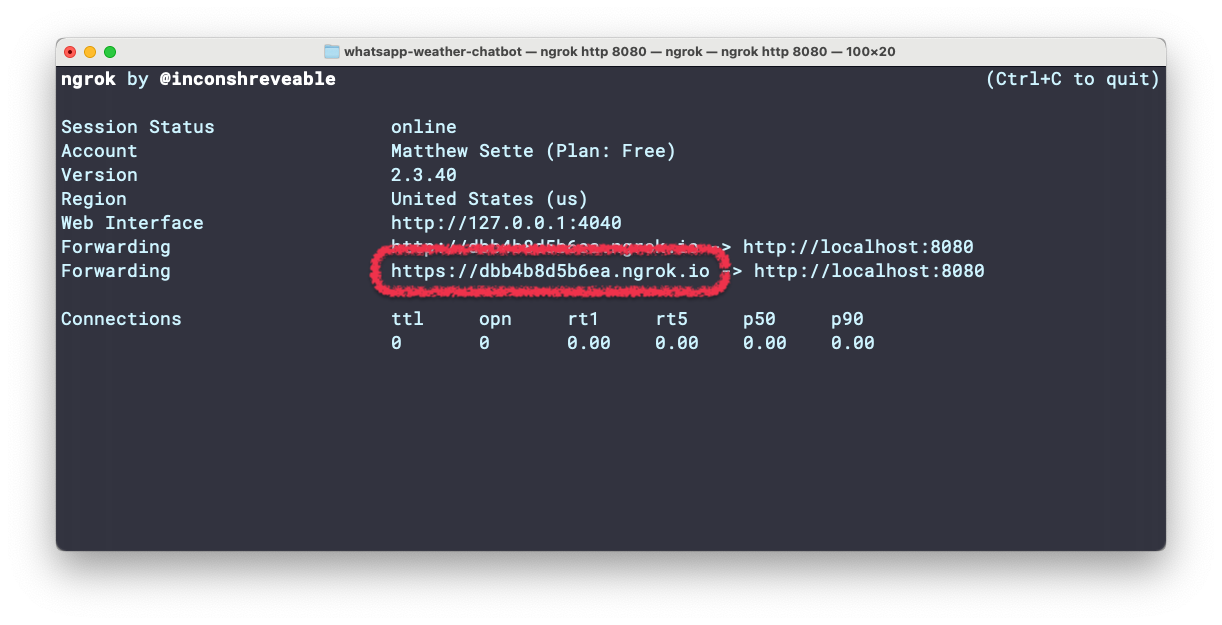
After ngrok starts, copy the https Forwarding URL. This is the public URL that ngrok uses to redirect requests to our service. Go back to the Twilio Console, click on Programmable Messaging, then select Settings. Look for the WhatsApp Sandbox Settings in the sidebar.
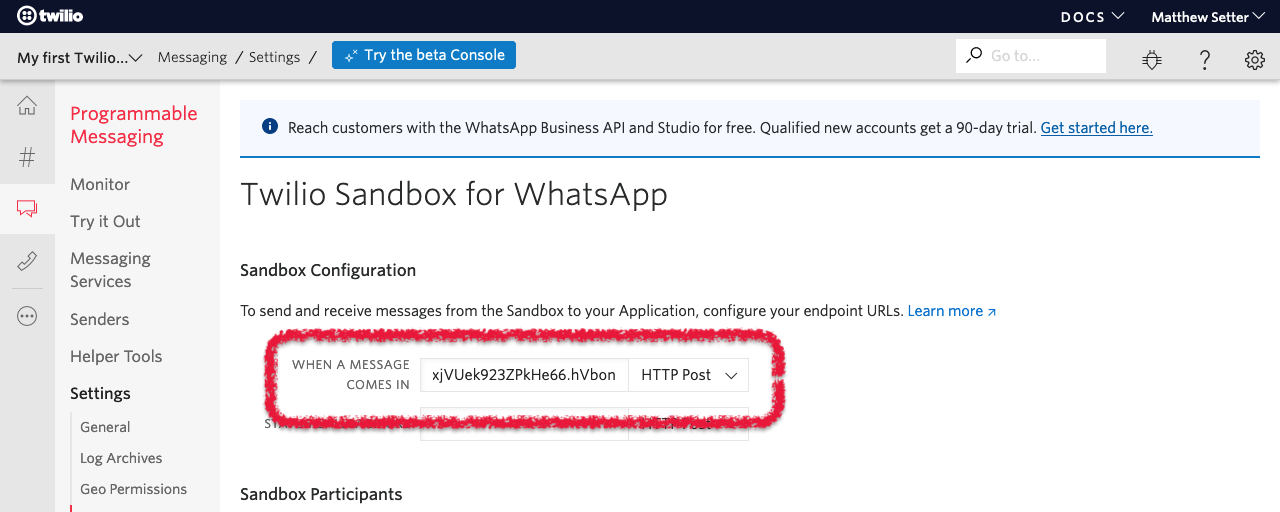
Paste the URL into the When a message comes in field and set the request method to "HTTP Post". Then, click the blue “Save” button at the bottom of the page, to make the changes permanent.
Test the chatbot!
Now, we can test our chatbot! Open WhatsApp on your phone and send a message to your Twilio number containing the name of the city that you want the weather report for. You should then see a response similar to the example below in WhatsApp.
That's how to build a WhatsApp Chatbot with PHP, Mezzio, and Twilio
Businesses and organizations of all sizes are increasingly using chatbots to streamline sales, marketing, and support interactions with existing and potential customers, as they can be a quick and efficient way of getting started before a human has to get involved.
If you’d like to dive deeper into what’s possible when building a chatbot, check out these articles:
- Build a WhatsApp Chatbot With Python, Flask and Twilio
- Build a WhatsApp Chatbot to Learn German using GPT-3, Twilio and Node.js
- Create a WhatsApp Chatbot that Books Appointments in Google Calendar Using Autopilot and PHP
- Build a Nearby Hospital Finder WhatsApp Chatbot with Laravel, Redis, and Twilio
I would love to see the chatbot that you build!
Matthew Setter is a PHP and Go editor in the Twilio Voices team, and a PHP and Go developer. He’s also the author of Mezzio Essentials and Deploy With Docker Compose. You can find him at msetter@twilio.com. He's also on LinkedIn and GitHub.
Related Resources
Twilio Docs
From APIs to SDKs to sample apps
API reference documentation, SDKs, helper libraries, quickstarts, and tutorials for your language and platform.
Resource Center
The latest ebooks, industry reports, and webinars
Learn from customer engagement experts to improve your own communication.
Ahoy
Twilio's developer community hub
Best practices, code samples, and inspiration to build communications and digital engagement experiences.