Build Your Own IVR with AWS Lambda, Amazon API Gateway and Twilio
Time to read: 8 minutes
September 17, 2015
Written by

My stomach is filled with butterflies. My mind is racing:
“What could it be? I think I have an idea… but maybe I’m wrong. What am I waiting for?!?”
Nothing quite tops the feelings you experience when someone gives you a gift. Our good friends at Amazon Web Services (AWS) stopped by the greatest city in the world for AWS Summit New York in July and dropped some super rad gifts on the audience. Of course, their gifts came in the form of developer tools that help make building and shipping software easier.
Of all the things AWS launched I am most excited about the Amazon API Gateway. Using the API Gateway we can now invoke Lambda functions when phone calls or text messages come into Twilio. Today, to help you see how it all works, we’re going to build an IVR (or a “phone tree” for those of you not up on your telecom jargon) using AWS Lambda, the Amazon API Gateway and Twilio.
Our Tools
- We just need two things to get started:
- An AWS Account
- A Twilio Account – sign up for free!
Look, No (Managing) Infrastructure!
We’ll start off our application by writing a couple Lambda functions. AWS Lambda is code that runs without you needing to put server infrastructure in place. The code will spin up, run in response to an event and then disappear until you need it again. What kind of events can trigger Lambda functions? Things like an image uploaded to your S3 bucket, a new entry in Dynamo DB, or a click on your website. And now, thanks to the API Gateway, a function can be invoked via an incoming HTTP request.
Let’s start building our application. Go to the AWS Lambda dashboard and click “Get Started Now”. The first thing we do when creating a Lambda function is pick a blueprint, we’re going to keep it simple and select the hello-world blueprint.
We’ll then be given the option to configure triggers. For this function, we don’t need to configure any triggers so we can just press the next button.
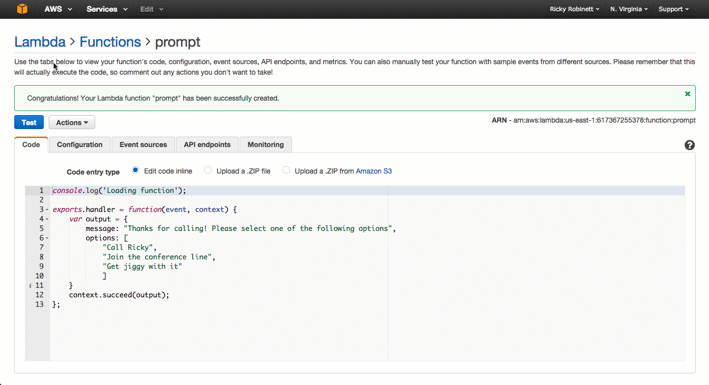
Now we’re going to set up our first function. We’ll name it “prompt”, this is the function we’ll invoke when a phone call comes into Twilio. It will prompt the caller to pick one of the options on our IVR.
We can pick between Node.js and Java for the run time of this function. I’m a big fan of Node.js so let’s select that.
With everything else in place we can now write our Lambda function. We want this function to provide two things:
- The message we want Twilio to say to someone when they call our number
- The options that a caller will be able to select when they call our IVR
When someone calls our number they’re going to have 3 options. They can call me, they can join a conference line or they can “get jiggy with it”.
Before we can create our function we need to assign it a role. The suggested role of lambda_basic_execution will work for us. If this is your first time creating a Lambda function then selecting this role will open a new window asking for some extra permissions. Just click “Allow” and you’ll be good to go. We’ll keep the Amazon defaults for all the other options for our Lambda function.
With our code in place, and our role properly set, we can click “Next” and then “Create Function”.
Now that our function has been created we can invoke it once and see that it returns our data by clicking the “Test” button. Clicking this button will prompt for some sample data to pass, we can leave the default data for this test:
We need to create one other Lambda function to take whatever option the user selects when prompted and return the information Twilio needs about that selection. Just like our prompt function we’ll select the hello-world blueprint with no trigger. Name your new function, takeAction. We’ll need to look at the input a caller entered and take the appropriate action:
Our options here contain the TwiML required to take each action the user could have selected. If you haven’t worked with TwiML before it’s how you give Twilio instructions of what to do with an incoming phone call or text message. It’s really just XML but TwiML is a much more fun word to say.
Whenever a phone call comes into our Twilio phone number Twilio will make an HTTP POST request to our server with some data about the phone call. This data comes through in the POST body as a query string so we also add a function (parseQuery) to parse out the data from our query string.
In this code we’re using the digits property of the events object. Any parameters passed to our Lambda function will be passed in the events object. We can use this to tell what digit our user pressed when prompted by the previous function.
With our code in place you can set the role to lambda_basic_execution, click next, and create our function.
This time when we invoke this function we want to invoke it with some test data. After you click “Test” update the “Input sample event” to pass digits:
With that sample input data in place we can test our function and see that it returns the correct action to take.
There’s Always Money in the Banana Stand
Right now, we can’t invoke our Lambda function via HTTP. That’s where Amazon’s API Gateway comes into play. The API Gateway let’s us create an endpoint that we can make a request to will invoke our function.
On the API Gateway dashboard click “Get Started”, select the option for “New API” and then give your new API a name. “My IVR” will work if you’re not feeling inspired.
We now have the world’s most basic API. So basic that it doesn’t actually do anything. We should probably fix that. Luckily for us, it won’t take too long.
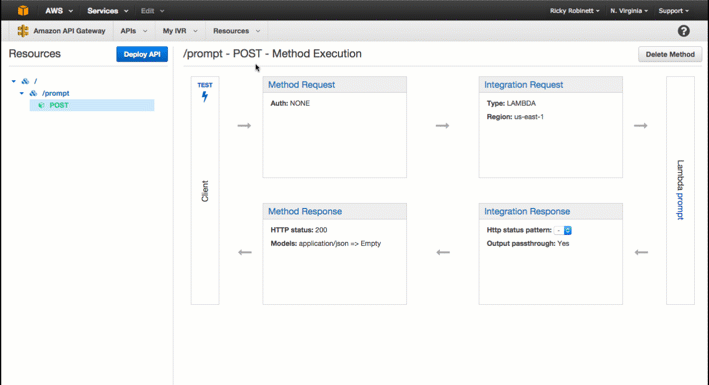
To kick things off, we want to add a new resource. A resource represents an endpoint on our API. The location that we’re going to make a request to when we want to invoke our Lambda function. We can give our resource a name of prompt and then click “Create Resource”.
A resource by itself isn’t super useful, we need to add a method to it so the magic can really happen. A method is the HTTP method we want to be able to interact with this resource. Now we’ll add a POST method. We want the Integration Type to be Lambda Function. Pick the region you created your Lambda function in and then pick your prompt function. When prompted to add permissions to your Lambda Function click “Allow”.
Before we go any further we want to test our function. Click the “Test” button:
Looking good! One last thing, I mentioned before, that Twilio gets basic instructions of what to do with a phone call by receiving TwiML from your server. You’ll notice our request is currently returning JSON. It’s ok, we can change that! Click on the Integration Response (it’s the box in the bottom left). We need to edit the Mapping Template for our Default mapping. There should only be one row in the table showing our integration responses, click the arrow next to that row. Next click application/json under “Body Mapping Templates”:
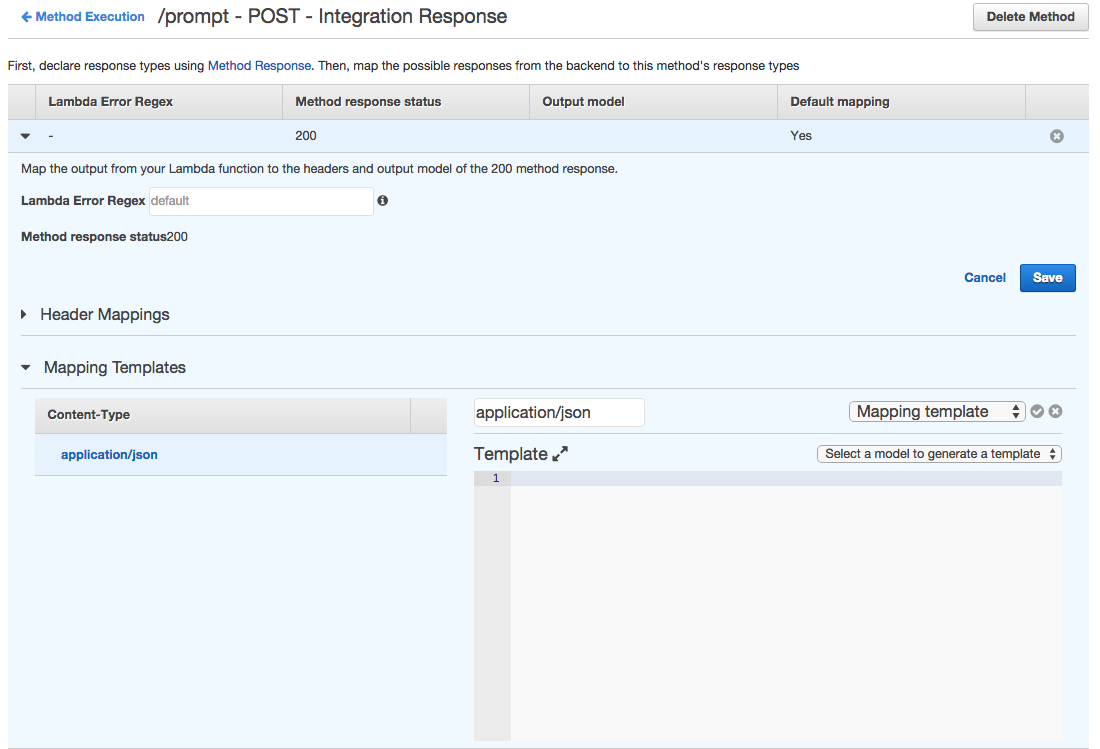
Now that we’ve indicated we’ll be using a template we can define the format:
This code is a bit dense so let’s step through it:
- On the first line we’re getting the data returned from our Lambda function and storing it in the $inputRoot variable. You can read a bit more about interacting with the input and how this works in the AWS API Gateway documentation.
- Next we’re creating a new variable called $i and setting it’s value to 1. We’ll use this variable when we prompt users to select an option.
- On line 3 our TwiML beginsby identifying that it is a to Twilio’s HTTP request.
- The fourth line introduces the TwiML verb which allows us to capture any digits the caller presses. We pass two arguments:
- numDigits of 1 to indicate we only need to capture the first digit they enter
- action of “/takeAction”. action tells Twilio where to POST to after the is over.
- Nested within our verb, the verb joins the party. gives us access to a text to speech engine. We’re passing our verb the message returned by our Lambda function.
- On line 6 we kick off a loop over all the options we got back from our Lambda function.
- Our friend returns on line 7 as we tell the caller what digit to press for each specific option.
- We then increment our $i variable so caller is given the correct digit to press.
- We close out our loop and the XML elements we’ve opened.
Once you’ve added this code save the Template Mapping by clicking the “Save” button for both the template we just added and Integration Response. as whole. Test the function again and you’ll see our response is now TwiML. Beautiful!
We’re getting close to a working application. We just need to do a couple more things to make sure the API Gateway works with Twilio. First, we need to tell our endpoint how to handle an incoming request with the Content-Type of “application/x-www-form-urlencoded”. Let’s go to the Integration Request for this resource and add a Mapping Template for this Content-Type:
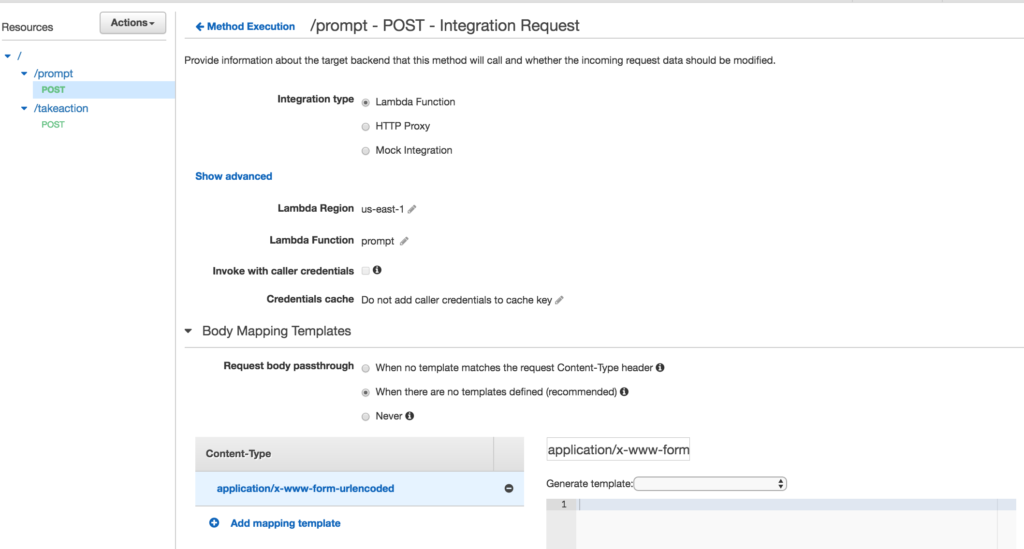
Our template is going to be very basic:
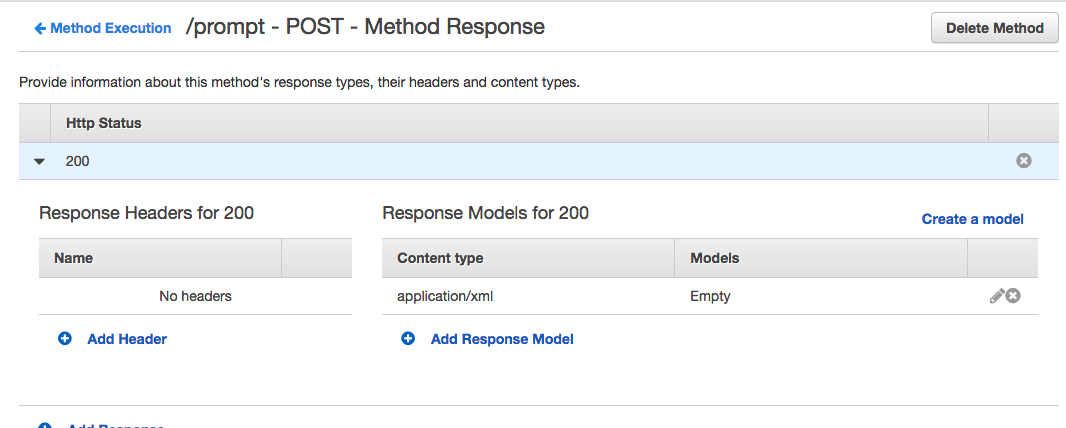
The other thing we need to do is switch the Content-Type on our Method Response from application/json to application/xml:
Now we need to repeat the same steps for our takeAction function. Create a new resource at the top level of the API, a new POST method for that resource, and set that method to invoke takeAction. Also update the Integration Request and Method Response in the same way. If you forgot how to do all of this just jump back up to the instructions you followed for the prompt resource.
The one thing different between takeAction and prompt is the template for our Integration Response:
Since our Lambda function is returning the appropriate TwiML based on the number entered by a user we just need to output the result of our lambda function which is stored in inputRoot.
Now that our API is in place we need to deploy it. Click “Action” button and select “Deploy API” button. It’ll ask you to create a new deployment stage. Let’s call it dev. Make note of the URL that Amazon gives your API. It should look something like this:

Hi, May I Help You?
We’re almost done, we just need to set up a Twilio phone number. Head over to the “Buy a Number” page. Get a new number that looks nice to you.
Once you’ve got your number set the Voice Request URL to the URL that Amazon gave your API. Then make sure to append your resource (/prompt):
And then?
We’ve now built an IVR that scales with you thanks to Lambda, the Amazon API Gateway and Twilio. Take a look at the other TwiML verbs and see what other things you could when people call in. We’ve also built an IVR tutorial page to help with code snippets and tutorials in many common languages.
Have any questions or want to show me something sick you’ve hacked together with Lambda and Twilio? Find me on twitter (@rickyrobinett) or say “annyong” in the comments below.

Related Resources
Twilio Docs
From APIs to SDKs to sample apps
API reference documentation, SDKs, helper libraries, quickstarts, and tutorials for your language and platform.
Resource Center
The latest ebooks, industry reports, and webinars
Learn from customer engagement experts to improve your own communication.
Ahoy
Twilio's developer community hub
Best practices, code samples, and inspiration to build communications and digital engagement experiences.