Build Your Own Lockitron With Twilio, Arduino, and Node.js
Time to read: 6 minutes
March 27, 2014
Written by

This tutorial is based on a workshop I gave at the Makerland conference in Poland. It will teach you how to wirelessly control a deadbolt lock without damaging or modifying the lock itself. We will be using an Arduino Uno, a servo, and Node.js to make it possible for you to lock and unlock your door via SMS. This is inspired by the amazing Twilio-powered Lockitron device which thankfully is not held together by cardboard and duct tape.
Step 1: Setup
Parts
1. A lock
2. Duct tape + Cardboard
3. Servo motor (I used the HS-322HD)
4. Arduino Uno + Programming Cable
Prepare Your System
1. Download and install the Arduino IDE from http://arduino.cc/en/Main/Software.
2. Install node.js from http://nodejs.org/
3. Install the ngrok utility from https://ngrok.com/download
We will be using the Arduino IDE to write and upload code to your Arduino board. We will then use a node.js script to communicate with your Arduino over a Serial connection and respond to Twilio requests using the express web server. And lastly, we will be using ngrok to expose your express web server to the world so that Twilio can send incoming SMS messages to your application.
Now we’re ready to dive in and start wiring up our Arduino and connect it to our lock.
Step 2: Wiring Up Your Arduino
We will be using a servo to control our lock. A servo is a type of motor that typically has a 180 degree movement radius, which makes it perfect for a lock which only turns back and forth.
A servo motor has three wires – power (red), ground (black), and control (frequently yellow or white). Connect the power wire to the 5V pinout on the Arduino and the ground wire to the GND pinout next to it. We can then connect the control wire to Digital Pin 12 on our Arduino as in the following diagram:
That’s it! Now that our servo is wired to our Arduino, we can mount it to our lock.
I prefer to use household items when prototyping these types of applications, though if you have access to a 3D printer I would recommend designing and printing your own lock mount.
For the purpose of prototyping, we will be using cardboard and duct tape to mount our servo to our lock – just like astronauts do!
Attach the two metal rods (or some other tall object) to your servo with screws and washers.

Now use a piece of cardboard (or other stiff material) to make a tighter bond between the servo and the lock:

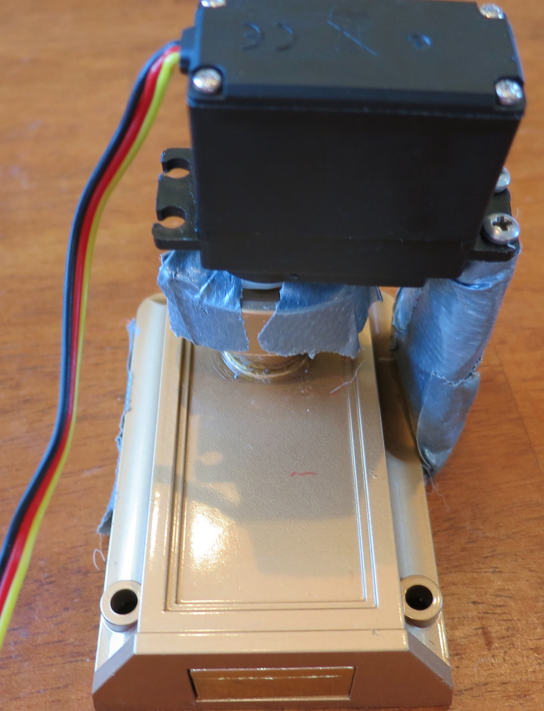
Now you can tape the servo to the deadbolt lock. Make sure it is positioned on the correct side so that the direction that the servo turns in is aligned with the direction that the lock turns in:

And last but not least, we will tape our servo’s arms to the deadbolt itself:
Now you have your fully mounted (and fully impermanent) servo-controlled deadbolt:
Step 3: Writing Your Control Code
Once you have your Arduino wired up and your initial software installed (Node.js and Arduino), you can run the following command to install the necessary node.js modules for your script. Note that if you are on Windows, you will need to follow the node-serialport Windows installation instructions.
npm install serialport twilio express
Node-Serialport makes it easy to communicate with your Arduino via a Serial connection from a Node.js program. We will be using it to receive HTTP request for incoming text messages from Twilio, and passing instructions along to the Arduino to lock or unlock your deadbolt.
Express is a simple node.js web framework. And the twilio module makes it easy to communicate with the Twilio API.
First things first, we can set up our new Arduino sketch by opening the Arduino IDE.
To begin with, we need to open a 9600-baud Serial connection and attach to your servo (on pin 12).
We also tell the Arduino that servo position 0 is ‘locked’ and servo position 180 is ‘unlocked’. You may need to reverse these depending on how you mounted your servo to your lock. When the Arduino starts up, we tell the servo to move to the ‘locked’ position.
Next we will read in a character from the Serial connection to determine whether or not we should move the servo motor.
The Serial input that the Arduino is parsing is coming from our node.js script, which we will write in the next section.
Outside of the Arduino IDE, create a new file in your editor of choice called nodelock.js and start off the file by requiring the modules that we installed earlier using npm:
Next we will want to set up our new express web server and our serialPort connection:
Note that we are specifying which USB port to connect to and the baud rate. You may need to change the value of the USB port on your own computer. You can find the name of your active USB port in the Arduino->Tools->Port menu.
Next we will set up our HTTP route, called /sms
We are telling express to accept POST requests at the /sms route, and to parse the POST body using its bodyParser, which will make it easier to access the parameters sent by Twilio’s incoming SMS. We add in the twilio webhook middleware to validate that the request is actually from Twilio (since it is a security-necessary use case)
Now that we have our route to accept an incoming SMS, we will want to check if the number the message is from has permission to lock and unlock the door.
We are checking the From POST parameter and logging whether or not it is verified. We verify not only the phone number the message is From, but also the Body of the message to make sure it includes our unique code (in this case it is ABC123)
In the block for a verified number, we can now add the handler to send and respond to data from the Arduino’s Serial connection.
This looks fairly meaty, but what is really going on is fairly straightforward. We set up an event handler to receive Serial data from the Arduino. This event handler checks if the Arduino has sent “U” or “L” – we then take this value and return an SMS response to the user using the sendMessage function (which we will write shortly).
After setting up our event handler, we write “V” to the Arduino’s serial connection to tell it that a verified SMS has been received, and it should now lock/unlock the door.
Towards the top of the file we can now create our sendMessage function, which takes two arguments – res and message:
sendMessage is called to generate a TwiML response for the user. TwiML is the subset of XML that Twilio uses to pass around instructions. In this case, we are telling Twilio to respond to the SMS message we have received with another SMS message. So the user might send in “unlock” and we might send back “Unlocking!” via Twilio SMS.
Now that our SMS handler is configured, we can finish up our application by opening our SerialPort and starting up our Express web server:
And that’s all of our code. Now, if you Upload the sketch we wrote to your Arduino and run your nodelock.js script by typing node nodelock.js into your Terminal we will be good to go.
If you have run into errors and would like to compare with the solution, you can check it out here.
Once you have created or logged into your Twilio account, we can head over to our Twilio dashboard and click on the Numbers tab. Then click on the number you wish to send messages to for control of your lock.
Here, there are two fields: Voice Request URL and Messaging Request URL. We will be using the Messaging Request URL to tell Twilio where to send data about incoming text messages.
But since Twilio communicates via HTTP requests, we will need a publicly accessible web URL for it to POST to when it receives an SMS to your number. For this, we will be using ngrok – the utility you installed earlier.
Once you have started up your node.js server with node nodelock.js, open a new Terminal window and type ./ngrok 3000 from the directory you installed ngrok to. Here you will be given a forwarding URL that allows external websites to securely access your local running web server. Take this forwarding URL, append /sms to it, and put it into your Twilio Messaging Request URL in your dashboard. Save your Number’s settings, and try sending an SMS to it! Your lock should lock and unlock as long as you set the verified number to be yours.
Great work and happy hacking!
If you have any questions or comments feel free to tweet at @jonmarkgo or e-mail jonmarkgo@twilio.com


Related Resources
Twilio Docs
From APIs to SDKs to sample apps
API reference documentation, SDKs, helper libraries, quickstarts, and tutorials for your language and platform.
Resource Center
The latest ebooks, industry reports, and webinars
Learn from customer engagement experts to improve your own communication.
Ahoy
Twilio's developer community hub
Best practices, code samples, and inspiration to build communications and digital engagement experiences.