Building a Real-time SMS Voting App Part 2: Socket.io and Highcharts.js
Time to read:
December 05, 2012
Written by
This post is part of Twilio’s archive and may contain outdated information. We’re always building something new, so be sure to check out our latest posts for the most up-to-date insights.

This is the second in a multi-part series of blog posts on building a real-time SMS voting application using Node.js. In part one, we created the Node.js application, set-up the CouchDB database and captured incoming votes over SMS with Twilio. In this blog post, we will create a chart that displays the status of the voting and update that chart in real-time using Socket.io.

Now that we can accept votes via SMS and store those votes in our database, it’s time to create a live view of the voting. There are many ways to visualize voting, but a bar chart is probably the most simple way. There are numerous graphing and charting libraries, and I spent quite a bit of time looking for the right one. Here were my requirements:
- Client-side JS
- Easy to update data and refresh
- Great default styles
After doing some digging, I found a great thread on Hacker News about this. I took a look at some popular FOSS libraries like Flot and gRaphaël, but I found that they had non-trivial learning curves, especially when it came to dynamically updating the graph data. I ended up going with Highcharts and was able to get my voting chart set-up in less than 30 minutes. We’ll dive into Highcharts in more detail later, but first let’s wire-up our Node.js app to accept URL requests for individual events.
Add a Route for an Event
The view we are building will represent a single event. Events are stored in our CouchDB as individual documents. So, when a user makes a request to our application, the URL looks like this:
In our Node.js application (routes/index.js), we need to tell Express how to handle requests like this:
Remember, routes is a module that we have defined to store our controller logic. In our routes/index.js file, we now need to create a function to handle the request:
The event callback function is relatively simple and does the following:
- Loads the event from CouchDB based on a view query
- Sanitizes sensitive data in the document
- Passes a hash of key/value pairs to the view
- Returns 404 if the event could not be looked up
Create the View
Now let’s set up our view. In the world of Node.js application, you have a truly amazing set of template engines to choose from. I’m not sure this is a good thing, sometimes I miss the comfort of stacks that enforce a particular set of conventions. In any case, we are in luck because the wonderful Garann Means built an awesome Node.js template picker to help people drill down to the perfect template engine. Let’s walk through the criteria for my app:
- Is this for use on the client of the server? Server
- How much logic should it have? Basics
- Does it need to be the fastest? No
- Do you need to pre-compile templates? No
- Do you need partials? No
- Do you want a DOM structure or just a string? String
- Aside from template tags, should it be the same language before and after rendering? Yes
And the results are in!

Since we started our project using Hogan.js (HJS) and it meets our criteria, we’ll stick with it. Let’s go ahead and create a new file called events.hjs and place it in the views folder of our app. Hogan.js (and Handlebars and many others) are part of the mustache family of logic-less templating engines. If you look at our new events.hjs file, you’ll see lines like this:
The variable name that you see maps to the name key that we defined in our event function in routes/index.js. Mustache-style templates are awesome and really improve the readability and maintainability of your views by forcing a separation of concerns and ensuring that your logic is in your application. There’s a lot going on in this file, but let’s now take a look at Highcharts and how you set it up.
Setting up Highcharts
In order to use Highcharts, you’ll first need to download and include the JS library:
Now, you can start to define the chart itself and get it attached to the DOM. In our HTML, I’ve defined a div that the chart will be housed in:
The ID of the div is entirely customizable. The next step is to use jQuery to detect when the HTML page has finished loading and to then instantiate the Highcharts object and initialize its values:
Initial Load of the Event Data
In our Node.js app, we used JSON.stringify to serialize our voteoptions objects before sending it down to the view. As a refresher, the voteoptions object looks like this:
It’s an array of objects that represent the options being voted on and some information about those options such as number of votes they each garnered. In our Node.js app, we serialize this object using the JSON.stringify function. The lines of code below render that string in our JavaScript block and decode it, first by undoing the HTML encoding that the template engine applied to the string and second by using the JSON.parse function:
If you’re curious about the unescapeHtml method that I’m applying to my data String object, it’s a small monkeypatch that I initialized earlier in the script. Here is the function:
At this point, we have a variable voting that contains the current state of this event. All we have to do is iterate through this data and build a couple of arrays for Highcharts to use to define the series:
Once we have the chartdata and labels arrays initialized, we simply pass these arrays to Highcharts during the initialization:
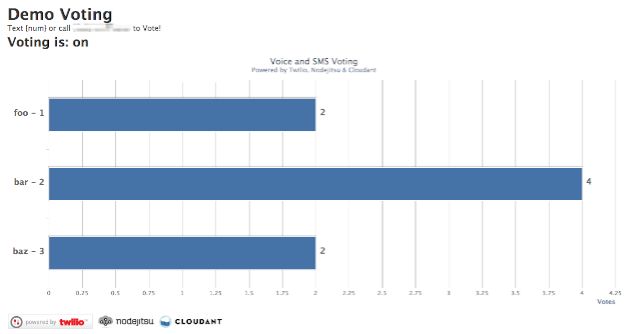
And that’s it! Assuming you’ve already set-up an event in your database, you can navigate to http://domain.com/events/event-short-name and you should see something like this:
Setting up Socket.io
Now it’s time to do add some real-time awesomesause and animate this graph as live votes come in over SMS. To do this we are going to use socket.io, probably the easiest way to add real-time capabilities to a Node.js application. Socket.io provides both an NPM module (server-side) and a client-side JS library and provides a clean and easy to understand interface for developers to use when building their real-time apps. Socket.io supports web sockets but will support older browsers by degrading to XHR and long polling.
Adding socket.io to our Node.js app is easy:
- Edit package.json and add “socket.io”: “0.9.11” to our dependencies
- npm install
In our app.js, let’s configure socket.io for use:
The last block of code is worth discussing. I’m simply setting up an event handler that will run when socket.io detects a connection from a client, in our case a browser. When this socket gets established, I set up a message handler for that particular socket that will listen for an “event” message.
The event message is basically the browser saying, “Hey server, I am interested in hearing about new votes for event X. Please don’t bother me about votes for other events.” In response to this message the server puts that socket into something called a room using the join method. Rooms are just a handy way to group sockets. Think of them like chat rooms. When a message gets sent to that room, only the sockets in that room will receive the message. In our case, each voting event has a unique name and will be used to define a room.
Now let’s wire-up things on the client side. First, let’s include the JS library:
Next, let’s open up a socket and once the connection is established, send the event message to the server.
Updating the Chart with New Votes
Okay, we’re almost done. All we need to do now and use socket.io to tell the browser when new votes come in. On the server, let’s look at routes/index.js and our voteSMS function. On line 94 we can see that we successfully saved the vote to the database and are about to send a “thank you” SMS in reply to the voter. This is the perfect place to add some code to update our chart:
First, we scope our outgoing message to sockets in the “room” for this event using io.sockets.in and then we emit a “vote” message with the value of the vote. Let’s take a look at the code on the client-side that will receive this message:
This code accepts the incoming vote, parses the string to create an int, calculates an array index and then does a simple increment of the vote count. Here’s a video of this in action:
Up Next: Scaling!
Okay, that concludes part 2 of Building a Real-time Voting App using Node.js. The source for the application we built in this blog post is up on Github: https://github.com/crabasa/votr-part2.
If you’re an astute engineer you might have started to notice some glaring scalability issues with the code thus far. It’s safe to say that this application isn’t going to perform well under even a moderate load of voting. But that’s okay, I wanted to start from scratch and build this application incrementally. In Part 3 we will tackle how to get this application to scale to hundreds or thousands of incoming votes per second.


Related Resources
Twilio Docs
From APIs to SDKs to sample apps
API reference documentation, SDKs, helper libraries, quickstarts, and tutorials for your language and platform.
Resource Center
The latest ebooks, industry reports, and webinars
Learn from customer engagement experts to improve your own communication.
Ahoy
Twilio's developer community hub
Best practices, code samples, and inspiration to build communications and digital engagement experiences.