Saving My Mom's Pictures: Building a Backup WhatsApp Chatbot With Python, Flask, Dropbox and Twilio
Time to read: 11 minutes
February 27, 2020
Written by

My mom isn’t really into tech and here and there she has trouble with her phone: “it’s out of space, again!”. She, like everybody else, uses WhatsApp everyday to solve business issues, to ask when we’re coming back home, and to receive and send tons of pictures.
For her, backups aren’t a trivial task, so I decided to help her on this quest. I had an idea: building a WhatsApp bot to backup her pictures to my Dropbox. Instead of deleting pictures, she only would have to forward her pictures to our bot. How does it sound?
Of course, solving my mom’s problem is only one of many possibilities brought by working with WhatsApp’s pictures. You can identify products wanted by your clients using image recognition, receive documents needed by them, and more. All of it will help you improve the customer experience with your product.
This blog post will show how to handle WhatsApp pictures using the Twilio API for WhatsApp, the Dropbox API, and the Flask framework for Python.
Tutorial Requirements
To follow this tutorial you need the following components:
- Python 3.6 or newer. If your operating system does not provide a Python interpreter, you can go to python.org to download an installer.
- Flask. We will create a web application that responds to incoming WhatsApp messages with it.
- ngrok. We will use this handy utility to connect the Flask application running on your system to a public URL that Twilio can connect to. This is necessary for the development version of the chatbot because your computer is likely behind a router or firewall, so it isn’t directly reachable on the Internet. If you don’t have ngrok it installed, you can download a copy for Windows, MacOS or Linux.
- A smartphone with an active phone number and WhatsApp installed.
- A Twilio account. If you are new to Twilio create a free account now. If you use this link to sign up, you will receive $10 in credit when you upgrade to a paid account.
- A Dropbox account. If you are new to Dropbox create a free account and get 2 GB of storage. If you use this link to sign up, you will receive 500 MB of bonus space.
Configure the Twilio WhatsApp Sandbox
Twilio provides a WhatsApp sandbox where you can easily develop and test your application. Once your application is complete you can request production access for your Twilio phone number, which requires approval by WhatsApp.
Let’s connect your smartphone to the sandbox. From your Twilio Console, select Programmable SMS and then click on WhatsApp. The WhatsApp sandbox page will show you the sandbox number assigned to your account, and a join code.
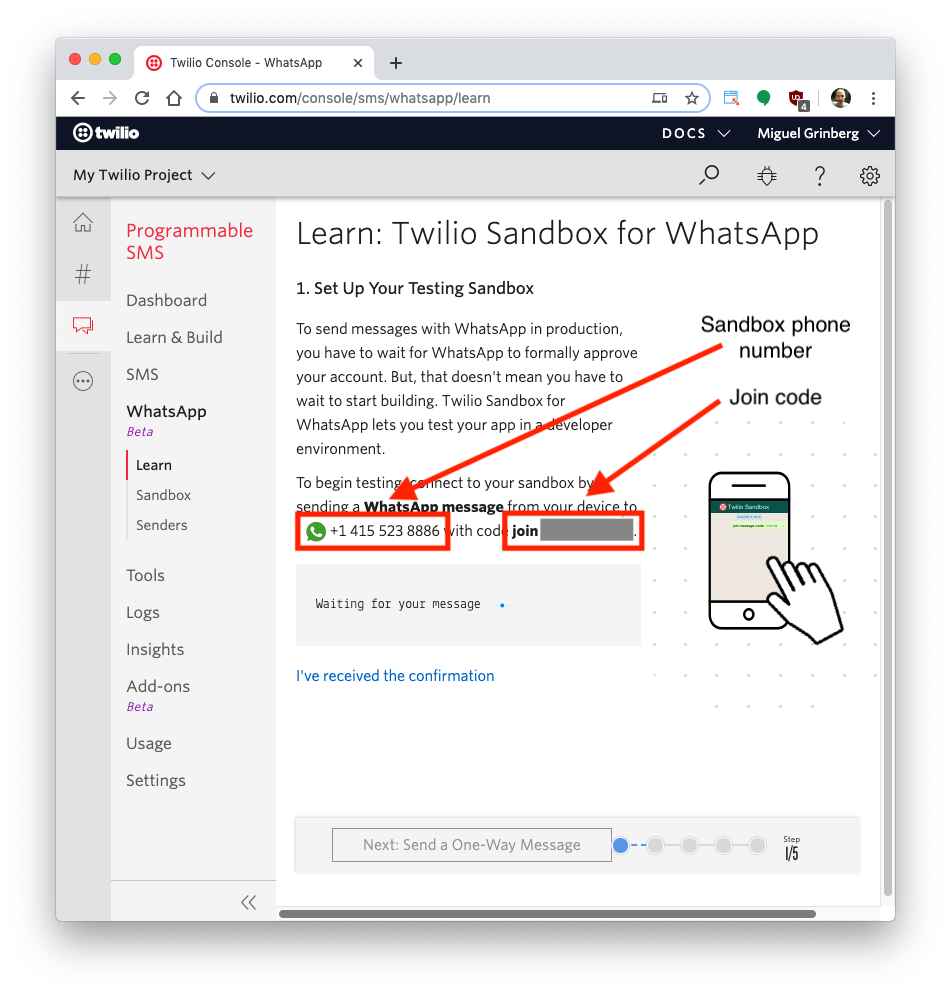
To enable the WhatsApp sandbox for your smartphone send a WhatsApp message with the given code to the number assigned to your account. The code is going to begin with the word join, followed by a randomly generated two-word phrase. Shortly after you send the message you should receive a reply from Twilio indicating that your mobile number is connected to the sandbox and can start sending and receiving messages.
Note that this step needs to be repeated for any additional phones you’d like to have connected to your sandbox.
Create a Python Virtual Environment
Following Python best practices, we are going to make a separate directory for our chatbot project, and inside it we are going to create a virtual environment. We then are going to install the Python packages that we need for our chatbot on it.
If you are using a Unix or Mac OS system, open a terminal and enter the following commands to do the tasks described above:
For those of you following the tutorial on Windows, enter the following commands in a command prompt window:
The last command uses pip, the Python package installer, to install the three packages that we are going to use in this project, which are:
- The Flask framework, to create the web application
- The Twilio Python Helper library, to work with the Twilio APIs
- The Dropbox SDK for Python, to work with the Dropbox API
For your reference, at the time this tutorial was released these were the versions of the above packages and their dependencies tested:
Create a Flask Chatbot Service
Having it all in place, let’s save some pictures!
The purpose of this chatbot is helping our users to backup their pictures by forwarding them to a specific chat. We’re going to reply with a message for every picture sent, and react when they ask to see the pictures. By doing it, you’ll have a glimpse of what is possible to do with Twilio and WhatsApp Pictures.
Creating a webhook
In order to interact with our users, Twilio API for WhatsApp uses webhooks. A webhook is a web endpoint that handles the messages sent by our users and reacts to them properly. You will see what the data sent to a webhook looks like in a minute. First, let’s create our endpoint.
Flask is a micro-framework that makes endpoint creation really easy. We can define the app and the endpoint in a single file. Let’s adapt the example from the Flask website to our webhook. Copy the code below into a file called bot.py:
This boilerplate is what we need to get it started. We have basically created an endpoint that will react to a user message with the message "What's up, Twilio?".
Giving you a bit more context about it: first thing we did was receive a POST request on the /reply endpoint. This endpoint is going to be reachable by /reply URL. In the function reply, we’re printing values from a request object. This object will hold the information about the requests you will receive. Over request.values you may see the payload in the terminal once you’ve run it. Note that we’re using the module pprint here - it will make the payload look nicer to read.
Also, Twilio expects us to return a TwiML (Twilio Markup Language) response. TwiML is an XML-based language, which can be easily created using the Twilio library for Python. The object MessagingResponse is responsible for transforming our message into a response acceptable by Twilio’s API.
Cool! We have the first version of our endpoint. Recapping: this endpoint will be our webhook. Every time a new message comes in, this endpoint will receive a POST request. In the current version, for every message received it will reply with a message saying “What's up, Twilio?”.
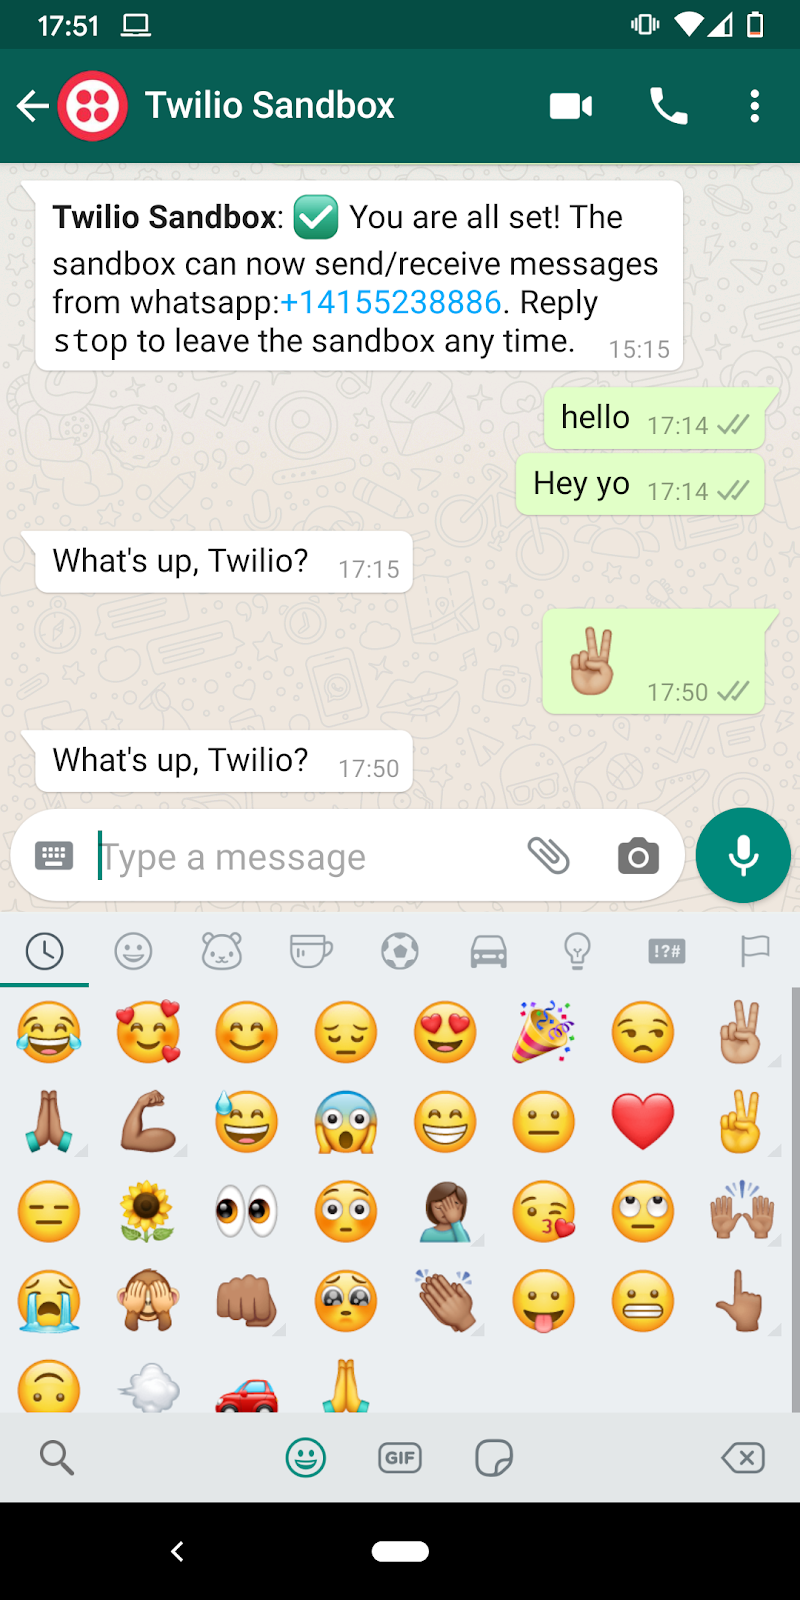
Testing your sandbox
Now it’s time to check if our code is working fine. Start your server by doing:
If you’re seeing this output, you’re doing just fine. Now we have to make our brand new endpoint available to the world. Ngrok will help us on this task. Leave the Flask app running and open a second terminal window. Go to the folder where Ngrok’s executable is and run:
This command is connecting your local port 5000 with a temporary external URL.You may see something like:
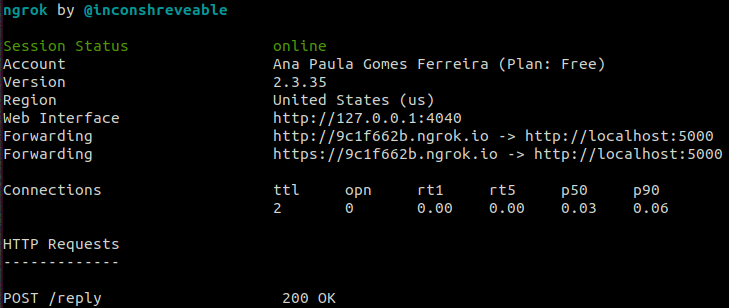
We got a URL. Yay! Copy the https:// address from “Forwarding” (https://9c1f662b.ngrok.io/ in my case, but yours will be different). We’ll need it for the next step.
Note: avoid closing Ngrok’s window. Every time you start it will give you a different URL.
On the Twilio Sandbox for WhatsApp page (Twilio’s console > Programmable SMS > WhatsApp), you will add this URL followed by your endpoint resource (“/reply”) to the field “When a message comes in” and pick the option “HTTP Post”. In our example the address would be: http://9c1f662b.ngrok.io/reply.
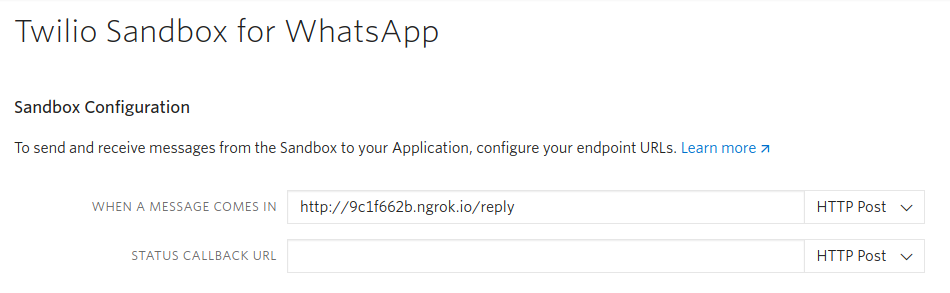
Save it and voilà! You can now message the Twilio Sandbox number from WhatsApp and the application will respond back.
Twilio’s payload
We have our sandbox configured and our server is up and running. Nice! We’ve added a pprint in our endpoint and you may have noticed that the payload was printed in the terminal running the Flask application every time a new message came in. Try to send a picture to your bot. The payload should look like this:
When receiving a picture, the most important attributes are:
- MediaContentType0: here you will see if the media is a video, an image or an audio file
- MediaUrl0: Twilio will store this media and make it available for you.
- NumMedia: if there is a media file or not. This field may be a 0 or 1 because this API treats each picture as a separated message. In case your user sends a bunch of pictures for you with a caption, for instance, the first message will have the
Bodyfield filled and the others don’t (more on send and receive media messages here).
Note: Be aware of the pricing for storage of all the media files that you keep on Twilio’s servers. More about WhatsApp media messages and pricing.
Telling mama that we’ve saved her pictures
It’s time to implement the logic behind the backup of our mom’s pictures and get the trophy of sons and daughters of the year. 😄 Here is how this is going to be: we’re going to check whether there is a picture or not. If there is one, we’ll save it. If not, we’ll check if the user has typed save or see. If they typed save, our code will assume that they’re asking us to save their pictures - let’s consider this point as a starting point. If they typed see instead, we may assume that they want to know where their pictures have been stored, so we’ll reply with a Dropbox folder URL.
Below you can see what our endpoint should look like. Let’s go through it together.
Preparing the data we need (lines 11-17)
To check how many media items we have received and whether they’re pictures or not, we need NumMedia, MediaContentType0, and From. Even though From already has the phone number it behaves differently for SMS and WhatsApp numbers. Note that the field From comes with a prefix for messages from WhatsApp (in this case “whatsapp”) separated by a colon ('whatsapp:+490001112223'). If you’re receiving an SMS, the field will just show the number, without any prefix. So, we have to check if we have to extract the phone number or not. It will be useful to differentiate the user’s folder on Dropbox (we’ll get there soon).
Answering when a user has sent a media message (lines 22-29)
This part of the code checks whether a media file was received or not, and if there is an image on it. Note that we have a method called save_on_dropbox that receives a phone number, the picture URL (MediaUrl0), and the picture extension. To save the media, we’re going to call the Dropbox API to upload our picture - we’ll come back to it soon. The upload may take a while and you may need confirmation whether the picture was uploaded or not. You can accomplish this with background tasks, useful when you want to return a message as soon as possible, without blocking your endpoint. This won’t be covered by this tutorial but it’s something to keep in mind.
Our user may send an audio or a document by mistake, so we must let them know, right? We’re going to save only the images. For each one sent, we’ll save and reply with a confirmation message.
Answering when a user has sent a text message (lines 30-39)
So, what if our user just sent us a text? Or asks us about where their pictures are stored? In this case, they will get a sad “I didn't get it 😕”. Would be nice letting them know where their pictures are, so let’s do a basic check, looking if the message (Body) has the word “see” or “save” in it. In case the user sent a message, we’ll simply check if a certain word is in it. For save, our code will reply with a “welcome” message. For see, we’ll reply with the Dropbox folder URL for the phone number used.
Please note that we’re importing a module called storage. It’s a Python file that will hold the methods responsible for the interactions with Dropbox. We’ll implement it in the next section.
Saving our mom’s pictures
Our endpoint is ready and there is only one piece left: the storage. I decided to use Dropbox because I have much space left there that isn’t being used - yet. You can implement the same methods in other solutions such as Google Drive and Amazon S3.
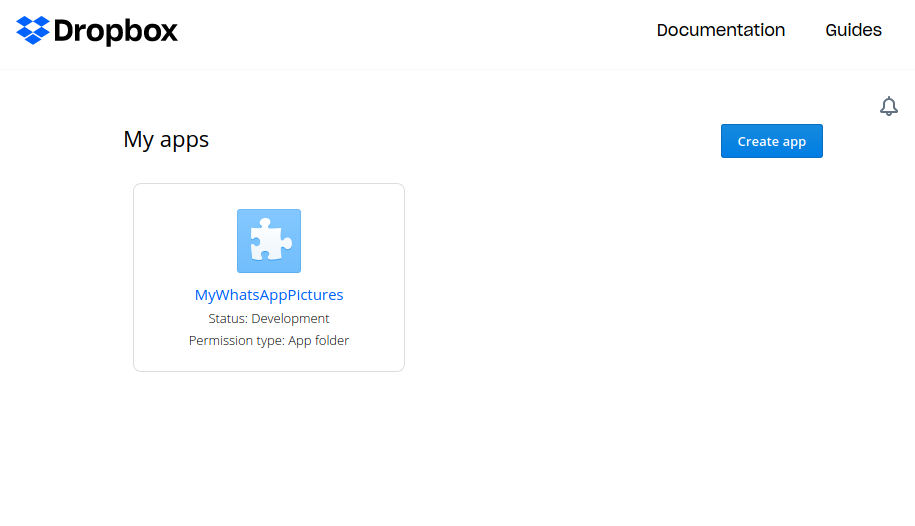
Getting your Dropbox ready
After logging in your Dropbox account, go to https://www.dropbox.com/developers/apps and click on “Create app”:
In the next page, you will have a few options to choose:
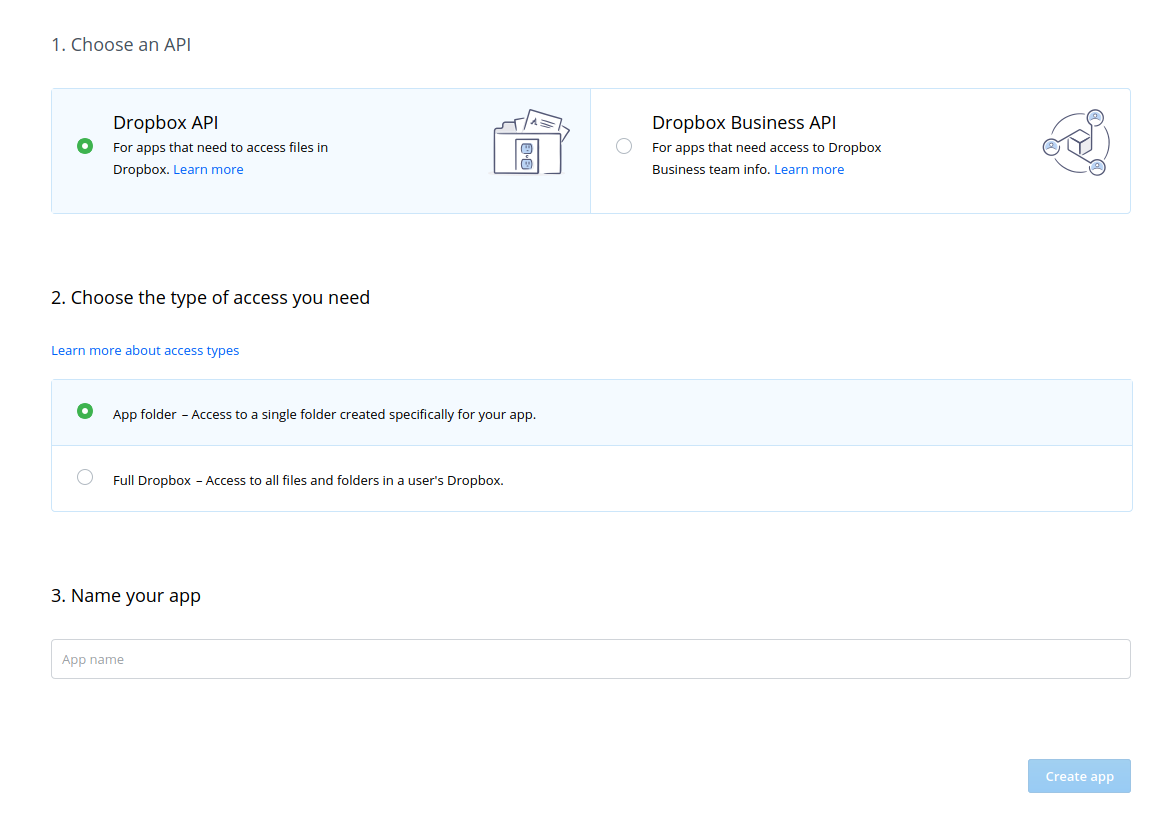
The number one is “1. Choose an API:” - you must pick “Dropbox API” (suitable for personal Dropbox accounts). The following option is “2. Choose the type of access you need:” - choose “App folder – Access to a single folder created specifically for your app.” A folder for your app will be created in the folder Apps. And last but not least, “3. Name your app”. You may choose the name you liked the most. I put the original “MyWhatsAppPictures” on mine.
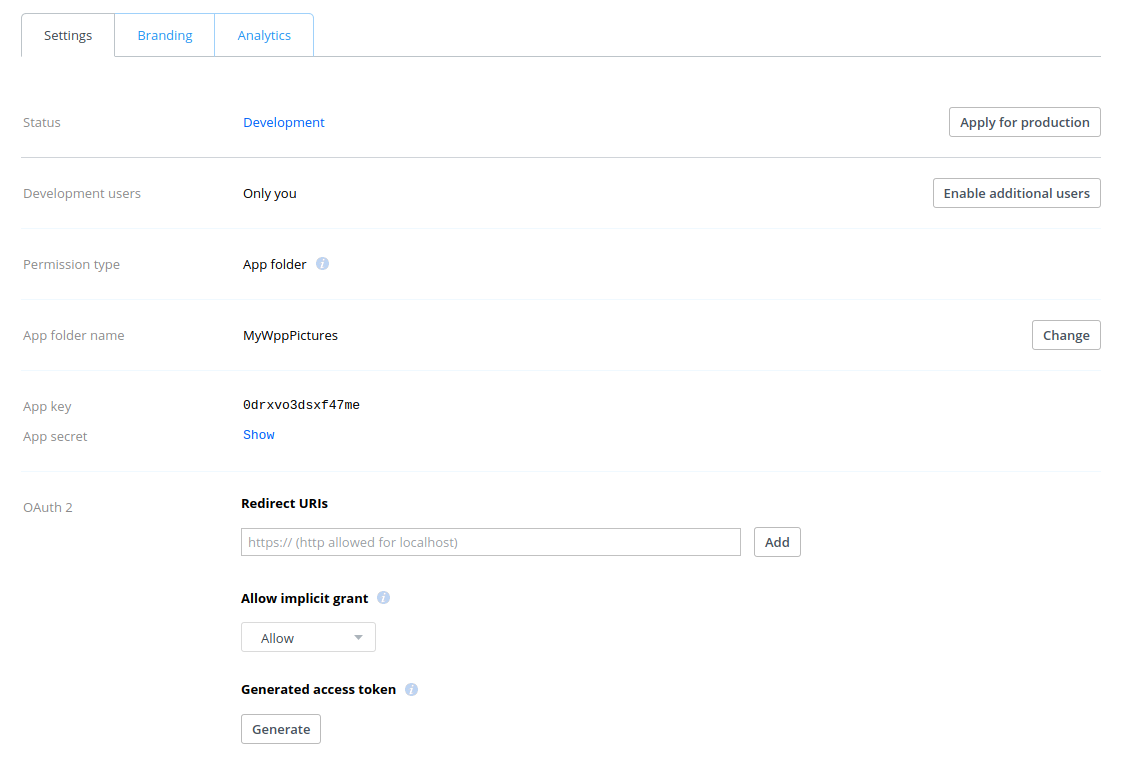
We have a Dropbox app! Yay! Now we have to get an access token, so we can upload pictures and get a shared link on behalf of Dropbox. On Dropbox Apps home page, click on your app. In the tab “Settings”, section “OAuth 2”, below “Generate Access Token”, click on “Generate” . It will give you a token to make Dropbox API calls. Please be careful with this token. Don’t share it publicly neither push it to any source control management.
Uploading pictures to Dropbox
Our Dropbox is ready. Time to get our hands dirty! Create a Python file called storage.py. You can copy the code below to it.
First things first: we need to tell Dropbox that we have a token but we can’t have it exposed in our code. Having it as an environment variable is a nice solution to hide such sensitive information. Go to the terminal, and create an environment variable called DROPBOX_TOKEN. On Mac OS/Linux this can be done by:
For those of you following the tutorial on Windows, enter the following command in a command prompt window:
Importing the os builtin module, we’ll access this environment variable. Also, importing dropbox we’ll be able to create an instance of a Dropbox object. This object is what we need to upload the pictures and get a shared link.
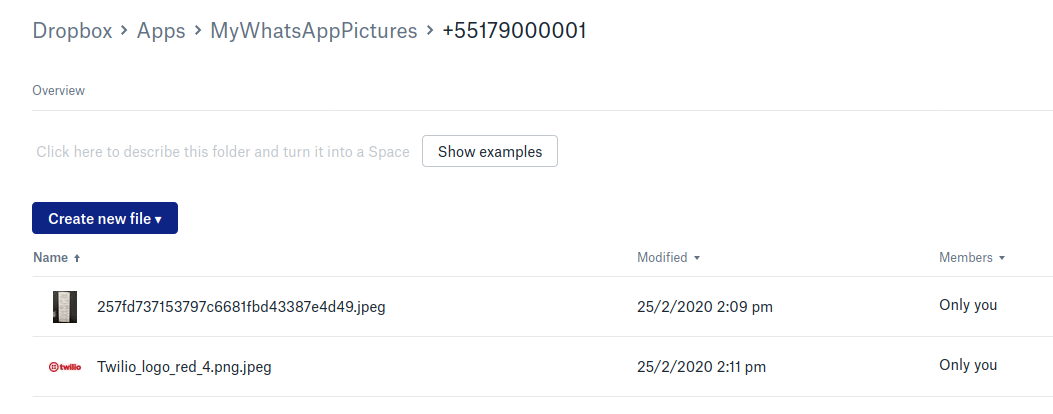
Now let’s jump to the method responsible for uploading the pictures: save_on_dropbox. This method receives a phone number, the picture URL, and the picture extension (png, jpg, etc). The phone number is important to know which folder should be used and where the pictures are. From the picture URL (file_url), we’ll extract the name given by Twilio to this picture and add the extension specified in the payload. Combining all these arguments together, we have the file path. It’s important to note that file_path begins with a slash. Dropbox requires us to give the full path where a file will be stored.
Having the file path and the URL in place, we just need to call the Dropbox method files_save_url. That’s it! Our picture is uploaded. If you want to check the result from this operation, this method returns a “Result” object. See more details here.
Note: you don’t have to create a folder manually. If the folder doesn’t exist yet, Dropbox is going to create one and upload the picture there.
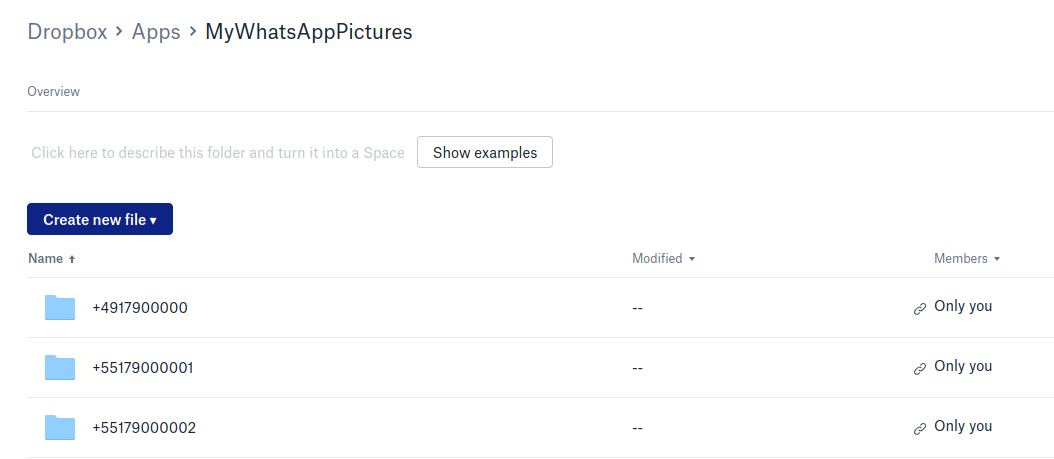
Pictures are now uploaded, but where are they? To answer this question, the method dropbox_folder_from receives a phone number - essential to know where our pictures are. If there is no shared link, we’ll create a new one with the Dropbox method sharing_create_shared_link_with_settings. If not, an exception will be raised and we’ll be able to get the shared link using another Dropbox method called sharing_get_shared_links. As the method name suggests, a folder may have more than one shared link. Here we’re assuming that the first one is the one we’re looking for.
Altogether!
We’ve seen all the pieces we need to save pictures from WhatsApp to Dropbox. Below you can see how it looks like together:
bot.py
storage.py
Now you can spin your server again and see how it saves pictures to Dropbox!
Conclusion
Chatbots are already a great tool for customer relationships, teams and businesses in general. Making use of WhatsApp pictures to interact with your users makes your application go to another level of interaction. Having it combined with other APIs such as Dropbox API can be powerful.
I hope you liked this tutorial and that it has given you some new insights. Can’t wait to hear what you build!
Ana Paula Gomes is a software engineer, a runner wannabe and crazy open source lady.
- Github: https://github.com/anapaulagomes

Related Resources
Twilio Docs
From APIs to SDKs to sample apps
API reference documentation, SDKs, helper libraries, quickstarts, and tutorials for your language and platform.
Resource Center
The latest ebooks, industry reports, and webinars
Learn from customer engagement experts to improve your own communication.
Ahoy
Twilio's developer community hub
Best practices, code samples, and inspiration to build communications and digital engagement experiences.