Building JavaScript Microservices with Node.js
Time to read: 5 minutes
April 10, 2019
Written by

When your JavaScript application grows in size you start facing challenges with maintaining the code, fixing bugs, and implementing new features. Also, adding new developers to the project becomes complicated.
Applications are built from pieces, like packages and modules, but at some point those structures aren’t enough to reduce the size and complexity of the application. The idea behind distributed systems is to break big, monolithic designs into small, independent programs which communicate with each other to exchange data and perform operations.
One of the many variants of distributed systems is the microservices architecture, which structures an application as a collection of loosely coupled services. Services are fine-grained and the communication protocols are lightweight (like the HTTP protocol).
There are few things worth emphasizing about the superiority of microservices, and distributed systems generally, over monolithic architecture:
- Modularity – responsibility for specific operations is assigned to separate pieces of the application
- Uniformity – microservices interfaces (API endpoints) consist of a base URI identifying a data object and standard HTTP methods (GET, POST, PUT, PATCH and DELETE) used to manipulate the object
- Robustness – component failures cause only the absence or reduction of a specific unit of functionality
- Maintainability – system components can be modified and deployed independently
- Scalability – instances of a service can be added or removed to respond to changes in demand.
- Availability – new features can be added to the system while maintaining 100% availability.
- Testability – new solutions can be tested directly in the “battlefield of production” by implementing them for restricted segments of users to see how they behave in real life.
In addition, every microservice can be written using the language, technique, or framework that’s most appropriate to the tasks it will perform. The only feature that is necessary is the ability to publish RESTful APIs for communication with other services.
In this post you’ll learn how to build microservices by building a basic system consisting of two JavaScript services running on Node.js.
Prerequisites for building microservices architecture with Node.js
To accomplish the tasks in this post you will need the following:
- Node.js and npm (The Node.js installation will also install npm.)
To learn most effectively from this post you should have the following:
- Working knowledge of JavaScript and Node.js
- Some exposure to the HTTP protocol
There is a companion repository for this post available on GitHub.
Create the heroes service
Go to the directory under which you’d like to create the project and create following directory and file structure:
If you’d like to use source code control, this would be a good time to initialize a repository. Don’t forget to add a .gitignore file like this one if you’re using Git.
Initialize the npm project inside ./heroes directory and install necessary dependencies by executing the following command instructions:
It’s time to implement the service. Copy this JavaScript code to the ./heroes/heroes.js file:
Download the superhero and superhero team pictures from the following links and place them in the /heroes/img directory:
The code for the heroes service provides:
- a list of heroes super powers
- a list of heroes
- API endpoints to get the list of heroes, update a hero’s profile, and get a hero’s picture
Test the heroes.js service
The heroes service code shown below enables you to run service on any HTTP port you want.
Ellipsis (“...”) in code represents a section redacted for brevity.
Run the service by executing the following command line instruction:
You can check to see if the service works as expected by using Postman, curl, PowerShell Invoke-WebRequest, or your browser. The curl command line instruction is:
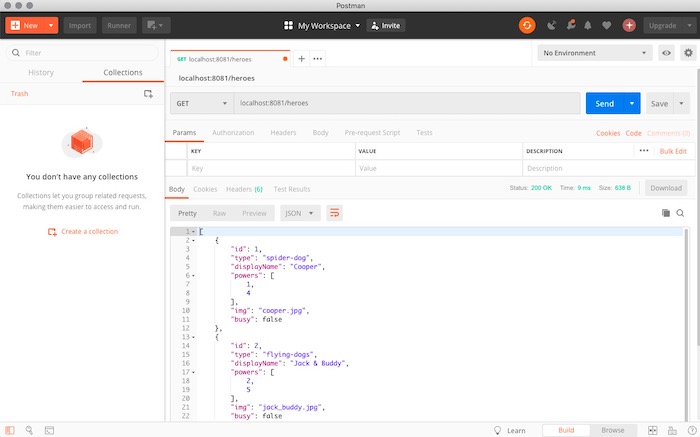
If the service is working correctly you should see results similar to the following console output from curl:
In Postman the body of the response should look like this:
If you want to catch up to this step using the code from the GitHub repository, execute the following commands in the directory where you’d like to create the project directory:
Create the threats service
What’s the purpose of a superhero if there’s no peril? The microservices architecture of our application uses a separate service to represent the challenges that only a superhero can overcome. It also provides an API endpoint for matching superheros to threats.
The procedure for creating the threats service is similar to heroes service.
In the main directory of your project, create following directory and file structure:
In the ./threats directory, initialize the project and install its dependencies with the following npm command line instructions:
Don’t forget to include this project in source code control, if you’re using it.
Place this JavaScript code in the ./threats/threats.js file:
Because the code implements inter-services communication, it needs to know the address of the heroes service, as shown below. If you changed the port on which the heroes service runs you’ll need to edit this line:
Test the threats service
If you’ve stopped the heroes service, or closed its terminal window, restart it.
Open another terminal window and start the threats service by executing the following command line instruction:
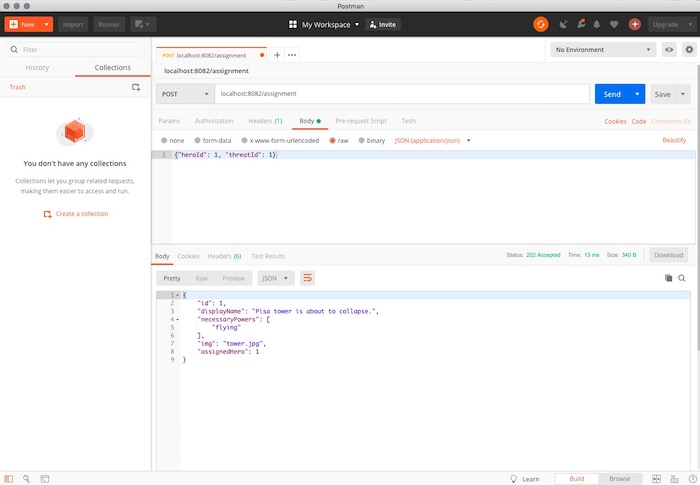
In the same way you tested the heroes service, test the threats service by executing a web request using Postman, curl, PowerShell Invoke-WebRequest, or your browser. Note that this time it’s a POST request.
The curl command line instruction is:
If the service is working correctly you should see results similar to the following console output from curl:
In Postman the body of the response should look like this:
In the terminal window where the heroes service is running you should see:
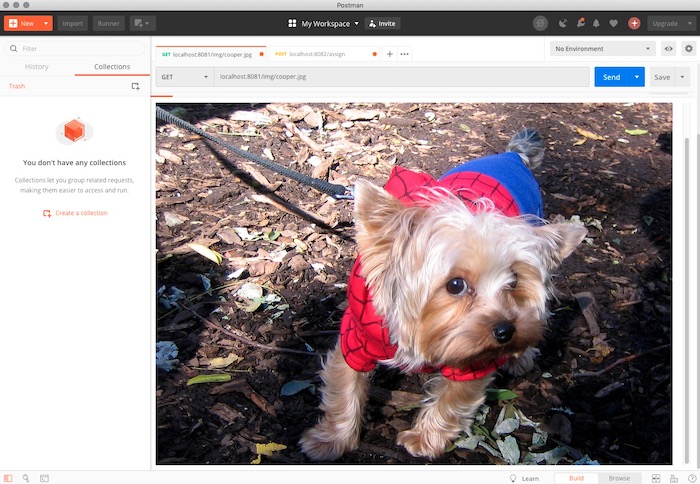
You just sent Cooper (localhost:8081/img/cooper.jpg) on a mission ...
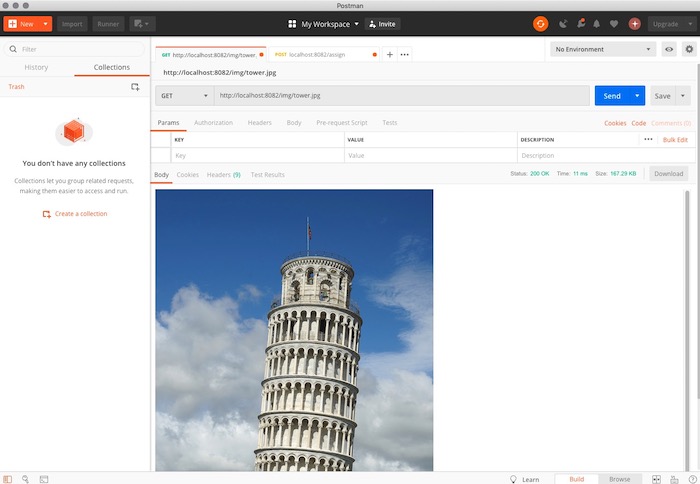
… to fly to Pisa and save the historical monument! (localhost:8082/img/tower.jpg):
You can use the hero and threats images to explore the functionality of the services on your own. These objects will also be part of a project in a forthcoming post that uses this project as a starting point.
If you want to catch up to this step using the code from the GitHub repository, execute the following commands in the directory where you’d like to create the project directory:
JavaScript Microservices with Node.js
In this post you learned how to create a basic distributed system architecture with Node.js. You saw how to delegate responsibility for different tasks to separate applications and to communicate between services. Both applications communicate with each other by exposed REST APIs. Each manipulates only the data for which it is responsible and can be maintained, extended, and deployed without involving the other service.
Additional Resources
Architectural Styles and the Design of Network-based Software Architectures, Roy Thomas Fielding, 2000 – Fielding’s doctoral dissertation describes Representational State Transfer (chapter 5) and other architectural styles.
Microservices – Although flawed, the Wikipedia article is a good starting place for finding more information about microservices architecture and implementation.
Node.js reference documentation.
Maciej Treder is a Senior Software Development Engineer at Akamai Technologies. He is also an international conference speaker and the author of @ng-toolkit, an open source toolkit for building Angular progressive web apps (PWAs), serverless apps, and Angular Universal apps. Check out the repo to learn more about the toolkit, contribute, and support the project. You can learn more about the author at https://www.maciejtreder.com. You can also contact him at: contact@maciejtreder.com or @maciejtreder on GitHub, Twitter, StackOverflow, and LinkedIn.

Related Resources
Twilio Docs
From APIs to SDKs to sample apps
API reference documentation, SDKs, helper libraries, quickstarts, and tutorials for your language and platform.
Resource Center
The latest ebooks, industry reports, and webinars
Learn from customer engagement experts to improve your own communication.
Ahoy
Twilio's developer community hub
Best practices, code samples, and inspiration to build communications and digital engagement experiences.