Building an Order Tracking System in Laravel Powered by Twilio SMS
Time to read: 6 minutes
January 17, 2020
Written by

In today's world where online shopping is at an all-time high, the chances of your e-commerce site standing out are going to be based on how much you can get your customers to trust in your service(s) and the level of satisfaction gotten from using them. One way of improving customer satisfaction and "trust" in your online shop is by allowing your customers to gain knowledge about the current state of their package.
An order tracking system will allow your customers to gain more information about the current status/location of their package. Doing this will help increase the satisfaction of your customers, as they too will have detailed insight into where their package is at any given point in time until it arrives at their desired location.
In this tutorial, you will learn how to use Twilio’s Programmable SMS to create an order tracking system using Laravel and update users about their package(s) via SMS.
Prerequisites
In order to follow this tutorial, you will need:
- Basic knowledge of Laravel
- Laravel installed on your local machine
- Composer globally installed
- MySQL setup on your local machine
- Twilio Account
Project Setup
We will begin by creating a new Laravel project. This can be done either using the Laravel installer or Composer. In this tutorial we will be making use of the Laravel installer. If you don’t have it installed, you can learn how to set it up from the Laravel documentation. To generate a Laravel project using the Laravel Installer, run the following command on your terminal:
Next, set up a database for the application. For this tutorial, we will make use of a MySQL database. If you don't have MySQL installed on your local machine, head over to the official site to get it installed on your platform of choice. After successful installation, open up your terminal and run the following to login to MySQL:
NOTE: Add the -p flag if you have a password for your MySQL instance.
Once you are logged in, run the following command to create a new database:
Next, update your .env file with your database credentials. Open up .env and make the following adjustments:
Next, install the Twilio SDK for PHP via Composer. Open up a terminal and run the following to install the Twilio SDK:
If you don’t have Composer installed on your local machine you can do so by following the instructions in their documentation.
Setting up Twilio SDK
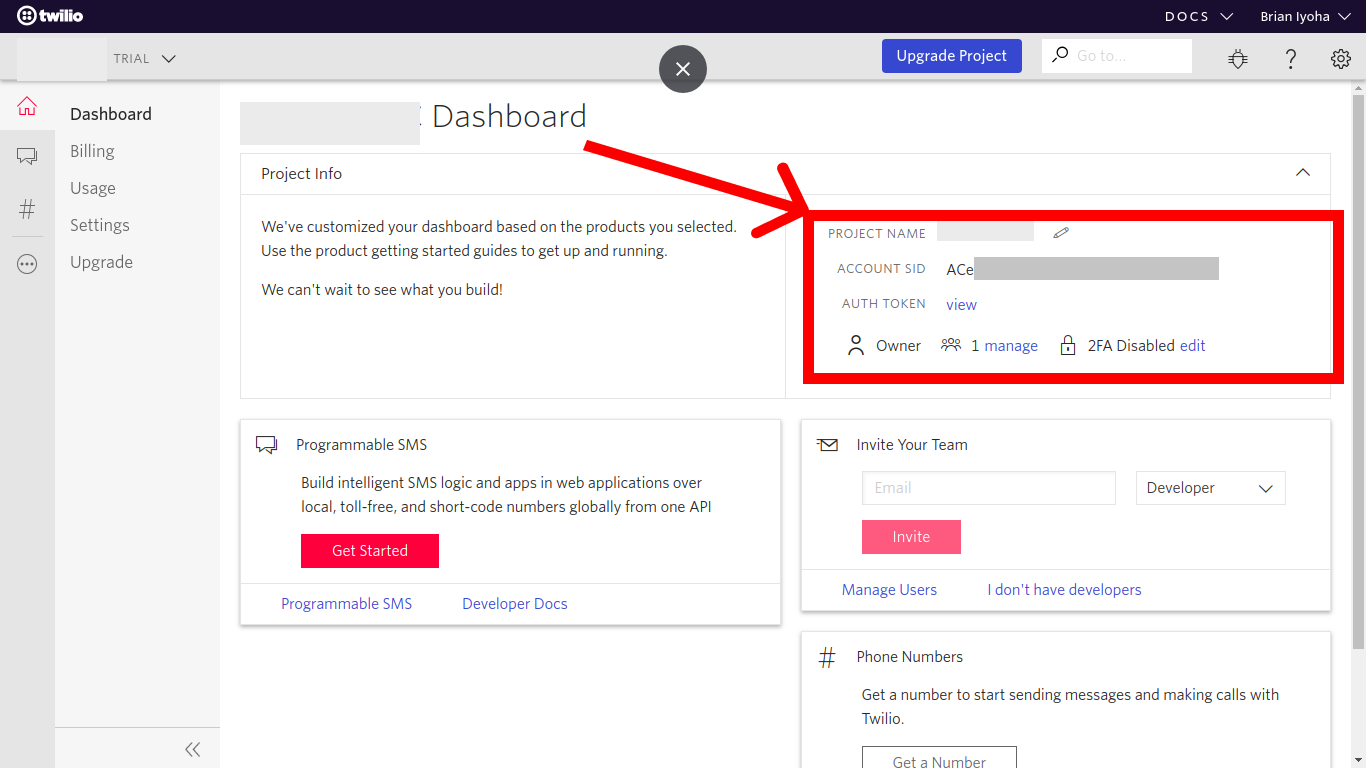
After the successful installation of the Twilio SDK, you need to also fetch your Twilio credentials and your active Twilio phone number from your Twilio console. Head over to your console and grab your account_sid and auth_token.
Now navigate to the Phone Number section to get your SMS enabled phone number.
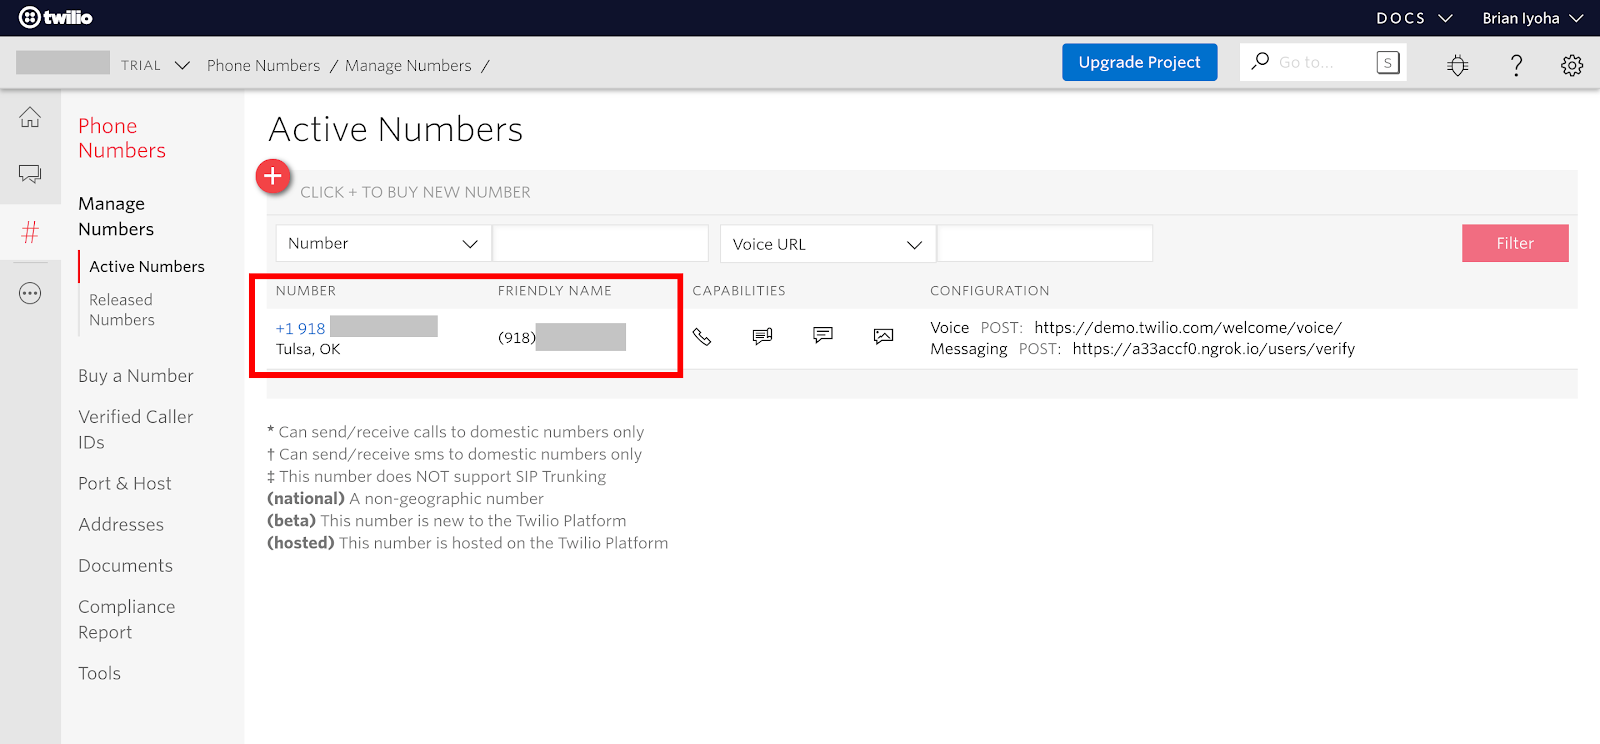
If you don’t have an active number, you can easily create one here. This is the phone number you will use for sending and receiving SMS and also making phone calls via Twilio.
Next, update your .env file with the credentials. Open .env located at the root of the project directory and add these values:
Mocking data
At this point, you should have your base project ready! In order to complete this tutorial you will need to create a table that will hold the mock orders data for the application. To create the orders table, run the following command to generate an Eloquent model alongside a migration file which will hold the definitions for the orders table:
Now, open the create_orders_table migration file (database/migrations/{timestamp}_create_orders_table.php) and make the following changes:
Next, execute the migration to actually commit the changes to your database. To do this, open up a terminal and run the following:
Seeding Database
Next, you will need to setup seeders for your database. This will be used to seed the Orders table with some sample data. To do this, generate a seeder class using the artisan command:
Now, open up the just generated database/seeds/OrdersTableSeeder.php file and make the following changes:
This will create four dummy orders in your Orders table which will serve as the placed orders for this tutorial. Now open up your terminal and run the following to actually seed your database with the data:
Tracking Orders
At this point, you should have some test data in your database which will be used in the remaining part of this tutorial. First, generate a controller which will hold the logic for the application. Open up your terminal and run the following artisan command to generate a controller class::
Now, open up app/Http/Controllers/OrderController.php and make the following changes:
The OrderController now has two methods; getOrder and sendMessage. The getOrder() method will be called whenever an order_id is sent to your Twilio phone number. Upon receipt, an appropriate response is sent back to the sender based on the content of the message body. This method (getOrder) gets the Body of the SMS and also the sender's phone number from the body of the request which is sent by Twilio after receiving an SMS. After retrieving the SMS data, the Orders table is queried with the order_id and a $response is sent back to the sender using the sendMessage() method depending on the results of the query.
The sendMessage() method accepts two arguments; message and recipients. Internally, the sendMessage() method makes use of Twilio programmable SMS SDK for sending out text messages:
The Twilio Client SDK requires your Twilio credentials to be instantiated, using the built-in PHP getenv() function. You can retrieve your Twilio credentials stored in your .env from the earlier parts of this tutorial. After creating an instance of the Twilio Client, you can then proceed to send an SMS by calling the $client->messages->create() method. This method accepts two arguments of a receiver which can either be a string or an array of phone numbers and an array with the properties of from and body where from is your active Twilio phone number and body is the text you want to be sent to the recipients.
Creating Routes
The next step is to make the methods we just created accessible via a route that calls your controller method. Open routes/web.php and make the following changes:
NOTE: The GET / route has been modified to return all the orders in your orders table as you will need to make use of an order_id to test your application.
Before proceeding, you have to exclude your route from CSRF protection by adding your /order route to the except array in app/Http/Middleware/VerifyCsrfToken.php:
Setting up Twilio Webhook For Responding To SMS
As you might have figured, you will need a way to alert your application when an SMS is sent to your Twilio phone number. One of the best ways to allow such communication to your application from external services is via webhooks. Twilio supports using webhooks to send an HTTP request to your application after an event occurs, such as receiving an SMS or getting an incoming call. To allow Twilio to send this request to your application, you must first configure your webhook URL from your Twilio console.
Exposing Your Application To The Internet
Before your application can be accessed via a webhook, it must first be accessible remotely from the internet and not just your local machine. Luckily, this can easily be accomplished by using ngrok.
If you don't have ngrok set up on your computer, head over to their official download page and follow the instructions to get it installed on your machine. If you already have it set up, then open up your terminal and run the following commands to start your Laravel application and expose it to the internet:
Now open another instance of your terminal and run this command:
NOTE: 8000 should be replaced with the port number that your Laravel application is running on.
After successful execution of the above command, you should see a screen similar to this:
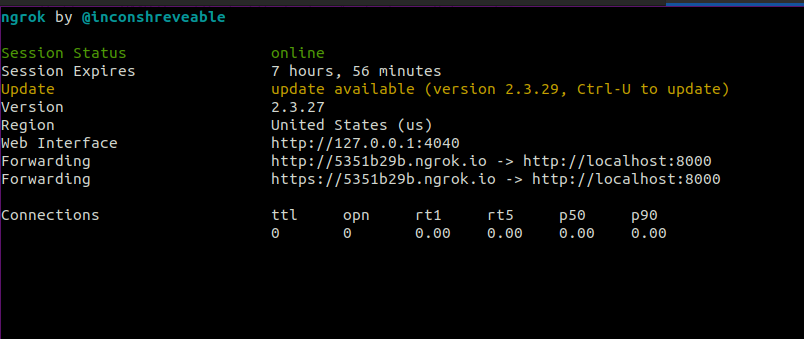
Now, copy your forwarding URL as this will be used shortly.
Updating Twilio phone number configuration
Next, you need to update the webhook URL for your Twilio phone number's SMS configuration. This will allow Twilio to forward requests to your application when an SMS message is received. Head over to the active phone number section in your Twilio console and select your active phone number from the list. This number will be used as the phone number for receiving messages. Scroll down to the "Messaging" section and update the webhook URL for the field labeled “A message comes in” as shown below. Be sure to append /order to the end of your forwarding URL you copied earlier.

Testing
Awesome! Now that you have both your application running and exposed to the web, you can proceed to carry out the final test. Send a text message to your active Twilio number with any of the order_id (this can be gotten by opening the / route on your browser) and you should get a response back depending on the order_id you sent.
Conclusion
You should now have a working SMS based order tracking system. You should have also learned how to make use of Laravel to accomplish this using Twilio’s programmable SMS and how to expose your local server using ngrok. If you would like to take a look at the complete source code for this tutorial, you can find it on Github.
I’d love to answer any question(s) you might have concerning this tutorial. You can reach me via:
- Email: brian.iyoha@gmail.com
- Twitter: thecodearcher
- GitHub: thecodearcher
Related Resources
Twilio Docs
From APIs to SDKs to sample apps
API reference documentation, SDKs, helper libraries, quickstarts, and tutorials for your language and platform.
Resource Center
The latest ebooks, industry reports, and webinars
Learn from customer engagement experts to improve your own communication.
Ahoy
Twilio's developer community hub
Best practices, code samples, and inspiration to build communications and digital engagement experiences.