Build a Serverless Queueing System in AWS to Call Twilio’s APIs with Metering, Monitoring, and Error Handling

Time to read: 15 minutes
March 22, 2023
Written by
Reviewed by
Plenty of examples show how straightforward it is to call Twilio’s APIs. However, how would you call Twilio’s APIs in batches of hundreds, thousands, or many thousands? And can you automate API calls out of a JSON or CSV file?
In this post, I’ll show you one way to handle this common scenario, and design a serverless system which you can trigger from a CSV or JSON file using Amazon AWS serverless technologies (Lambda, Step Functions) and managed products (SQS, SNS, S3, DynamoDB). As Infrastructure as Code, “IaC”, it will be straightforward to deploy into any AWS account.
Let’s explore some of the issues you can hit calling Twilio at scale, then discuss the solution.
Handling Twilio API calls at scale: what are the issues?
Many of our customers call our APIs “at scale” and have to address some important issues, such as:
- Rate limiting
- Monitoring and Reporting
- Error Handling
Let’s take a quick look at each of these.
Rate Limiting
Each Twilio Account has a concurrency limit that only allows a certain number of concurrent API calls. You can read about Twilio concurrency limits here, and customers calling our API in excess of this rate can receive 429 errors. It is crucial that you call Twilio’s APIs at a metered rate that does not exceed your account concurrency limit.
In addition, specific Twilio products like Messaging have their own limits to consider. For SMS specifically, senders need to be aware of the “Messages per second”, or MPS, that they have available for their provisioned senders, and call the Twilio API at a rate that matches that MPS. Twilio does provide queueing for SMS messages, however, controlling the rate at which you send messages to Twilio is important, as a full queue will lead to errors and rejected requests. This solution can help you send messages to Twilio at a rate that matches your MPS. Twilio Programmable Voice has its own rate limits, as do other Twilio channels and products.
In sum, when calling Twilio’s APIs, you need to be principally aware of the concurrency limits on your Twilio Account, and also aware of the rate limits on the Twilio products you are using. This solution can help.
Reporting and Monitoring
Twilio Insights provides real time and historical “out-of-the-box” reporting for many of our key channels and software products. However, Twilio understands that data generated by your customer engagements are valuable, and many of our customers will want to maintain their own reporting and monitoring capabilities. Keeping track of responses back from Twilio’s APIs is a crucial part of successfully implementing a solution built in Twilio.
Error Handling
We all know that errors happen. A Twilio implementation should be able to effectively respond to errors.
Serverless Twilio API Call Queue Solution Architecture
First, let me show you what we’ll be building together. Here’s an overview of the architecture:
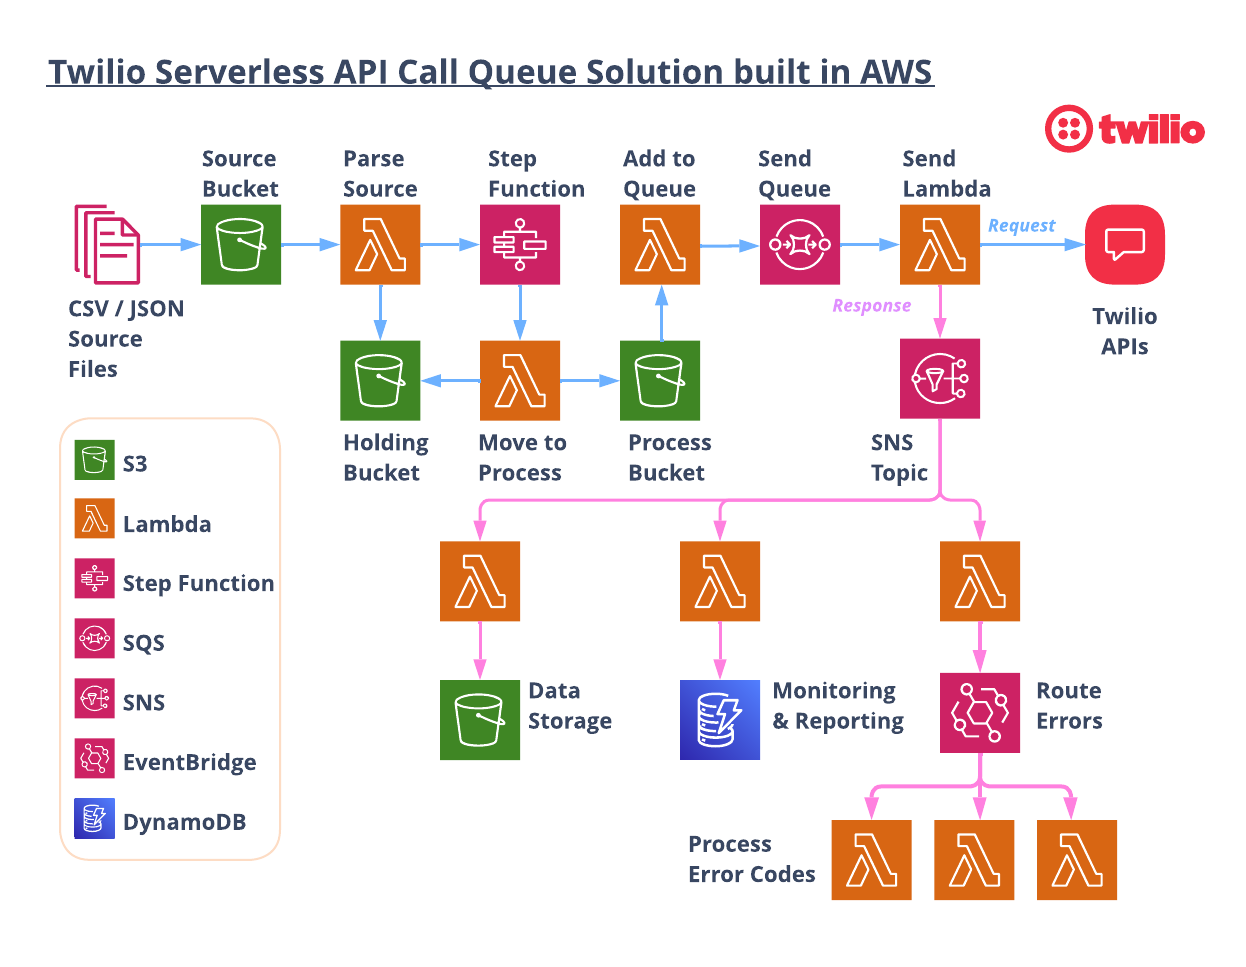
Let’s walk through the flow starting from the top left.
1. Load an input file
The process starts when a CSV or JSON file is dropped into the S3 “Source” Bucket. The CSV or JSON can be generated from any system, then loaded manually or programmatically. Each row of the CSV file, or object in the JSON file, has the necessary parameters to execute an API call.
Loading a CSV/JSON file into the S3 bucket triggers a Lambda function to open the file and begin processing. The initial lambda checks the number of API calls that need to be made and then, if necessary, breaks the files into multiple files to be called sequentially. The files are broken down to hold only the number of messages that can be sent in 15 minute increments BASED ON the set “API Calls Per Second”.
2. Parse the input file
Within each file, each row or object is given a DelaySeconds parameter. The DelaySeconds parameters will hide the message from being seen in the SQS queue for n seconds. A message will not be “consumable” while it is serving out its delay time.
The maximum value for DelaySeconds in an SQS queue is 15 minutes, or 900 seconds. So you can effectively load 15 minutes worth of messages into a queue with each “batch” of message having a DelaySeconds value starting at 1 second and incrementing by 1 second all the way to 900 seconds. This effectively rate-limits calling the Twilio API at a specific rate (API Calls Per Second).
The system can string together as many files containing “15 minutes worth” of messages as needed to process all of the messages. The new smaller files are added to the HOLDING bucket, and then the lambda invokes the Step Function.
3. Step through the file
The Step Function controls submitting the files to the SQS in 15 minute increments. It receives an array of files and submits the first one, and then enters a loop to check if there are more files. If there are more, it first waits for 15 minutes before submitting the next one. Waiting for 15 minutes in Step Functions incurs no cost, so this is a straightforward and cost-effective way to cycle through files over any period of time.
The Step Function calls a lambda that copies one file from the HOLDING bucket to the PROCESS bucket, which kicks off another lambda.
4. Add to the queue
The Add to Queue lambda opens up the file and submits all of the messages to the SQS queue. Since all messages have a DelaySeconds parameter, messages will become available to be processed in the queue in n seconds.
5. Send the messages
The Send Lambda opens the messages and configures and executes the API call. The response from Twilio is published to an SNS topic for downstream processing.
6. (Optional) Downstream processors
That was a lot, but it shows one way you could build a serverless system to call Twilio’s APIs at a specific calls per second rate!
But wait there's more… Since the response from Twilio is published to an SNS topic, you can include downstream processors to intelligently process feedback from your calls to Twilio.
This project includes three downstream processors you can use or adapt for your own needs:
- Save Responses to S3 ⇒ Save all responses to an S3 bucket that can be sent to other analytics tools, data lakes, or warehouses. These customer engagements are important data points that should be a part of your data pipeline!
- Save Responses to DynamoDB => Similar to above, putting all responses into a database (either NoSQL or a relational database), allows you to have real time visibility into your Twilio API calls.
- Check For Errors ⇒ Using EventBridge, you can check every response for errors and handle them as needed. Did you send to a landline number or to a number that has replied “STOP”? You’ll need to update your database so you don’t send any more messages to that customer. Did you receive a filtering error or a rate limit error? Notify someone right away to take action!
If you have read this far, then I think you are ready to see how you can spin this up yourself!
Let’s get started…
AWS Resources
All of the AWS components of the serverless application are provided as "Infrastructure as Code" (oft-shortened to IaC) and deployed via CloudFormation into AWS. Here is an overview of the components:
- AWS SAM => an open-source framework that enables you to build serverless applications on AWS
- AWS CLI => Not required, but recommended because it simplifies credentials when deploying
- AWS Lambda => serverless compute service
- AWS Step Functions => step functions
- S3 => Object Storage
- SQS => simple queue service
- SNS => simple notification service
- EventBridge => serverless event bus
Prerequisites
This is not a beginner level build! You need to have some knowledge of AWS, serverless computing, and programming.
- Twilio Account. If you don’t yet have one, you can sign up for a free account here.
- AWS Account with permissions to provision Lambdas, step functions, S3 buckets, IAM Roles & Policies, an SQS queue, SNS topics, and a custom EventBus. You can sign up for an account here.
- AWS SAM CLI installed.
- Node.js installed on your computer.
Let’s Build it!
Here are the basic steps of our serverless multichannel build today.
- Add your Twilio Credentials to AWS Secrets Manager
- Download the code
- Deploy the stacks in sequence
- Try it out!
1. Add Twilio Credentials to AWS Secrets Manager
Making sure that you never include credentials in your code is a core security tenet. So we are going to use AWS Secrets Manager to save our Twilio credentials. The compute components will be able to access these credentials at runtime to call the Twilio APIs.
From your AWS Console, be sure that you are in the AWS Region where you wish to deploy this project, Next, go to Secrets Manager.
We need to save values for the following:
ACCOUNT_SIDACCOUNT_KEYACCOUNT_SECRETTEST_ACCOUNT_SIDTEST_ACCOUNT_KEYTEST_ACCOUNT_SECRET
ACCOUNT_SID, ACCOUNT_KEY, and ACCOUNT_SECRET are used to make real calls to the Twilio API. It is best practice to use Twilio API Keys to make these calls from external systems like this. Using API Keys will allow you to disable this system quickly should the need ever arise.
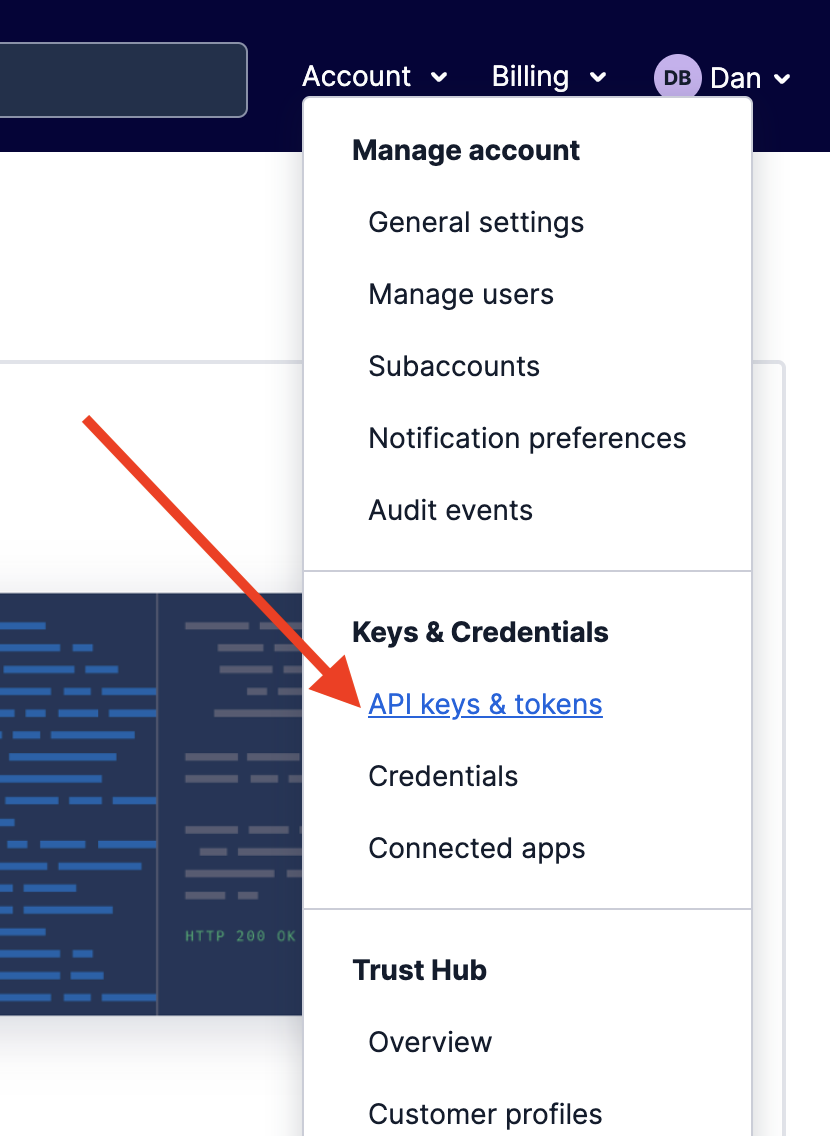
In the Twilio Console, select API Keys & Tokens under the Account option in the upper right corner of the page…
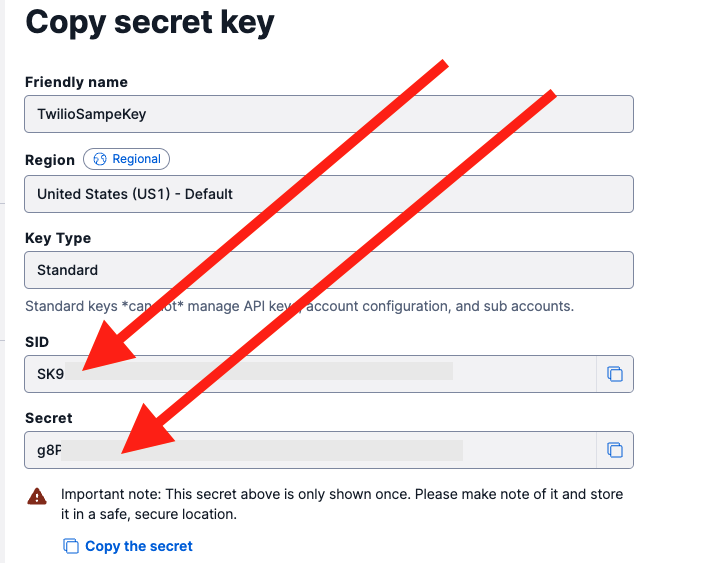
Then click on CREATE API KEY . Create a standard key and then copy the SID and SECRET. These values are show here:
You will also need the Account SID found on the home page of the Twilio Account:
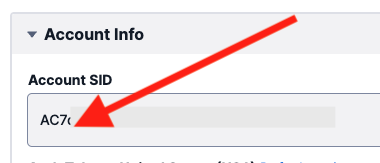
Copy down the Account SID, and the SID and SECRET from the new API Key. These are values that will make “real” API calls!
To make test calls to the Twilio API, find the Test Credentials section at the bottom of the API Keys & Tokens page. It looks like this and the two values you need are marked with red arrows:
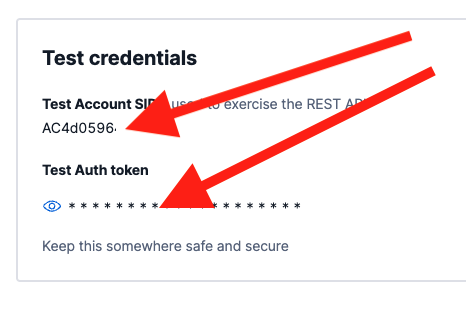
Copy down the Test Account SID and the Test Auth token as shown above and you will paste them into Secrets Manager shortly.
Back at the AWS Console and in Secrets Manager, select Store a new secret.
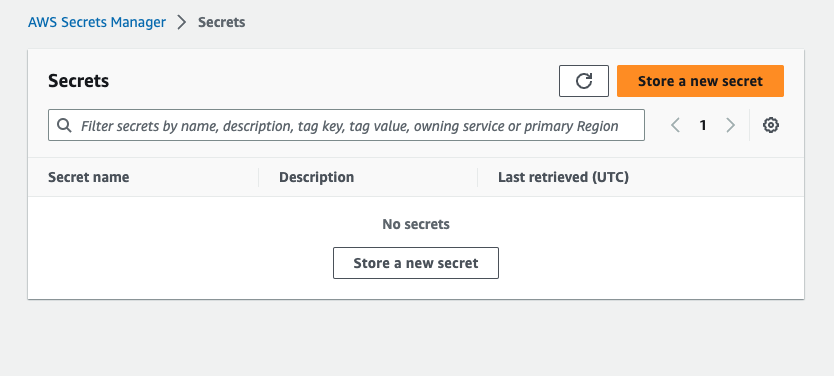
You will enter 6 key value pairs:

ACCOUNT_SID⇒ enter the Account SID from the Twilio account you are using.ACCOUNT_KEY⇒ enter the SID from the API key you just created.ACCOUNT_SECRET⇒ enter the secret from the API key you just created.TEST_ACCOUNT_SID⇒ enter your Test Account SID.TEST_ACCOUNT_KEY⇒ enter your Test Account SID again.TEST_ACCOUNT_SECRET⇒ enter your Test Auth Token.
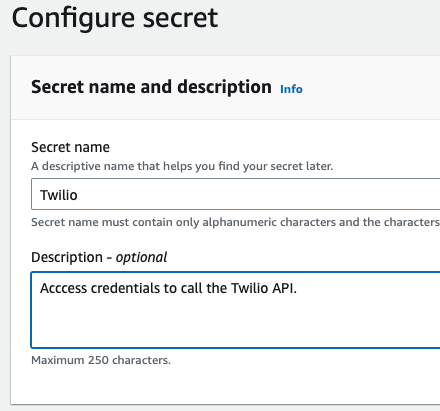
On the next screen, enter “Twilio” as your secret name like below…
After this step you can configure rotation options for this secret. You can accept default values for now, or configure to your requirements. The CloudFormation stack will pull these values when deploying so you do not save these credentials in your code base. A little later we will show how to switch between test and production credentials.
2. Download the Code for this Application
Download the code from this repo.
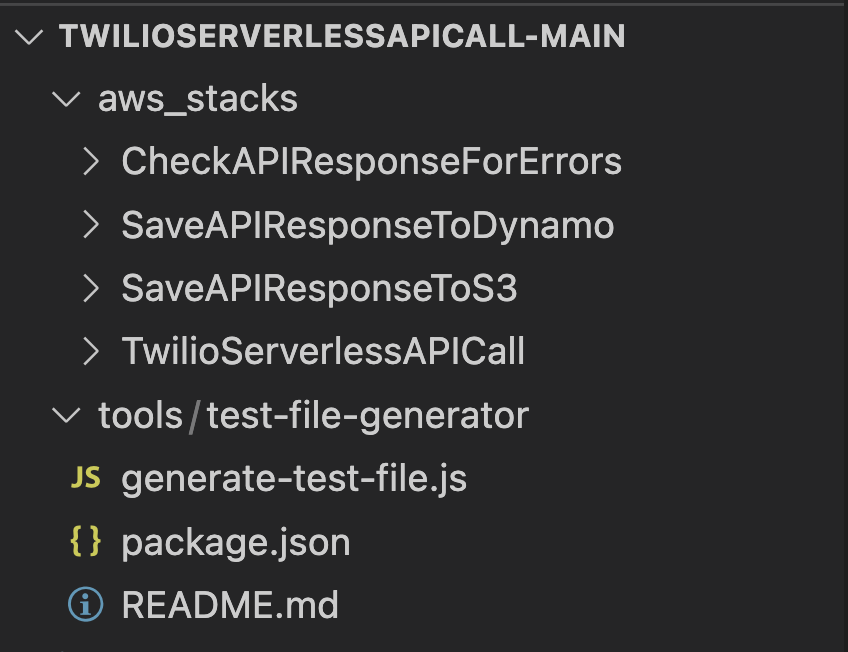
The repo contains two directories: aws_stacks and tools.
The aws_stacks directory contains the 4 stacks that are deployable to your AWS account. The TwilioServerlessAPICall stack is the “primary stack” and must be deployed first.
The “tools” directory contains a Node script to generate test files that use Twilio’s Magic Numbers. More on that later, as well.
3. Configure API Calls Per Second and Your Account Credentials
Open up the file aws_stacks/TwilioServerlessAPICall/template.yaml.
At the top under the Parameters section you will see the following:
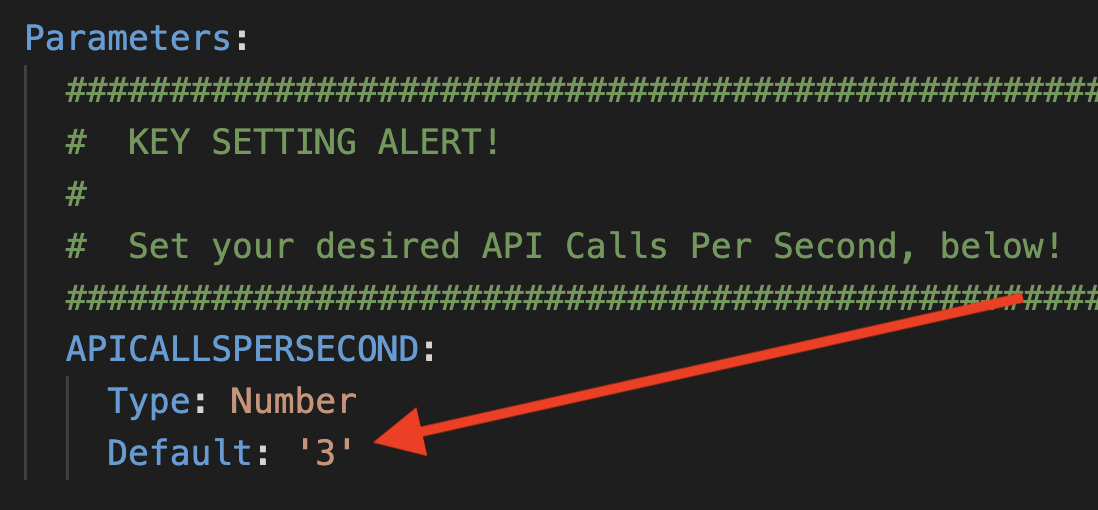
This is a key setting that determines how many api calls per second you want to make to Twilio.
In addition to the APICALLSPERSECOND, you can switch between using real account credentials or the test credentials in this same file. You added both options to AWS Secrets Manager in step 2, and now you can see where they are used.
Comment out the production values to send test requests. Comment out the test values to make “real” api calls.
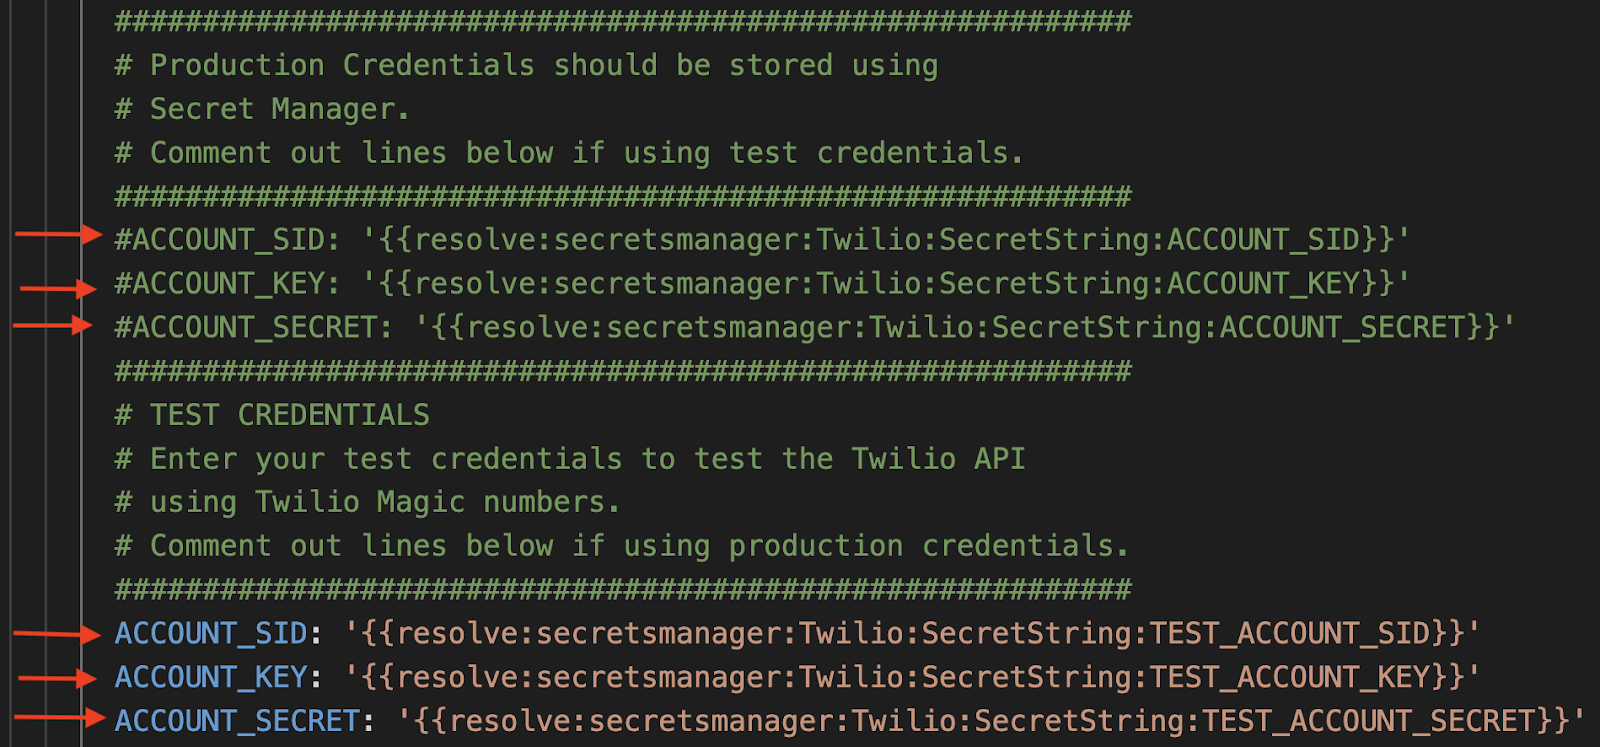
To start, the test credentials are uncommented, and the production values are commented out. With these settings, all API calls will be test calls.
4. Deploy Code
Here is a video covering the installation:
From a terminal window, first go into aws_stacks/TwilioServerlessAPICall. Using AWS SAM makes deploying serverless applications straightforward. First, run:
This command goes through the yaml file template.yaml and prepares the stack to be deployed.
In order to deploy the SAM application, you need to be sure that you have the proper AWS credentials configured. Having the AWS CLI also installed makes it easier, but here are some instructions.
Once you have authenticated into your AWS account, you can run:
This will start an interactive command prompt session to set basic configurations and then deploy all of your resources via a stack in CloudFormation. Here are the answers to enter after running that command (except, substitute your AWS Region of choice – be sure to use the same region as step 2 above!):
After answering the last questions, SAM will create a changeset that lists all of the resources that will be deployed. Answer “y” to the last question to have AWS actually start to create the resources.
The SAM command prompt will let you know when it has finished deploying all of the resources. You can then go to your AWS Console and CloudFormation and browse through the new stack you just created. All of the Lambdas, Lambda Layers, S3 buckets, Custom EventBus, IAM Roles, SQS queues, SNS topics are all created automatically. (IaC – Infrastructure as Code – is awesome!)
Also note that the first time you run the deploy command, SAM will create a samconfig.toml file to save your answers for subsequent deployments. After you deploy the first time, you can drop the --guided parameter of sam deploy for future deployments.
Once that stack has successfully deployed, you can continue on to the other three “downstream” stacks and repeat the same process as above…
The downstream stacks are optional, but certainly recommended. If you want to choose one to start, SaveAPIResponseToS3 is the most straightforward.
5. Generate test files
Back in the code base, open a terminal window and go into tools/test-file-generator.
Here is the node command to generate a new file:
The last two arguments allow you to select csv or json and then the number of messages.
Start with: node generate-test-file.js csv 10
Look in the csv/ directory and you should see a new csv file. Your test file should look like this:
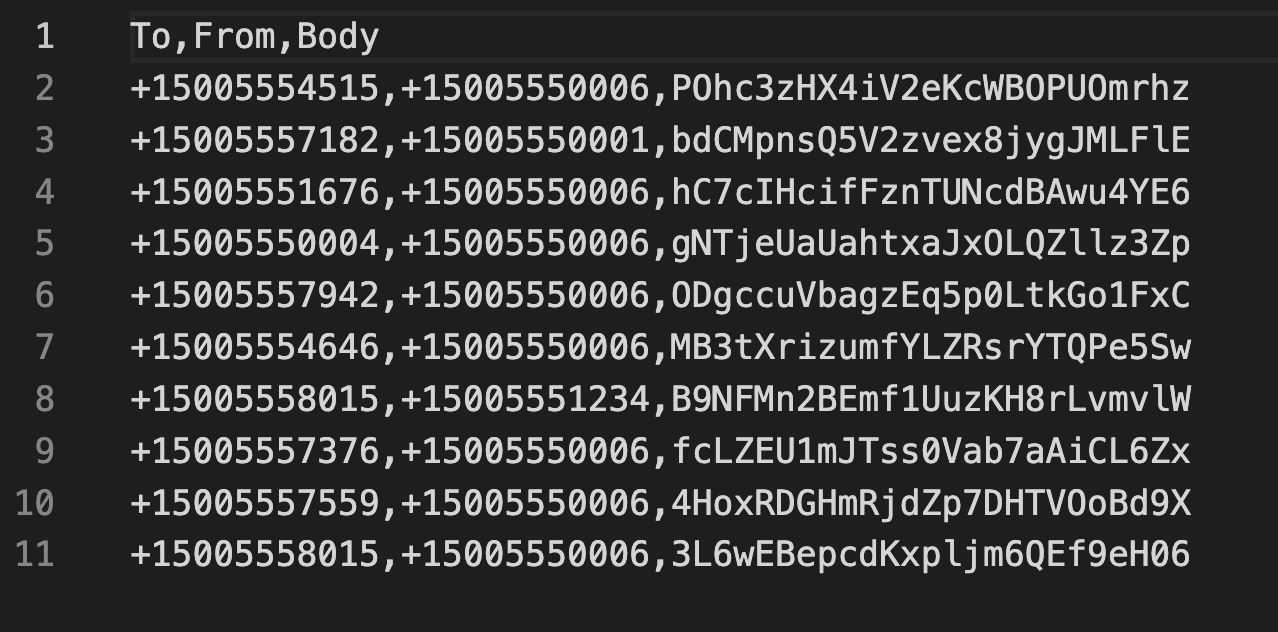
The test file generation script uses Twilio Magic Numbers for both the TO and FROM numbers. These numbers allow you to simulate success and error cases.
6. Try it out!
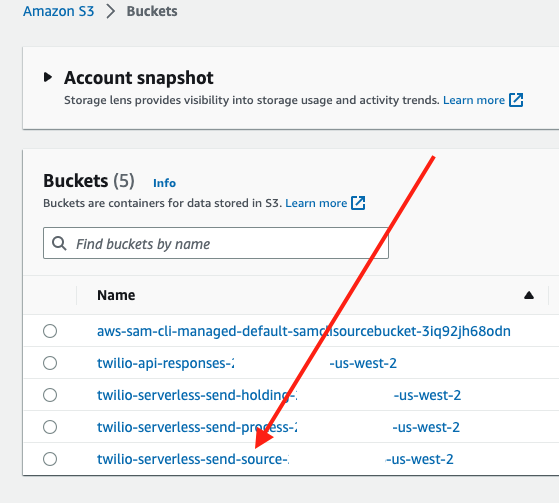
In the AWS console, navigate to S3. Select the SOURCE S3 bucket…
…and then click the UPLOAD button and then add the test CSV file you just created…
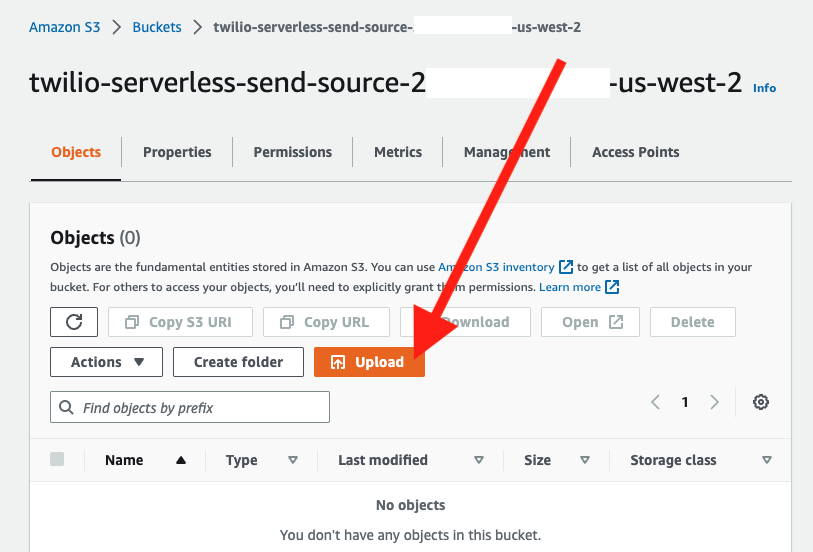
That will kick things off!
You can check the logs of the lambda files and the step function to see them processing the request.
You can also navigate to the api-responses S3 bucket and you will start to see the API responses showing up…
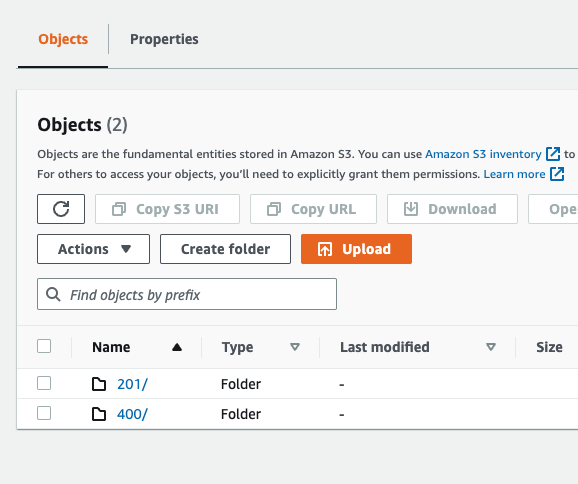
Since you are using Magic Numbers, you should see 201, 400, and 429 errors. Click into the folders and you can view individual responses!
You now have a Serverless System that makes API Calls to Twilio at a set metered rate AND with the ability to record, monitor, and act on API responses – awesome!
What about retries?
Sometimes API calls don’t go through. Network events or “transient failures or faults” can occur, causing an API call to fail when it otherwise would have succeeded. In addition, Twilio can reject API calls when limits are reached – typically resulting in 429 errors. How do we handle these cases?
A benefit of using managed services from AWS, such as SQS and Lambda, is that retry logic is built in and configurable. For the purpose of this system, that means that Lambda executions and delivery of SQS messages will be automatically retried if there are “transient faults”, resulting in each API call entered into this flow being made only once. In the event that an API call is not completed even after retries, they will be routed to an SQS Dead Letter Queue for additional handling.
Once an API call to Twilio has been successfully made from this AWS solution, the response from Twilio is made available to the downstream processors. 429 responses back from Twilio occur when API calls that would otherwise be accepted by Twilio, are instead rejected temporarily because of a spike in demand.
One of the reasons for using a queue based system like this one is to avoid these 429 errors. API requests to Twilio are made at a metered rate that avoids overwhelming your Twilio account and product rate limits. However, should 429 errors occur, a downstream processor can be configured to retry API calls that receive 429 responses.
The CheckAPIResponseForErrors stack can look for 429 responses, route them to a lambda to configure additional processing to put them back into the queue. For example, calls that receive 429 responses could be appended to a JSON object saved in S3 and the JSON object could be submitted to this process once the original batch has finished processing.
Alternatively, the last step of the Step Function could check the responses saved to S3 or to DynamoDB and pull out any 429 errors and resubmit them into a new process.
The bottom line is that AWS will make sure that API calls put into this system will be accounted for (either processed or sent to DLQ) and all successful responses from Twilio can be checked and retried if needed. And, since you will be making API calls at a metered rate, you should avoid 429 responses in the first place!
Customization, developing, and debugging
Building applications with AWS SAM takes a little practice but can be very efficient. In addition, writing code in an IaC paradigm means that you end up with solutions that are straightforward to deploy. Dig into the Cloudwatch logs to debug and explore.
For debugging Lambda functions, go to the AWS Console, and then select a lambda. Click on the Monitor tab and then the View logs in CloudWatch button as shown here:
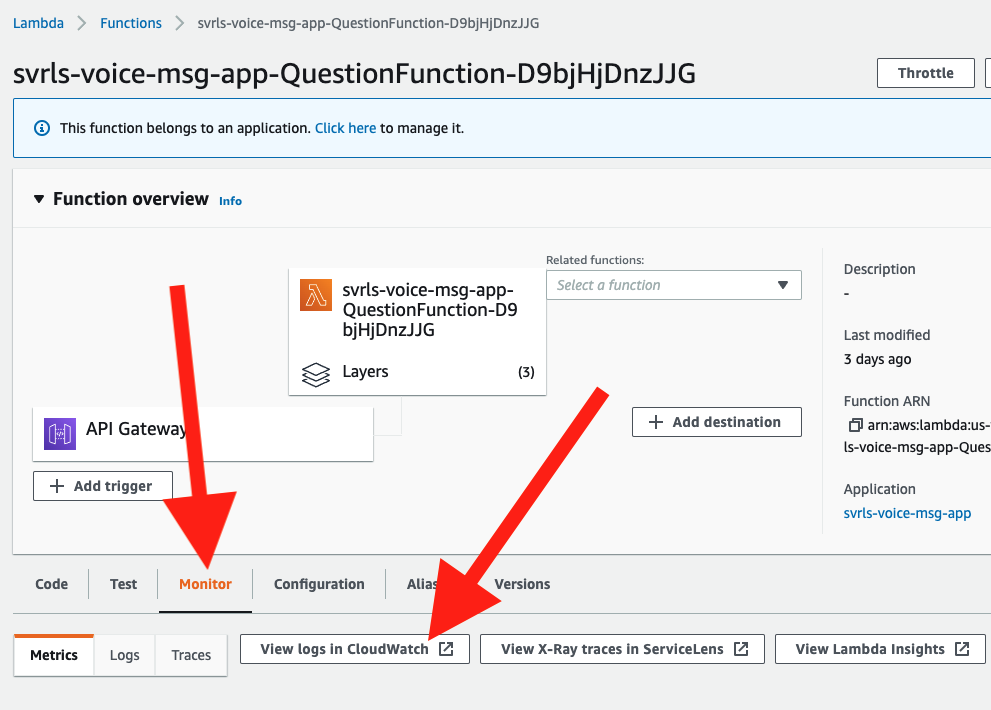
This will give you access to logs from all executions of this function. Note that runtime data and data from the console.logs will show up in the logs to help you build and debug.
This system is set up to call our Messaging API but it could be used to hit any other Twilio API (Programmable Voice, Studio, Verify, Lookup…).
Can I see it in action? How about 100,000 API Calls?
Certainly! The video below shows how to set the API Calls Per Second to 50 and then shows a test processing a JSON file containing 100,000 API calls.
If you plan on sending high rates of API calls, see our guide on scaling your voice application. The general guidance is also applicable for our other channels.
What about calling different APIs?
You bet! The video below shows calling 4 different Twilio endpoints (Messaging, LookUp, Verify, and Studio) from the same input file... take a look:
Cleanup
To avoid any undesired costs, you can delete the application that you created using the AWS CLI and the console.
First, delete the S3 buckets. From the S3 “home” page, first empty the buckets by selecting the bucket and then select the EMPTY option. Next, delete the actual bucket by selecting the bucket and then the DELETE button.
Next, delete the stack from CloudFormation in the AWS console. Select the DELETE STACK option. AWS SAM also creates a stack and an S3 bucket to manage deployments. You can delete them from CloudFormation in the AWS console following the same procedure as above.
Deploy to production
While you can get this system working pretty quickly, it is not ready for your production environment. Be sure to customize and refine this codebase for your needs, thoroughly test your version of this system in your environment, and configure error handling.
Conclusion
In short order you have the foundation for a serverless system to call Twilio APIs at a specific metered rate.
Next up – how are you going to trigger these API calls? Dropping a JSON or CSV file into an S3 bucket is a pretty straightforward task. You could add this to an existing application, or to a scheduled job, or even build a GUI to enable sending to large lists.
How many calls do you need to make? Try making 1,000, 10,000, or even 100,000 API calls (you can use the test credentials and the Messaging endpoint) to see how the system can scale to meet your needs.
More sophisticated error handling. What do you currently do if you send a message to a landline? Check for specific errors (such as 429 errors). Add a lambda to update your records to not send messages to numbers after receiving landline (or other) errors.
Use other Twilio APIs. The code in this project points to the Messaging API. As shown starting at line 80 in aws_stacks/TwilioServerlessAPICall/lambdas/send-message/app.mjs, you could extend this system to include an API parameter and hit different Twilio endpoints per object! Watch a demo calling 4 endpoints from one input file. You could send SMS, emails, or outbound voice calls, hit our Lookup API, or start a Studio Flow on a per object basis! Pretty cool!
Finally, because of the benefits of serverless computing (speed, cost, agility), this template could be a terrific way to build a POC for projects of any size.
What else?
Customize this code base for your environment. Here are some ideas:
- Build a UI to enable users to drop CSV or JSON files into the S3 bucket to initiate sends.
- Push JSON objects saved to S3 to your data analytics platform, data lake, data warehouse.
- Build queries to the DynamoDB instance to look up specific data or run queries in real time.
- Load the api responses into a relational database instead of DynamoDB.
- Customize the error handling to update your customer database when you received specific errors (landline, unreachable).
- Set up notifications when you receive service level errors like message filtering by the carriers.
- To save costs, consider adding lifecycle policies on the S3 buckets so objects are deleted after set time periods. You could also set TTL’s on items saved in DynamoDB.
- Combine this code with the Serverless Status Callback Handler for a more complete solution!
Dan Bartlett has been building web applications since the first dotcom wave. The core principles from those days remain the same but these days you can build cooler things faster. He can be reached at dbartlett [at] twilio.com.

Related Resources
Twilio Docs
From APIs to SDKs to sample apps
API reference documentation, SDKs, helper libraries, quickstarts, and tutorials for your language and platform.
Resource Center
The latest ebooks, industry reports, and webinars
Learn from customer engagement experts to improve your own communication.
Ahoy
Twilio's developer community hub
Best practices, code samples, and inspiration to build communications and digital engagement experiences.