Calling Rails 5: Getting started with Twilio on Rails
Time to read:
May 09, 2016
Written by
This post is part of Twilio’s archive and may contain outdated information. We’re always building something new, so be sure to check out our latest posts for the most up-to-date insights.

I’m sad I missed RailsConf 2016 in Kansas City but it got me thinking about Rails again. Rails 5 RaceCar 1 was just released and there is a release candidate around the corner, so it’s about time to see how it plays with Twilio.
Let’s build a quick Twilio application with Rails 5. You’ll need Ruby installed, a Twilio account and a Twilio number. If you don’t already have one, you can sign up for a free Twilio account now. If you want to test this locally, you’ll need ngrok too. I’m a big fan of ngrok and I’m sure you will be too.
A brand new set of tracks
We’ll start by installing Rails 5. Open up your terminal and get yourself the latest and greatest.
Let’s create a new Rails application.
We can check out a new feature of Rails 5 already at this point by running the tests with the new, all encompassing rails command.
Sure, we have no tests and if you’ve been using Rails 4 it looks the same as the old rake test command, but the difference is that in Rails 5 all commands will live under the rails command instead of some under rails and some under rake. We can’t see it yet, but the test runner has actually picked up some very nice upgrades along the way as well.
We can run our Rails server at this point too. Just enter:
on the command line and open up http://localhost:3000.
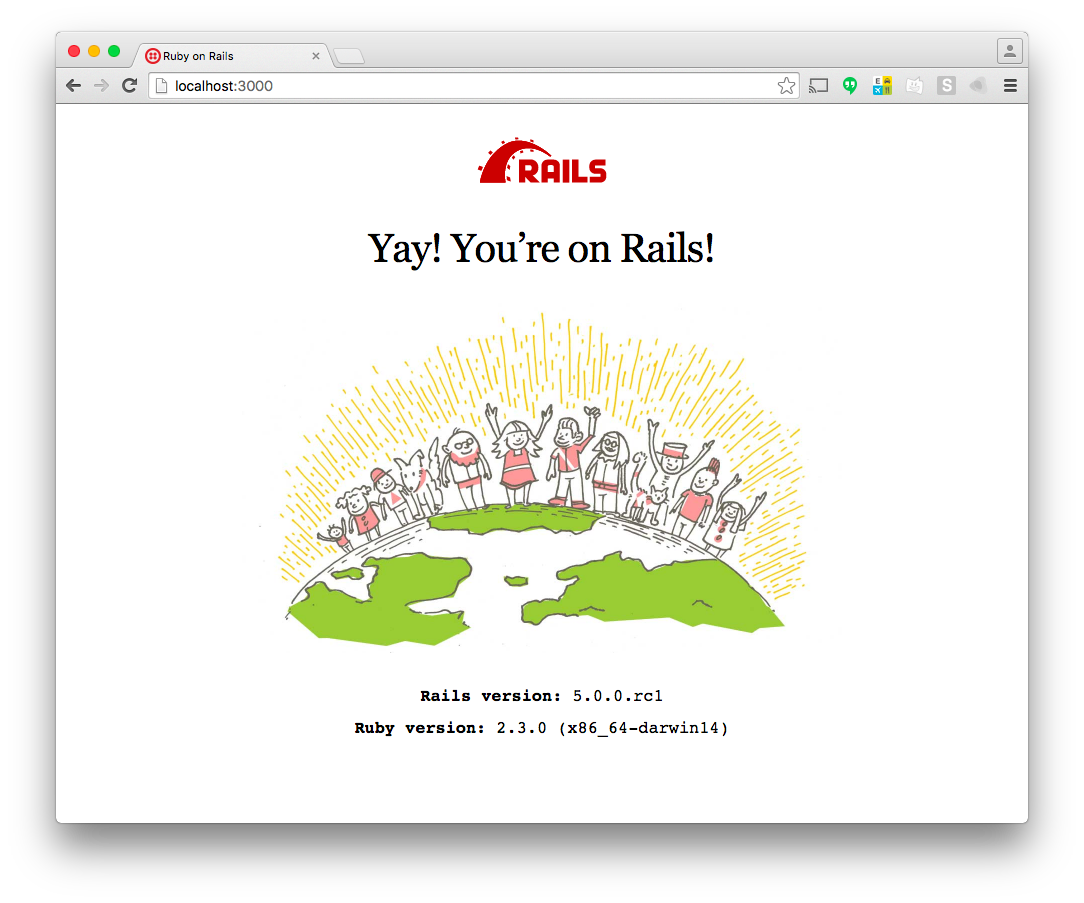
Yay! Check out the new branding and illustration for the successful install page.
Adding gems
Certain things haven’t changed with this latest version of Rails. To add the twilio-ruby gem, stop the server then open up the Gemfile, add the line:
and install the gem using Bundler.
Taking control
To get our Twilio app off the ground, we’re going to need a controller.
Open up app/controllers/twilio_controller.rb and let’s build a voice endpoint for our Twilio number. The idea is that when a call is made to our Twilio number, Twilio will send an HTTP request to our application to ask what to do with it. This action will respond to that request with the instructions in TwiML, which is a set of XML tags and attributes that Twilio understands.
First, we need to disable verifying the Rails authenticity token. This is intended to stop CSRF attacks, but that doesn’t apply when we’re expecting to receive a webhook from an external service. We also have our own way of verifying a request came from Twilio using Rack middleware.
Now we can write an action to respond to an incoming phone call. We’re going to build up some TwiML to speak a response to us down the phone, send us a congratulatory SMS message and play us out with a favourite tune.
We’re using the Twilio Ruby library’s TwiML builder (which is actually based on the builder gem) to generate our XML which we then render with the correct content type using the Rails render method.
Routing requests
In order to serve our request from Twilio, we’ll need a route too. Open up config/routes.rb and enter:
Now a POST request to our application at the path /twilio/voice will route through to the action we just wrote. Start the server and we’ll get Twilio POSTing those requests.
Tunnelling with ngrok
We need to make our local application available to the internet so that Twilio can get through to it. I like using ngrok to do this, so I just open a new terminal window and type:
When ngrok starts, it looks like this. Grab the URL you can see, we’re going to need that right away.
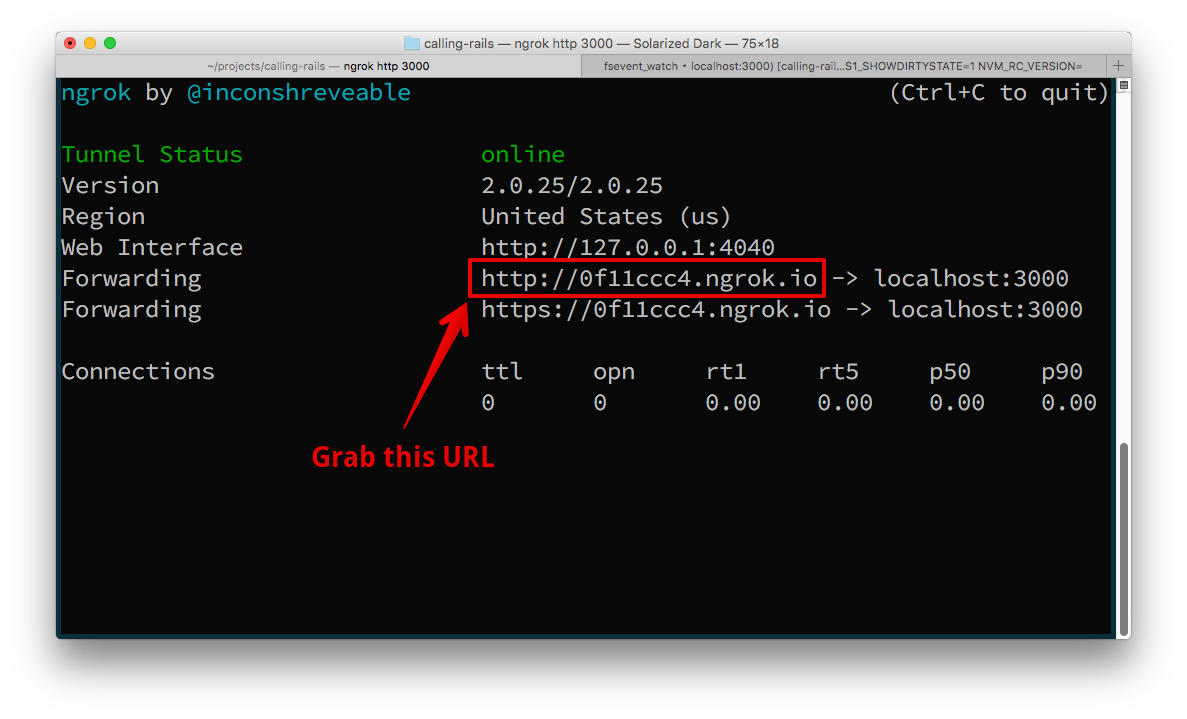
We need the URL, along with the route we created earlier, so that we can tell Twilio what URL to call when we phone our number. Jump into your Twilio console, find or buy a number that you want to use for this (make sure it can receive phone calls) and edit the number.
Find the Voice section, make sure you have Webhooks/TwiML selected as your configure option. Then, for when a call comes in, enter the full URL to your voice action.

Save the settings, whip out your phone and dial up your number. Soon enough you’ll be hearing the celebratory tones of a successful Twilio call.
Rocking on Rails 5
Now we’ve built our first Rails 5 and Twilio app there’s much more to be done. You could read up on all the other changes between Rails 4 and 5, particularly the brand new, real time ActionCable. It seems like a useful candidate for making a snappy user interface for two factor authentication with Authy OneTouch.
If you want to talk more about Ruby, Rails and communications then SIGNAL is the place to be. Not only are there over a hundred sessions on topics from real time communications to security and even bots, but we have two members of the Rails Committers team speaking. Eileen Uchitelle will be covering common software vulnerabilities and Sean Griffin will be diving into the hidden semantics of the code we write. I’ll be there too, and while I haven’t managed to get a commit into Rails yet, I do have a promo code that will get you 20% off to join Eileen and Sean in just two short weeks. Register now and use the code PNASH20 at checkout.
I hope to see you at SIGNAL. If you need me before, just drop me a comment below, hit me up on Twitter or grab me over email.
Related Resources
Twilio Docs
From APIs to SDKs to sample apps
API reference documentation, SDKs, helper libraries, quickstarts, and tutorials for your language and platform.
Resource Center
The latest ebooks, industry reports, and webinars
Learn from customer engagement experts to improve your own communication.
Ahoy
Twilio's developer community hub
Best practices, code samples, and inspiration to build communications and digital engagement experiences.