Capturing Studio Flow Progress with Segment
Time to read:
June 16, 2021
Written by
Reviewed by

The objective of this blog post is to show how you can leverage Segment to capture and track progress through Studio Flows. In this case we will adapt our standard Appointment Reminder Studio Flow Template to track feedback in Segment using Functions. This will allow us then to leverage
What’s Required
To complete this you’ll need a Twilio Account with a phone number and a Segment account that has Functions enabled.
How it works
Here we’re using Studio HTTP Request Widget to call a Segment Source Function. We will trigger the Studio Flow using the REST API, but this could be tied into any backend system that you have. At each stage of the flow, initiation, cancellation or confirmation, we will update Segment via the HTTP Request Widget.
Steps
In order to set up and test this integration we will first configure a test webhook from the Studio flow to confirm the webhook is sending the right information across to Segment Functions. Then we will complete the rest of the flow with the Production function link.
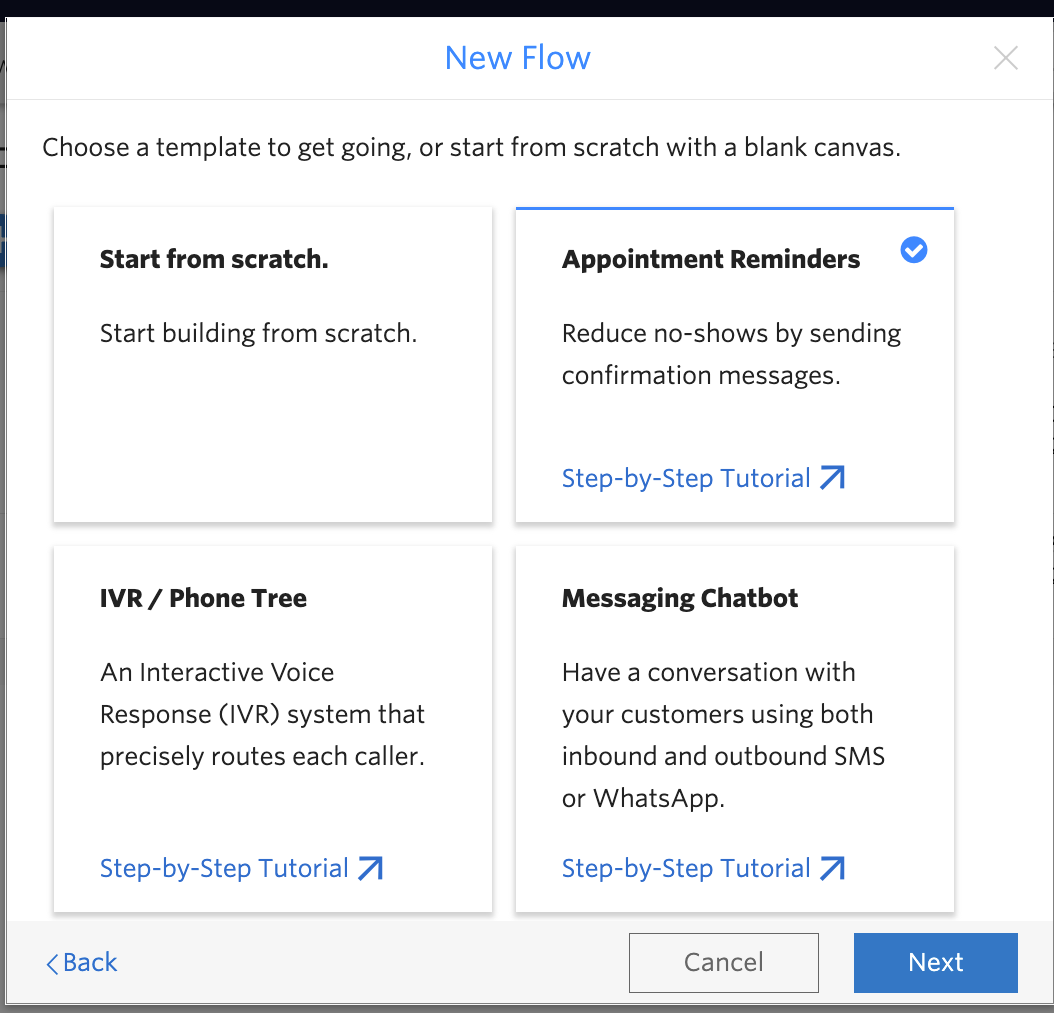
Our first step is to create the initial Studio Flow. The easiest way to do this is to select “Create a Flow” from the Studio dashboard and select the Appointment Reminders Template as shown below. Alternatively, you could build out the Flow from scratch following the tutorial.
Next we’re going to disconnect the ‘confirm_appt’ widget from the Trigger and add a new ‘Make HTTP Request’ widget to the flow. We’ll connect the HTTP Request to the REST API Trigger as shown below. We will use this to go through the Segment Function setup without needing to trigger SMS or other parts of the Studio flow.
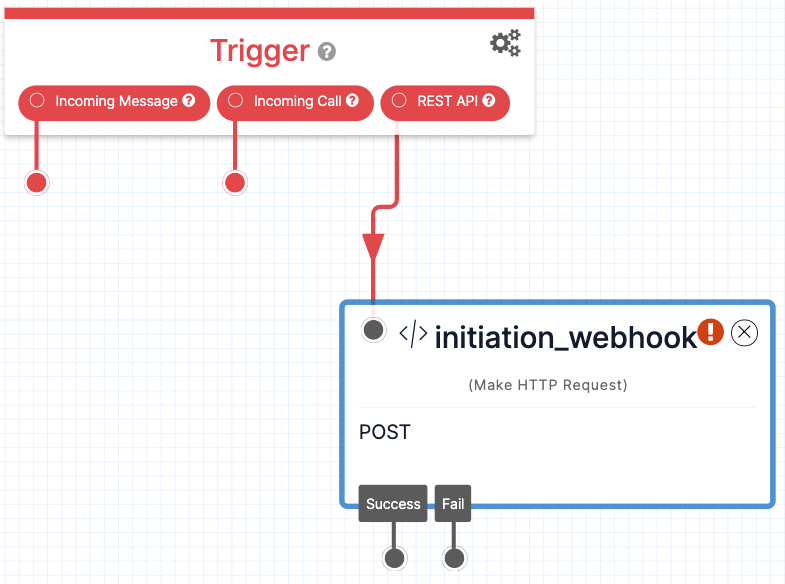
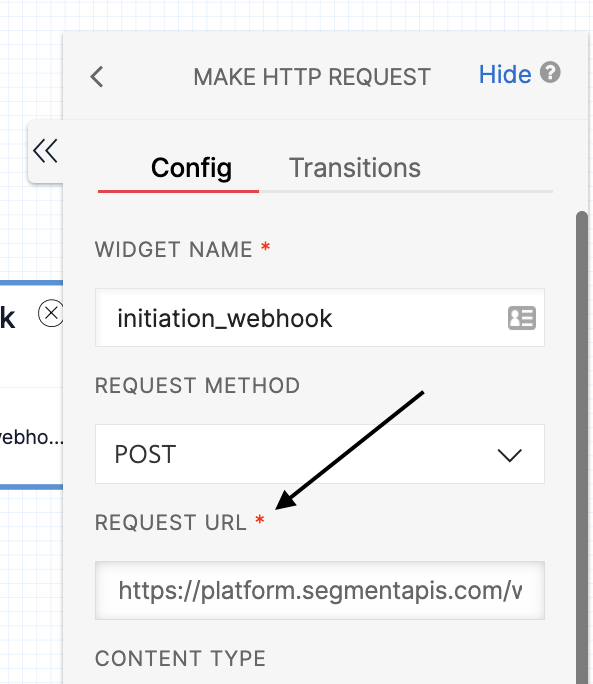
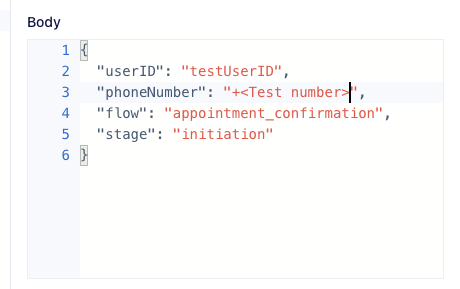
We will name this widget “initiation_webhook”. Set the Content Type to “Application/JSON” and the request body to the content shown below:
We will leave the “REQUEST URL” blank for now as we will obtain that from Segment.
At this point we need to head over to Segment, and we need to set up our Segment Source Function to receive the incoming Webhook from Studio. So head over to Segment and navigate to “Connections” in your workspace.
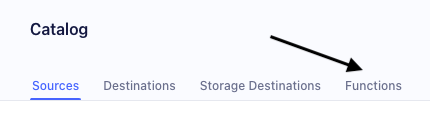
Select “Add Source”. Then in the Catalog view switch to the Functions Tab (as shown in the image below), and select “New Function”, pick “Source” as the function type, and click “Build”.
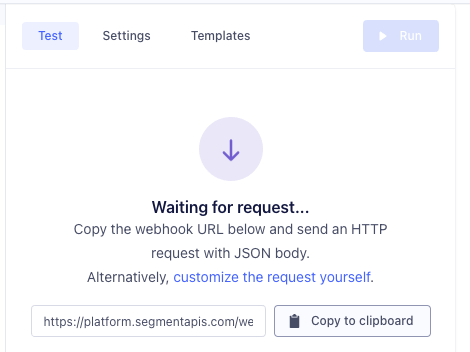
Next you’ll be presented with the function view. Here you’ll want to head over to the top-right corner and hit the “Copy To Clipboard” button. This will give you a URL of the form starting with https://platform.segmentapis.com/webhook.
Now switch back to the Studio Flow and paste this URL into the REQUEST URL field of the Make HTTP Request Widget you started earlier. Hit “Save” and then publish the Studio flow.
Now we can test that we are sending the correct information over by triggering the Studio Flow. There are several ways to trigger a Flow using the Executions API, including directly calling via curl or Postman. In this case I am going to use the Twilio CLI and specify a test userID as shown below. You can grab the Flow SID from the list of Flows page and pick one of your Twilio phone numbers to send the message from.
Within a few seconds of executing the flow you should see the data in the Segment console on the right hand side as shown below.
Now that we’ve confirmed the data is flowing to our Segment test endpoint we can replace the default function with our code. We’re going to track these as ‘Studio Flow Steps’ and include the phone number, flow name and stage as properties.
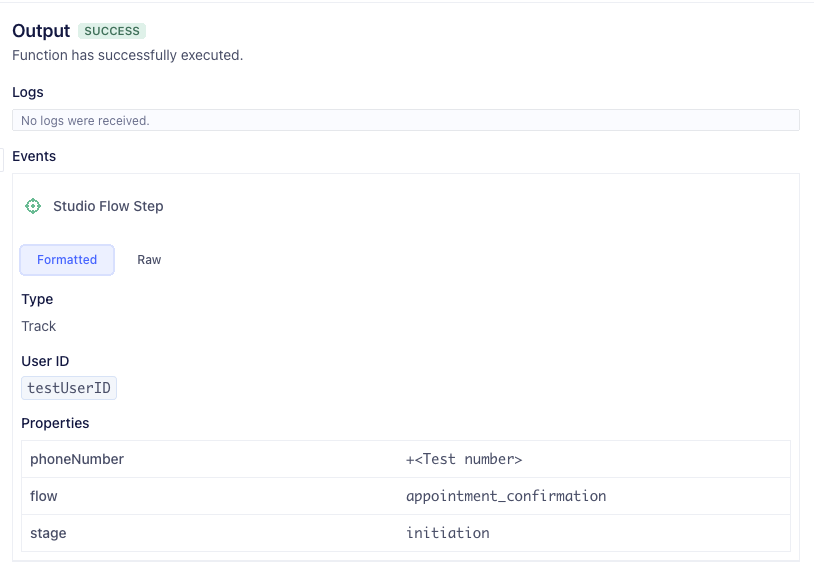
Once you’ve updated the function you can click “Run” in the top right hand corner to check if your function works and creates a valid event. You should get an output similar to the below.
Once you’ve confirmed that the function is behaving correctly you can go ahead and click “Configure”.
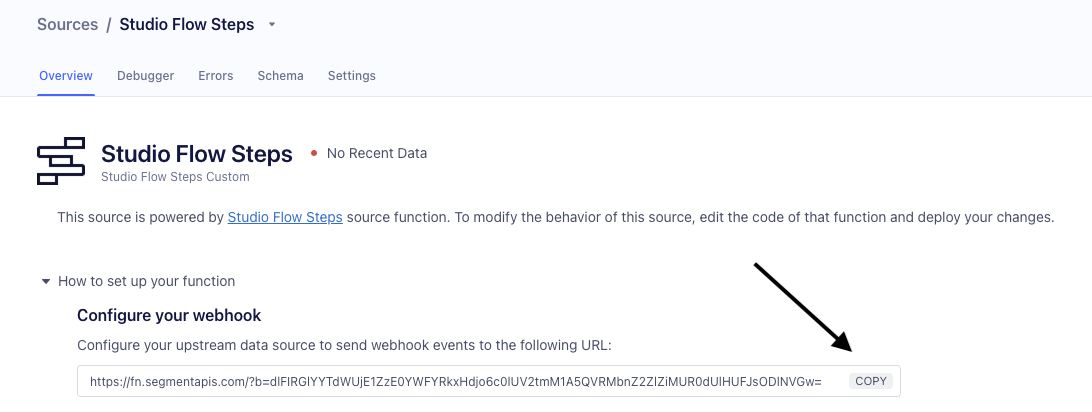
Once this is completed you’ll need to go through the steps of connecting this by selecting “Connect Source” and following the prompts. Once completed you’ll need to copy the webhook URL displayed and save it somewhere. This time the URL will begin with https://fn.segmentapis.com
Now it is time to head back into Studio and finish setting up our end-to-end flow.
First step is to replace the REQUEST URL in the Make HTTP Request widget we tested with above with the new webhook URL you just copied.
Connect the “Success” Output of the “initiation_webhook” widget to the input of the “confirm_appt” widget.
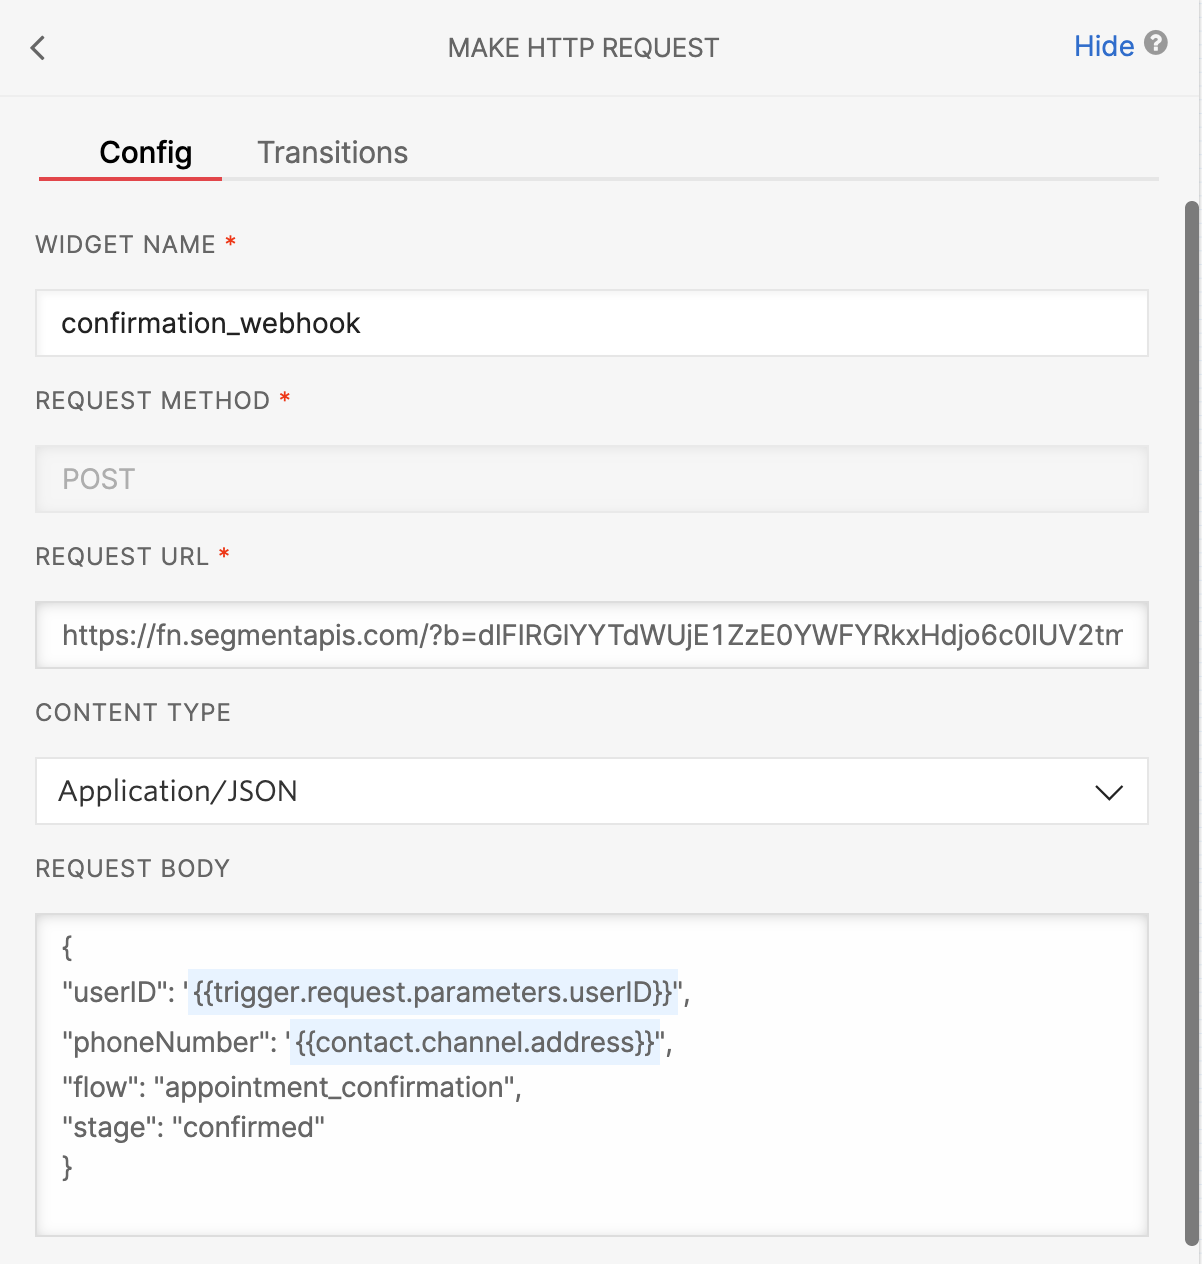
Next update the configurations on the “confirmation_webhook” and “cancellation_webhook” widgets. To do this, copy and paste the request body from the “initiation_webhook” and update the stage to either “confirmed” or “cancelled” depending on the widget. Also, update the Request URL to point to the Segment Webhook and be sure to select the correct Content Type of “Application/JSON” as shown below.
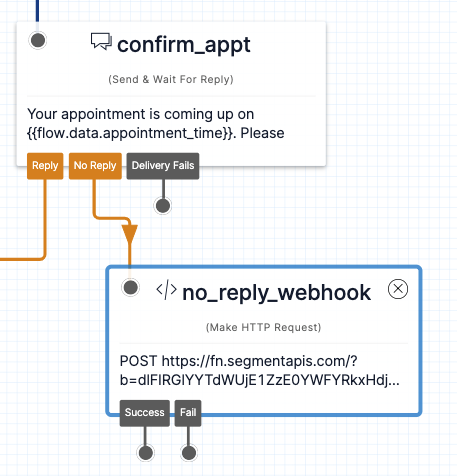
In order to fully capture all of the execution paths I also recommend adding another HTTP Request Widget connected to the “No Reply” outbound of confirm_appt widget, and set the request body to include the stage “no_reply” as shown below.
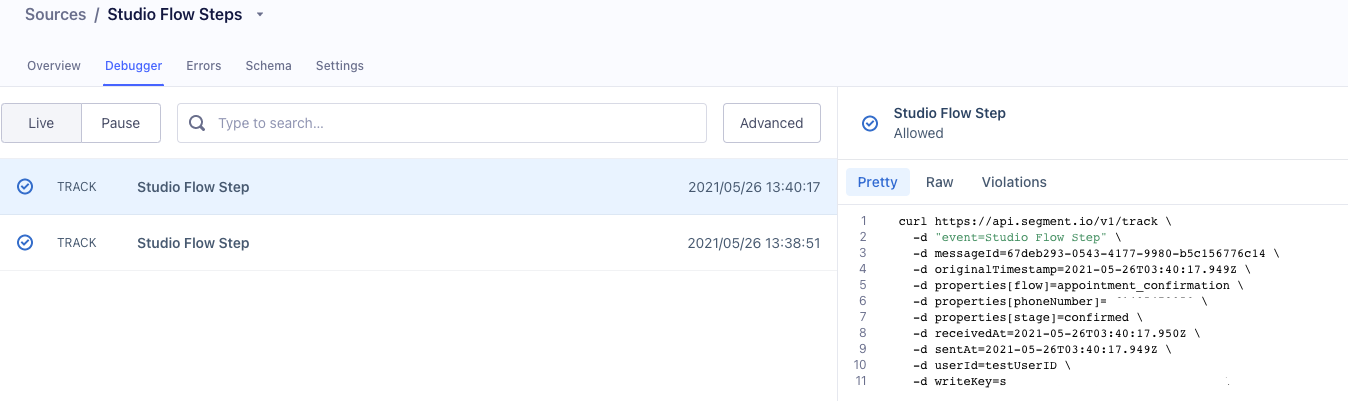
Once you’ve updated everything in the Flow and published it you can run a test execution and view it in the Segment Source Debugger. You should see two Track events for each execution and you should see the properties passed through successfully as shown in the image below.
Leveling Up - Automated Escalation
Now that we have our events successfully arriving inside Segment we have a number of options, including building out custom audiences based on the responses, or triggering escalations if responses haven't been received. These options include:
- Leverage the Make Outgoing Call Studio widget to escalate to a call when the No Reply time out is hit.
- Create Segment Destination Function that triggers an escalation action such as an email, phone call or task for an agent to confirm the appointment. An example of how to create such a destination function can be seen in the following blog post: How to Send Personalized SMS Using Segment & Twilio.
- Using Segment Personas to create audiences and track people for follow up.
Toby Allen is a Twilio Solutions Architect focused on supporting business with the most complex communications, regulatory and security needs. He has worked in communications for 15 years and communications APIs for 4. He believes communications should be tightly integrated into all aspects of business, is a CISSP & CCSP and is active on Twitter @tobyallen and LinkedIn.
Related Posts


Related Resources
Twilio Docs
From APIs to SDKs to sample apps
API reference documentation, SDKs, helper libraries, quickstarts, and tutorials for your language and platform.
Resource Center
The latest ebooks, industry reports, and webinars
Learn from customer engagement experts to improve your own communication.
Ahoy
Twilio's developer community hub
Best practices, code samples, and inspiration to build communications and digital engagement experiences.