Add Christmas Face Masks to Twilio Video using TensorFlow and WebGL

December 06, 2022
Written by
Eluda Laaroussi
Contributor
Opinions expressed by Twilio contributors are their own
Reviewed by

Christmas face masks twilio video header

This article is for reference only. We're not onboarding new customers to Programmable Video. Existing customers can continue to use the product until December 5, 2024.


We recommend migrating your application to the API provided by our preferred video partner, Zoom. We've prepared this migration guide to assist you in minimizing any service disruption.

Introduction

The Golden Rule says that “it’s better to give than to receive” and December is the perfect time of the year to share our best. Kick off the Holiday Season by using your coding skills to add your own touch to Twilio’s React demo and build a new feature that enables live face mask effects, so you can surprise your friends and family by wearing a virtual Santa mask!

Demo of final app

Prerequisites

You’ll be using Twilio Video for this project, so you must have some credits in your account. When you create a new account, Twilio gives you a free trial of $15 that you can use for this tutorial.

When it comes to this tutorial, all of your focus will be placed on the Twilio Video conferencing itself. As such, you’ll be using Yoshiteru’s face landmarks implementation as it covers all the data science and computer graphics complexities.

Clone the Twilio React demo

Start-up this project by cloning Twilio’s React demo into your computer. Navigate to your terminal and enter the following command:

git clone https://github.com/twilio/twilio-video-app-react christmas-conf
cd christmas-conf

It’s also important that you’re working on the same version of the demo that this tutorial is based on:

git reset --hard 0711b6be64151608cc661eb1f2046452fe77e158

After that’s done, install the project’s dependencies:

npm install

And just like that, the demo’s fully downloaded on your computer!

Next up’s configuration; start by creating a .env file at the root of the project:

touch .env

Your credentials are securely stored in your Twilio dashboard. Open the console page and take note of the Account SID.

Twilio Account SID

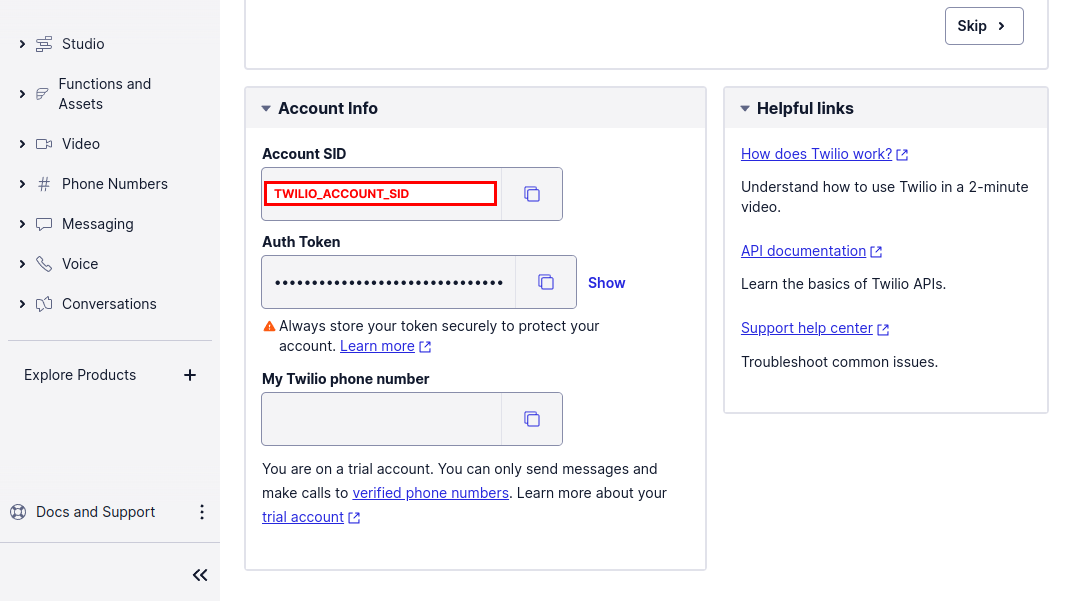
Open up your .env file in your preferred IDE and copy in the following code into the file:

TWILIO_ACCOUNT_SID=XXXXX

Don’t forget to replace the XXXXX placeholders with your token. Then, head over to the API Keys section under Programmable Video Tools to create a new key. 

Twilio API Key SID and Secret

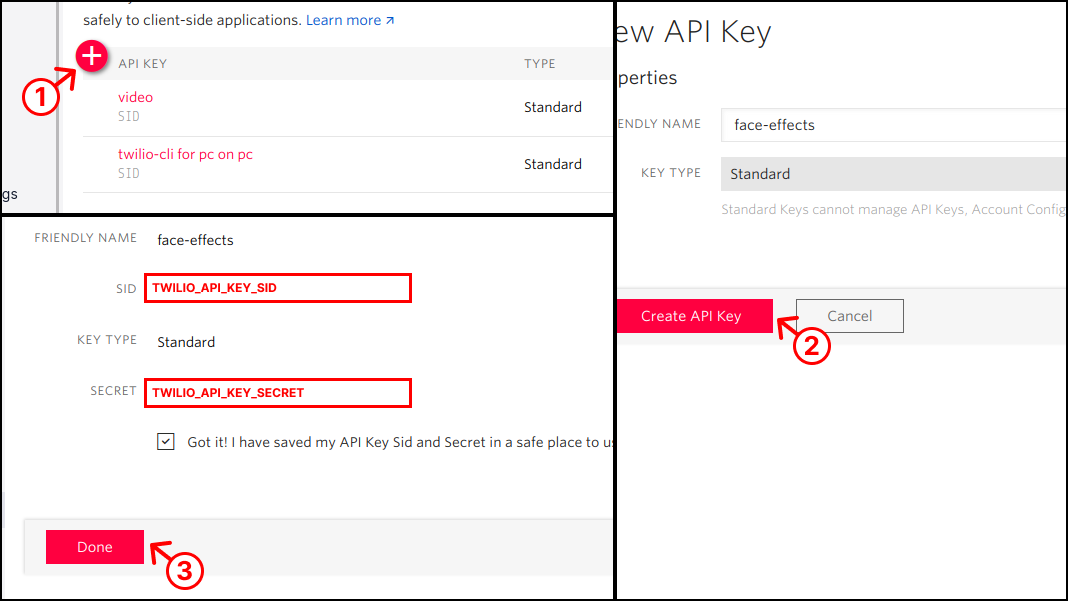
Paste its SID and Secret into the .env file:

TWILIO_API_KEY_SID=XXXXX
TWILIO_API_KEY_SECRET=XXXXX

After that, head over to the Services section of Twilio Conversations and create a new Conversations service.

Twilio Conversations Service SID

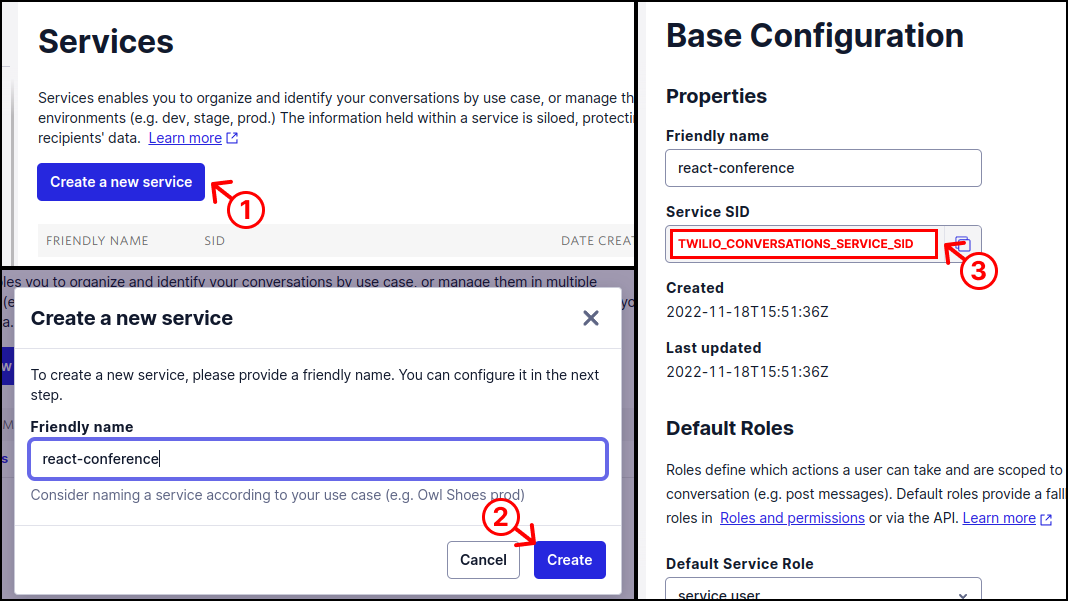
Paste its Service SID into the .env file:

The Twilio Conversations token is used to add support for text chat. It’s already been built into this demo app.

TWILIO_CONVERSATIONS_SERVICE_SID=XXXXX

And that’s it for configuration! Navigate back to your terminal and run the app locally to make sure that everything works:

npm start

It will take a few moments for the application to start. Once the application has started, you’ll be redirected to localhost:3000 which is where the app will be hosted.

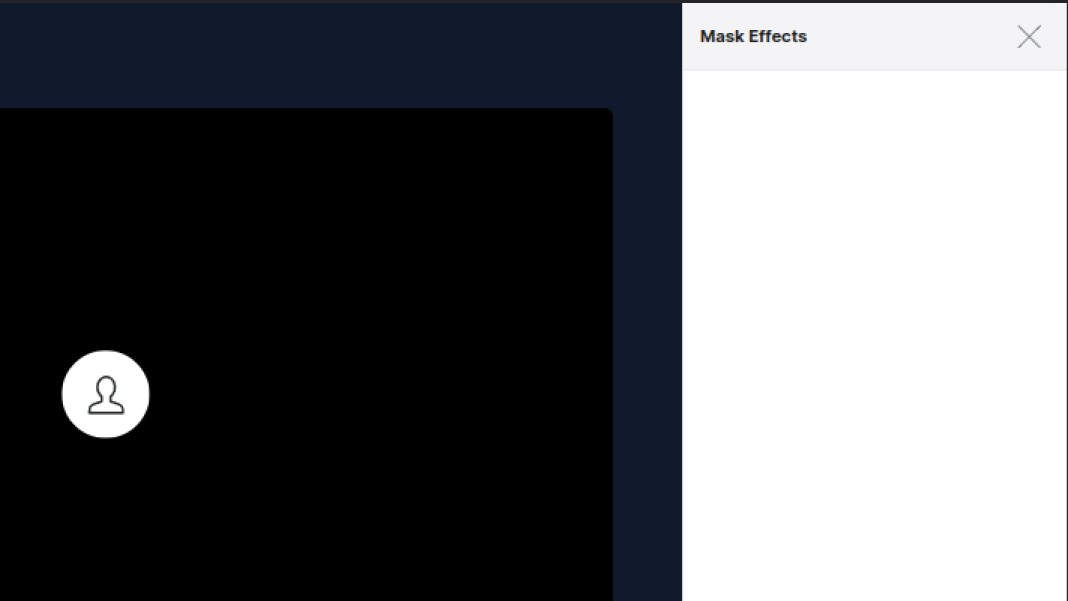
Create the Mask Effects Selection Dialog

Adding the face effects button to the menu

The face mask effects menu button.

You’ll need a way to have users enable and choose face effects. In this section you’ll be adding a button in the react app just for that.

You’ll want to place the face effects button below the Backgrounds button in the More menu. The component for the More menu can be found in the following directory: /src/components/MenuBar/Menu/Menu.tsx.

You can add the masks button by adding the highlighted code below the Backgrounds component:


…
{isSupported && (
         <MenuItem
           onClick={() => {
             setIsBackgroundSelectionOpen(true);
             setIsChatWindowOpen(false);
             setMenuOpen(false);
           }}
         >
           <IconContainer>
             <BackgroundIcon />
           </IconContainer>
           <Typography variant="body1">Backgrounds</Typography>
         </MenuItem>
       )}

       {isSupported && (
           <MenuItem
             onClick={() => {
               // TODO: open face effects dialog.
               setIsBackgroundSelectionOpen(false);
               setIsChatWindowOpen(false);
               setMenuOpen(false);
             }}
           >
             <IconContainer>
               <MaskIcon />
             </IconContainer>
             <Typography variant="body1">Face Effects</Typography>
           </MenuItem>
       )}
…

You’ll also need to import the mask icon for button; enter the following code at the top of the file:

import MaskIcon from "../../../icons/MaskIcon";

You’ll also want to create a new component called MaskIcon, stored in the /src/icons/MaskIcon.tsx file. Create a new file named MaskIcon.tsx within the /src/icons directory and enter in the following code:

import React from 'react';

export default function MaskIcon() {
  return (
    <svg width="20" height="20" viewBox="0 0 191 115" fill="none" xmlns="http://www.w3.org/2000/svg">
      <path
        d="M95.6998 0C-36.3889 0 -11.0127 115 48.4093 115C60.317 115 71.5293 108.804 78.6769 98.2711L86.3557 86.9538C91.0292 80.0687 100.373 80.0687 105.047 86.9538L112.726 98.2711C119.87 108.804 131.083 115 142.99 115C199.652 115 229.725 0 95.6998 0V0ZM54.9123 73.1807C42.6584 73.1807 34.6901 65.4961 31.0134 60.8871C29.4525 58.9315 29.4525 56.0685 31.0134 54.1099C34.6901 49.4979 42.6554 41.8163 54.9123 41.8163C67.1691 41.8163 75.1344 49.5009 78.8112 54.1099C80.372 56.0655 80.372 58.9285 78.8112 60.8871C75.1344 65.4991 67.1661 73.1807 54.9123 73.1807ZM136.087 73.1807C123.834 73.1807 115.865 65.4961 112.188 60.8871C110.628 58.9315 110.628 56.0685 112.188 54.1099C115.865 49.4979 123.831 41.8163 136.087 41.8163C148.344 41.8163 156.31 49.5009 159.986 54.1099C161.547 56.0655 161.547 58.9285 159.986 60.8871C156.31 65.4991 148.341 73.1807 136.087 73.1807V73.1807Z"
        fill="#606B85"
      />
    </svg>
  );
}
The face effects selection dialog.

You should start by creating the dialog component itself; this will be stored in a file called MaskSelectionDialog.tsx within the /src/components/MaskSelectionDialog/ directory. Create the /MaskSelectionDialog directory, then create the MaskSelectionDialog.tsx within it and add the following code:

import React from "react";
import MaskSelectionHeader from "./MaskSelectionHeader/MaskSelectionHeader";
import Drawer from "@material-ui/core/Drawer";
import { makeStyles, Theme } from "@material-ui/core/styles";
import useVideoContext from "../../hooks/useVideoContext/useVideoContext";

const useStyles = makeStyles((theme: Theme) => ({
  drawer: {
    display: 'flex',
    width: theme.rightDrawerWidth,
    height: `calc(100% - ${theme.footerHeight}px)`,
  },
  thumbnailContainer: {
    display: 'flex',
    flexWrap: 'wrap',
    padding: '5px',
    overflowY: 'auto',
  },
}));


function MaskSelectionDialog() {
  const classes = useStyles();

  return (
    <Drawer
      variant="persistent"
      anchor="right"
      open={true /* TODO: use the dialog's open state */}
      transitionDuration={0}
      classes={{
        paper: classes.drawer,
      }}
    >
      <MaskSelectionHeader
        onClose={() => {
          /* TODO: close the dialog */
        }}
      />
      {/* TODO: put mask options here */}
    </Drawer>
  );
}

export default MaskSelectionDialog;

After that, you’ll need to give the dialog a header containing a title and a close button. The code for this component goes in the /MaskSelectionDialog/MaskSelectionHeader/MaskSelectionHeader.tsx file. Create a /MaskSelectionHeader directory within /MaskSelectionDialog. Then, within the new directory, create the MaskSelectionHeader.tsx file and enter in the following code:

import React from 'react';
import { makeStyles, createStyles } from '@material-ui/core/styles';
import CloseIcon from '../../../icons/CloseIcon';

const useStyles = makeStyles(() =>
  createStyles({
    container: {
      minHeight: '56px',
      background: '#F4F4F6',
      borderBottom: '1px solid #E4E7E9',
      display: 'flex',
      justifyContent: 'space-between',
      alignItems: 'center',
      padding: '0 1em',
    },
    text: {
      fontWeight: 'bold',
    },
    closeMaskSelection: {
      cursor: 'pointer',
      display: 'flex',
      background: 'transparent',
      border: '0',
      padding: '0.4em',
    },
  })
);

interface MaskSelectionHeaderProps {
  onClose: () => void;
}

export default function MaskSelectionHeader({ onClose }: MaskSelectionHeaderProps) {
  const classes = useStyles();
  return (
    <div className={classes.container}>
      <div className={classes.text}>Mask Effects</div>
      <button className={classes.closeMaskSelection} onClick={onClose}>
        <CloseIcon />
      </button>
    </div>
  );
}

And to actually see the masks dialog, you must import it and use it in the Room component, stored in the /src/components/Room/Room.tsx file. Add the following header to the top of the Room.tsx file:

import MaskSelectionDialog from "../MaskSelectionDialog/MaskSelectionDialog";

Within the return statement of the Room() function, append the highlighted code below the <ChatWindow /> and <BackgroundSelectionDialog /> components:


export default function Room() {
…
  return (
   …
      <ChatWindow />
      <BackgroundSelectionDialog />
      <MaskSelectionDialog />
    </div>
  );
}
Face Mask Thumbnails in the Selection Dialog.

To be able to select them, you need a React hook that stores and handles modification of all mask images.

First, download some mask images into your computer:

wget https://github.com/eludadev/twilio-3d-face-masks/raw/8702f223e841e72d669f04b94ad3b4ede2a8f0eb/src/images/Santa.jpg -O src/images/Santa.jpg
wget https://github.com/eludadev/twilio-3d-face-masks/raw/8702f223e841e72d669f04b94ad3b4ede2a8f0eb/src/images/Santa2.jpg -O src/images/Santa2.jpg
wget https://github.com/eludadev/twilio-3d-face-masks/raw/8702f223e841e72d669f04b94ad3b4ede2a8f0eb/src/images/Santa3.jpg -O src/images/Santa3.jpg
wget https://github.com/eludadev/twilio-3d-face-masks/raw/8702f223e841e72d669f04b94ad3b4ede2a8f0eb/src/images/Santa4.jpg -O src/images/Santa4.jpg
wget https://github.com/eludadev/twilio-3d-face-masks/raw/8702f223e841e72d669f04b94ad3b4ede2a8f0eb/src/images/Scary1.jpg -O src/images/Scary1.jpg
wget https://github.com/eludadev/twilio-3d-face-masks/raw/8702f223e841e72d669f04b94ad3b4ede2a8f0eb/src/images/Scary2.jpg -O src/images/Scary2.jpg

If you don't have wget installed on your command line, follow the instructions shown here. You can also manually download the images on the github repository and place them within the /src/images folder.

Proceed by creating a new hook called useMaskSettings.ts and place it in the new /src/components/VideoProvider/useMaskSettings/ directory. Once you’ve created the new useMaskSettings.ts file within the /useMaskSettings directory, enter the following code in the file:

import SantaImage from "../../../images/Santa.jpg";
import Santa2Image from "../../../images/Santa2.jpg";
import Santa3Image from "../../../images/Santa3.jpg";
import Santa4Image from "../../../images/Santa4.jpg";
import Scary1Image from "../../../images/Scary1.jpg";
import Scary2Image from "../../../images/Scary2.jpg";

const imageNames: string[] = [
  "Santa",
  "Santa 2",
  "Santa 3",
  "Santa 4",
  "Scary 1",
  "Scary 2",
];

const rawImagePaths = [
  SantaImage,
  Santa2Image,
  Santa3Image,
  Santa4Image,
  Scary1Image,
  Scary2Image,
];

Next, you’ll need a function that fetches these images on-demand. It’s completely inspired by its backgrounds equivalent (in /src/components/VideoProvider/useBackgroundSettings):

let imageElements = new Map();

const getImage = (index: number): Promise<HTMLImageElement> => {
  return new Promise((resolve, reject) => {
    if (imageElements.has(index)) {
      return resolve(imageElements.get(index));
    }
    const img = new Image();
    img.onload = () => {
      imageElements.set(index, img);
      resolve(img);
    };
    img.onerror = reject;
    img.src = rawImagePaths[index];
  });
};

Following that, you have to create and export the hook itself. It will manage the mask settings and later-on you’ll also add the functionality to add and remove the face masks video processor. Again, this is all being inspired by the backgrounds variant. Place the following headers at the top of the file:

import { LocalVideoTrack, Room } from "twilio-video";
import { SELECTED_MASK_SETTINGS_KEY } from "../../../constants";
import { Thumbnail } from "../../MaskSelectionDialog/MaskThumbnail/MaskThumbnail";
import { useLocalStorageState } from "../../../hooks/useLocalStorageState/useLocalStorageState";

Place the rest of the code at the bottom of the file:

export interface MaskSettings {
  type: Thumbnail;
  index?: number;
}

export const maskConfig = {
  imageNames,
  images: rawImagePaths,
};

export default function useMaskSettings(videoTrack: LocalVideoTrack | undefined, room?: Room | null) {
  const [maskSettings, setMaskSettings] = useLocalStorageState<MaskSettings>(SELECTED_MASK_SETTINGS_KEY, { type: "none", index: 0 });
  return [maskSettings, setMaskSettings] as const;
}

Take note of the SELECTED_MASK_SETTINGS_KEY constant. It’s used to remember your face mask choice so it’s automatically used again when you rejoin a room. Give it a value in the /src/constants.ts file:

export const SELECTED_MASK_SETTINGS_KEY = "TwilioVideoApp-selectedMaskSettings";

It’s also imperative that the mask settings are available throughout the app. To achieve that, you should add it to a React context. Luckily, there’s one already made for you in the /src/components/VideoProvider/index.tsx file. Update the index.tsx file with the highlighted code:

“Context is designed to share data that can be considered “global” for a tree of React components, such as the current authenticated user, theme, or preferred language.” — React Docs


import useMaskSettings, {
  MaskSettings,
} from "./useMaskSettings/useMaskSettings";

export interface IVideoContext {
  backgroundSettings: BackgroundSettings;
  setBackgroundSettings: (settings: BackgroundSettings) => void;
  maskSettings: MaskSettings;
  setMaskSettings: (settings: MaskSettings) => void;
}

export function VideoProvider({
  options,
  children,
  onError = () => {},
}: VideoProviderProps) {
…
// Add the following line above return statement in this function
  const [maskSettings, setMaskSettings] = useMaskSettings(videoTrack, room);

  return (
    <VideoContext.Provider
      value={{
        maskSettings,
        setMaskSettings,
      }}
    ></VideoContext.Provider>
  );
}

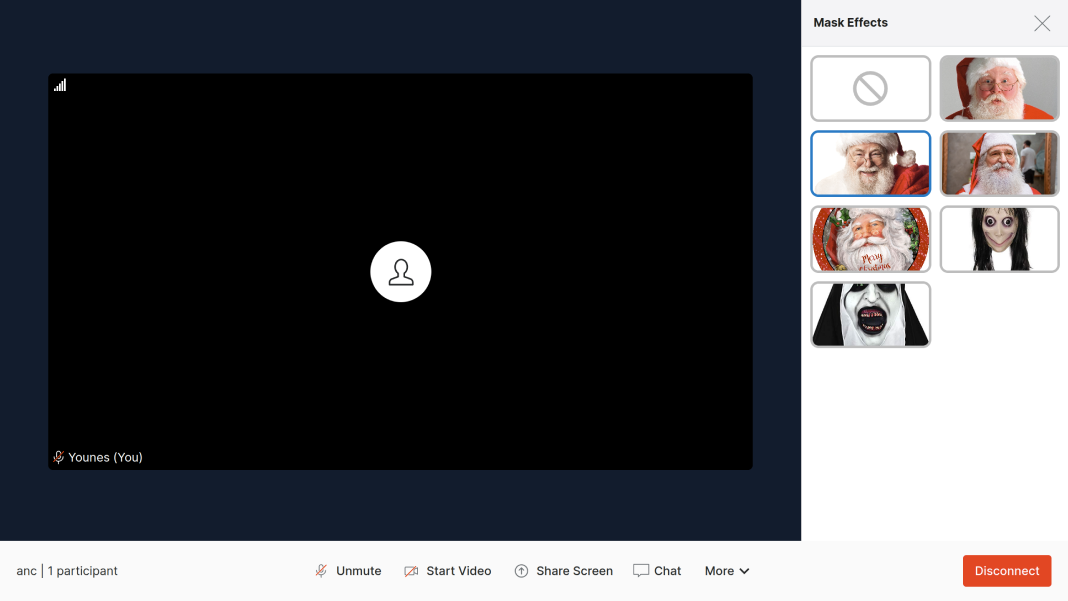
Head back to the components arena and create a new script for the face mask options, called MaskThumbnail.tsx and stored in the /src/components/MaskSelectionDialog/MaskThumbnail/ directory. This one’s also heavily copied from its backgrounds equivalent:

Line 15 of the code shown below is shortened for brevity. Grab the full code from the linked code file above (or click here).

import React from "react";
import clsx from "clsx";
import { makeStyles, Theme, createStyles } from "@material-ui/core/styles";
import NoneIcon from "@material-ui/icons/NotInterestedOutlined";
import useVideoContext from "../../../hooks/useVideoContext/useVideoContext";

export type Thumbnail = "none" | "image";

interface MaskThumbnailProps {
  thumbnail: Thumbnail;
  imagePath?: string;
  name?: string;
  index?: number;
}

const useStyles = makeStyles((theme: Theme) => createStyles({
// This part was cut for brevity. Check out the linked code file above.
}));

export default function MaskThumbnail({ thumbnail, imagePath, name, index }: MaskThumbnailProps) {
  const classes = useStyles();
  const { maskSettings, setMaskSettings } = useVideoContext();
  const isImage = thumbnail === "image";
  const thumbnailSelected = isImage ? maskSettings.index === index && maskSettings.type === "image" : maskSettings.type === thumbnail;
  const icons = { none: NoneIcon, image: null };
  const ThumbnailIcon = icons[thumbnail];

  return (
    <div
      className={classes.thumbContainer}
      onClick={() =>
        setMaskSettings({
          type: thumbnail,
          index: index,
        })
      }
    >
      {ThumbnailIcon ? (
        <div
          className={clsx(classes.thumbIconContainer, {
            selected: thumbnailSelected,
          })}
        >
          <ThumbnailIcon className={classes.thumbIcon} />
        </div>
      ) : (
        <img
          className={clsx(classes.thumbImage, { selected: thumbnailSelected })}
          src={imagePath}
          alt={name}
        />
      )}
      <div className={classes.thumbOverlay}>{name}</div>
    </div>
  );
}

And the final step is to display these interactive thumbnail images in the /MaskSelectionDialog/MaskSelectionDialog.tsx component. Update the file with the highlighted code:


import MaskThumbnail from "./MaskThumbnail/MaskThumbnail";
import { maskConfig } from "../VideoProvider/useMaskSettings/useMaskSettings";

function MaskSelectionDialog() {
  const imageNames = maskConfig.imageNames;
  const images = maskConfig.images;

  return (
    <Drawer
      variant="persistent"
      anchor="right"
      open={true /* TODO: use the dialog's open state */}
      transitionDuration={0}
      classes={{
        paper: classes.drawer,
      }}
    >
      <MaskSelectionHeader
        onClose={() => {
          /* TODO: close the dialog */
        }}
      />
      <div className={classes.thumbnailContainer}>
        <MaskThumbnail thumbnail={"none"} name={"None"} />
        {images.map((image, index) => (
          <MaskThumbnail
            thumbnail={"image"}
            name={imageNames[index]}
            index={index}
            imagePath={image}
            key={image}
          />
        ))}
      </div>
    </Drawer>
  );
}
Toggling the Face Mask Effects Dialog.

Just like mask settings, you’ll add fields to the video context to keep track of the selection dialog’s open state in the /src/components/VideoProvider/index.tsx file. Update the file with the highlighted code:


export interface IVideoContext {
  isMaskSelectionOpen: boolean;
  setIsMaskSelectionOpen: (value: boolean) => void;
}

export function VideoProvider({ options, children, onError = () => {} }: VideoProviderProps) {
  const [isMaskSelectionOpen, setIsMaskSelectionOpen] = useState(false);

  return (
    <VideoContext.Provider
      value={{
        isMaskSelectionOpen,
        setIsMaskSelectionOpen,
      }}
    ></VideoContext.Provider>
  );
}

With that done, head back to the /src/components/MaskSelectionDialog/MaskSelectionDialog.tsx file and use this new feature. Update the file with the highlighted code:


import useVideoContext from "../../hooks/useVideoContext/useVideoContext";

function MaskSelectionDialog() {
  const { isMaskSelectionOpen, setIsMaskSelectionOpen } = useVideoContext();

  return (
    <Drawer
      open={isMaskSelectionOpen}
    >
      <MaskSelectionHeader onClose={() => setIsMaskSelectionOpen(false)} />
    </Drawer>
  );
}

And the last step is to handle clicks on the face effects button in the menu stored in the /src/components/MenuBar/Menu/Menu.tsx file. We’ll open the masks selection dialog when its respective button is clicked on, and close it when the backgrounds dialog is triggered. Update the file with the highlighted code:


export default function Menu(props: { buttonClassName?: string }) {
  const { room, setIsBackgroundSelectionOpen, setIsMaskSelectionOpen } = useVideoContext();

  return (
    <>
      {isSupported && (
        <MenuItem
          onClick={() => {
            setIsBackgroundSelectionOpen(true);
            setIsMaskSelectionOpen(false);
            setIsChatWindowOpen(false);
            setMenuOpen(false);
          }}
        >
          <IconContainer>
            <BackgroundIcon />
          </IconContainer>
          <Typography variant="body1">Backgrounds</Typography>
        </MenuItem>
      )}

      {isSupported && (
        <MenuItem
          onClick={() => {
            setIsBackgroundSelectionOpen(false);
            setIsMaskSelectionOpen(true);
            setIsChatWindowOpen(false);
            setMenuOpen(false);
          }}
        >
          <IconContainer>
            <MaskIcon />
          </IconContainer>
          <Typography variant="body1">Face Effects</Typography>
        </MenuItem>
      )}
    </>
  );
}
The Room UI Shrinks when the Selection Dialog Opens.

When the background selection dialog is open, the room is shrunk to avoid being covered. Make the same happen for the masks dialog by modifying the /src/components/Room/Room.tsx file. Update the file with the highlighted code:


export default function Room() {
  const { isBackgroundSelectionOpen, isMaskSelectionOpen, room } = useVideoContext();

  return (
    <div
      className={clsx(classes.container, {
        [classes.rightDrawerOpen]: isChatWindowOpen || isBackgroundSelectionOpen || isMaskSelectionOpen,
      })}
    ></div>
  );
}

Build the Face Effects Video Processor

The building blocks of a video processor

This React demo app already uses Twilio Video Processors, an official library that applies background replacement effects live on video. In this next step, you’ll be creating your own video processor!

But first, what is a video processor? Well, to put it simply, a processor is an object that handles the processFrame method. This method takes in the camera input, and modifies it into the output frame. During this process, you can apply various effects to video such as face masks.

Create a new file called MaskProcessor.ts in the /src/processors/face-mask/ directory (that you should create) and build the mask processor class. You’ll also be creating a WebGL canvas and context that will later be used in the processFrame method. Enter the following code in the file:

export interface MaskProcessorOptions {
  maskImage: HTMLImageElement;
}

export class MaskProcessor {
  private readonly _name: string = "MaskProcessor";

  private _outputCanvas: HTMLCanvasElement;
  private _outputContext: WebGL2RenderingContext;

  constructor(options: MaskProcessorOptions) {
    this._outputCanvas = document.createElement("canvas");
    this._outputContext = this._outputCanvas.getContext("webgl") as WebGL2RenderingContext;
  }
}

Up next is the mask image. Whenever it’s updated, you want to run the AI model again to make new mask predictions. Achieve this behavior using some new fields and getters/setters. Update the file with the highlighted code:


export class MaskProcessor {
  private _maskImage!: HTMLImageElement;
  private _isMaskUpdated: boolean;

  constructor(options: MaskProcessorOptions) {
    this._isMaskUpdated = false;
  }

  get maskImage(): HTMLImageElement {
    return this._maskImage;
  }

  set maskImage(image: HTMLImageElement) {
    if (!image || !image.complete || !image.naturalHeight) {
      throw new Error("Invalid image. Make sure that the image is an HTMLImageElement and has been successfully loaded");
    }
    this._maskImage = image;
    this._isMaskUpdated = false;
  }
}

With that done, you can head back to the class constructor and assign the mask image. Note that behind the scenes, it will execute the set maskImage() setter method.


constructor(options: MaskProcessorOptions) {
  this.maskImage = options.maskImage;
}

And now, create the main function, processFrame, and use it to simply copy the WebGL output canvas to the output frame:


async processFrame(inputFrameBuffer: OffscreenCanvas, outputFrameBuffer: HTMLCanvasElement): Promise<void> {
  const ctx2D = outputFrameBuffer.getContext('2d');
  ctx2D?.drawImage(this._outputCanvas, 0, 0);
}
Face Mask Predictions on Face

The Twilio Video Processors library uses the Tensorflow BodyPix model to segment people from selfie images with incredible speed and precision. You’ll use a similar model, called Face Landmarks, to predict the surface geometry of human faces.

This official demo (on Codepen) shows how this model tracks your face geometry in real time.

Get started by downloading the dependencies needed for this feature. Navigate to your terminal and enter the following commands:

npm install @tensorflow/tfjs-backend-wasm @tensorflow/tfjs-core @tensorflow-models/face-landmarks-detection --force

Then, initialize this model in the /src/processor/face-mask/MaskProcessor.ts script. Add the following code at the top of the file:

import * as tfjsWasm from "@tensorflow/tfjs-backend-wasm";
import "@tensorflow/tfjs-backend-webgl";

import {
  createDetector,
  SupportedModels,
  Face,
  FaceLandmarksDetector,
} from "@tensorflow-models/face-landmarks-detection";

// Initialize Tf.js
tfjsWasm.setWasmPaths(
  `https://cdn.jsdelivr.net/npm/@tensorflow/tfjs-backend-wasm@${tfjsWasm.version_wasm}/dist/`
);

After that, add a static property to the mask processor class and add a function to initialize the model:


export class MaskProcessor {
  private static _model: FaceLandmarksDetector | null = null;

  async loadModel() {
    try {
      MaskProcessor._model = await createDetector(SupportedModels.MediaPipeFaceMesh,
        {
          runtime: "tfjs",
          refineLandmarks: true,
        }
      );
      console.log("Loaded face landmarks model successfully.");
    } catch (error) {
      console.error("Unable to load face landmarks model.", error);
    }
  }
}

You can now update the processFrame() function to make predictions about the mask image once it’s updated, and to do the same for the camera image. Update the file with the highlighted code:


export class MaskProcessor {
  private _maskPredictions: Face[];
  private _facePredictions: Face[];

  constructor(options: MaskProcessorOptions) {
    this._maskPredictions = [];
    this._facePredictions = [];
  }

  async processFrame(inputFrameBuffer: OffscreenCanvas, outputFrameBuffer: HTMLCanvasElement): Promise<void> {
    // Get image bitmap from input frame
    const inputImageBitmap = inputFrameBuffer.transferToImageBitmap();

    // Update mask if needed
    if (!this._isMaskUpdated && MaskProcessor._model) {
      // make prediction twice for more precision
      for (let i = 0; i < 2; i++) this._maskPredictions = await MaskProcessor._model?.estimateFaces(this._maskImage);
      this._isMaskUpdated = true;
    }

    if (MaskProcessor._model) {
      this._facePredictions = await MaskProcessor._model.estimateFaces(inputImageBitmap);
    }
  }
}
Rendering the Face Masks on Camera

You don’t need to know anything about WebGL to make this step happen. Create two new directories, /data and /utils, both in the /src/processors/face-mask/ directory, and download the following files:

FileLocationPurpose
constants.ts/src/processors/face-mask/List of constants used in Math. (e.g. PI)
shaders.ts/src/processors/face-mask/List of WebGL shaders used in this program.
Facemesh.ts/src/processors/face-mask/utils/Utility class to render 3D face geometry with a texture.
matrix.ts/src/processors/face-mask/utils/Collection of matrix algebra functions.
Render2D.ts/src/processors/face-mask/utils/Utility class to render 2D surfaces.
shaders.ts/src/processors/face-mask/utils/Collection of functions to compile, link and generate shader objects.
textures.ts/src/processors/face-mask/utils/Collection of functions to create WebGL textures from various data types.
webgl.ts/src/processors/face-mask/utils/Two functions to prepare for and to render the whole scene (camera + face mask).
face-contour-idx.json/src/processors/face-mask/data/Vertex indices used by Facemesh.ts
s-face-tris.json/src/processors/face-mask/data/Vertex indices used by Facemesh.ts
s-face-wo-eyes-tris.json/src/processors/face-mask/data/Vertex indices used by Facemesh.ts


All these files originated from Yoshiteru’s face landmarks implementation, but were modified to take advantage of TypeScript and Object-Oriented Programming.

With that done, head-on back to the MaskProcessor class and add the following new properties:


import { Facemesh } from "./utils/Facemesh";
import { Render2D } from "./utils/Render2D";

export class MaskProcessor {
  private _facemesh: Facemesh;
  private _r2d: Render2D;

  constructor(options: MaskProcessorOptions) {
    // Add the following code at the bottom of this constructor
    this._facemesh = new Facemesh(this._outputContext);
    this._r2d = new Render2D(this._outputContext);
  }
}

After doing that, prepare for WebGL rendering by setting-up the scene. Place the highlighted code at the top of the processFrame() function:


async processFrame(inputFrameBuffer: OffscreenCanvas, outputFrameBuffer: HTMLCanvasElement): Promise<void> {
  // The WebGL Canvas Context
  const gl = this._outputContext;

  // Configure viewport dimensions
  const camWidth = inputFrameBuffer.width;
  const camHeight = inputFrameBuffer.height;

  this._outputCanvas.width = camWidth;
  this._outputCanvas.height = camHeight;

  // Handle viewport resizing
  this._facemesh.resize_facemesh_render(camWidth, camHeight);
  this._r2d.resize_viewport(camWidth, camHeight);
  gl.viewport(0, 0, camWidth, camHeight);
}

Following that, create WebGL textures for both the camera and the mask image.

Note that we only need to update the mask texture if the image was updated.


import { createTextureFromImage, createTextureFromImageBitmap} from "./utils/textures";
import { calcSizeToFit, Region } from "./utils/webgl";

export class MaskProcessor {
  private _maskTex: WebGLTexture | null;
  private _camRegion: Region | null;

  constructor(options: MaskProcessorOptions) {
    this._maskTex = null;
    this._camRegion = null;
  }

  async processFrame(inputFrameBuffer: OffscreenCanvas, outputFrameBuffer: HTMLCanvasElement): Promise<void> {
    // Update mask if needed
    if (!this._isMaskUpdated && MaskProcessor._model) {
      this._maskTex = createTextureFromImage(gl, this._maskImage);
      for (let i = 0; i < 2; i++) this._maskPredictions = await MaskProcessor._model?.estimateFaces(this._maskImage);
      this._isMaskUpdated = true;
    }

    const camTex = createTextureFromImageBitmap(gl, inputImageBitmap);
    this._camRegion = calcSizeToFit(camWidth, camHeight, camWidth, camHeight);
  }
}

And just like that, you’re down to the last step! Use the WebGL utility script to render the whole scene using all the data that was just computed. Update the file by adding in the highlighted lines:


// Add this to top of file
import { render2dScene } from './utils/webgl';

// ...

async processFrame(inputFrameBuffer: OffscreenCanvas, outputFrameBuffer: HTMLCanvasElement): Promise<void> {
  gl.clearColor(0, 0, 0, 1);
  gl.clear(gl.COLOR_BUFFER_BIT | gl.DEPTH_BUFFER_BIT);

  if (!camTex || !this._maskTex) return;

  render2dScene(
    gl,
    camTex,
    this._facePredictions,
    camWidth,
    camHeight,
    this._maskImage,
    this._maskTex,
    this._maskPredictions,
    this._camRegion,
    this._facemesh,
    this._r2d
  );
}

And don’t forget to conclude the processFrame function by copying the WebGL canvas to the output frame buffer, so you can actually see the results (this should already be at the top of the function; you'll just need to move it to the bottom):


 async processFrame(inputFrameBuffer: OffscreenCanvas, outputFrameBuffer: HTMLCanvasElement): Promise<void> {
  // Copy content to output frame
  const ctx2D = outputFrameBuffer.getContext('2d');
  ctx2D?.drawImage(this._outputCanvas, 0, 0);
}
Demo of final app

And to finally put this shiny new video processor to use, head back to the mask settings hook (/src/components/VideoProvider/useMaskSettings/useMaskSettings.ts) and listen for changes to the mask image, and accordingly apply/remove the video processor to/from the Twilio video track. Again, this is wholly inspired by its backgrounds equivalent, useBackgroundSettings located in the same parent directory:


import { useEffect, useCallback } from "react";
import { isSupported } from "@twilio/video-processors";
import { MaskProcessor } from "../../../processors/face-mask/MaskProcessor";

let maskProcessor: MaskProcessor;

export default function useMaskSettings(videoTrack: LocalVideoTrack | undefined, room?: Room | null) {
  const removeProcessor = useCallback(() => {
    if (videoTrack && videoTrack.processor) {
      videoTrack.removeProcessor(videoTrack.processor);
    }
  }, [videoTrack]);

  const addProcessor = useCallback((processor: MaskProcessor) => {
      if (!videoTrack || videoTrack.processor === processor) {
        return;
      }
      removeProcessor();
      videoTrack.addProcessor(processor);
    },
    [videoTrack, removeProcessor]
  );

  useEffect(() => {
    if (!isSupported) {
      return;
    }
    // make sure localParticipant has joined room before applying video processors
    // this ensures that the video processors are not applied on the LocalVideoPreview
    const handleProcessorChange = async () => {
      if (!maskProcessor) {
        maskProcessor = new MaskProcessor({
          maskImage: await getImage(0),
        });

        // Load the face landmarks model
        await maskProcessor.loadModel();
      }

      if (!room?.localParticipant) {
        return;
      }

      if (maskSettings.type === "image" && typeof maskSettings.index === "number") {
        maskProcessor.maskImage = await getImage(maskSettings.index);
        addProcessor(maskProcessor);
      } else {
        removeProcessor();
      }
    };
    handleProcessorChange();
  }, [maskSettings, videoTrack, room, addProcessor, removeProcessor]);
return [maskSettings, setMaskSettings] as const;
}

Conclusion

As you can see, the Twilio video track with type LocalVideoTrack accepts any video processor that handles the processFrame method. You used this method to apply a face mask to the user’s face, but you could’ve really done anything with it! This is where your imagination should run wild.

Go explore the TensorFlow open-source models collection where you’ll find many great things. One of my favorites is the Pose Detection model; try and use it to build another video processor!

I also suggest that you learn about JEST and write unit tests for all the code you wrote in this tutorial. It will make your app a much more sustainable one!

Eluda is a technical writer doing many projects. He can be reached by email at me@eluda.dev, on Twitter @eludadev, and on LinkedIn @eludadev.