Coding Twilio Webhooks in Java with Spring Boot
Time to read:
May 07, 2019
Written by

Twilio’s APIs enable communication in a whole host of ways: by phone, WhatsApp, Facebook, SMS and more. Usually when events such as incoming messages or calls happen Twilio will make an HTTP request to a server the user provides to discover what it should do - these are called webhooks. HTTP servers can be written with any technology to respond to these webhooks, and for Java developers the most popular framework is Spring Boot.
In this post we’ll create a Spring Boot app which can respond to incoming phone calls by playing callers a short message followed by the marvellous Rogers and Hammerstein song “It Might As Well Be Spring”.

Requirements
Creating a Spring Boot App
The Spring folks have created the Spring Initializr for quickly creating a new project. Head over to https://start.spring.io and set up a new project like this:
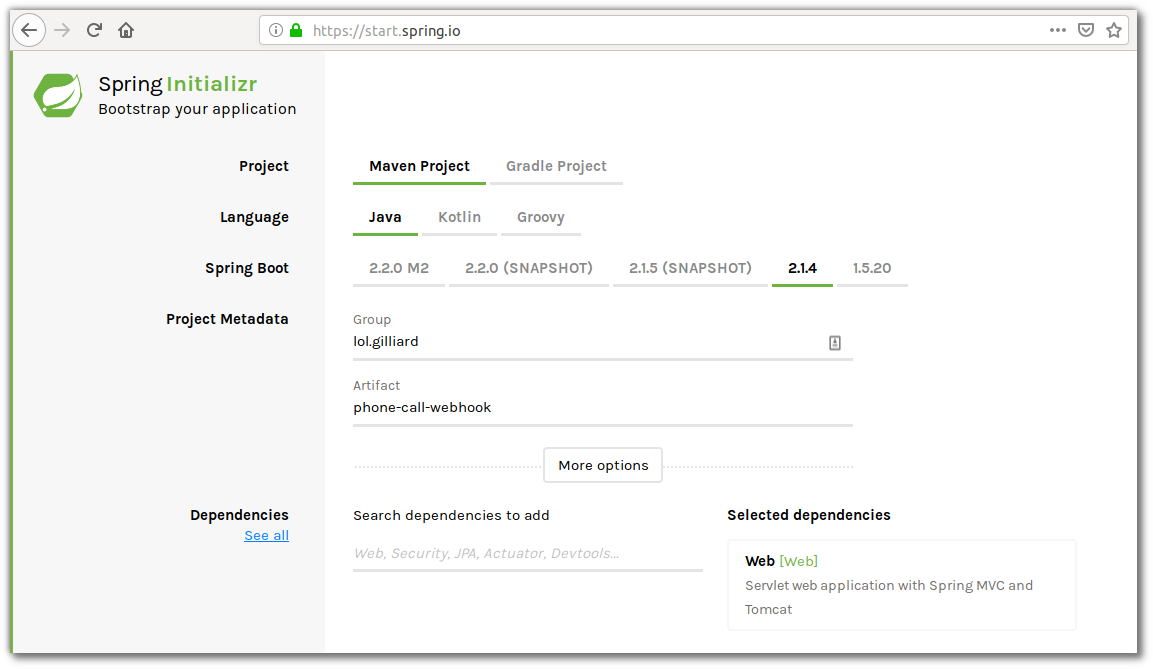
Use either Maven or Gradle, choose suitable Group and Artifact names and use the Search dependencies to add field to add the Web dependency. Click on the Generate Project button and the project will be downloaded as a zip file which can be unzipped and imported into an IDE.
In src/main/java there are folders corresponding to the Artifact name, and a single Java class named, in this case, PhoneCallWebhookApplication.java. That is the main class for the project - it is annotated with @SpringBootApplication and has a main method. The @SpringBootApplication annotation sets up a lot of helpful defaults for Spring, including the embedded HTTP server and Component Scanning.
Create a class called WebhookController in the same package as the Application class, by creating a new file called WebhookController.java in the same directory as the PhoneCallWebhookApplication.java file. The Controller class will hold the code for the webhook. An @Controller annotation will ensure that it is found by Spring’s component scanning, and Spring will automatically register HTTP endpoints for methods annotated with @GetMapping.
For the first iteration, the WebhookController class should look like this:
This is enough code for a working web server. Before going any further we can test it. The project contains a wrapper script for Maven or Gradle, so build and run it with one of these 2 commands. If this is the first time it’s run then there might be a lot of dependencies to download so there’s time to brush up on your piano playing.
or
Once it’s running, browse to http://localhost:8080/call and see the welcoming message:

How to Respond to a Twilio Webhook
The response to a Twilio webhook should usually be a type of XML we call TwiML. It is possible to write TwiML by hand, but for anything more than the simplest cases I’d recommend using the Java Helper Library. Add the helper library to the project by putting it in the <dependencies> section of the pom.xml file:
Change the WebhookController class to look like this:
Build and run this again using Maven or Gradle as before. Browsing to http://localhost:8080/call will now show the TwiML that the helper library generates:

Using Ngrok to Develop Webhooks
For Twilio to access the webhook, localhost just won’t be enough. The service needs to be on an internet-accessible URL. For developing webhooks Ngrok is a great tool. It provides a temporary internet-accessible URL for your development environment. Install it and in a new terminal run:
Ngrok will create public http and https URLs that redirect to localhost:

I would always recommend using https, so use the https URL instead of `localhost` in the webhook address. Ngrok hostnames will be different every time - you can check yours in a browser before going any further.
Setting up a Twilio phone number
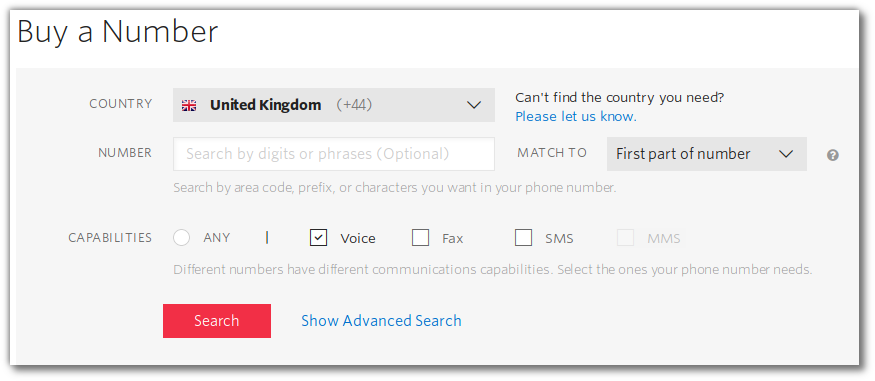
Once logged into your Twilio account browse to the phone numbers page and buy a new number in your country, making sure to check the box for Voice capability:
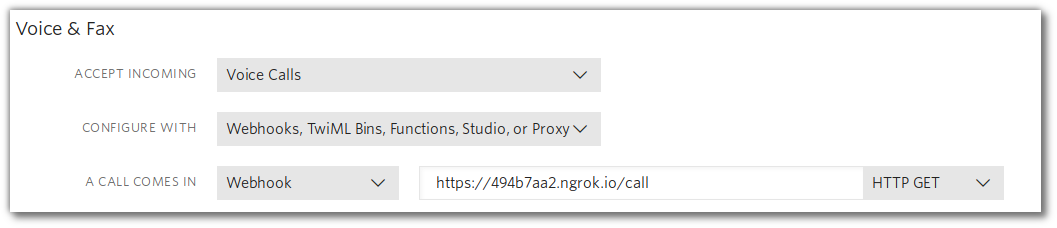
After choosing a number you will be prompted to head to the phone number management page, to configure what Twilio should do in response to incoming calls and messages. Here, put the ngrok URL as the webhook for incoming calls, and because of the @GetMapping annotation make sure to choose HTTP GET as well:
Save this configuration and everything is finished! Call your Twilio phone number and just listen to the glorious sounds.
To recap: when the number is called, Twilio makes a request to the ngrok URL which is tunneled to your Spring Boot app. The app responds with the TwiML created in the controller class, and Twilio plays the greeting and the music to the caller. All in ten lines of code - neat huh?

A Permanent Place on the Cloud
Developing webhooks using ngrok is fine, but the URL will not be accessible when the computer is turned off or the ngrok command is cancelled. For a more reliable solution the Spring documentation has several recommendations for places to permanently deploy applications - just don’t forget to update the URL on the phone number configuration page.
What Next?
We’ve just scratched the surface of what we can do with Spring Boot - there are lots of other Spring projects for building more complex apps, using SQL or NoSQL datastores, deploying to the cloud and more. And of course, Twilio has much more to offer than just playing music down the phone! Check out all of the Twilio docs, see the other Java Quickstarts or have some fun learning while playing Twilio Quest.
I would ❤ to see what you build - let me know on Twitter or by email:


Related Resources
Twilio Docs
From APIs to SDKs to sample apps
API reference documentation, SDKs, helper libraries, quickstarts, and tutorials for your language and platform.
Resource Center
The latest ebooks, industry reports, and webinars
Learn from customer engagement experts to improve your own communication.
Ahoy
Twilio's developer community hub
Best practices, code samples, and inspiration to build communications and digital engagement experiences.