Containerize an Existing .NET Core App with Docker and Deploy It to Azure
Time to read: 22 minutes
November 27, 2019
Written by

In a previous post you learned how to take a fresh application and deploy it to a Kubernetes cluster. While it’s great to start with a new application, most of us don’t get that luxury. Usually, you’re going to start off with something older and have to refactor and then migrate it.
This tutorial will show you how to take an existing application, refactor it using cloud-native principles, and deploy it to Azure Kubernetes Services. By the time you’re done, you will know how to move your own applications to the cloud.
If you would like to see a full integration of Twilio APIs in a .NET Core application then checkout this free 5-part video series. It's separate from this blog post tutorial but will give you a full run down of many APIs at once.
Cloud Migration Patterns
When migrating applications to the cloud, there are a handful of different patterns you can follow. Which pattern you choose will depend on what you are trying to migrate and how much time you want to spend migrating them. Each of these patterns has different tradeoffs, so it’s good to understand them all when looking to migrate your own applications.
Lift and Shift
A “lift and shift” is where you take your existing architecture and recreate it in the cloud. If you have four VMs in your data center, you spin up four VMs in the cloud. If you go this route, you’re generally spinning up IaaS (Infrastructure as a Service) resources that match the ones in your data center. Many companies do a lift and shift as their first move, but it should be a last resort.
While this is the easiest strategy to implement, it’s almost always a bad idea. Taking machines you already paid for and substituting them for machines you need to pay a monthly fee for is expensive and you miss out on a lot of the management features of the cloud. There are a handful of situations where this approach makes sense, but don’t use it as your first option.
Refactor
This is sometimes referred to as a “lift, tinker, and shift”. This is where you take a relatively modern application and refactor it for use in a Platform as a Service (PaaS) or container-based service. An example of this is where you take an existing MVC application, make a few minor changes, and then deploy it to an Azure Web App. If you have the right kind of application, this approach is easy and inexpensive. This should be your first choice for migrating applications in the cloud.
Re-architect
Re-architecting an application is where you take an application and refactor it into a new format, then migrate it to the cloud. For example, let’s say you have an older, monolithic app with solid domain code. You could take that solid domain code and move it into a fleet of microservices. Then you could run those services in containers on an Azure Kubernetes Service (AKS) instance.
This approach is great for applications that have solid domain logic classes that are well separated from the frameworks they run in. If your legacy app doesn’t have a solid separation of concerns, then you should rewrite it instead.
Rewrite
Sometimes your applications are so old that they require a full rewrite. While this is expensive, it’s also an opportunity to use newer cloud technologies like serverless. An example of a rewrite would be taking a set of batch processes running on a mainframe and turning it into an event-driven serverless application.
General Refactoring Tips
Here are a few considerations for refactoring applications to cloud-native principles. These are broad concepts that apply to most situations.
.NET Core vs .NET Full Framework
If you want to run your application on Kubernetes, you should have your apps on .NET Core. In the container world, you can run either Windows-based containers or Linux-based containers. While there are ways to run both in a single Kubernetes cluster, most services use Linux containers. If you’re running .NET Core, you can use Linux based containers. You can’t do this with the full framework.
There are lots of other reasons to move to .NET Core as well. It’s faster and easier to use. The configuration stack meshes better with cloud-native principles. Also, the full .NET Framework will be merged into version 5 of .NET Core. .NET Core is the future.
Automated Tests
Automated tests are your best friend when refactoring anything. Take some time to shore up any gaps in your automated tests. This is especially important if you’re doing a refactor or rearchitecting your application. A nice suite of unit tests can help you determine if your code still behaves the way you think it should.
As you complete your refactoring or re-architecting, make sure you still have adequate test coverage. You can lose test coverage while refactoring if you don’t pay attention.
Build/Release Automation
While not strictly required, you should automate your builds and releases in separate processes. While a lot of people get caught up in “the cloud” as a buzzword, cloud technologies are really a subset of DevOps. The reason cloud tech is so powerful is that you can automate the creation and destruction of infrastructure. Another aspect of this is automating the building and releasing of your code.
Breaking Down Services
If you have a large monolithic application, breaking it down into smaller services might help you deploy it more quickly. One way to migrate your application is to pull out individual services and deploy them to the cloud. Slowly, your whole application ends up fully migrated. This allows for incremental migrations, which are easier to complete and easier to integrate with business needs.
That being said, it’s not always the best move. For example, if you don’t have a good understanding of your application’s domain, your microservices are going to be poorly factored. Additionally, if your application isn’t very large, then microservices add low value complexity.
Many companies get attached to the idea of microservices and take it too far. Not every application needs to be a suite of microservices. If your application is small, moving it to a microservices architecture is a bad use of time.
If you’re figuring out if you want to divide your app, there are two solid criteria. The first is team size. If your application can’t be worked on by a single team, it might be a good idea to break the application down into smaller units that can each be handled by a single team. The ideal team size is the “two pizza” team of eight or fewer people. Smaller teams can move faster, especially if you can avoid cross-team communication and coordination.
The other criteria is the domain scope. If you have obvious business domain boundaries that don’t talk to one another much, then it might be a good idea to separate those into their own domain services. Domain boundaries are not always obvious at the beginning of a project, so don’t beat yourself up if you didn’t notice the boundaries until recently.
Disposability
Applications should be easy to start and stop. Generally, this means that applications should be easy to spin up and they shouldn’t leave behind lots of half-finished resources once they are finished. This is good most of the time, though there are applications with long pre-cache routines on app startup that are a bad idea for cloud-native apps.
Another aspect of disposability is making your applications stateless. There’s no guarantee in the cloud that a user's request is going to the same server or even to the same app as the previous request. Store state outside of your app code, using a database or a distributed cache like REDIS.
Prerequisites
You'll need the following to successfully build and execute the project in the tutorial section of this post:
Azure Account – Microsoft provides first-time Azure subscribers with a free 12-month subscription. If you've used up your 12-month trial period, the project in this tutorial will incur costs determined by your subscription type and the length of time you maintain the resources created in the project. For a typical US-based Pay-As-You-Go subscription, charges are usually less than $100 if you remove the resources promptly. The project includes an Azure CLI command for this purpose.
Azure CLI – The CLI scripts in this tutorial were written with version 2.0.68.
Docker Desktop for Windows (541 MB) – Docker is used by Visual Studio to package your applications for deployment to Azure. If you are new to Docker, check out the What to know before you install section on the linked page for important information on system requirements and other considerations.
If you can’t install Docker for Windows, you can still do this tutorial by running your containers in Azure. You won’t be able to debug Docker containers locally, but you can debug your apps outside of Docker. This is an inconvenience, not a showstopper.
Git – Cloning the project from GitHub or managing will require a Git client.
Visual Studio 2019 – The Community Edition of Visual Studio 2019 is free.
To get the most out of this post you should be familiar with creating ASP.NET Core Web Applications in C# with Visual Studio 2019 or VS Code.
Refactoring a Legacy App to Be Cloud-Native
For this project, begin with a legacy application that was recently upgraded to .NET Core 3.0. This application generates placeholder text for websites. The application does what it’s supposed to do, but there are a few things you need to change to make it more cloud friendly. Head out to Github and download the application here:
https://github.com/DustinEwers/cloud-native-refactoring
The project you are going to refactor is in the legacy directory. If you want to see the finished result, head over to the modern directory.
Specific Refactorings
Refactoring for cloud compatibility consists of a number of discrete activities which can be categorized to make understanding and organizing them easier. These categories should also help you plan your migration.
Abstract Infrastructure Dependencies
One of the most important things you can do to make your application cloud-ready is to abstract out any infrastructure dependencies. This includes file stores, databases, message brokers, and other things your application talks to. The reason for abstracting these out is that the infrastructure your app relies on in the data center might be represented differently in the cloud. Instead of using a file, for instance, you might use an Azure Storage account or a database. Being able to swap these out using dependency injection makes your application more flexible.
Additionally, services should be addressable by URL. This allows you to swap out those services when you need to.
In the WiscoIpsum application, there are some infrastructure dependencies you can refactor away. Open Services\IpsumGenerator.cs. In the constructor of the IpsumGenerator class, there’s a direct reference to a file store:
You need to move this infrastructure dependency out of the application. You could abstract the file call and use a cloud storage solution like an Azure Storage account. This is a valid way to handle this issue, but this file is being used as a database, so let’s set up Entity Framework and use it to create a database.
Open the Models directory and create an entity class called Phrase.cs. This class corresponds to a database table.
Some of the instructions below use the Entity Framework Core Tools for .NET CLI. You can install them globally (as most developers choose to do) with the following command:
Note: As of this writing, because of Issue 18977 you must supply the version number in the CLI command, even if you are using .NET Core 3.0.101 (the current RTM version as of this writing) or higher.
Install the Entity Framework Core SqlServer package by running this command in your WiscoIpsum project folder:
The design-time components for Entity Framework Core tools are part of a different package, so you’ll need to also the following package in your WiscoIpsum project folder:
Create a Data directory in your main project folder alongside your Controllers and Models directories. In that directory, create a file called WiscoIpsumContext.cs.
Add the following using directives to WiscoIpsumContext.cs:
Replace the existing code with the following:
Open your appsetting.json file in the root project folder. Remove the PhrasesFile element and add a connection string. This application uses LocalDb for its local development. Your completed appsettings.json should look like the following:
Open the Startup.cs file in the project root folder and add the following using directives:
Add your newly minted DbContext. The completed ConfigureServices method should look like this:
Create your first Entity Framework migration. The following .NET CLI command should create a single table called Phrases in LocalDB:
Note: When you run EF Core CLI Tools commands using version 3.0.0 of the tools on a project with Entity Framework Core 3.0.1 or higher you will receive a warning message like the following but the migration should still be created. Don’t upgrade the tools as suggested by the warning message because of the aforementioned issue.
At this point you’re going to need some data for your database. There are several ways to add seed data. For example, you could turn the Phrases.txt in the main folder into a set of insert statements and directly run the script. But for this application you are going to add an Entity Framework data migration.
Open your Data/WiscoIpsumContext.cs file and change your OnModelCreating method to the following:
Now that you’re updated your context, create another migration for the data only:
With the definition of your database now complete, apply your migrations to the database with the following command:
Now that Entity Framework is set up, you can get rid of the direct file reference and replace it with a database context.
Open Services/IpsumGenerator.cs and swap the file access code for an Entity Framework call by adding a using directive for LINQ and the data model to the existing directives:
Add a private member variable for the data context and modify the IpsumGenerator constructor and GenerateIpsum methods as follows:
Remove the Phrases.txt file from your project root; you won’t be needing it anymore.
Remove State from Your Application
Cloud applications are designed to create resilience through redundancy. Instead of having a single well-kept server, cloud environments have many instances running in parallel. Each individual process is transient, but the collection is not.
The upshot of this is that your application process should not store any kind of state information. This includes memory cache, session state, and local files. Since an application instance can go down at any second, you need to store state elsewhere.
Open the HomeController.cs class in the Controllers folder. The class contains a reference to IMemoryCache. This is a memory cache, which stores state on the application process. To make this application cloud-native, you need to either remove the memory cache or use a distributed cache.
In ASP.NET Core, there are several options for a distributed cache. You could spin up an Azure REDIS instance or a new SQL Server Database. For this application, caching is unnecessary and adds needless complexity.
Remove the references to the memory cache in the private member variables, the HomeController constructor, and the Index POST methods so they look like the following:
Ellipsis (...) in the code block indicates a section redacted for brevity.
Use your environment to store configuration data
In cloud-native applications, configuration is stored in the environments in which the applications run. By default, ASP.NET Core uses appsettings.json configuration files, but it also supports using environment variables.
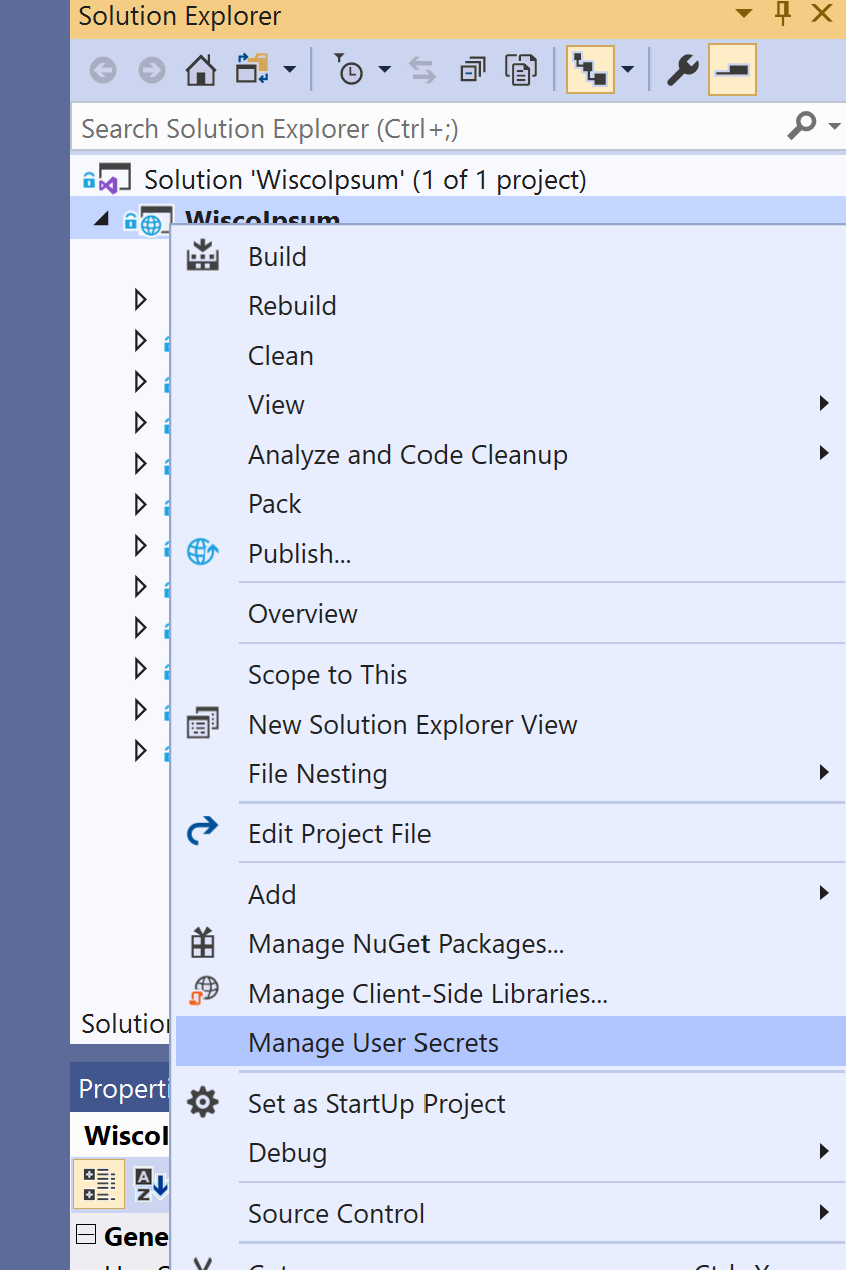
For local development, store application secrets locally in the secrets.json file. To view this file, right-click on your project and select Manage User Secrets.
This will open a file called secrets.json. Take your configuration data out of appsettings.json and move it to your secrets.json file. Then, remove the appsettings.json and appsettings.Development.json files.
When you deploy your application, you’ll add this configuration data to your environment.
Building a Docker File
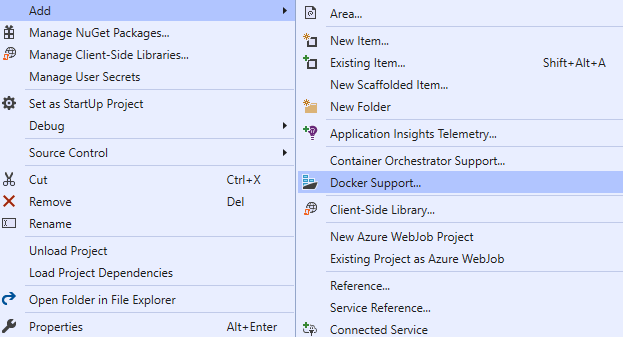
The easiest way to build a Docker file in ASP.NET Core is to not build a Docker file. Right-click on your project and select Add. Then select Docker Support. This will generate a dialog asking what Target OS to use. Select Linux and click OK.
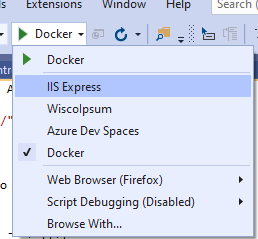
Once you add Docker support to your app, Visual Studio will try to run your app in Docker. You can switch back to IIS Express or Kestrel if you encounter problems. Many developers prefer the IIS Express / Kestrel debugging experience and switching is easy.
This process adds a Dockerfile to your project. This file works, but you can simplify it to make it easier to read. Open your Dockerfile and make it look like this:
Build your environment
One of the advantages of using the cloud is that you can create repeatable environments. Instead of clicking buttons in the Azure Portal, you’re going to create a PowerShell script to build your Azure resources.
Build your AKS Cluster and Container Registry
If you have created a local copy of the WiscoIpsum solution by cloning or unzipping the entire DustinEwers/cloud-native-refactoring repository you’ll have an infrastructure directory in the root of the project. If you’ve taken another approach to creating a local copy, such as extracting only the legacy folder from the repo, you’ll need to create your own infrastructure directory. You can locate it within the solution structure or above it, depending on your preferences and version control requirements.
In the infrastructure directory, create a new file called generate-aks-environment.ps1.
Open it and add the variable declarations in the following code block. Make particular note of the following required modifications:
- Change the value for
$locationto the most appropriate Azure region for your location after checking to ensure the region supports Azure Kubernetes Services. - Substitute your own value for the
$acrNamevariable in place ofwiscoipsumacr. The name of the Azure Container Registry (ACR) is public-facing and must be unique across Azure, so make it something distinctive. - Wherever you see the ACR name literal
wiscoipsumacrused in the subsequent command-line instructions you’ll need to replace it with the value you created for your ACR. - If you still have your setup from the previous post, either delete the resource group or change the variables to different names so you don’t cause conflicts.
Once you've set up your PowerShell variables you can add the commands that use them. Each of the following az commands should be added to the bottom of the code already in the file.
Add a command to create a resource group to house your application. This will create a resource group at the location specified in the $location variable:
Add a command to create an Azure Container Registry:
Add a command to create a service principal and assign the app ID and password to variables:
A service principal is like a user account. When you build your AKS cluster, you will it assign it a service principal. Your Kubernetes cluster will run under this account.
This command uses the | ConvertFrom-Json command to turn the JSON sent back by Azure CLI into a PowerShell object you can use later.
If you’re using a corporate subscription which includes Azure, like your company’s MSDN account, you might not be able to create a service principal. If you lack the permissions, ask your local administrator to create one for you and give you the app ID and app password.
Add a command to wait 120 seconds before continuing to execute commands:
When you create a Service Principal, it takes a few seconds to propagate the changes. Since you are running these commands in a script, you’ll need to give Azure some time to propagate the service principal. Increase the sleep interval if you see an error like the following when you run the script:
Add a command to get the ACR ID from your container registry and save it to a variable:
This command highlights two handy things you can do in the Azure CLI. The --query “id” is a query parameter. It will select the id field of the object returned by the Azure CLI. You can use query parameters to filter down the result of any Azure command. This is useful if you need to grab fields to use in scripts. Also, note the --output tsv parameter. By default, the Azure CLI returns JSON, which is not always readable. By using --output tsv, you return tab-separated values instead. Another useful output parameter is --output table, which returns a table.
Now that you have a service principal and an ACR ID, add a command to assign pull permissions to the service principal. This will let your AKS cluster pull images from the container registry:
Create your AKS cluster:
Here’s the final script you’ll use to create your environment:
To run your script, open a PowerShell window and execute the following command-line instruction to login to Azure:
The command will open a browser window to a page that will enable you to sign in to Azure.
If you experience the dreaded "This site can't provide a secure connection" error in Chrome after signing into Azure, and none of the recommended methods of resolution work (or you just don't want to bother trying to fix it), press Ctrl+C in the PowerShell window to exit the current process and restart it with the following command:
After you authenticate, run the script you created in the infrastructure directory:
After a few minutes, you should have a Container Registry and an AKS cluster ready to receive an application deployment. You can confirm that the script executed successfully in the Azure portal by looking for wisco-ipsum in the Resource groups section.
Keep this PowerShell window open: you’ll be using it later.
Build Your Database
In addition to an AKS cluster and Container registry, you’ll also need an Azure SQL database. To begin, in your infrastructure directory create a file called generate-sql-environment.ps1.
First, add some variables to your file. These will be used in future steps. Make note of the following required modifications:
- Change the value for
$locationto the most appropriate Azure region for your location. For optimal performance, it’s best to put the database in the same region where you created the AKS cluster. - Substitute your own value for the
$sqlServerNamevariable in place ofipsum-db-server. The name of the SQL Server is public-facing and must be unique across Azure, so make it something distinctive. - Wherever you see the SQL Server name literal
ipsum-db-serverused in the subsequent command-line instructions you’ll need to replace it with the value you created for your SQL Server. Specifically, ensure your connection string uses the correct server value.
Add a line to create your resource group:
Add a az sql server create command to create your SQL Server instance:
Now that you have a SQL Server, use the az sql db create command to put a database on it:
Finally, Azure SQL databases come with a built-in firewall. By default, this firewall allows no one to access the database. Add a firewall rule to allow Azure services by setting the IP range to 0.0.0.0 - 0.0.0.0.
If you want to use the SQL database from your own computer, add your own IP using another firewall rule or use the Azure Portal.
If you haven’t added the rule, Visual Studio or SQL Server Management Studio will prompt you to so.
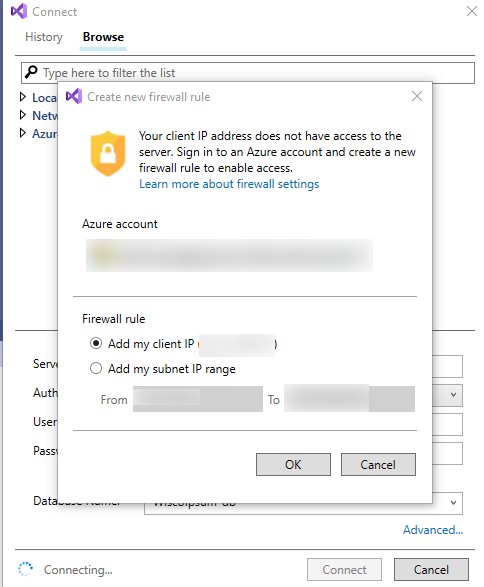
In Visual Studio, look for the database in the Server Explorer under your Azure account. (You may need to connect to Azure and refresh the object list to see recently added items.) Under SQL Databases, right-click on the database and click Open in SQL Server Object Explorer. You should see the Create new firewall rule dialog box, from which you can add a firewall rule to all your client IP to access the database, as shown in the screenshot below:
Your completed file should look like this:
Run the completed PowerShell script to create your database with the following command-line instruction in the infrastructure directory:
Once you application database is created, you need to run your migrations on it. You could modify your local connection and run dotnet ef database update, but it’s easier to create a SQL script and run it on your new cloud database.
To create a script, open up your project directory (the one with the .csproj file) and run the following command:
This command will deposit a script in your infrastructure folder. Login to your database using Visual Studio or SQL Server Management Studio and run the SQL script in the create-db.sql file to create your database.
Upload your application to Azure
To deploy your application, you need to get an image of your app into your Container Registry. You could use Docker to build an image and push it to the registry, but the Azure Container Registry can do it for you in one step.
The value for the --registry parameter should correspond to the unique name you gave your ACR in the variable declarations above (ex. $acrName='wiscoipsumacr'). Remember that ACR names need to be unique across all of Azure.
The --image wiscoipsum:v1.0.0 parameter determines the tag for your image. This is how you reference that image when you run it later. If you’re using a build tool, then you’ll replace the “v1.0.0” with the version number of your build.
Execute the following command from the directory containing your solution (*.sln) file:
Note that the dot (".") at the end of the command-line instruction is significant and essential, as explained below.
If you see an error like the following, you probably didn’t set your Docker context correctly:
When building Docker images, Docker copies files from your computer. The relative location of those files is based on the Docker context. You set the context when you run your build command. When Visual Studio generates a Docker file for you, it assumes that you’re going to be using the directory containing your solution (*.sln) file as your context. When you run a docker build or az acr build, ensure the context is set to the solution root directory.
To set the context correctly, use the --file parameter to point to your Dockerfile and then set the context. In the command above, the context is “.”, which is the current directory.
There are around 15 steps in the process, so you’ll see quite a bit of output while the command is running. If the process completed successfully you should see a final line of output similar to the following:
Your application image is now in your container registry. Woo-hoo!
Deploy your application to your Azure Kubernetes Services cluster
Now that your AKS cluster is setup and you have an image to deploy, it’s time to deploy your application to your cluster. To setup your cluster, you’ll use the aks commands in the Azure CLI to get the tools and credentials you need to connect to your cluster. You’ll also use the kubectl (often pronounced “kubb - cuddle”) tool to control and deploy your Kubernetes cluster.
Logging In To Your Kubernetes Cluster
You can interact with your Kubernetes cluster by using the kubectl command-line tool. Install this tool from Azure by running the following command:
Download your Kubernetes credentials from Azure by running the following command, substituting the appropriate values for --resource-group and --name with the values you created in the generate-aks-environment.ps1 file for $kubernetesResourceGroup and $aksClusterName, respectively:
This command should produce output similar to the following:
Secrets and Configuration in Kubernetes
In cloud-native applications, configuration is stored in the environment of the application. In Kubernetes, there are a few ways to store configuration. The first way is by using a ConfigMap. This is a key/value storage mechanism that you can create and inject into your application. ConfigMaps are easy to create, but they store configuration in clear text, so don’t use them for secret data.
For your project, you are going to use a config map to store non-sensitive information. To do this, add a file to the infrastructure called app-configmap.yaml and add the following:
The names of your data keys correspond to your config variables. The Environment provider in ASP.NET Core swaps out “__” for “:”, so define your variables using “__” in your yaml file.
Create your config map by using the kubectl apply command. This command updates the cluster’s internal database with your configuration object:
This should return:
Kubernetes also has a built in Secret object you can use to store secrets. This encodes and encrypts the secrets so they cannot be viewed in cleartext.
To create a secret, create a PowerShell variable using the following template, substituting your fully-qualified server name, database/catalog name, User ID, and password from the previous steps:
In the same PowerShell window, execute the following Kubernetes CLI command to create the secret:
You should see a “secret/db-secret created” message in response.
Like the configMap, secrets use a key-value structure. In ASP.NET Core, the Environment provider has some special prefixes for different types of database connection strings. For Azure SQL, if you prefix your environment variable name with “SQLAZURECONNSTR_” it will be imported as an Azure SQL Connection string.
Deploy Your Application
The final step is to deploy your application on your AKS cluster. Kubernetes has an internal database that describes what should be running in the cluster. This includes what applications, how many instances, and any associated networking. Kubernetes will spin up resources so what’s running looks like its internal database.
In your infrastructure directory, create a file called app-deployment.yaml and add the following code to the file, changing the value of wiscoipsumacr in the spec node to the unique name you created for your ACR ($acrName):
This file describes a deployment and a service, which are two common Kubernetes resources. A deployment in Kubernetes describes an application to be deployed. Deployments usually include one or more containers. Services provide a path to your deployed applications. (Note that the service name is different than the ACR name.)
Kubernetes files begin with a description of the type of resource they are describing. In this case, we’re describing a deployment:
The containers section is where you define the applications you’re going to run. In this case, we’re grabbing the application we pushed into the container registry:
As noted above, instead of the value wiscoipsumacr.azurecr.io your file will reflect the unique name you created for your ACR. (For example, cheezywiscoipsumacr1337.azurecr.io).
The resource limits will ensure that your application doesn’t take up too many resources. If your application exceeds its limits, Kubernetes will either throttle it or shut it down and spin up a new one. CPU in Kubernetes is measured in “miliCPUs”. 1000 miliCPUs = 1 core.
The port node identifies the HTTP port the application is going to run on:
The envFrom takes values from configuration objects like ConfigMaps and Secrets and injects them into your application’s environment.
The last part of the file describes a service. You can have many resources in a deployment, separating them with three dashes (“---”). In this case, you’re going to use a load balancer service to serve your app. This load balancer service takes your app and exposes it to the world on port 80.
Apply the deployment file you just created by running the following PowerShell command in the directory containing your app-deployment.yaml file:
Successful execution produces the following output:
You have a deployed application running on your cluster.
Congratulations! You’re kind of a big deal now.
Get your application’s public IP address
To figure out the IP your application uses, you can monitor your service using the following Kubernetes CLI command:
The --watch parameter will continue to run the command until your application gets an IP. Eventually, you’ll get something like this:
Test your Kubernetes deployment
Once you have an external IP, you can point your web browser to it and see your deployed app.
If you have an external IP and you don’t see your app, check your local application. Make sure it runs correctly on your machine. If it runs well on your machine, try looking at the logs for your app in your cluster. The following command will display the log data from your application:
Remove your test deployment
To clean up—and save yourself some money on Azure fees—delete your resource group as soon as you’ve finished experimenting with the hosted app. Deleting your resource group will dispose of the AKS cluster and the container registry you created so you don’t get charged any additional money for having the resources just sitting there.
Summary
In this post you learned about refactoring cloud-native applications in ASP.NET Core. You learned about the different cloud migration patterns and some of the different refactoring steps you need to move applications into the cloud. You also learned how to build the infrastructure to run your newly refactored application.
Go forth and migrate your apps to the cloud.
Additional resources
Azure Kubernetes Service Documentation – The official Microsoft Azure documentation for AKS includes resources for C#, Python, Node.js and other languages.
Installing the Azure CLI – Keeping the Azure CLI up-to-date is important, and you do that by running the installer or the PowerShell command shown on this page. The CLI is updated fairly frequently: the current version changed at least 3 times during the creation of this post.
The Twelve-Factor App – The Twelve-Factor App, by Adam Wiggins, describes an approach to building web apps (software-as-a-service) that conform to some general design principles.
12-Factor Apps in Plain English – This gloss on the methodology is a useful companion to the original document, expanding, explaining, and contextualizing the source material.
Dustin Ewers is a software developer hailing from Southern Wisconsin. He helps people build better software. Dustin has been building software for over 10 years, specializing in Microsoft technologies. He is an active member of the technical community, speaking at user groups and conferences in and around Wisconsin. He writes about technology at https://www.dustinewers.com. Follow him on Twitter at @DustinJEwers.
Related Resources
Twilio Docs
From APIs to SDKs to sample apps
API reference documentation, SDKs, helper libraries, quickstarts, and tutorials for your language and platform.
Resource Center
The latest ebooks, industry reports, and webinars
Learn from customer engagement experts to improve your own communication.
Ahoy
Twilio's developer community hub
Best practices, code samples, and inspiration to build communications and digital engagement experiences.