How to Create a Landing Page with Laravel, Vue.js, and SendGrid
Time to read: 14 minutes
May 19, 2021
Written by
Reviewed by
Landing pages are everywhere in modern business. They're used when people offer a free giveaway in return for someone joining a mailing list, to sell a product or service, and as glorified resumes.
Landing pages are a great solution for these kinds of business needs as they can be rapidly created and deployed. Knowing how to create them can also be a great skill for developers to have, whether creating landing pages for others or for personal projects.
In this tutorial, I'll show you how to create a landing page using a combination of Laravel 8, Vue.js, and SendGrid. It's a reasonably long tutorial. By the end of it, I'm confident that you'll have learned a lot.
Prerequisites
To complete the tutorial, you will need the following 4 things in your local development environment:
- Prior experience with Laravel (ideally version 8.0) and Vue.js (ideally the 3.x series)
- A free or paid SendGrid account
- Composer installed globally
- cURL
- Node.js and npm
- PHP 7.4 (with the cURL, mbstring, intl, and OpenSSL extensions installed and enabled)
- The Laravel installer
Application Overview
Before we dive in and start building the application, I want to give you a broad overview of the application's user flow, which you can see in the image below.
The landing page will allow users to sign up for notifications about upcoming offers from the fictitious online store that I created — The Little PHP Shop —in a recent SendGrid tutorial
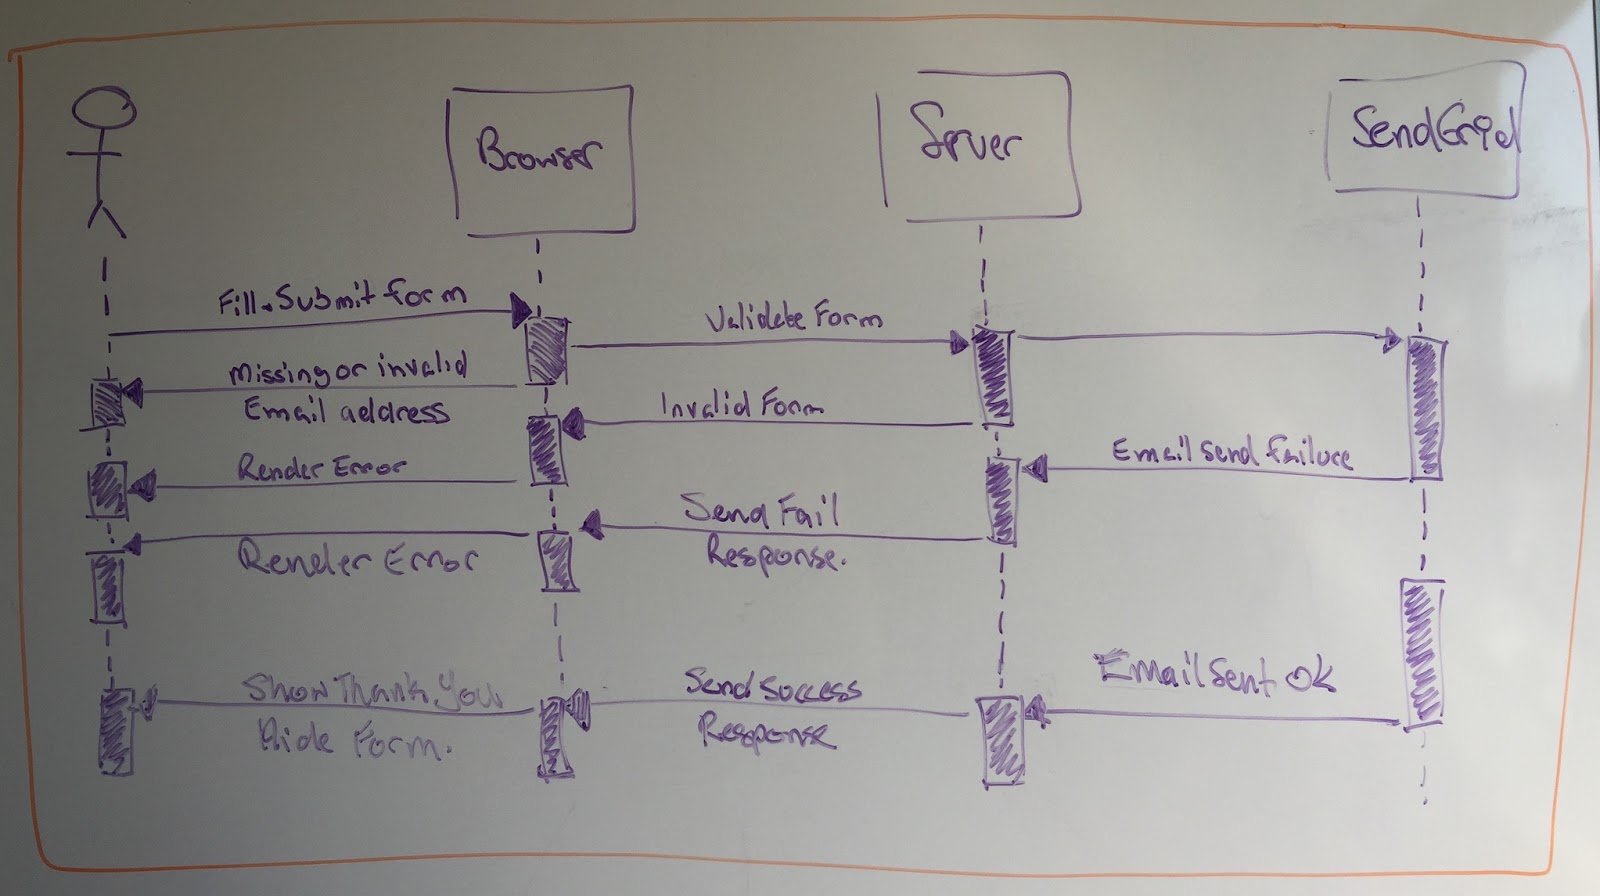
The application will have two routes, / and /signup, both handled by a single controller, named LandingPageController.
When the user requests the default route (/), they'll see a form asking them to provide their email address so they can sign up for notifications from The Little PHP Shop.

The form will be validated on both the client- and server-side after submission. If client-side validation is successful, the email address will be sent as a JSON object to the server. If the server-side validation passes, the user will be registered and an email will be sent to them confirming their registration.
At this point, a JSON response will be sent to the client confirming signup success. When the client receives this, it will hide the form and display a message confirming that everything went well.
If server-side validation failed or if the user could not be successfully subscribed, a JSON response will also be sent to the user. This JSON response will indicate both that the process failed and why.
Create the backend application
Bootstrap the Laravel application
The first thing we need to do is to bootstrap a new Laravel application. To do that, run the command below. Feel free to use any of the other methods of bootstrapping Laravel applications if you prefer them.
The bootstrapped application will be created in a new directory named landing-page. Change to the directory and start the application to check that everything's working by running the commands below. The app will be available on localhost on port 8000.
If the application is running, you will see a page similar to the screenshot below. Stop the application running by pressing Ctrl+c.
Install the required packages
With the application bootstrapped, we now need to install two external packages:
- s-ichikawa/laravel-sendgrid-driver: to send emails through SendGrid. This is because Laravel doesn't provide a native email transport for SendGrid. I picked this library as it's the only package designed specifically for Laravel.
- sendgrid/sendgrid: to add a contact to our contacts list in SendGrid.
To install them, run the command below in the root directory of the project.
Create an API key
Next, you need to supply the application with your SendGrid API key. To do that, after logging into SendGrid, navigate to "Settings ->API Keys". Once there:
- Click “Create API Key” to create an API key
- Give the new API key a name
- Accept the default API Key Permission of “Full Access”
- Click “Create and View”
After the API key is created, copy it so you can use it in a later step.
Then, open the .env file in the root directory of the project and add the key/value pair below to the end of the file. Replace YOUR-KEY-HERE with the API key that you created and copied. In addition, update two existing keys in the file: MAIL_MAILER to sendgrid and MAIL_FROM_ADDRESS to an email address of your choice.
Note: the email address must be listed as “Verified” in the “Single Sender Verification” table in Sender Authentication.
Create a Mailable
We now need to create a Mailable class that will store the email's subject, set the view to render for the email's body, and specify the mail transport to use. To do that, run the command below in the root directory of the project.
A new file, named Subscribed.php, will be created in app/Mail. Copy and paste the code below in place of the file's existing code.
Most of the action in a Mailable happens in the build method. The method calls a series of other methods to set:
- The template to render to create the email's body (
view) - The email's subject (
subject)
The build method finishes by calling sendgrid, which ensures that the email is sent using the SendGrid transport.
Create the Landing Page Controller
Now it's time to create a controller to handle requests to the application's two routes. To do that, run the command below. When the command completes, a new file, named LandingPageController.php, will have been created in app/Http/Controllers.
With the file created, open app/Http/Controllers/LandingPageController.php and add two methods to it. Firstly, the show method from the example below, and then the signup method. I've linked to the signup method as it's a bit too long to directly include in the article.
After that, add the following use statements for the signup method.
I'll skip over the show method, as it should be self-explanatory, and dive into the signup method. The method starts off using Laravel's Validator facade to validate the data sent in the request, retrieved by calling $request->all(), against a validation ruleset, with the result being stored in $validator.
To pass validation, the request body needs to contain an element named email whose value is a legitimate email address. In addition, I've added the email-specific Request For Comment (RFC) and Domain Name System (DNS) validation rules because:
- RFC validation: ensures that the email is valid according to the email RFC. However, even if it passes that validation, the email may not be universally routable, such as
matthewormatthew@lan. - DNS validation: ensures that the email address doesn't contain reserved top-level DNS names, or mDNS, and private DNS namespaces, such as
test,local,lan,intranet, andinternal.
Note: to learn more about Laravel's validators, check out the official documentation.
If the result of calling the fails method returns false, a JSON object is returned that contains a list of form validation errors. These are retrieved by calling the $validator's errors method. In addition, the response's status code is set to422 to show that the request was not processable.
If validation succeeded, however, it's time to add the email address to our contact list. To do that, a new SendGrid object is instantiated, which requires our SendGrid API key that is retrieved from the 'SENDGRID_API_KEY' environment variable.
After that, a PUT request is sent to the SendGrid API's /marketing/contacts/ endpoint. To that request, an array of contacts is passed, albeit with only one contact, where we specify the new contact's email address.
If the response's status code is not 202, then we know that something went wrong. If this happens, a JSON response is returned to the client containing three properties:
status, set tofalsemessage, set to "subscription failed"reason, initialized with the errors returned from the SendGrid API call
If the user was successfully added to our contacts list, it's time to send them a confirmation email. To do that, the code makes use of two methods on Laravel's Mail Facade: to to set the recipient and send to send the email.
The recipient is retrieved from the email address sent in the request body, handily retrieved by calling $request's input method. The remainder of the email's properties are specified in Subscribed, the Mailable object which we created previously, which is passed to the Mail facade's send method.
The attempt to send the email is wrapped in a try/catch block, just in case there's a problem sending the email, such as attempting to send from an email address that isn't listed as “Verified” in the “Single Sender Verification” table.
If an error is caught, a JSON response is returned to the client containing three properties, similar to before:
status, set tofalsemessage, set to "registration failed"reason, initialized with the exception's message
At this point everything has succeeded, so it's time to let the user know that. The code does that by returning a JSON response again, but this time with only two properties: status set to true and message set to "registration is completed".
It's small but effective!
Note: there are more maintainable ways to code the controller method, but for the purposes of an example, I've included all of the required calls in the body of the signup method.
Create the required templates
Now it's time to create the templates that our app will use. Under resources/views, we're going to create two directories (email and layouts) and three files (landing.blade.php, email/subscribed.blade.php, and layouts/app.blade.php).
Here's a quick visual representation of the file & directory structure that we'll create.
I've chosen this structure primarily because I love the Two-Step View pattern. If you're not familiar with it, it essentially splits views into two parts. There's one part for any content that is consistent across all requests (layouts/app.blade.php), and one part for content that is request-specific (landing.blade.php).
It might seem like overkill on such a small application, but I've found that this approach makes it easier to create more maintainable templates.
Run the commands below to create the file and directory structure.
Note: If you're using Microsoft Windows, the -p flag isn't necessary, and the touch command doesn't exist, so try the following commands instead.
Update resources/views/layouts/app.blade.php
Open resources/views/layouts/app.blade.php and paste the code below into it. Most of it is pretty standard Laravel template code which you can find in resources/views/welcome.blade.php.
The final two tags in the head section are worth noting, however. Here, we're linking the CSS stylesheet that we'll create later in the tutorial and storing a CSRF token, which Laravel will generate for us (more on that shortly), as a meta tag.
We're not going to touch resources/views/landing.blade.php and resources/views/email/subscribed.blade.php now, as they're covered later in the tutorial.
Update the routing table
We only need to make two changes to the routing table. We need to change the default route's handler, and add a new route to handle signups. To do that, replace the existing route in routes/web.php with the code below.
Also, add the use statement for the LandingPageController as well:
Update Laravel's configuration
With the routes defined, we now need to update three of Laravel's core configuration files: config/cors.php, config/mail.php, and config/services.php.
Update config/cors.php
The first file that we need to update is config/cors.php. This is so that the XHR requests that we'll make in the Vue.js frontend can successfully make requests to the backend Laravel app.
To enable that, update the paths element's array in the array returned in config/cors.php, so that it matches the example code below.
Update config/mail.php
Next, we need to update config/mail.php to register sendgrid as a valid mail transport. To do that, add the configuration below to the mailers element's array, at the end of the existing list of transports.
Update config/services.php
The final change that we have to make is to config/services.php, to register sendgrid as a service with Laravel's DI Container. To do that, add the configuration below at the end of the array returned in the file.
Create the Vue.js application
Now that we've created the backend of the application, it's time to create the frontend Vue.js application. Before we can do that we need to install several dependencies.
Gladly, there aren't that many, just Vue.js, and Laravel Mix with support for Tailwind CSS, PostCSS and Lodash, to simplify building the frontend.
To install them, run the commands below in the root directory of the project.
Update resources/views/landing.blade.php
I won’t include the full contents of resources/views/email/landing.blade.php since it’s quite long and would take up too much space here in the article. You can find it in the GitHub repository for this project. Copy and paste the contents into the template.
I'm going to step through the most relevant parts of the file. First, let’s visualize what’s happening in the file so it's easier to appreciate what's going on.
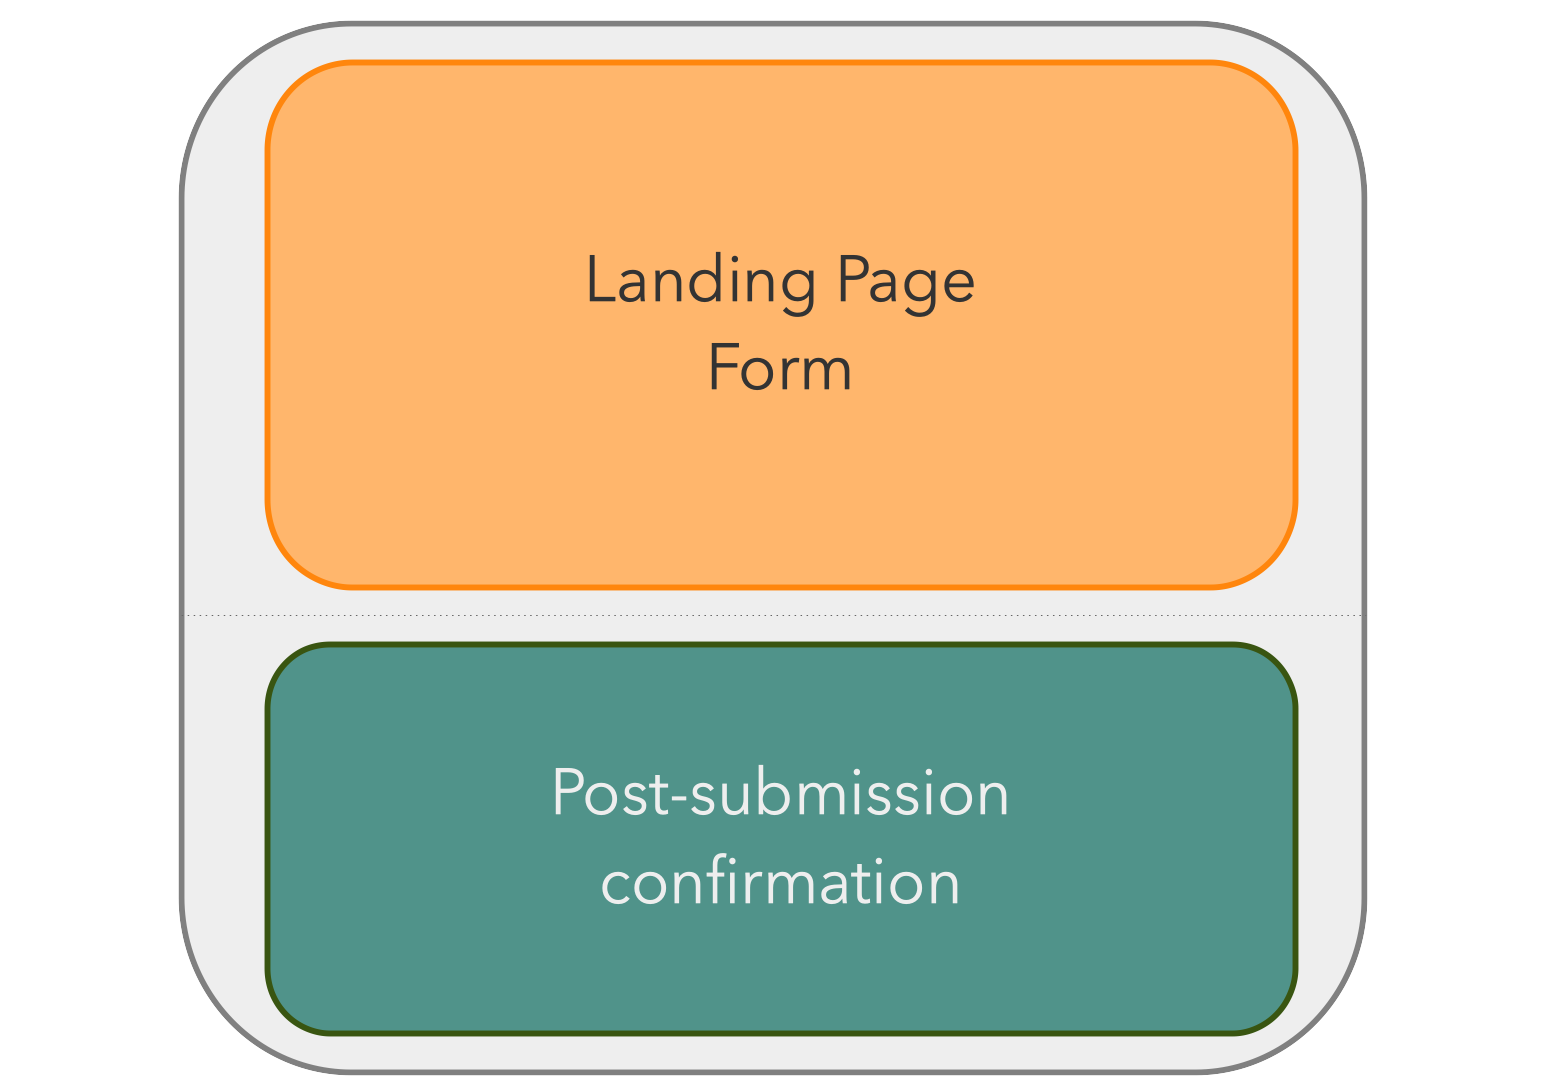
We're creating a small Vue.js application, called app, that is composed of two parts:
- The landing page form that the user sees when they initially land on the page
- A post-submission confirmation which appears in place of the form after a successful form submission.
Let's start off with the landing page form. It contains two parts:
- A header and marketing description to convince the reader to provide their email address
- A form that the user can fill in and submit, which can render errors when the form submission fails validation or the server-side request fails.
The section directly below is part one. There's not a lot to it, except for the v-show directive, which conditionally displays the element if submitted is set to true.
The next section uses a custom Vue.js component, error-item, to reduce the amount of code required in the template and to make the error rendering more maintainable. We’ll discuss this component shortly.
This section makes use of a v-if directive to conditionally render the element based on whether there are any errors or not. It uses Vue.js' @submit.prevent attribute to pass control of the normal form submission process to the processForm method. It uses Laravel Blade's CSRF directive to render a CSRF token in a hidden form field.
One other thing worth noting is the v-model directive in the email input field, v-model="form.email". This creates a two-way binding between the form element and the form.email property in the JavaScript code. We'll come back to this shortly.
Note: We'll use the namespace form.email to keep the naming more intuitive than plain email.
The final section contains the confirmation message which will be displayed when the form is successfully submitted. We can keep it simple by just specifying a header and body text.
Create the JavaScript code
Next, let's work through the JavaScript that's going to power the frontend. It's a little long, so copy the code from the GitHub repository and paste it in place of the existing code in resources/js/app.js. Then, let's step through it.
The code starts off by defining sendGridApp, which forms the basis of our Vue.js application, which contains 3 data properties:
errors: This is a list of form validation errorsform.email: This stores the email address that the user suppliessubmitted: This determines whether the form has been successfully submitted or not. If it's set tofalse, the form will be displayed. If set totrue, then the confirmation message will be displayed in place of the form.
Next up, we define sendGridApp's methods. Starting with processForm, this is triggered when the form is submitted, checking if the email's been set. If it hasn't, it sets an error message and returns false, so that form submission stops. If it has, then it calls subscribeUser to subscribe the user to the list.
subscribeUser makes a POST request to /signup, with a JSON body, containing a JSON-encoded copy of the submitted form.
The request headers are important to pay attention to. This is because they ensure that Laravel interprets the request as an XHR request, not a normal form submission (Content-Type and Accept), and that the request is valid because it has a CSRF token (X-CSRF-TOKEN).
If we were building a purely server-side application using only Blade templates, then we would only need to include Blade's @csrf directive, and Blade would do the rest. However, it's not quite so simple with JavaScript.
The code usesthe Promise's then method to retrieve the JSON in the response (if the request was successful) or to throw an Error (if it was unsuccessful). If the request was successful, the next then method is called.
Here, it sets submitted to true, which does several things:
- Hides the form
- Displays the confirmation message
- Clears the email address entered in the form
Finally, if something goes wrong, the error is caught and logged to the console.
Finally, a new Vue.js app is created, named app, with the const that we just defined. The app creation code defines a small component for rendering form errors and mounts the app.
Create the stylesheet
Next, in resources/css/app.css, add the code below. It includes Tailwind's base, components, and utilities styles, and creates several additional base styles for some elements that are common across the view templates.
Update resources/views/email/subscribed.blade.php
I've not included the full contents of resources/views/email/subscribed.blade.php, as it is quite long and would take up too much space here in the article. You can find it in the GitHub repository for this project. Copy it and paste the contents into the template.
Now, let's step through the most relevant parts of the file.
The template extends resources/views/layouts/app.blade.php, by setting the content for the content section, when rendered. The content itself is relatively simple, just thanking the user for subscribing, and ending by giving the user a link to unsubscribe.
Build the frontend application
At this point, we're just about ready to test the app. However, we need to build the frontend and its supporting files before we can do that. Gladly, Laravel Mix makes this pretty trivial. To start, we have to update one configuration file and create a second configuration file.
Update webpack.mix.js
Because Laravel Mix comes bundled with Laravel, its configuration file, webpack.mix.js, is already available and contains a basic configuration.
However, we need to make two additions to it. The first addition supports Laravel Mix for Vue.js single-file components. The second addition supports Tailwind CSS. Add the highlighted changes below to webpack.mix.js.
Create tailwind.config.js
Because we're using Tailwind CSS to style the frontend and because we've just added support for it to Laravel Mix's configuration file, we need to supply the tailwind.config.js configuration file so that it can be built properly.
Create a new file named tailwind.config.js in the root directory of the project, then copy and paste the code below into it.
This instructs PostCSS to parse all PHP, Blade, JavaScript, and Vue.js files in the above directories and to build a list of all Tailwind CSS styles discovered therein. Using that list it strips out any unused styles from the default Tailwind CSS stylesheet, generating a stylesheet around 20.5KB in size.
This is handy because the uncompressed default file is 3566.2Kb in size. This is far too large for a website that needs to be performant.
With the files in place and configured, in the terminal in the root directory of the project, run the command below.
This command runs Laravel Mix telling it to:
- Generate public/js/app.js from resources/js/app.js
- Generate public/css/app.css from resources/css/app.css
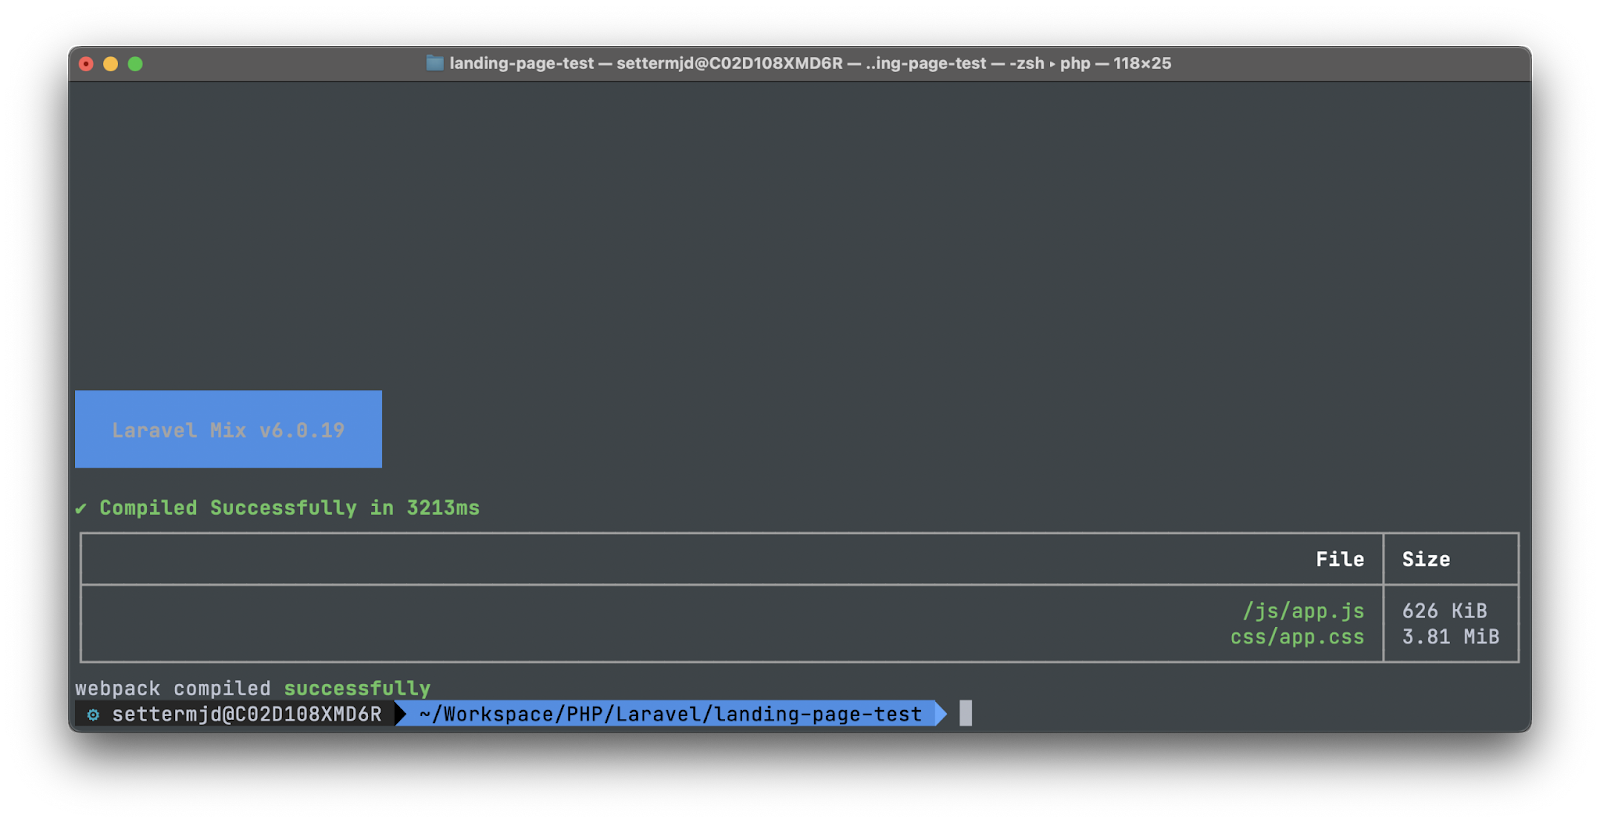
This should only take a few seconds to complete and render the following to the terminal.
Test the application
With the code in place and all wired up, it's time to test that it works properly. To do that, start the application by running the command below.
Then, open http://localhost:8000 in your browser of choice. Before filling out the form, open up the Developer Tools and change to the Console tab. With everything ready, fill in the form with a valid email address.

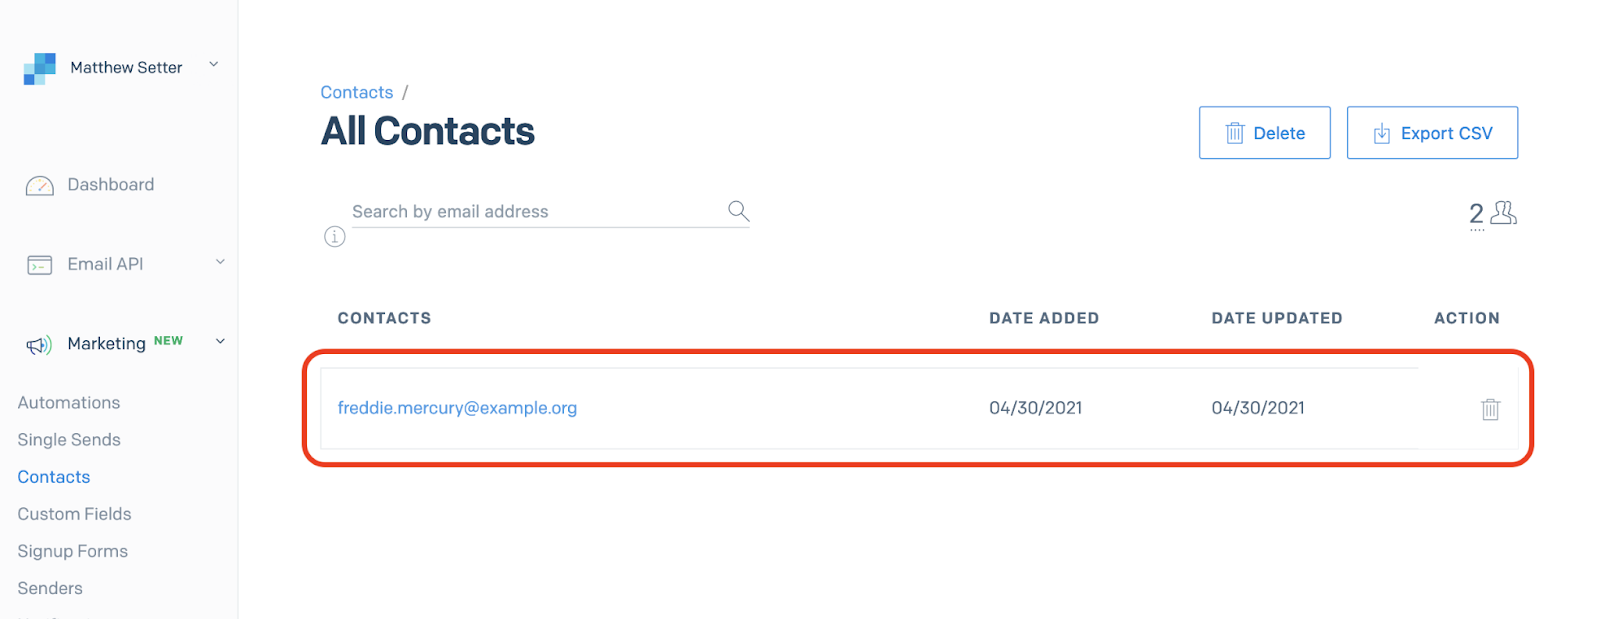
You should see the form hide and be replaced by the confirmation message. Check your inbox for the confirmation email. Then, view your All Contacts list, to confirm that the user was successfully subscribed. If successful, you should see them listed, similar to in the screenshot below.
Now, try again by clicking the "Start over" link and submitting the form without entering an email address or after entering an invalid email address. You should see an applicable error message displayed.
That's how to create a landing page using Laravel 8, Vue.js, and SendGrid
We've stepped through how to turn a stock-standard Laravel 8 site into a basic landing page, one that can sign up a user to a mailing list when they submit their email address.
While not a lot of emphasis was placed on it, we also made use of Laravel Mix and Tailwind CSS to streamline the process of creating a custom, performant front end for our application.
If you'd like to know more about what makes a great landing page, check out this article from Copyblogger. Otherwise, you can find all the code for the application which we build in this series over on GitHub.
Matthew Setter is a PHP and Go editor in the Twilio Voices team, and a PHP and Go developer. He’s also the author of Mezzio Essentials and Deploy With Docker Compose. You can find him at msetter@twilio.com. He's also on LinkedIn and GitHub.

Related Resources
Twilio Docs
From APIs to SDKs to sample apps
API reference documentation, SDKs, helper libraries, quickstarts, and tutorials for your language and platform.
Resource Center
The latest ebooks, industry reports, and webinars
Learn from customer engagement experts to improve your own communication.
Ahoy
Twilio's developer community hub
Best practices, code samples, and inspiration to build communications and digital engagement experiences.