Designing Chat Applications for iOS Using Swift
Time to read:
December 10, 2015
Written by
This post is part of Twilio’s archive and may contain outdated information. We’re always building something new, so be sure to check out our latest posts for the most up-to-date insights.

One of my favorite mobile applications on iOS is Slack. So many of my daily conversations happen inside of this well-designed chat application. They get so many of the little details right such as the ability to swipe down or tap to dismiss the keyboard. There’s a level of polish in the application that is missing in many apps. So, when I started building things with Twilio IP Messaging I really wanted to replicate the things that they do so well. It quickly turned into a struggle as I fought Auto Layout and UITableViews. I went to the Internet for help and that’s when I found SlackTextViewController. All of the features I love about Slack’s message view are available as an easy to use control.
In this post we’ll pick up where the Swift iOS Quickstart leaves off and enhance it with the feature-packed SlackTextViewController. Along the way we’ll learn how to light up more of Twilio IP Messaging’s features such as typing indication and channel history. We’ll also take a look at how to use Auto Layout to design the view for an individual message such that it automatically resizes.
Before we get started you’ll need to work through the Swift iOS Quickstart since we’ll be using that as our starting point. I’ll wait here patiently while you build that…

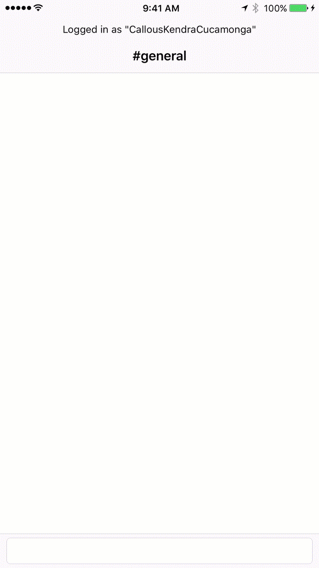
Great, you’re back! Here’s what we will be building in this post:
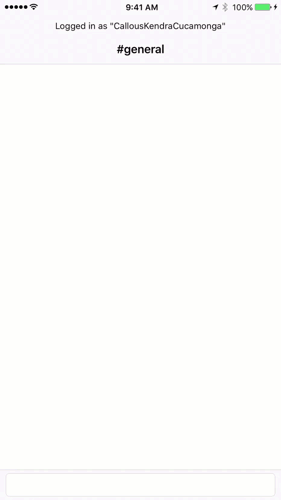
The big improvements are keyboard management, typing indicator and the built in send button. These are all provided by SlackTextController. Let’s get started.
Gearing Up
Now that you’ve gone through the Quickstart, let’s recap what you have already:
- IP Messaging service set up through Twilio
- Backend application for obtaining tokens
- Swift iOS application that authenticates a user with the IP Messaging Service using a random name and joins a chat channel named ‘general’
To move forward with our improvements to the Quickstart we’ll need to add SlackTextViewController. The easiest way to get this into our application is using CocoaPods. CocoaPods is a dependency manager for Objective-C and Swift libraries. Thankfully the Quickstart already uses CocoaPods to install the Twilio IP Messaging SDK so we’ll just add another CocoaPod to our dependency list. Open up Podfile from the Pods project in the Quickstart workspace in Xcode and add the following lines to it:
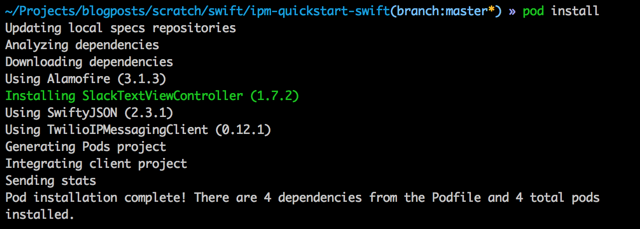
The use_frameworks! line ensures that any Objective-C libraries installed as pods will be exposed as dynamic frameworks in the Swift project. This prevents us from needing to import Objective-C header files for these libraries in a bridging header. After you have saved the Podfile run the following command from the terminal in your project directory:
You should see some output indicating that SlackTextViewController has been added to the project:
You’ll need to build the project after installing the new pod for the dependencies to properly be picked up by Xcode. With SlackTextViewController installed let’s add some more IP Messaging features to our app while also adding some UI polish.
Migrating to SlackTextViewController
The Quickstart uses a UITableView to display the messages for the chat channel. The good news for us is that SlackTextViewController uses a UITableView by default and implements the same methods we used in the Quickstart for populating the UITableView. This means we will be able to reuse a lot of the code from the Quickstart’s implementation of the message list. There is quite a bit of unnecessary code in the Quickstart’s ViewController class though due to the features SlackTextViewController takes care of for us that had to be implemented in the Quickstart. To save describing copying a bunch of code over into a new file or deleting a bunch of code from the existing file I’ve done that work for you. Replace the code in ViewController with the code in this Gist. The code in the Gist makes ViewController a subclass of SLKTextViewController and sets up most of the code we had in the previous version of ViewController. Code that managed the keyboard, the text field and the send button have been removed since SlackTextViewController handles these for us.
The new ViewController class also adds some methods to load all of a channel’s messages into the table view and a method that adds messages sorted by timestamp to the table view. Here’s what these methods look like:
The ViewController uses these methods to load a channel’s message history when it is joined:
At this point the project will build but it won’t run correctly. The app will connect to IP Messaging and join the general channel but no messages will be displayed. The problem is that the Main.storyboard file that set up our user interface was built for the code in the Quickstart’s version of ViewController. Let’s fix that by adding the user interface for our new SlackTextViewController code. Open up Main.storyboard and add a new View Controller:
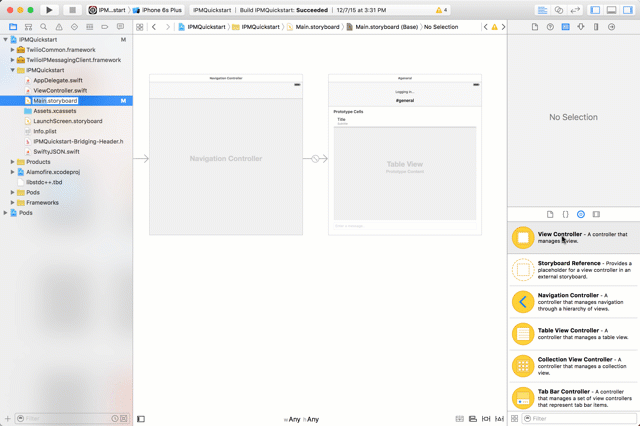
Control-drag from the Navigation Controller to the new View Controller and select the root view controller relationship segue:
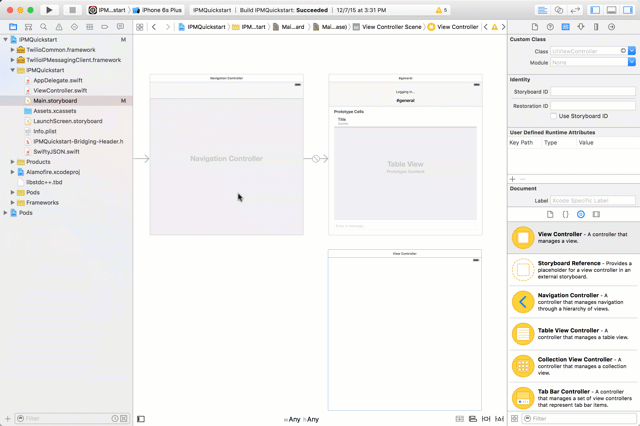
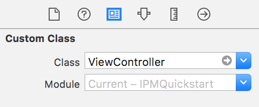
Select the View Controller and in the Identity Inspector set the Class to ViewController:
Delete the original root view controller (the one that still says “#general” in the header) from the storyboard and save the file. The application will build and run at this point but if you try it you’ll notice it crashes right at the point when it would normally display the message list. Perusing the logs in Xcode we can find the cause:
The problem is that the UITableViewCell we were using in the Quickstart is no longer available since it was embedded in the storyboard. Let’s fix that and dive into some Auto Layout.
Growing Up With Auto Layout
We’re going to create a message cell that looks like this:

The message cell is composed of two UILabels. One is a single-line label for the author of the message. The other is a multi-line label that will expand for longer body text. In order for the cell to resize we need to make use of Auto Layout to specify how the cell’s contents should be sized and laid out. This will allow the cell to resize when the body text is longer than one line or when the user specifies larger text sizes using Dynamic Type.
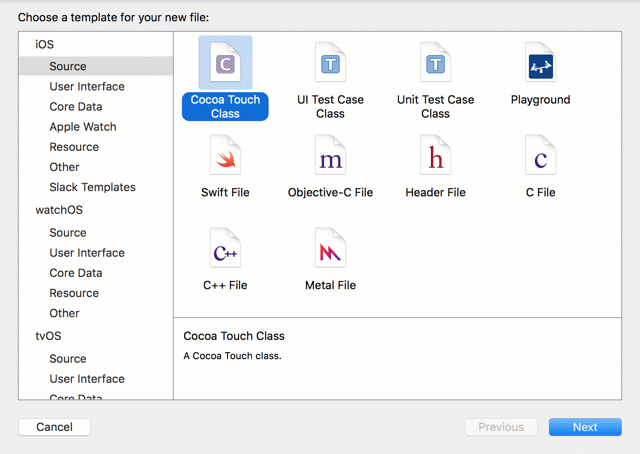
Let’s start by creating a UITableViewCell in our project. Create a UITableViewCell subclass named MessageTableViewCell from Xcode’s File->New->File… menu:
The first thing that we’ll do in MessageTableViewCell.swift is add properties for our two labels and configure their properties using lazy instantiation. Replace the contents of MessageTableViewCell.swift with this code:
The lazy keyword indicates we want to instantiate and configure the labels at the point where they are first accessed in code. We use UIFont.preferredFontForTextStyle to set the font instead of hardcoding it so that we can accommodate Dynamic Type users. For the body label we set the number of lines to 0 so that it can expand vertically if its text is long.
Next, let’s add initializers to the class so that we can instantiate the cell from our table view:
You might see an error in Xcode at this point because we haven’t written the configureSubviews() method yet. We’ll take care of that now. The configureSubviews() method will set add the labels to the cell set up the Auto Layout constraints. To make our lives easier while using Auto Layout we’ll use the popular library SnapKit. SnapKit makes it easy to express complicated layout constraints using an easy to read DSL. Add SnapKit to your Podfile:
Run pod install from the terminal and then build the project to bring in the new pod. Then import the SnapKit library at the top of MessageTableViewCell.swift:
Now we can add the configureSubviews() method:
The highlighted lines use SnapKit to create Auto Layout constraints for the two labels. The lines of code are pretty easy to read but a diagram might help picture what is going on:
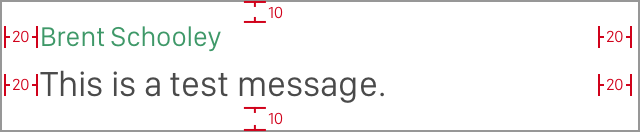
As you can see in the diagram we’re specifying constraints that allow Auto Layout to position the labels within the view. The constraints are created by specifying relationships between the sides of our views. We specified just enough constraints to cover how to position the edges of our views. The sizes will be determined by the content the labels contain at runtime plus the size and orientation of the device they’re displayed in.
With this code in place our auto-resizing table view cell is ready to be used in ViewController.swift.
Plug In the Cell
The first thing we need to do is tell the table view where it can find the message cell we created in the previous section. Add this line to viewDidLoad in ViewController.swift to register the cell’s class:
Now head to the tableView:cellForRowAtIndexPath: method and replace it with the following code:
We also need to set one more important property on our view controller before we run the app. There’s a property of SlackTextViewController called inverted that will cause messages to start from the bottom of the screen instead of the top. For this app we won’t use it but it’s something worth exploring in the future in your own apps. It’s true by default so let’s set it to false in viewDidLoad:
Run the app and you should see messages load into the channel using our new cell. Now that messages are displaying with the new SlackTextViewController let’s explore some of the other features of the control. We’ll start by hooking up the Send button so we can send messages.
I Have a Message For You
SlackTextViewController has a built-in Send button that we can wire up to send new messages to the channel. When the Send button is tapped the method didPressRightButton: will be called. Let’s override that method in ViewController.swift with code to send a new message:
Run the application again and verify that you are now able to send messages to the channel.
What’s That Tapping Noise?
For our last trick in this post let’s enable SlackTextController’s typing indicator. The typing indicator will display just above the keyboard and update whenever IP Messaging tells us someone is typing in the channel. The two methods in the TwilioIPMessagingClientDelegate that we need to provide for this to work are
ipMessagingClient(client:typingStartedOnChannel:member:) and ipMessagingClient(client:typingEndedOnChannel:member:). When these are called they will pass in the channel name and the identity of the member who started or stopped typing. With that knowledge we can use SlackTextViewController’s typingIndicator.insertUserName and typingIndicator.removeUserName to update the typing indicator for our channel. Let’s add these methods to SlackChannelViewController.swift:
We also need to let the IP Messaging service know when we begin typing. We’ll override textViewDidChange and call self.channel?.typing() within it:
Fire up multiple instances of your IP Messaging app (perhaps one simulator and one on a physical device) and start typing in one of them. You’ll see the typing indicator pop up almost immediately in the other instance. By default this times out after 6 seconds or when the user sends a message. Here’s a reminder of how the final product should look:
Got Your Message, What’s Next?
We’ve accomplished a lot in this post. We took the Swift iOS Quickstart project and upgraded it with the powerful SlackTextViewController. We then took a look at how to use Auto Layout to create an auto-sizing table view cell. Finally we hooked up the IP Messaging service’s typing indication feature to our SlackTextViewController. You can view all the changes we made on GitHub. This is a great start towards the usability and design of my favorite chat client but there’s still a lot left to do in future posts. In the meantime, try some of the following:
- Show a loading message while the channel history loads on initial channel join
- Create a channel list (either on it’s own page or in a slide out menu like Slack)
- Add user management with a login page
- Once you have users, add avatars to the table view cell
- Use IP Messaging’s message editing features to allow users to update previous messages
I’m so incredibly excited to see what you will build with this new product. Please share what you build with me on Twitter @brentschooley or send me an email at brent@twilio.com.

Related Resources
Twilio Docs
From APIs to SDKs to sample apps
API reference documentation, SDKs, helper libraries, quickstarts, and tutorials for your language and platform.
Resource Center
The latest ebooks, industry reports, and webinars
Learn from customer engagement experts to improve your own communication.
Ahoy
Twilio's developer community hub
Best practices, code samples, and inspiration to build communications and digital engagement experiences.