Build a Doctor Appointment Bot with Azure Bot Service, Language Understanding, and Twilio SMS

March 02, 2022
Written by
Yan Sun
Contributor
Opinions expressed by Twilio contributors are their own
Reviewed by

Build a Doctor Appointment Bot with Azure Bot Service, Language Understanding, and Twilio SMS

Telehealth services can improve access to healthcare for people living in remote areas. One common issue in remote areas is unreliable internet service. It’s a challenge for patients in remote areas to make appointments via web applications when internet service is poor or not available at all.

SMS is a reliable and low-cost alternative to reach people living in remote areas. In this article, you will learn how to build a doctor appointment booking system which allows users to book via SMS.

System Overview

The architecture of the SMS booking system is illustrated below.

A diagram to explain how the SMS booking system works. Users send text messages using their phones to a Twilio Phone Number, Twilio forwards the message to the webhook URL which is pointing to the Azure Bot, the Azure Bot forwards the message to the Language Understanding service for AI analysis. The Azure Bot responds to Twilio and Twilio forwards the response back to the users" phone.

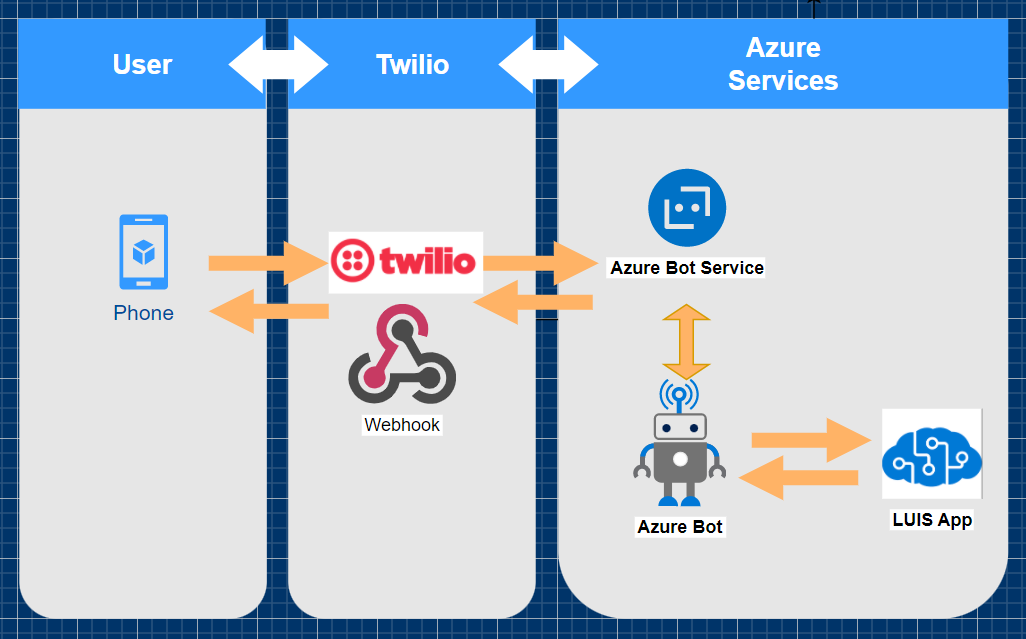
Twilio is the communication channel between Microsoft Azure Bot Service and the end user. The core of the system is an Azure Bot built on the Microsoft Bot Framework. When the bot receives a message, it asks  Language Understanding (LUIS) to analyze the message. LUIS responds with the intent of the message, which the bot uses to respond with a helpful answer.

Prerequisites

You'll need these technologies to follow along:

You can find the completed source code in this GitHub repo.

Create the Language Understanding Service app

Azure Configuration

You need to create a resource group to store the Azure resources you will create later.

Open a PowerShell and sign in to Azure using the Azure CLI:

az login

Run the following command to create a new resource group:

az group create --name rg-bot --location [AZURE_LOCATION]

Replace [AZURE_LOCATION] with the name of your preferred Azure location.

Every resource in Azure is stored in a resource group, and every resource and resource group in Azure is stored in a specific Azure region or location. There are different reasons for picking different locations, but most commonly you want to pick the location that's closest to you and your end users. You can find all regions by running az account list-locations -o table. Find your preferred location and use the value from the Name column to specify the location when creating Azure resources. Keep in mind that not all resources are available in all Azure locations.

To interact with specific types of Azure resources, the resource provider for those resource types needs to be enabled. The most common resource providers are enabled by default, but you'll be using Language Understanding (LUIS) which is part of the Cognitive Services resource provider that is not enabled by default. You can register the Cognitive Services resource provider in Azure Portal, or using the Azure CLI as shown below.

First, check the status of the Cognitive Services resource provider using this command:

az provider show --namespace Microsoft.CognitiveServices -o table

If the RegistrationState is UnRegistered, then run the following command to register it:

az provider register --namespace Microsoft.CognitiveServices --wait

This command may take a minute to complete.

Create the LUIS app and train the model

Language Understanding (LUIS) is a cloud-based conversational AI service, part of Azure’sCognitive Services. It can process natural language text to predict overall meaning, and pull out relevant, detailed information.

To learn how to use LUIS, you need to know a few core concepts:

  • Intent: The purpose or goal expressed in a user’s utterance.
  • Entity: An item or an element that is relevant to the user’s intent
  • Utterance: Unit of speech. Every sentence from a user is an utterance.

Diagram to explain the difference between intent, utterances, and entity. Intent is what a user wants to do, like flight booking. Utterances are different ways to express the intent, like "I want to book a flight form NY to LA". Entities are details of the intent, like NY and LA.

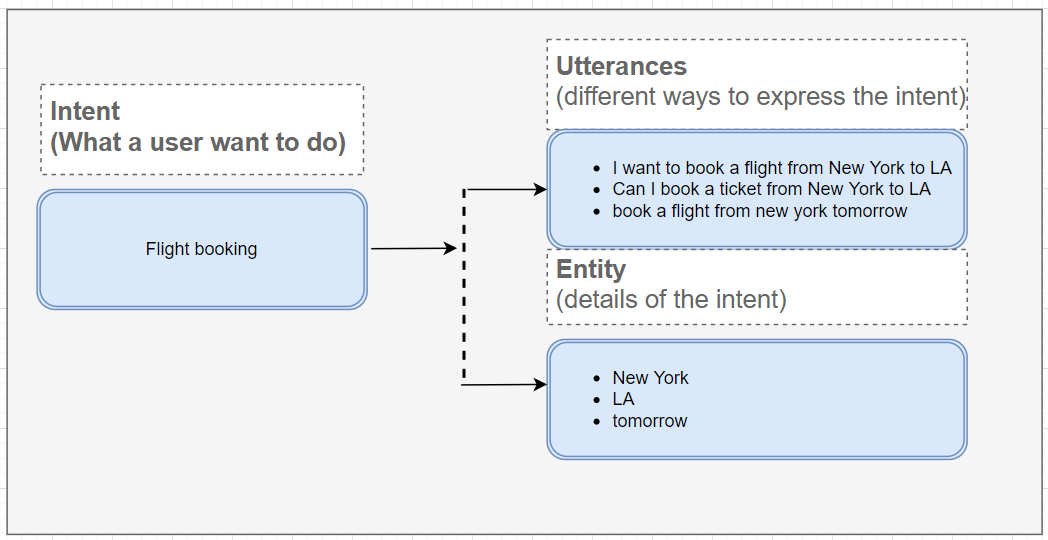
LUIS will act as the brain of the bot by helping the bot understand the incoming messages.

Create the LUIS App

Log in to the LUIS portal with your Azure account.

If you are a new user to LUIS, you will be prompted to Choose an authoring resource.

Choose an authoring resource modal in the LUIS dashboard. The "Authoring resource" dropdown is empty because there"s no authoring resource created yet. There"s a button underneath to "Create a new authoring resource"

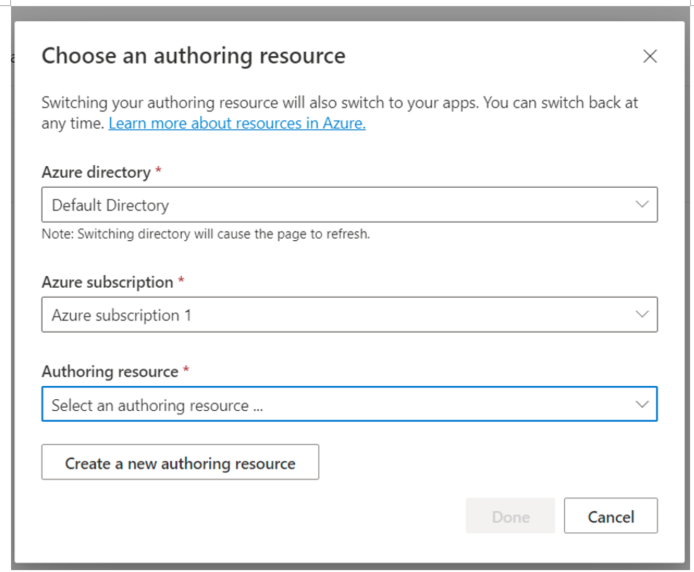
Click Create a new authoring resource if you haven’t created one before.

Another modal will appear to Create a new authoring resource.

Create a new authoring resource modal, which asks for an Azure Subscription, Azure resource group, an Azure resource name, an Azure location, and pricing tier.

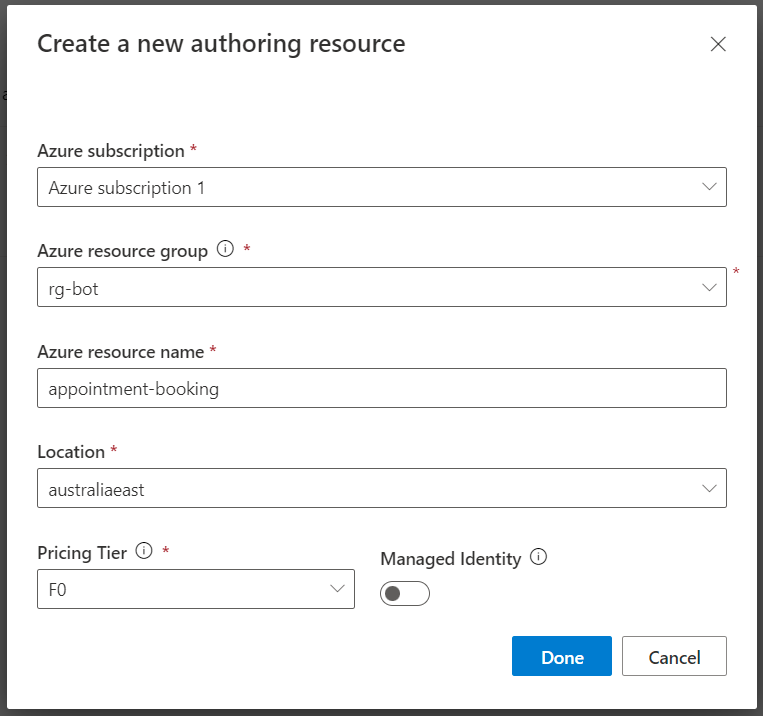
Choose "rg-bot" in the Azure resource group dropdown, and enter “appointment-booking” in the Azure resource name field. Then pick your preferred region in the Location dropdown, choose "F0" in Pricing Tier, and click Done.

You will be redirected back to previous Choose an authoring resource modal. Now, you can click on the Done button, then you will be redirected to the dashboard page.

On the dashboard page, click Create new app. The Create new app modal will appear.

Create a new LUIS app modal that requires a name, but all other fields are optional and can be safely ignored.

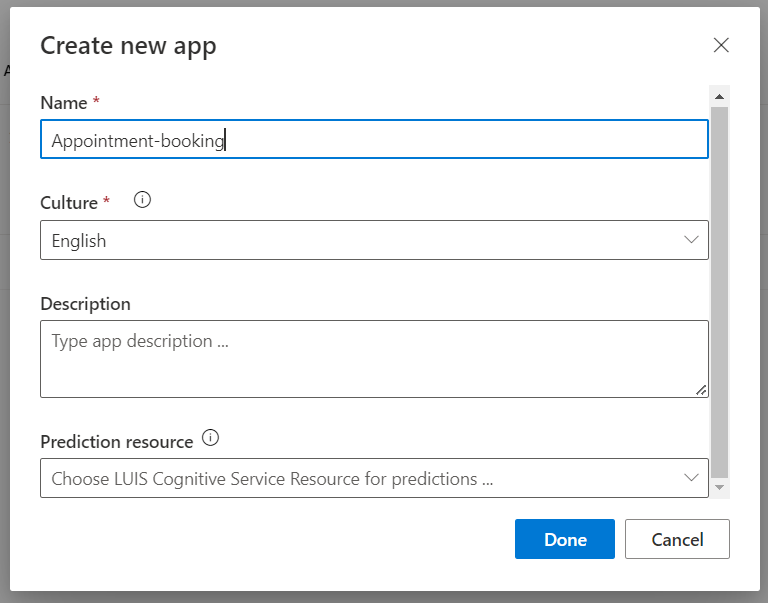
Enter “Appointment-booking” in the Name field and click Done.

After the app is created, a tutorial modal will be shown. Click outside the modal to go to the newly created app details page.

You'll need to collect some key information for later use. Click on the MANAGE tab and then on the Settings link. Take note of the App ID. Now, click on the Azure Resources link on the left menu and then click on the Authoring Resource tab.

The Authoring Resource sub-tab under the manage tab. This sub-tab shows details about the authoring resource, most importantly, the Primary Key and the Endpoint URL.

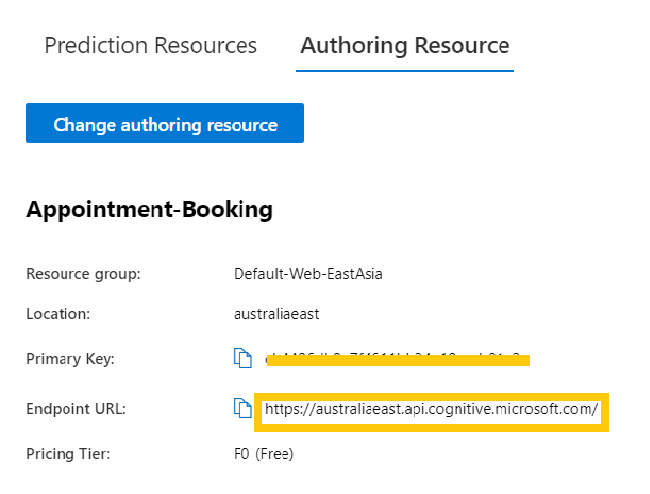
Take note of the Primary key (LUIS API key) and the Endpoint URL.

Now, the appointment-booking LUIS app is created successfully. The next step is to create the heart of the app: the LUIS model.

Import the Model

There are two ways to create the model. You can navigate to the Build tab of the app, and then create entities and intents manually. Or you can import a predefined model file into the app. To save time, you can download this LUIS model JSON file and import it.

After downloading the JSON model file, navigate to the Versions page via MANAGE > Versions. Click on the Import button, and choose “Import as JSON” to open the import popup as shown below.

LUIS"s import as JSON modal to import LUIS models using LUIS JSON files. The modal prompts for a JSON file and a name.

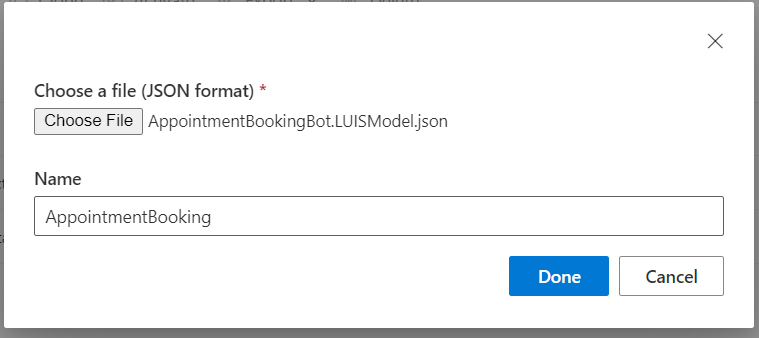
Click on the Choose file button, select your JSON file, and click on the Done button. The new model will be imported into the app.

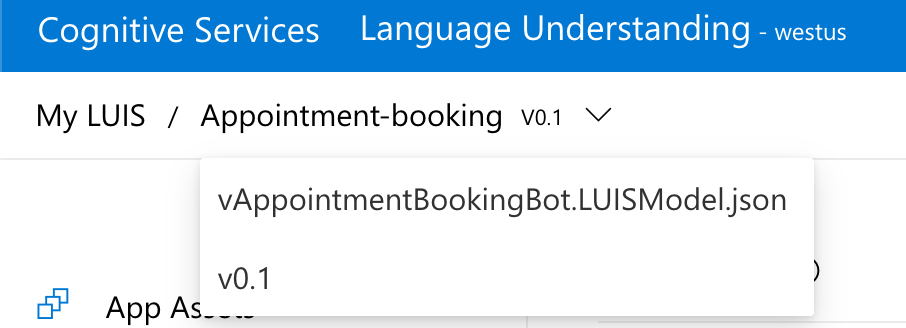
Navigate to the Build > App Assets page and pick “vAppointmentBookingBot.LUISModel.json” from the versions dropdown which you can find in the breadcrumb navigation at the top-left of the page. 

A dropdown in the breadcrumb navigation to switch between model versions. The vAppointmentBookingBot.LUISModel.json file and the default v0.1 dropdown options are shown.

Now, you will see the newly created intents and entities.

Train, Test, and Publish the LUIS Model

After the intents and entities are imported, the Train button in the top navigation bar is enabled.

The navigation bar for the LUIS app containing a "train" button.

Click the Train button to start the training process. The Train button will be disabled and the Test button will be enabled after training is completed.

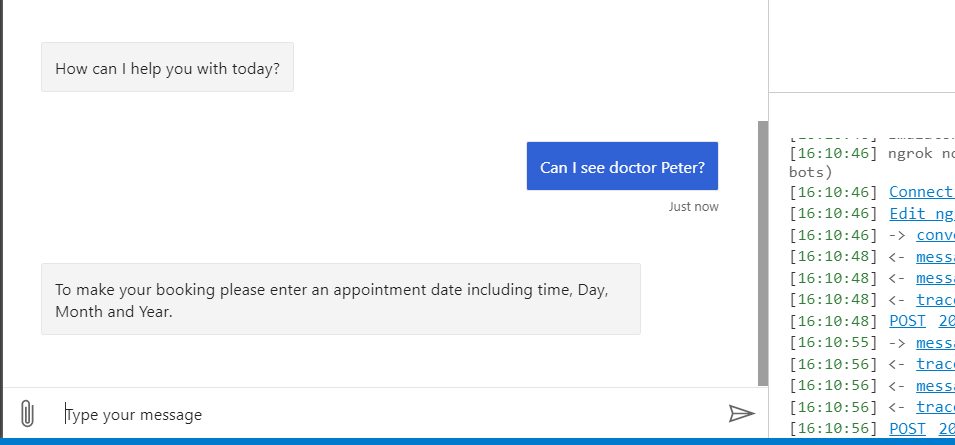
To test the new model, click on the Test button. A Test flyout panel will appear on the right. You can type an utterance into the test panel to try it out.

In the screenshot below, “i want to see doctor kathy” is given a score 0.973 out of 1 for the BookAppointment intent. In the Inspect window, it also identifies the Doctor entity as “kathy” correctly.

The LUIS test panel where the user enters "i want to see doctor kathy" and LUIS returns the "BookApointment" intent with a 97% certainty and identifies "kathy" as a doctor..

Since the test result looks pretty good, you can publish the LUIS app now. Click on the Publish button on the navigation bar, select the Production Slot, and click Done.

Green notification indicating that publishing the app was successful.

After publishing is completed, a successful message notification is shown as shown above. That means the LUIS app is ready to be used!

Build the bot

Create the bot using a Bot Framework template

In this tutorial, you’re going to use Bot Framework v4 SDK Templates to create the bot project. Open a shell and install the Bot Framework templates using the .NET CLI with these commands:

dotnet new -i Microsoft.Bot.Framework.CSharp.EchoBot
dotnet new -i Microsoft.Bot.Framework.CSharp.CoreBot
dotnet new -i Microsoft.Bot.Framework.CSharp.EmptyBot

You'll only be using the CoreBot template in this tutorial, but feel free to explore the EchoBot and EmptyBot template.

Now, you can use the newly installed template to generate a new bot project. Run the following command to create the bot project:

dotnet new corebot -n AppointmentBot

After creating the project with the previous command, the project is created into the AppointmentBot/CoreBot folder and the root namespace is set to "CoreBot". This is inconsistent with how .NET templates usually work, but it can easily be rectified. The following PowerShell script will move the contents into the AppointmentBot folder, rename the project, and change all the namespaces to "AppointmentBot". Run the following script using PowerShell:

$CorrectProjectName = "AppointmentBot"
Push-Location "./$CorrectProjectName"
Move-Item ./CoreBot/* ./
Remove-Item ./CoreBot
Move-Item ./CoreBot.csproj "./$CorrectProjectName.csproj"
Get-ChildItem * -Recurse -File | ForEach-Object { (Get-Content $_) -replace 'CoreBot', $CorrectProjectName | Set-Content $_ }
Pop-Location

Open the project using your preferred .NET editor. The project structure will look like below.

A list of files and folders that were generated using the "CoreBot" template, most importantly, a folder "CognitiveModels" with C# models in it for flight booking, a "Controllers" folder with a "BotController.cs" file, "AdaptorWithErrorHandler.cs" file, "FlightBookingRecognizer.cs", and "Startup.cs".

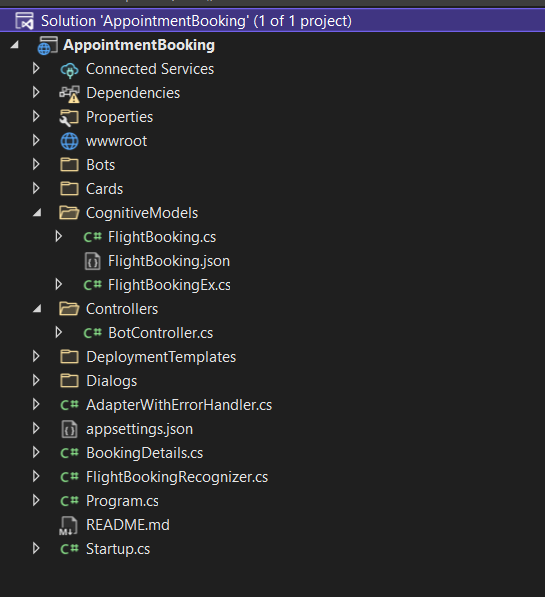
The generated project comes with a flight booking bot sample. Remove those related model and dialog files as listed below.

  • [projectRoot]\CognitiveModels\FlightBooking.cs
  • [projectRoot]\CognitiveModels\FlightBooking.json
  • [projectRoot]\CognitiveModels\FlightBookingEx.cs
  • [projectRoot]\Dialogs\BookingDialog.cs
  • [projectRoot]\Dialogs\MainDialog.cs
  • [projectRoot]\BookingDetails.cs
  • [projectRoot]\FlightBookingRecognizer.cs

To save time, you can run the script below to remove the above files. Run the script from the project root folder:

rm CognitiveModels/FlightBooking.cs
rm CognitiveModels/FlightBooking.json
rm CognitiveModels/FlightBookingEx.cs
rm Dialogs/BookingDialog.cs
rm Dialogs/MainDialog.cs
rm BookingDetails.cs
rm FlightBookingRecognizer.cs

You will also need to remove lines 41 to 51 in the Startup.cs file. Those are the references to the deleted files.

            // Register LUIS recognizer
            services.AddSingleton<FlightBookingRecognizer>();

            // Register the BookingDialog.
            services.AddSingleton<BookingDialog>();

            // The MainDialog that will be run by the bot.
            services.AddSingleton<MainDialog>();

            // Create the bot as a transient. In this case the ASP Controller is expecting an IBot.
            services.AddTransient<IBot, DialogAndWelcomeBot<MainDialog>>();

After the cleanup, the Startup class will look like below:

public class Startup
    {
        // This method gets called by the runtime. Use this method to add services to the container.
        public void ConfigureServices(IServiceCollection services)
        {
            services.AddHttpClient().AddControllers().AddNewtonsoftJson();

            // Create the Bot Framework Authentication to be used with the Bot Adapter.
            services.AddSingleton<BotFrameworkAuthentication, ConfigurationBotFrameworkAuthentication>();

            // Create the Bot Adapter with error handling enabled.
            services.AddSingleton<IBotFrameworkHttpAdapter, AdapterWithErrorHandler>();

            // Create the storage we'll be using for User and Conversation state. (Memory is great for testing purposes.)
            services.AddSingleton<IStorage, MemoryStorage>();

            // Create the User state. (Used in this bot's Dialog implementation.)
            services.AddSingleton<UserState>();

            // Create the Conversation state. (Used by the Dialog system itself.)
            services.AddSingleton<ConversationState>();

        }

        // This method gets called by the runtime. Use this method to configure the HTTP request pipeline.
        public void Configure(IApplicationBuilder app, IWebHostEnvironment env)
        {
            if (env.IsDevelopment())
            {
                app.UseDeveloperExceptionPage();
            }

            app.UseDefaultFiles()
                .UseStaticFiles()
                .UseWebSockets()
                .UseRouting()
                .UseAuthorization()
                .UseEndpoints(endpoints =>
                {
                    endpoints.MapControllers();
                });

            // app.UseHttpsRedirection();
        }
    }

Appointment Booking Cognitive Model

Now that the project has been cleaned up, you can start implementing your own logic. Next, you'll be creating the model, which LUIS will return to us with analysis data.

Next, you'll create these files under the CognitiveModels folder:

  • DoctorBooking.cs: This file will contain the DoctorBooking class, which represents the data returned by LUIS.
  • DoctorBookingEx.cs: This file will extend DoctorBooking using a partial class to simplify accessing the entities of the LUIS results

Create the CognitiveModels/Doctorbooking.cs and add the following code:

using Microsoft.Bot.Builder;
using Microsoft.Bot.Builder.AI.Luis;
using Newtonsoft.Json;
using System.Collections.Generic;

namespace AppointmentBot.CognitiveModels
{

    public partial class DoctorBooking : IRecognizerConvert
    {
        public string Text;
        public string AlteredText;
        public enum Intent
        {
            BookAppointment,
            Cancel,
            GetAvailableDoctors,
            None
        };
        public Dictionary<Intent, IntentScore> Intents;

        public class _Entities
        {

            // Built-in entities
            public DateTimeSpec[] datetime;

            // Lists
            public string[][] Doctor;

            // Instance
            public class _Instance
            {
                public InstanceData[] datetime;
                public InstanceData[] Doctor;
                public InstanceData[] AvailableDoctors;
            }
            [JsonProperty("$instance")]
            public _Instance _instance;
        }
        public _Entities Entities;

        [JsonExtensionData(ReadData = true, WriteData = true)]
        public IDictionary<string, object> Properties { get; set; }

        public void Convert(dynamic result)
        {
            var app = JsonConvert.DeserializeObject<DoctorBooking>(JsonConvert.SerializeObject(result, new JsonSerializerSettings { NullValueHandling = NullValueHandling.Ignore }));
            Text = app.Text;
            AlteredText = app.AlteredText;
            Intents = app.Intents;
            Entities = app.Entities;
            Properties = app.Properties;
        }

        public (Intent intent, double score) TopIntent()
        {
            Intent maxIntent = Intent.None;
            var max = 0.0;
            foreach (var entry in Intents)
            {
                if (entry.Value.Score > max)
                {
                    maxIntent = entry.Key;
                    max = entry.Value.Score.Value;
                }
            }
            return (maxIntent, max);
        }
    }
}

I generated this class using the Bot Framework CLI and provided it for your convenience, but you can also generate this yourself.

You'll need to install node.js and the BF CLI first, if you want to generate the Doctorbooking.cs yourself.

You can install the BF CLI using the following command: ​​​​npm i -g @microsoft/botframework-cli

Download the LUIS model JSON file to your project directory, and then run the following command from the project root directory:

​​bf luis:generate:cs --in=AppointmentBookingBot.LUISModel.json --out=CognitiveModels/DoctorBooking.cs --className=AppointmentBot.CognitiveModels.DoctorBookin

Create the CognitiveModels/DoctorBookingEx.cs file and add the following code:

using System.Linq;

namespace AppointmentBot.CognitiveModels
{
    // Extends the partial DoctorBooking class with methods and properties that simplify accessing entities in the luis results
    public partial class DoctorBooking
    {

        public string Doctor
        {
            get
            {
                var doctorChosen = Entities?._instance?.Doctor?.FirstOrDefault()?.Text;
                return doctorChosen;
            }
        }

        // This value will be a TIMEX. And we are only interested in a Date so grab the first result and drop the Time part.
        // TIMEX is a format that represents DateTime expressions that include some ambiguity. e.g. missing a Year.
        public string AppointmentDate
            => Entities.datetime?.FirstOrDefault()?.Expressions.FirstOrDefault()?.Split('T')[0];
    }
}

Connect the bot to the LUIS App

To integrate the bot service with the LUIS app, you need to add the LUIS App ID, API key, and API Endpoint URL into the project configuration.

Replace the contents of appsettings.json with the JSON below:


{
  "MicrosoftAppType": "",
  "MicrosoftAppId": "",
  "MicrosoftAppPassword": "",
  "MicrosoftAppTenantId": "",
  "LuisAppId": "[YOUR_LUIS_APP_ID]",
  "LuisApiKey": "<SET_USING_USER_SECRETS>",
  "LuisApiEndpointUrl": "[LUIS_ENDPOINT_URL]"
}

Replace [YOUR_LUIS_APP_ID] with your LUIS App ID, and [LUIS_ENDPOINT_URL] with the LUIS Endpoint URL you took note of earlier.

Please note that you should not store sensitive information including API keys or tokens in your source-code. That's why you'll configure the LuisApiKey using the Secret Manager tool.

Enable the Secret Manager tool for your project by running the following command at the project root directory:

dotnet user-secrets init

Run the following command to configure the LuisApiKey using the Secret Manager:

dotnet user-secrets set "LuisApiKey" "[YOUR_LUIS_API_KEY]"

Replace [YOUR_LUIS_API_KEY] with the LUIS App Primary Key you took note off earlier.

The bot application will retrieve the settings you just configured to establish the connection to your LUIS app in the AppointmentBookingRecognizer class below. Create a new file AppointmentBookingRecognizer.cs and add the following contents:

using Microsoft.Bot.Builder;
using Microsoft.Bot.Builder.AI.Luis;
using Microsoft.Extensions.Configuration;
using System.Threading;
using System.Threading.Tasks;

namespace AppointmentBot
{
    public class AppointmentBookingRecognizer : IRecognizer
    {
        private readonly LuisRecognizer _recognizer;

        public AppointmentBookingRecognizer(IConfiguration configuration)
        {
            var luisIsConfigured = !string.IsNullOrEmpty(configuration["LuisAppId"]) && !string.IsNullOrEmpty(configuration["LuisApiKey"]) && !string.IsNullOrEmpty(configuration["LuisApiEndpointUrl"]);
            if (luisIsConfigured)
            {
                var luisApplication = new LuisApplication(
                    configuration["LuisAppId"],
                    configuration["LuisApiKey"],
                    configuration["LuisApiEndpointUrl"]);
                // Set the recognizer options depending on which endpoint version you want to use.
                // More details can be found in https://docs.microsoft.com/en-gb/azure/cognitive-services/luis/luis-migration-api-v3
                var recognizerOptions = new LuisRecognizerOptionsV3(luisApplication)
                {
                    PredictionOptions = new Microsoft.Bot.Builder.AI.LuisV3.LuisPredictionOptions
                    {
                        IncludeInstanceData = true,
                    }
                };

                _recognizer = new LuisRecognizer(recognizerOptions);
            }
        }

        // Returns true if luis is configured in the appsettings.json and initialized.
        public virtual bool IsConfigured => _recognizer != null;

        public virtual async Task<RecognizerResult> RecognizeAsync(ITurnContext turnContext, CancellationToken cancellationToken)
            => await _recognizer.RecognizeAsync(turnContext, cancellationToken);

        public virtual async Task<T> RecognizeAsync<T>(ITurnContext turnContext, CancellationToken cancellationToken)
            where T : IRecognizerConvert, new()
            => await _recognizer.RecognizeAsync<T>(turnContext, cancellationToken);
    }
}

A recognizer is used to recognize user input and return intents and entities within a DialogContext. In the AppointmentBookingRecognizer class, a connection is established to the LUIS API endpoint. It also implements the RecognizeAsync method, which is called by dialogs to extract intents and entities from a user's utterance.

Control the Conversation Flow using Dialogs

You need to use Dialogs to manage conversation between the user and the bot.

Dialogs are a central concept in the SDK, providing ways to manage a long-running conversation with the user. A Dialog can be composed with other dialogs.

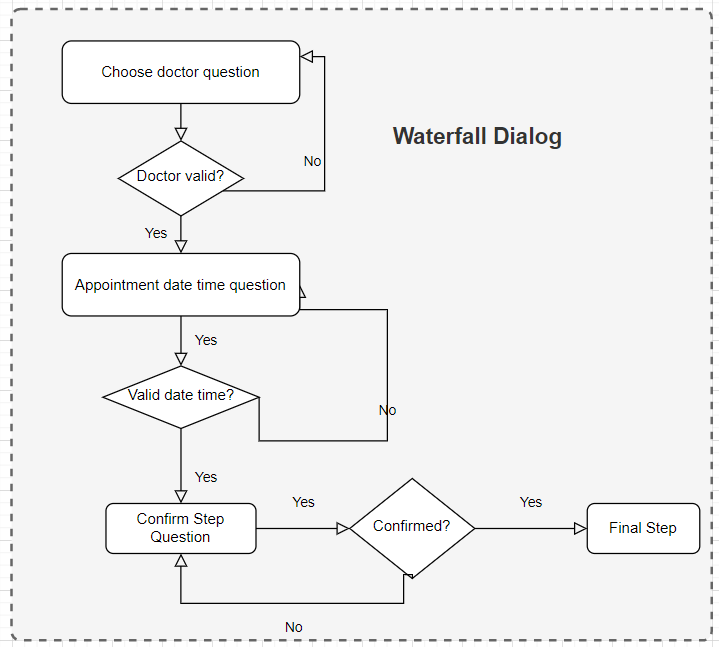
Bot framework provides a rich set of dialogs to make it easier to create a conversation flow. In this example, you will create an AppointmentBookingDialog class to manage the main conversation. It is composed of a few dialogs, including a waterfall dialog and prompt dialogs.

The waterfall dialog is used to define the sequence of steps. As illustrated in the diagram below, the bot interacts with the user via a linear process.

A flowchart plotting how the bot conversation should flow. Choose doctor question asked? If no, go back to start. If yes, is doctor valid? If yes, ask appointment date time question. Did the user respond with a valid date time? If no, go back to appointment date time question. If yes, ask user to confirm. If confirmed, run final step.

Create a new file AppointmentDetails.cs into project root and add the following code:

namespace AppointmentBot
{
    public class AppointmentDetails
    {
        public string Doctor { get; set; }

        public string AppointmentDate { get; set; }
    }
}

The AppointmentDetails class is the model class for the dialog. Next, create the AppointmentBookingDialog.cs file into the Dialogs folder. AppointmentBookingDialog class will implement the process above. Add the following code to the file:

using Microsoft.Bot.Builder;
using Microsoft.Bot.Builder.Dialogs;
using Microsoft.Bot.Schema;
using Microsoft.Recognizers.Text.DataTypes.TimexExpression;
using System.Threading;
using System.Threading.Tasks;

namespace AppointmentBot.Dialogs
{
    public class AppointmentBookingDialog : CancelAndHelpDialog
    {
        private const string DoctorStepMsgText = "Who would you like to see?";

        public AppointmentBookingDialog()
            : base(nameof(AppointmentBookingDialog))
        {
            AddDialog(new TextPrompt(nameof(TextPrompt)));
            AddDialog(new ConfirmPrompt(nameof(ConfirmPrompt)));
            AddDialog(new DateResolverDialog());
            AddDialog(new WaterfallDialog(nameof(WaterfallDialog), new WaterfallStep[]
            {
                DoctorStepAsync,
                AppointmentDateStepAsync,
                ConfirmStepAsync,
                FinalStepAsync,
            }));

            // The initial child Dialog to run.
            InitialDialogId = nameof(WaterfallDialog);
        }

        private async Task<DialogTurnResult>DoctorStepAsync(WaterfallStepContext stepContext, CancellationToken cancellationToken)
        {
            var bookingDetails = (AppointmentDetails)stepContext.Options;

            if (bookingDetails.Doctor == null)
            {
                var promptMessage = MessageFactory.Text(DoctorStepMsgText, DoctorStepMsgText, InputHints.ExpectingInput);
                return await stepContext.PromptAsync(nameof(TextPrompt), new PromptOptions { Prompt = promptMessage }, cancellationToken);
            }

            return await stepContext.NextAsync(bookingDetails.Doctor, cancellationToken);
        }

        private async Task<DialogTurnResult> AppointmentDateStepAsync(WaterfallStepContext stepContext, CancellationToken cancellationToken)
        {
            var bookingDetails = (AppointmentDetails)stepContext.Options;

            bookingDetails.AppointmentDate = (string)stepContext.Result;

            if (bookingDetails.AppointmentDate == null || IsAmbiguous(bookingDetails.AppointmentDate))
            {
                return await stepContext.BeginDialogAsync(nameof(DateResolverDialog), bookingDetails.AppointmentDate, cancellationToken);
            }

            return await stepContext.NextAsync(bookingDetails.AppointmentDate, cancellationToken);
        }

        private async Task<DialogTurnResult> ConfirmStepAsync(WaterfallStepContext stepContext, CancellationToken cancellationToken)
        {
            var bookingDetails = (AppointmentDetails)stepContext.Options;

            bookingDetails.AppointmentDate = (string)stepContext.Result;

            var messageText = $"Please confirm, I have you book with Doctor: {bookingDetails.Doctor} on: {bookingDetails.AppointmentDate}. Is this correct?";
            var promptMessage = MessageFactory.Text(messageText, messageText, InputHints.ExpectingInput);

            return await stepContext.PromptAsync(nameof(ConfirmPrompt), new PromptOptions { Prompt = promptMessage }, cancellationToken);
        }

        private async Task<DialogTurnResult> FinalStepAsync(WaterfallStepContext stepContext, CancellationToken cancellationToken)
        {
            if ((bool)stepContext.Result)
            {
                var bookingDetails = (AppointmentDetails)stepContext.Options;

                return await stepContext.EndDialogAsync(bookingDetails, cancellationToken);
            }

            return await stepContext.EndDialogAsync(null, cancellationToken);
        }

        private static bool IsAmbiguous(string timex)
        {
            var timexProperty = new TimexProperty(timex);
            return !timexProperty.Types.Contains(Constants.TimexTypes.Definite);
        }
    }
}

Main Dialog

The MainDialog class manages the main process flow. Create the MainDialog.cs file in the Dialogs folder and add the following code:

using AppointmentBot.CognitiveModels;
using Microsoft.Bot.Builder;
using Microsoft.Bot.Builder.Dialogs;
using Microsoft.Bot.Schema;
using Microsoft.Extensions.Logging;
using Microsoft.Recognizers.Text.DataTypes.TimexExpression;
using System;
using System.Collections.Generic;
using System.Linq;
using System.Threading;
using System.Threading.Tasks;

namespace AppointmentBot.Dialogs
{
    public class MainDialog : ComponentDialog
    {
        private readonly AppointmentBookingRecognizer _luisRecognizer;
        protected readonly ILogger Logger;

        // Dependency injection uses this constructor to instantiate MainDialog
        public MainDialog(AppointmentBookingRecognizer luisRecognizer, AppointmentBookingDialog appointmentDialog, ILogger<MainDialog> logger)
            : base(nameof(MainDialog))
        {
            _luisRecognizer = luisRecognizer;
            Logger = logger;

            AddDialog(new TextPrompt(nameof(TextPrompt)));
            AddDialog(appointmentDialog);
            AddDialog(new WaterfallDialog(nameof(WaterfallDialog), new WaterfallStep[]
            {
                IntroStepAsync,
                ActStepAsync,
                FinalStepAsync,
            }));

            // The initial child Dialog to run.
            InitialDialogId = nameof(WaterfallDialog);
        }

        private async Task<DialogTurnResult> IntroStepAsync(WaterfallStepContext stepContext, CancellationToken cancellationToken)
        {
            if (!_luisRecognizer.IsConfigured)
            {
                await stepContext.Context.SendActivityAsync(
                    MessageFactory.Text("NOTE: LUIS is not configured. To enable all capabilities, add 'LuisAppId', 'LuisApiKey' and 'LuisApiEndpointUrl' to the appsettings.json file.", inputHint: InputHints.IgnoringInput), cancellationToken);

                return await stepContext.NextAsync(null, cancellationToken);
            }

            // Use the text provided in FinalStepAsync or the default if it is the first time.
            var messageText = stepContext.Options?.ToString() ?? "How can I help you with today?";
            var promptMessage = MessageFactory.Text(messageText, messageText, InputHints.ExpectingInput);
            return await stepContext.PromptAsync(nameof(TextPrompt), new PromptOptions { Prompt = promptMessage }, cancellationToken);
        }

        private async Task<DialogTurnResult> ActStepAsync(WaterfallStepContext stepContext, CancellationToken cancellationToken)
        {
            if (!_luisRecognizer.IsConfigured)
            {
                // LUIS is not configured, we just run the BookingDialog path with an empty BookingDetailsInstance.
                return await stepContext.BeginDialogAsync(nameof(AppointmentBookingDialog), new AppointmentDetails(), cancellationToken);
            }

            // Call LUIS and gather any potential booking details. (Note the TurnContext has the response to the prompt.)
            var luisResult = await _luisRecognizer.RecognizeAsync<DoctorBooking>(stepContext.Context, cancellationToken);
            switch (luisResult.TopIntent().intent)
            {
                case DoctorBooking.Intent.BookAppointment:
                    var validDoctor = await ValidateDoctors(stepContext.Context, luisResult, cancellationToken);
                    if (!validDoctor)
                    {
                        return await stepContext.ReplaceDialogAsync(InitialDialogId, "Doctor Peter, Susan and Kathy are available?", cancellationToken);
                    }

                    // Initialize BookingDetails with any entities we may have found in the response.
                    var bookingDetails = new AppointmentDetails()
                    {
                        // Get destination and origin from the composite entities arrays.
                        Doctor = luisResult.Doctor,
                        AppointmentDate = luisResult.AppointmentDate,
                    };

                    // Run the AppointmentBookingDialog giving it whatever details we have from the LUIS call, it will fill out the remainder.
                    return await stepContext.BeginDialogAsync(nameof(AppointmentBookingDialog), bookingDetails, cancellationToken);

                case DoctorBooking.Intent.GetAvailableDoctors:
                    // We haven't implemented the GetAvailableDoctorsDialog so we just display a mock message.
                    var getAvailableDoctorsMessageText = "Doctor Kathy, Doctor Peter are available today";
                    var getAvailableDoctorsMessage = MessageFactory.Text(getAvailableDoctorsMessageText, getAvailableDoctorsMessageText, InputHints.IgnoringInput);
                    await stepContext.Context.SendActivityAsync(getAvailableDoctorsMessage, cancellationToken);
                    break;

                default:
                    // Catch all for unhandled intents
                    var didntUnderstandMessageText = $"Sorry, I didn't get that. Please try asking in a different way (intent was {luisResult.TopIntent().intent})";
                    var didntUnderstandMessage = MessageFactory.Text(didntUnderstandMessageText, didntUnderstandMessageText, InputHints.IgnoringInput);
                    await stepContext.Context.SendActivityAsync(didntUnderstandMessage, cancellationToken);
                    break;
            }

            return await stepContext.NextAsync(null, cancellationToken);
        }

        // Shows a warning if the doctor is not specified or doctor entity values can't be mapped to a canonical item in the Airport.
        private static async Task<Boolean> ValidateDoctors(ITurnContext context, DoctorBooking luisResult, CancellationToken cancellationToken)
        {
            var doctorChoosen = luisResult.Doctor;
            var noDoctor = string.IsNullOrEmpty(doctorChoosen);

            if (noDoctor)
            {
                var messageText = "Please choose a doctor";
                var message = MessageFactory.Text(messageText, messageText, InputHints.IgnoringInput);
                await context.SendActivityAsync(message, cancellationToken);
            }
            return !noDoctor;
        }

        private async Task<DialogTurnResult> FinalStepAsync(WaterfallStepContext stepContext, CancellationToken cancellationToken)
        {
            // If the child dialog ("AppointmentBookingDialog") was cancelled, the user failed to confirm or if the intent wasn't appointment Booking
            // the Result here will be null.
            if (stepContext.Result is AppointmentDetails result)
            {
                // Now we have all the booking details call the booking service.

                // If the call to the booking service was successful tell the user.

                var timeProperty = new TimexProperty(result.AppointmentDate);
                var appointmentDateMsg = timeProperty.ToNaturalLanguage(DateTime.Now);
                var messageText = $"I have you booked to Doctor {result.Doctor} on {appointmentDateMsg}";
                var message = MessageFactory.Text(messageText, messageText, InputHints.IgnoringInput);
                await stepContext.Context.SendActivityAsync(message, cancellationToken);
            }

            // Restart the main dialog with a different message the second time around
            var promptMessage = "What else can I do for you?";
            return await stepContext.ReplaceDialogAsync(InitialDialogId, promptMessage, cancellationToken);
        }
    }
}

This diagram gives you an overview of what the MainDialog class does.

A diagram showing how the MainDialog works. First the intro step is executed, then LUIS is called to analyze the user"s response, then based on the intent of LUIS results, the Appointment Booking Dialog is executed, the Other Action Dialog is executed, or the error handler is executed, then the final step is executed.

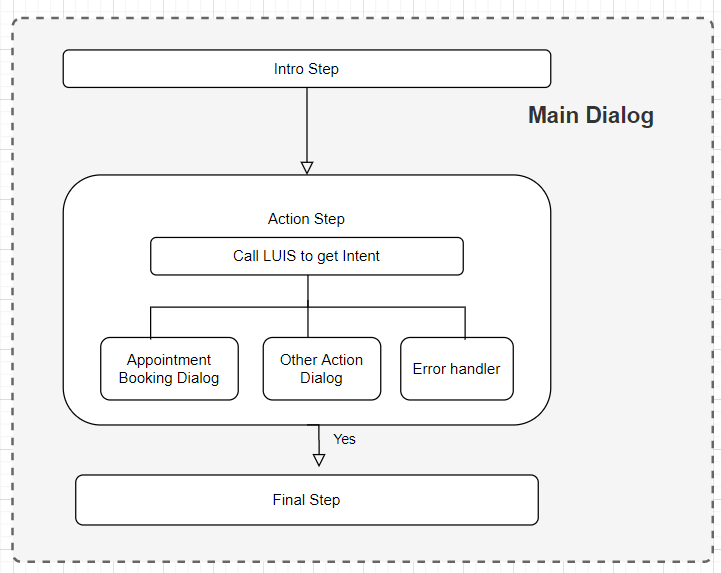
It's quite a lot of code, but the important part of the MainDialog class is below:

private async Task<DialogTurnResult> ActStepAsync(WaterfallStepContext stepContext, CancellationToken cancellationToken)
{
    if (!_luisRecognizer.IsConfigured)
    {
        // LUIS is not configured, we just run the BookingDialog path with an empty BookingDetailsInstance.
        return await stepContext.BeginDialogAsync(nameof(AppointmentBookingDialog), new AppointmentDetails(), cancellationToken);
    }

    // Call LUIS and gather any potential booking details. (Note the TurnContext has the response to the prompt.)
    var luisResult = await _luisRecognizer.RecognizeAsync<DoctorBooking>(stepContext.Context, cancellationToken);
    switch (luisResult.TopIntent().intent)
    {
        case DoctorBooking.Intent.BookAppointment:
            var validDoctor = await ValidateDoctors(stepContext.Context, luisResult, cancellationToken);
            if (!validDoctor)
            {
                return await stepContext.ReplaceDialogAsync(InitialDialogId, "Doctor Peter, Susan and Kathy are available?", cancellationToken);
            }

            // Initialize BookingDetails with any entities we may have found in the response.
            var bookingDetails = new AppointmentDetails()
            {
                // Get destination and origin from the composite entities arrays.
                Doctor = luisResult.Doctor,
                AppointmenDate = luisResult.AppointmentDate,
            };

            // Run the AppointmentBookingDialog giving it whatever details we have from the LUIS call, it will fill out the remainder.
            return await stepContext.BeginDialogAsync(nameof(AppointmentBookingDialog), bookingDetails, cancellationToken);

        case DoctorBooking.Intent.GetAvailableDoctors:
            // We haven't implemented the GetAvailableDoctorsDialog so we just display a mock message.
            var getAvailableDoctorsMessageText = "Doctor Kathy, Doctor Peter are available today";
            var getAvailableDoctorsMessage = MessageFactory.Text(getAvailableDoctorsMessageText, getAvailableDoctorsMessageText, InputHints.IgnoringInput);
            await stepContext.Context.SendActivityAsync(getAvailableDoctorsMessage, cancellationToken);
            break;

        default:
            // Catch all for unhandled intents
            var didntUnderstandMessageText = $"Sorry, I didn't get that. Please try asking in a different way (intent was {luisResult.TopIntent().intent})";
            var didntUnderstandMessage = MessageFactory.Text(didntUnderstandMessageText, didntUnderstandMessageText, InputHints.IgnoringInput);
            await stepContext.Context.SendActivityAsync(didntUnderstandMessage, cancellationToken);
            break;
    }

    return await stepContext.NextAsync(null, cancellationToken);
}

In a nutshell, when a message activity is received, the bot runs the MainDialog.

The MainDialog prompts the user using the IntroStepAsync method, then calls the ActStepAsync method.

In the ActStepAsync method, the bot calls the LUIS app to get the luisResult object which will include the user's intent and entities. The user's intent and entities are used to determine the next step, either performing validation or invoking other dialogs.

At the end, the bot calls the FinalStepAsync method to complete or cancel the process.

Twilio adapter and controller

By default, the Azure Bot service will connect to the web chat channel which is handled by the default AdapterWithErrorHandler adapter. The default adapter is injected into the default BotController class, and the controller exposes an endpoint /api/messages.

To connect the bot to Twilio, you will create a new TwilioAdapterWithErrorHandlerclass extended from the TwilioAdapter class. Run the following command to install the Microsoft.Bot.Builder.Adapters.Twilio NuGet package:

dotnet add package Microsoft.Bot.Builder.Adapters.Twilio --version 4.15.0

Make sure the Microsoft.Bot.Builder.Adapters.Twilio NuGet package is using the same versions as the other Microsoft.Bot.Builder.* packages specified in the csproj-file.

After the NuGet installation is completed, create the TwilioAdapterWithErrorHandler.cs file in the project root directory, and add the following code:

using Microsoft.Bot.Builder.Adapters.Twilio;
using Microsoft.Bot.Builder.TraceExtensions;
using Microsoft.Extensions.Configuration;
using Microsoft.Extensions.Logging;

namespace AppointmentBot
{
    public class TwilioAdapterWithErrorHandler : TwilioAdapter
    {
        public TwilioAdapterWithErrorHandler(IConfiguration configuration, ILogger<TwilioAdapter> logger)
                : base(configuration, null, logger)
        {
            OnTurnError = async (turnContext, exception) =>
            {
                // Log any leaked exception from the application.
                logger.LogError(exception, $"[OnTurnError] unhandled error : {exception.Message}");

                // Send a message to the user
                await turnContext.SendActivityAsync("The bot encountered an error or bug.");
                await turnContext.SendActivityAsync("To continue to run this bot, please fix the bot source code.");

                // Send a trace activity, which will be displayed in the Bot Framework Emulator
                await turnContext.TraceActivityAsync("OnTurnError Trace", exception.Message, "https://www.botframework.com/schemas/error", "TurnError");
            };
        }
    }
}

To handle the HTTP webhook requests from Twilio, you'll need to add a TwilloController. Create a new file TwilioController.cs in the Controllers folder, and add the following code:

using Microsoft.AspNetCore.Http;
using Microsoft.AspNetCore.Mvc;
using Microsoft.Bot.Builder;
using Microsoft.Bot.Builder.Adapters.Twilio;
using System.Threading;
using System.Threading.Tasks;

namespace AppointmentBot.Controllers
{
    [Route("api/twilio")]
    [ApiController]
    public class TwilioController : ControllerBase
    {
        private readonly TwilioAdapter _adapter;
        private readonly IBot _bot;

        /// <summary>
        /// Initializes a new instance of the <see cref="BotController"/> class.
        /// </summary>
        /// <param name="adapter">adapter for the BotController.</param>
        /// <param name="bot">bot for the BotController.</param>
        public TwilioController(TwilioAdapter adapter, IBot bot)
        {
            _adapter = adapter;
            _bot = bot;
        }

        /// <summary>
        /// PostAsync method that returns an async Task.
        /// </summary>
        /// <returns>A <see cref="Task{TResult}"/> representing the result of the asynchronous operation.</returns>
        [HttpPost]
        [HttpGet]
        public async Task PostAsync()
        {
            // Delegate the processing of the HTTP POST to the adapter.
            // The adapter will invoke the bot.
            await _adapter.ProcessAsync(Request, Response, _bot, default(CancellationToken));
        }
    }
}

The endpoint for TwilioController is /api/twilio. After adding the new endpoint, the bot can handle messages via  both web channel and Twilio SMS channel.

Finally, you need to register the dialogs and LUIS recognizer in the Startup class. Insert the following lines at the end of the ConfigureServices method in the Startup.cs file:


using Microsoft.AspNetCore.Builder;
using Microsoft.AspNetCore.Hosting;
using Microsoft.Bot.Builder;
using Microsoft.Bot.Builder.Integration.AspNet.Core;
using Microsoft.Extensions.DependencyInjection;
using Microsoft.Extensions.Hosting;
using Microsoft.Bot.Connector.Authentication;
using Microsoft.Bot.Builder.Adapters.Twilio;

using AppointmentBot.Bots;
using AppointmentBot.Dialogs;

namespace AppointmentBot
{
    public class Startup
    {
        // This method gets called by the runtime. Use this method to add services to the container.
        public void ConfigureServices(IServiceCollection services)
        {
            services.AddHttpClient().AddControllers().AddNewtonsoftJson();

            // Create the Bot Framework Authentication to be used with the Bot Adapter.
            services.AddSingleton<BotFrameworkAuthentication, ConfigurationBotFrameworkAuthentication>();

            // Create the Bot Adapter with error handling enabled.
            services.AddSingleton<IBotFrameworkHttpAdapter, AdapterWithErrorHandler>();

            // Create the storage we'll be using for User and Conversation state. (Memory is great for testing purposes.)
            services.AddSingleton<IStorage, MemoryStorage>();

            // Create the User state. (Used in this bot's Dialog implementation.)
            services.AddSingleton<UserState>();

            // Create the Conversation state. (Used by the Dialog system itself.)
            services.AddSingleton<ConversationState>();

            // Register LUIS recognizer
            services.AddSingleton<AppointmentBookingRecognizer>();

            // Register the AppointmentBookingDialog
            services.AddSingleton<AppointmentBookingDialog>();

            // The MainDialog that will be run by the bot.
            services.AddSingleton<MainDialog>();

            // Create the bot as a transient. In this case the ASP Controller is expecting an IBot.
            services.AddTransient<IBot, DialogAndWelcomeBot<MainDialog>>();

            // Create the Twilio Adapter
            services.AddSingleton<TwilioAdapter, TwilioAdapterWithErrorHandler>();
        }

        // This method gets called by the runtime. Use this method to configure the HTTP request pipeline.
        public void Configure(IApplicationBuilder app, IWebHostEnvironment env)
        {
            if (env.IsDevelopment())
            {
                app.UseDeveloperExceptionPage();
            }

            app.UseDefaultFiles()
                .UseStaticFiles()
                .UseWebSockets()
                .UseRouting()
                .UseAuthorization()
                .UseEndpoints(endpoints =>
                {
                    endpoints.MapControllers();
                });

            // app.UseHttpsRedirection();
        }
    }
}

Test Locally

You'll need to install the Bot Framework Emulator to test the bot locally. To Install the Bot Framework Emulator:

  • Navigate to GitHub releases page of the Bot Framework Emulator project
  • Click on the setup file for your OS to download it.
  • After the download is completed, click the file to start the installation. Follow the installation wizard, and use the default options to complete the installation.

Next, start the bot project using the .NET CLI:

dotnet run

Now, start the Bot Emulator, click on the Open Bot button, and enter the bot’s URL in your local environment, which by default, is http://localhost:3978/api/messages. Then click on the Connect button.

The Bot Emulator showing the Open a bot modal. This modal contains multiple fields, but most importantly the Bot URL field.

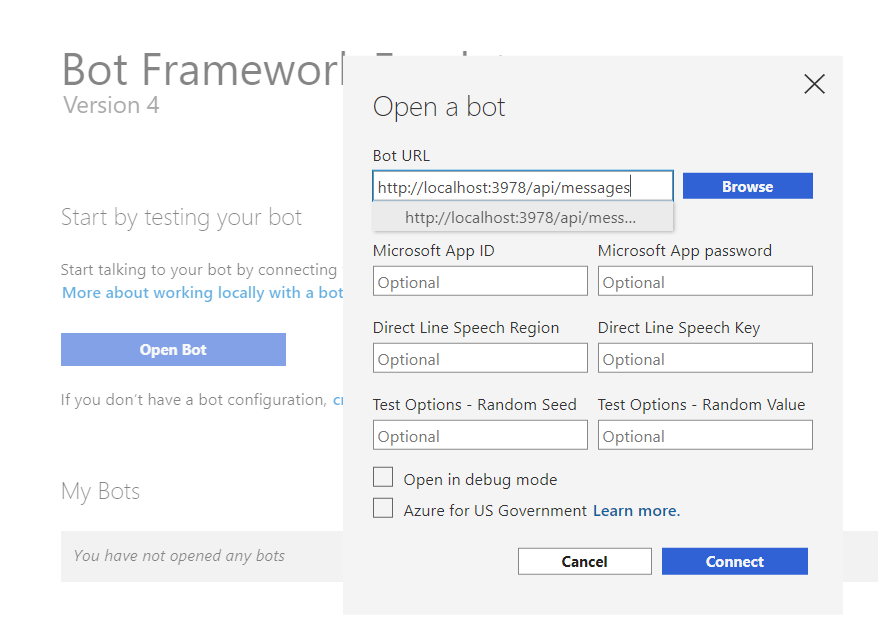
A chat window will be opened. You can type the message and start testing.

The user chats with the bot using the Bot Emulator. The user asks "Can I see doctor Peter?" and the bot responds with "To make your booking please enter an appointment date including time, Day, Month and Year.

After you are happy with test results, the bot can be deployed to Azure.

Deploy the bot to Azure

To deploy the .NET bot to Azure, you need to use Azure CLI to create the following resources:

To create a new App Service plan, run the following command:

az appservice plan create -g rg-bot -n asp-bot --location [AZURE_LOCATION] --sku F1

Here's what the parameters do:

  • -g or --resource-group: The resource group the resource should be placed in, in this case into the "rg-bot" resource group you created earlier.
  • -n or --name: The name of the App Service plan, which is asp-bot. "asp" is short for App Service plan.
  • -l or --location: The Azure location the resource should reside in. Replace [AZURE_LOCATION] with the location closest to you or your users, like you did when creating the resource group earlier.
  • --sku: The size (CPU/RAM/etc.) of the App Service plan by SKU, which in this case is F1 (free).

To make sure the .NET project will be deployed correctly, you'll need to generate a deployment file. The deployment file can be generated with the command below:

az bot prepare-deploy --lang Csharp --code-dir "." --proj-file-path "AppointmentBot.csproj"

Please note that --code-dir and --proj-file-path need to match together to resolve the path to the project file.

Create the managed identity using the following command:

az identity create --resource-group "rg-bot" --name "identity-appointment-bot"


After the command finished, a new "identity-appointment-bot" managed identity has been added in Azure, which will be used to create the new App Service and Bot Service in the next step.

The App Service and Bot Service can be generated using the existing App Service plan and the Azure Resource Manager (ARM) template which is part of the "CoreBot" .NET template.

You be using the DeploymentTemplates/template-with-preexisting-rg.json ARM template, but it requires a lot of parameters, which is why you should use a parameter file.  Create a new ParameterFiles folder in the project root and create a new file RegisterAppParams.json with the following contents:

{
  "$schema": "https://schema.management.azure.com/schemas/2019-04-01/deploymentParameters.json#",
  "contentVersion": "1.0.0.0",
  "parameters": {
    "appId": {
      "value": "[CLIENT_ID_FROM_MANAGED_IDENTITY]"
    },
    "appType": {
      "value": "UserAssignedMSI"
    },
    "tenantId": {
      "value": "[TENANT_ID]"
    },
    "existingUserAssignedMSIName": {
      "value": "identity-appointment-bot"
    },
    "existingUserAssignedMSIResourceGroupName": {
      "value": "rg-bot"
    },
    "botId": {
      "value": "bs-bot-[UNIQUE_SUFFIX]"
    },
    "newWebAppName": {
      "value": "appointment-bot-[UNIQUE_SUFFIX]"
    },
    "existingAppServicePlan": {
      "value": "asp-bot"
    },
    "appServicePlanLocation": {
      "value": "[AZURE_LOCATION]"
    }
  }
}

Some parameters have already been configured with the names of the previously created resources, but you still need to update a few with your own specific settings:

  • appId: The value of clientId in the response of the create identity command. You can also query the clientId like this: az identity show -g rg-bot -n identity-appointment-bot --query clientId
  • tenantId: The value of tenantId in the response of the create identity command. You can also query the tenantId like this: az account show --query tenantId
  • appServicePlanLocation: The Azure region you used when creating your App Service plan.
  • botId: The name for you Bot Service. This name has to be globally unique. Replace [UNIQUE_SUFFIX] with anything that would make the name unique, like "firstname-lastname1234". If it doesn't accept the name, change it up and try again.
  • newWebAppName: The name for your App Service. This name has to be globally unique because it will be used as a subdomain to azurewebsites.net. Replace [UNIQUE_SUFFIX] with anything that would make the name unique, like "firstname-lastname1234". If it doesn't accept the name, change it up and try again.

After the parameter file is updated, run the following command to generate the App Service and Bot Service:

az deployment group create `
  --resource-group "rg-bot" `
  --template-file "./DeploymentTemplates/template-with-preexisting-rg.json" `
  --parameters "@ParameterFiles/RegisterAppParams.json"

Azure will take a minute to deploy this infrastructure. After the App Service is generated, run the following command below to get the App Service hostname:

az webapp show -g rg-bot -n appointment-bot-[UNIQUE_SUFFIX] --query 'hostNames[0]'

Replace [UNIQUE_SUFFIX] with the suffix you used in the parameters file. Take note of this hostname as you will need it later.

Now that the App Service infrastructure has been provisioned, you can deploy your local .NET bot project. Run the following command which will create a ZIP file and deploy the ZIP file to App Service:

az webapp up -g rg-bot -n appointment-bot-[UNIQUE_SUFFIX]

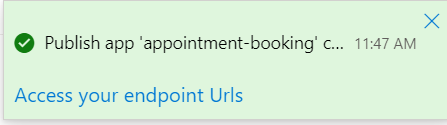
It can take about 30 seconds for the deployment to complete. When it is done, you will see the success response like below:

{
  "active": true,
  "author": "N/A",
  "author_email": "N/A",
  "complete": true,
  "deployer": "ZipDeploy",
  "end_time": "2022-02-27T21:58:45.0863404Z",
  "id": "b3c4cbb7a470479ebd7a2c6dd17bd70f",
  "is_readonly": true,
  "is_temp": false,
  "last_success_end_time": "2022-02-07T21:58:45.0863404Z",
  "log_url": "https://twilio-appointment-bot-app-service.scm.azurewebsites.net/api/deployments/latest/log",
  "message": "Created via a push deployment",
  "progress": "",
  "provisioningState": "Succeeded",
  "received_time": "2022-02-27T21:57:25.4159Z",
  "site_name": "twilio-appointment-bot-app-service",
  "start_time": "2022-02-07T21:57:25.5565272Z",
  "status": 4,
  "status_text": "",
  "url": "https://twilio-appointment-bot-app-service.scm.azurewebsites.net/api/deployments/latest"
}

Setting up Twilio for SMS communication

You've tested the bot locally using the web chat, but the goal of this tutorial is to use SMS to communicate. To receive and send SMS messages, you'll need a Twilio Phone Number.

  • Go and buy a new phone number from Twilio. The cost of the phone number will be applied to your free promotional credit if you're using a trial account.
    Make sure to take note of your new Twilio phone number. You'll need it later on!
  • If you are using a trial Twilio account, you can only send text messages to Verified Caller IDs. Verify your phone number or the phone number you want to SMS if it isn't on the list of Verified Caller IDs.
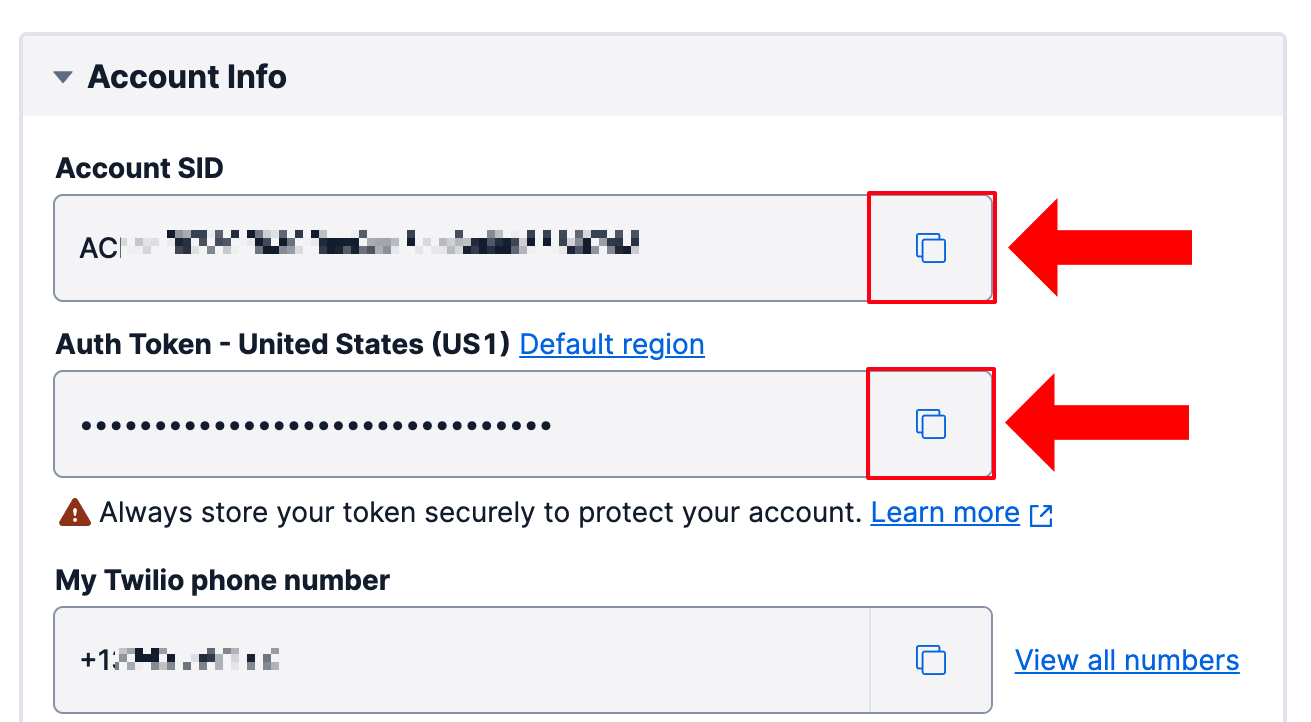
  • Lastly, you'll need to find your Twilio Account SID and Auth Token. Navigate to your Twilio account page and take note of your Twilio Account SID and Auth Token located at the bottom left of the page.
Account Info box holding 3 read-only fields: Account SID field, Auth Token field, and Twilio phone number field.

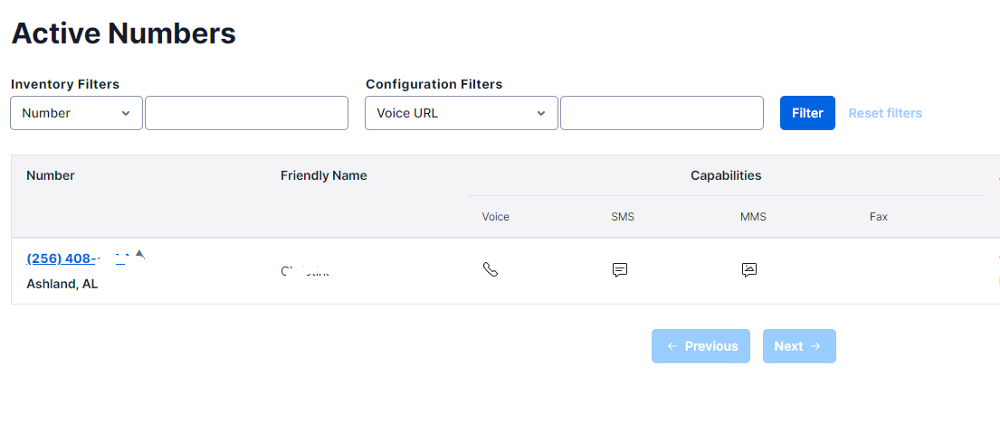
When your Twilio Phone Number receives a text message, Twilio should forward it to your .NET bot hosted on Azure App Service. To configure that, navigate to Phone numbers > Manage > Active numbers, and click on your Twilio Phone Number to access the Configure page.

Twilio"s Active Numbers page which shows a list of phone numbers the user owns. The page currently shows one phone number.

Under the Messaging section, set the dropdown under CONFIGURE WITH OTHER HANDLERS to “Webhook”, and in the adjacent text field, enter "https://", then paste in the App Service hostname you took note of earlier, and then enter "/api/twilio". The URL should look like https://your-hostname.azurewebsites.net/api/twilio.

The messaging configuration section for the Twilio Phone Number. The form has 3 fields for when a message comes in, a dropdown which is set to "Webhook", a text field which is set to the App Service URL with /api/twilio as path, and another dropdown set to "HTTP POST"

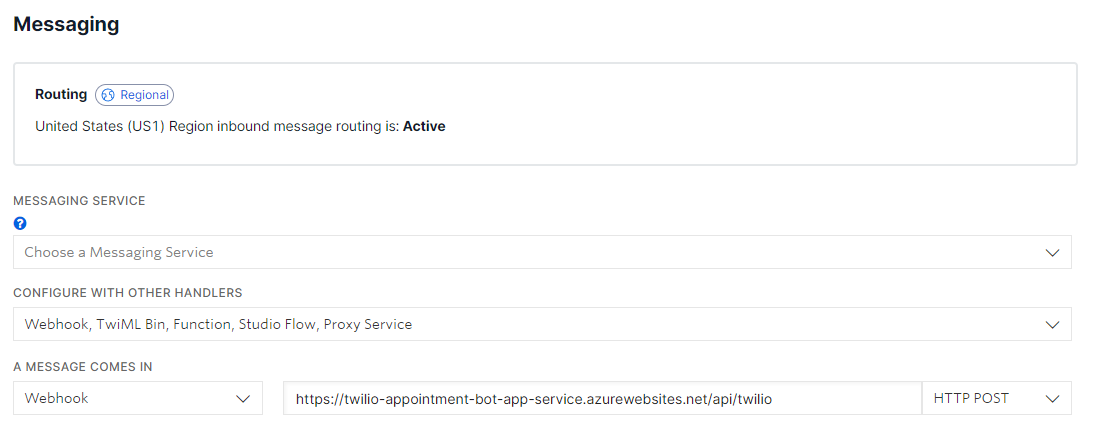
Click the Save button on the bottom left. Take note of this webhook URL, you will need it again soon.

Lastly, you need to add some configuration to your App Service. Run the following command to configure the app settings:

az webapp config appsettings set -g rg-bot -n appointment-bot-[UNIQUE_SUFFIX] --settings `
 LuisApiKey=[YOUR_LUIS_API_KEY] `
 TwilioNumber=[YOUR_TWILIO_PHONE_NUMBER] `
 TwilioAccountSid=[YOUR_TWILIO_ACCOUNT_SID] `
 TwilioAuthToken=[YOUR_TWILIO_AUTH_TOKEN] `
 TwilioValidationUrl=[YOUR_BOT_TWILIO_ENDPOINT]

Before running the command, replace the placeholders.

  • Replace [YOUR_LUIS_API_KEY] with the LUIS Primary Key you took note of earlier.
  • Replace [YOUR_TWILIO_PHONE_NUMBER] with your Twilio Phone Number you bought earlier. Enter the phone number using the E.164 which looks like +11234567890.
  • Replace [YOUR_TWILIO_ACCOUNT_SID] with your Twilio Account SID which you took note of earlier.
  • Replace [YOUR_BOT_TWILIO_ENDPOINT] with the webhook URL you took note of earlier. It should look like https://your-hostname.azurewebsites.net/api/twilio.

You can restart the App Service to make sure the app settings are loaded by the bot. Run the following command to restart the App Service:

az webapp restart -g rg-bot -n appointment-bot-[UNIQUE_SUFFIX]

End-to-End Test

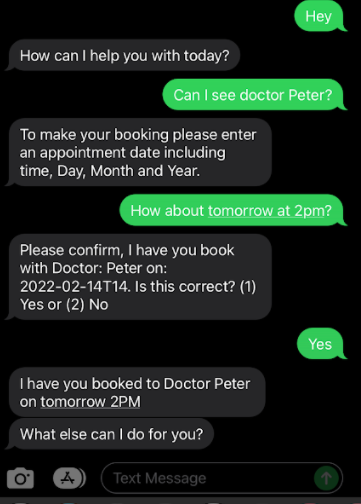
Finally, you have built and assembled all the moving parts. Let’s test it!

Send a text message to your Twilio Phone Number and you should see a response from your bot. Here you can see I sent the below SMS messages to my Twilio Phone Number, and it works!

An SMS conversation between a user and the appointment booking bot where the user successfully books an appointment with doctor Peter.

Next Steps

There are some important bot features that aren’t covered in this article. You may like to explore further when developing a production grade bot.

  • Authentication: When a bot needs to access resources on behalf of a user, you must authenticate the user identity. The user authentication can be handled by Identity providers such as Azure AD with OAuth 2.0. Your bot will use the token generated by Azure to access those resources. The details on how to add Azure AD authentication to a bot can be found at Microsoft's documentation.
  • Bot Framework Composer: It is an open-source visual designer and authoring tool to create a bot with Azure Bot Service. You can use it to build dialogs in the UI and visualize the flow to business users. It also allows you to train LUIS models within the tool, thus saving the need to switch between different environments. If your project requires involving non-technical people to bot development, it is definitely a good tool to consider.

Conclusion

In this article, you walked through the steps to build an SMS booking system using Twilio, Azure Bot Framework, and LUIS. You could extend this by adding more channels, expanding the LUIS model to support real-life scenarios, and incorporating other features like image recognition or multiple language support.

Yan Sun is a full stack developer. He loves coding, always learning, writing and sharing. Yan can be reached at sunny [at] gmail.com.