Build an Email Newsletter Application with Express, Node.js and SendGrid
Time to read: 13 minutes
March 02, 2022
Written by
Reviewed by

Introduction
Consumers of all kinds are constantly having information sent their way.
But if you’re looking for a way to connect and establish a touch point with your audience, sending out a newsletter is a great way to grab their attention. Newsletters are a must-have for businesses and can build engagement with new and existing customers.
Twilio SendGrid has the perfect solution when it comes to building a newsletter system: Marketing Campaigns. And although there are many non-technical services available that make this process painless, building out your own system allows you to have complete transparency and customization of the system.
The mighty SendGrid API is a terrific solution to create your own newsletter system. With marketing tools such as Email List Management, the API doesn’t lose out on controllability.
In this post, you’ll learn how to build an app that allows users to sign up, confirm, and unsubscribe to a newsletter, and allows file uploads to send newsletters out to the masses through SendGrid contact lists.
Prerequisites
To follow this tutorial you need the following components:
- Node.js installation
- A free Twilio SendGrid account. Sign up here to send up to 100 emails per day completely free of charge
- An email address to test out this project
- A preferred IDE or text editor
Overview
Here's how the application will work.
Users will need a place to sign up for the newsletter, where they can enter their name and email into a form, and receive a confirmation email along with a unique confirmation link.
This confirmation link will serve as a double opt-in which will redirect them back to the website, and signal the backend to add the user to the newsletter list.
Existing subscribers should also be able to unsubscribe from the list through a unique link at the bottom of every email newsletter which will signal the backend to delete the user from the newsletter list.
Lastly, there should be an admin panel where the newsletters can be uploaded and be sent to everyone on the list.
Putting this all together, we can organize these requirements into four routes: /signup, /confirm, /delete, and /upload.
Configure SendGrid
To get started, we’ll need to do four things with SendGrid: Verify your Sender Identity, generate your API key, create the Contact List and add a confirmation number as a custom field to Contacts.
The confirmation number will be placed as a query parameter in the subscribe and unsubscribe links to their respective URL routes to verify the request. This unique number will be randomly generated and linked to the contact on SendGrid once they fill out and submit the sign-up form. This is to ensure that no one else can subscribe/unsubscribe on the user's behalf, by sending a request to the /confirm and /delete routes with their email as a query parameter.
Verify your Sender Identity
SendGrid customers are required to verify their Sender Identity to ensure that they own the email address that they’ll be using. A Sender Identity represents your 'from' email address—the address your recipients see as the sender of your emails.
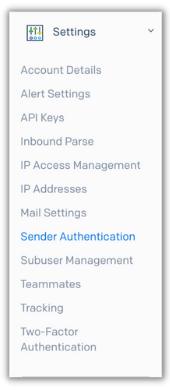
Log in to SendGrid and head over to the settings tab on the left hand side. Click on the drop down and click on Sender Authentication.
Within the Sender Identity section click on the Verify a Single Sender button and fill out the form that pops up with your information.
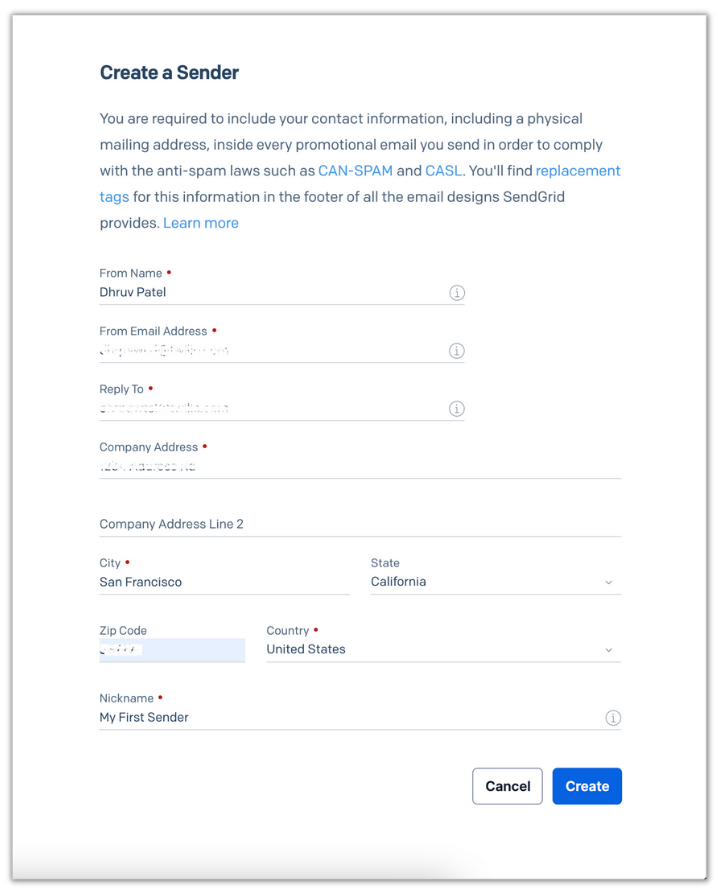
Once the form is filled, click on the blue Create button and you’ll receive an email in your inbox to verify your email address. Open up that email and click on Verify Single Sender which will redirect you back to SendGrid to let you know that your email is ready to be used.
Generate your API key
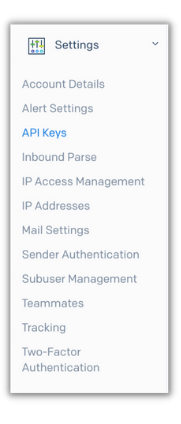
Next, from the SendGrid dashboard, head to the API Keys section, by clicking API Keys under the settings tab on the left hand side.
Click the blue “Create API Key” button on the top right and a form will appear.
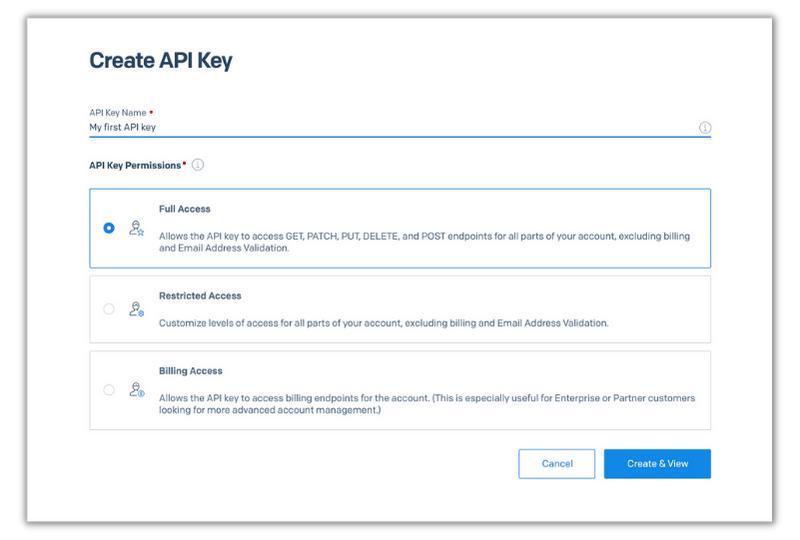
Choose whatever name you’d like for your API key and click the blue Create & View button. Copy your API key and store it in a safe place.
Create the Contact List
SendGrid’s Email List Management allows you to store contacts and create lists without needing to set up a database, and so that you can interact with Marketing Campaigns in the way that best fits your needs.
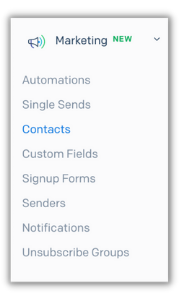
On the SendGrid dashboard open the Marketing section in the left panel and click Contacts.
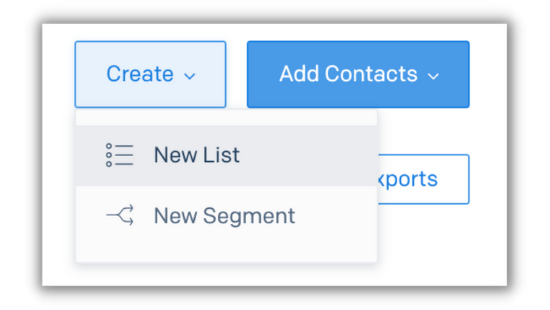
Once you reach the contacts page, click on the dropdown that says Create and then click on New List.
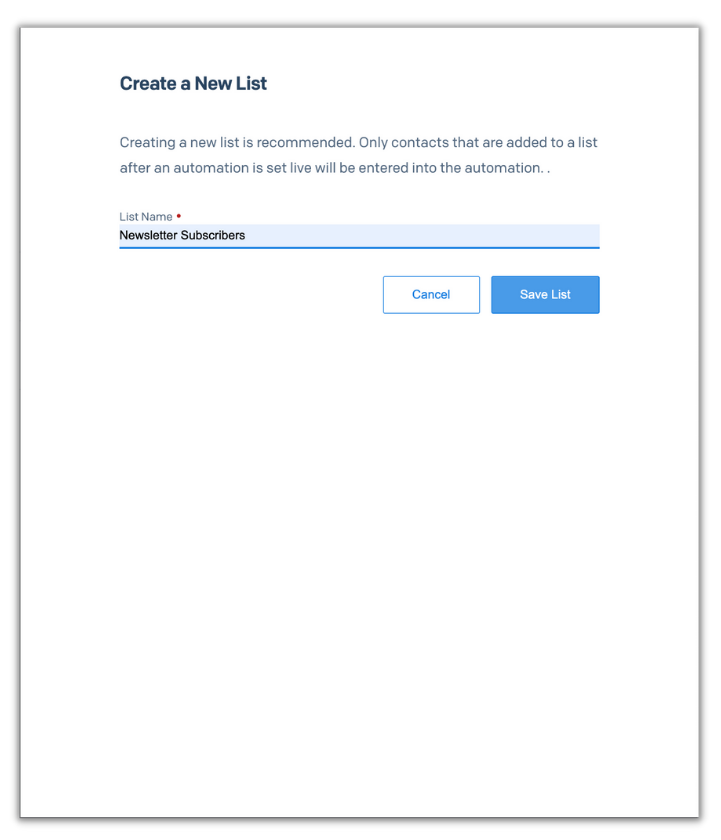
For the list name, enter “Newsletter Subscribers” and then click Save List.
Create a custom field
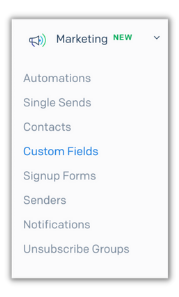
Now that you have your newsletter subscribers list created, let's create a custom field for the confirmation number for the contacts. To do that, from the SendGrid dashboard, head to the Custom Fields section, by heading to the Marketing tab on the left hand side and clicking Custom Fields.
On the top right corner click on the New Custom Field button.
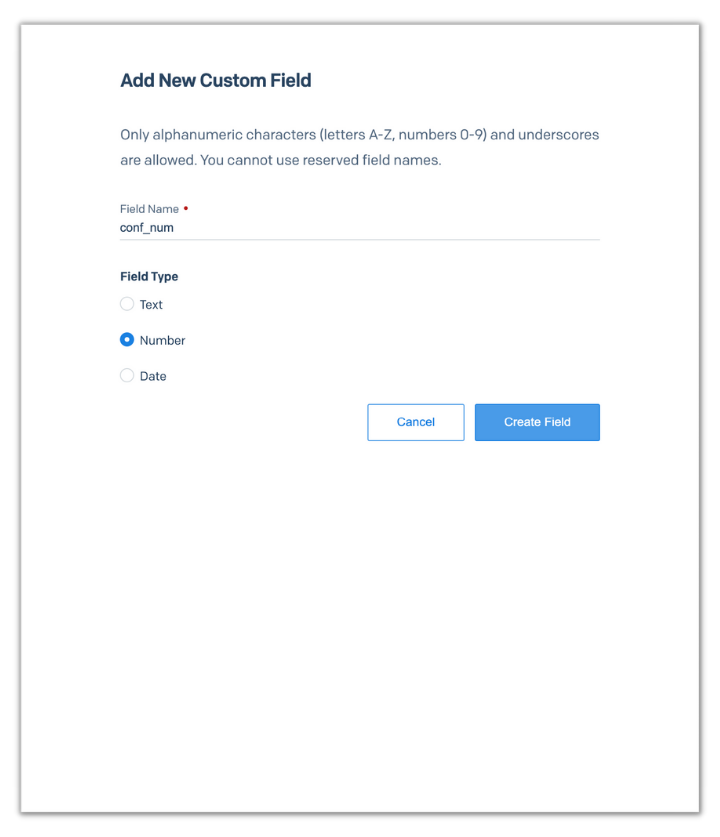
For the Field Name, enter “conf_num” for the confirmation number, click Number as the Field Type, and lastly click Create Field.
Now that everything is configured on the SendGrid side, the next step is to start building out the newsletter backend.
Set up your Node.js app
To keep things organized, create a folder called newsletter-app to store all of your application files. To do that, in your terminal or command prompt, navigate to your preferred directory and enter the following commands:
This command will create your project directory and scaffold out a Node project by creating a package.json file that will contain your project's metadata and package dependencies.
Install dependencies
Your next step is to install all the dependencies needed for the project. You will need seven packages:
- @sendgrid/mail - To send out emails
- @sendgrid/client To interact with all other SendGrid API endpoints
- Dotenv - To store and access environment variables.
- EJS - A JavaScript templating package which will allow us to create dynamic pages using the same HTML file
- Express - To build your server with routes
- express-fileupload - A simple middleware that allows us to upload files from the front-end to the Express server
- Nodemon - A utility that automatically restarts your application when it notices file changes.
To install these dependencies, enter the following command in your terminal:
As you are building out the application in this tutorial, you will also be testing it out. To avoid constantly stopping and starting your server as you edit and test the code, Nodemon will be used to prevent this process. To use nodemon in your terminal, you’ll need to install Nodemon globally with the following command:
Now that the dependencies are installed, you need to scaffold your application.
Set up necessary files
Open up your preferred text editor and create two new files: index.js and .env.
.env is where you’ll add your environment variables, and index.js is where you’ll write the code for your backend.
Open .env and place the following lines into the file:
The XXXXXX strings represent placeholder values for your SendGrid API key. Grab the API key from the previous section and replace the placeholder with it.
Then, open index.js and add the following lines to it:
This code initializes and imports all of the packages we installed earlier. Below this add the following code:
This code sets the API key for both of the SendGrid packages and initializes the Express server with middleware. Line 7 parses incoming requests with JSON payloads, line 8 handles file uploads to the server, and line 9 sets EJS as the viewing engine for rendering web pages.
Append the following code to index.js:
This code provides the rest of the structure for index.js . It includes a section for all of the needed routes as well as a section to store helper functions and variables that we’ll need within the routes. These sections will be filled out as we progress through the tutorial.
While all routes allow GET requests to be made, you’ll also notice that some routes accept POST requests as well. These routes will have forms that, upon submission, the data will be sent out in a POST request to the server.
The last bit in the code chunk will spin up the server and will listen to all requests on port 3000.
Build the Newsletter Application
In this section, you’ll be creating HTML templates for the front-end views and filling in all of the routes in the index.js file.
Create page templates
For the sake of simplicity, we’ll be using EJS templates for this tutorial – this will help us focus more on the backend and get the front-end built quicker.
Within the newsletter-app directory create a folder named views. Within this folder, create two files: form.ejs and message.ejs.
form.ejs will be used to display forms on the front-end – sign-up and newsletter upload forms will be displayed in this view. message.ejs will be used to display messages to the user on the front-end – confirmation and error messages will be displayed in this view.
Open form.ejs and place the following HTML in the file:
Then, in message.ejs, insert the following code:
In both code chunks above, the first highlighted line imports a CSS stylesheet from Bootstrap and the second highlighted line imports the Whitney font that is used here at Twilio! Both of these are used to stylize the form and make it more appealing for the users.
Also, take note of the variables with the format: <%- someVariable %>. This formatting is used in EJS files through its engine to render variables passed to the template from the backend. Depending on which route the user requested, the backend needs to fill in the variables with the necessary values which is a part of our next step.
Don't forget to save both files before moving on!
Build the routes
In this section, we’ll go through each of the routes that were set up in the index.js file. As we fill out each route, you’ll notice a lot of use of helper functions which you will add under the // Helper functions and variables section of the file after you implement each route.
Subscribe to the newsletter
The /signup route will be where users can sign-up for your newsletter. It will contain a form which will be passed to the form.ejs template from the route. On submission, it will send back a POST request with the input data to be processed.
Head back to the index.js file and update the GET and POST methods of the /signup route with the highlighted lines:
The first line of the GET method renders the front-end page and takes in two parameters: a string pointing to the view that will be rendered in the front-end, and an object of local variables that will be passed along to it. The ’form’ string will signal EJS to use for the form.ejs file and use the contents of signUpPage to fill in the variables in the file.
The POST method grabs the inputs from the front-end and creates a contact in SendGrid for the user along with their confirmation number. The confirmationURL, which will request the /confirm route, will be formed using the user's email and confirmation number as query parameters, and will then be emailed to the user for double opt-in using the Mail Send endpoint of the API.
Don't forget to change the SENDER_EMAIL to the email you verified in the previous section!
Next you’ll need to add the helper functions and variables. Scroll down to the helper functions and variables section and place the following code within it:
The signUpPage object stores the title, subtitle, and the HTML sign-up form for the template. The randNum() function generates a random number for the confirmation number. The addContact() function will create the contact in SendGrid using the user's name, email, and confirmation number with the Add or Update a Contact endpoint.
Since the confirmation number is a custom field we created, the only way to add to the field in the contact is to grab the custom field ID. This function uses the getCustomFieldID() function which takes in the name of the custom field (in our case conf_num) to get the ID with the Get All Field Definitions endpoint.
Now that our sign-up page is ready, let's see how it looks. Save the file, and head back to the terminal and enter the following command to start the application:
Once the console logs Listening on port 3000, head over to the /signup route on http://localhost:3000/signup in your web browser:

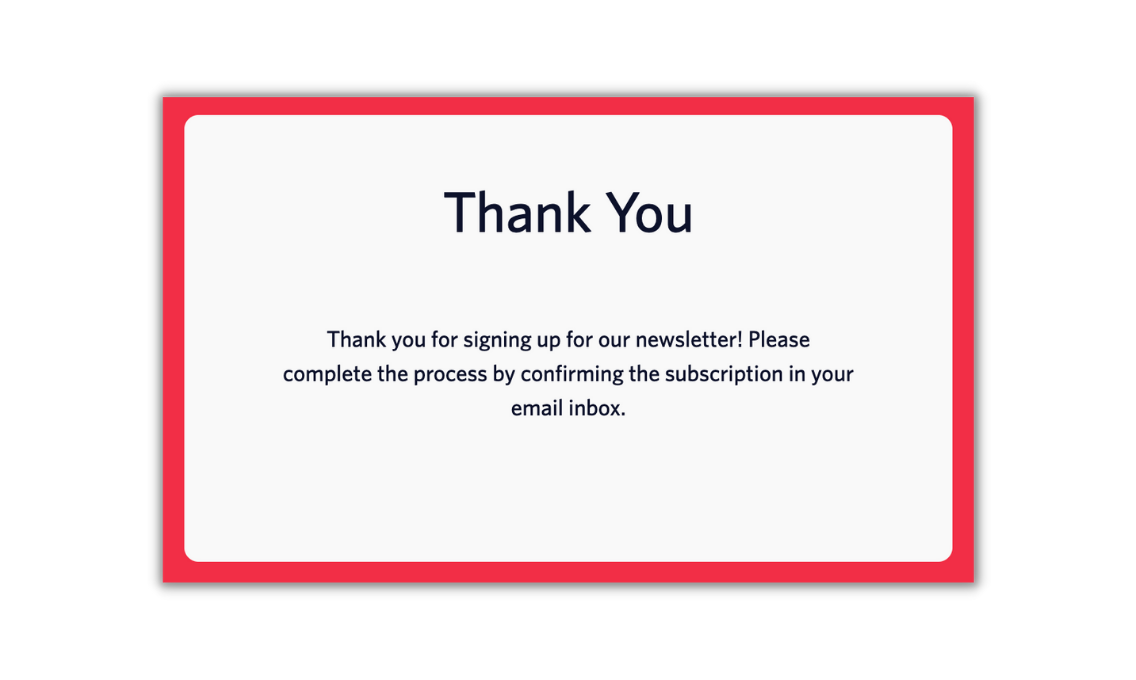
Fill out your information and click Subscribe. Once the information is successfully processed in the backend, you will receive a message to confirm your subscription through your email inbox:
If you head to the Contact section in SendGrid, you’ll notice your new contact show up in “All Contacts” – if you don't see your contact right away, wait a few seconds as it takes a bit to update.
Feel free to click on your contact within All Contacts and you can see the info that you filled out from the form – you can even see the confirmation number you were given within the Custom Fields section.
The next step is to confirm your subscription through the link sent to your email inbox, but before you do that, we’ll need to implement the /confirm route.
Confirm the users subscriptionUsers will need to confirm their subscription by clicking on the confirmation link they received in their inbox. This will trigger a GET request to the /confirm route.
In the routes section, update the GET method of the /confirm route with the highlighted lines:
When the method is requested, it parses the user's email and confirmation number from the query string to check whether the user is a contact and if the confirmation number matches the number on the custom field of the contact.
If the contact is found and the confirmation numbers match, it'll add the SendGrid contact of the user to the Newsletter Subscribers list we created earlier. If the function returns a null, it'll throw and catch the error. In both cases, the message.ejs view will be displayed on the front end with their respective message.
Scroll back down the the helper functions and variables section and add the following anywhere within it:
The getContactByEmail() function takes in an email address and calls the Get Contacts by Email endpoint to return the user's contact; if the contact is not found, it will return a null.
The addContactToList() function will take in an email and list ID and will update the contact with the given list using the Add or Update a Contact endpoint. To get the list ID, the getListID() will be used and will take in a list name (in our case “Newsletter Subscribers”) and return its ID using the Get All Lists endpoint.
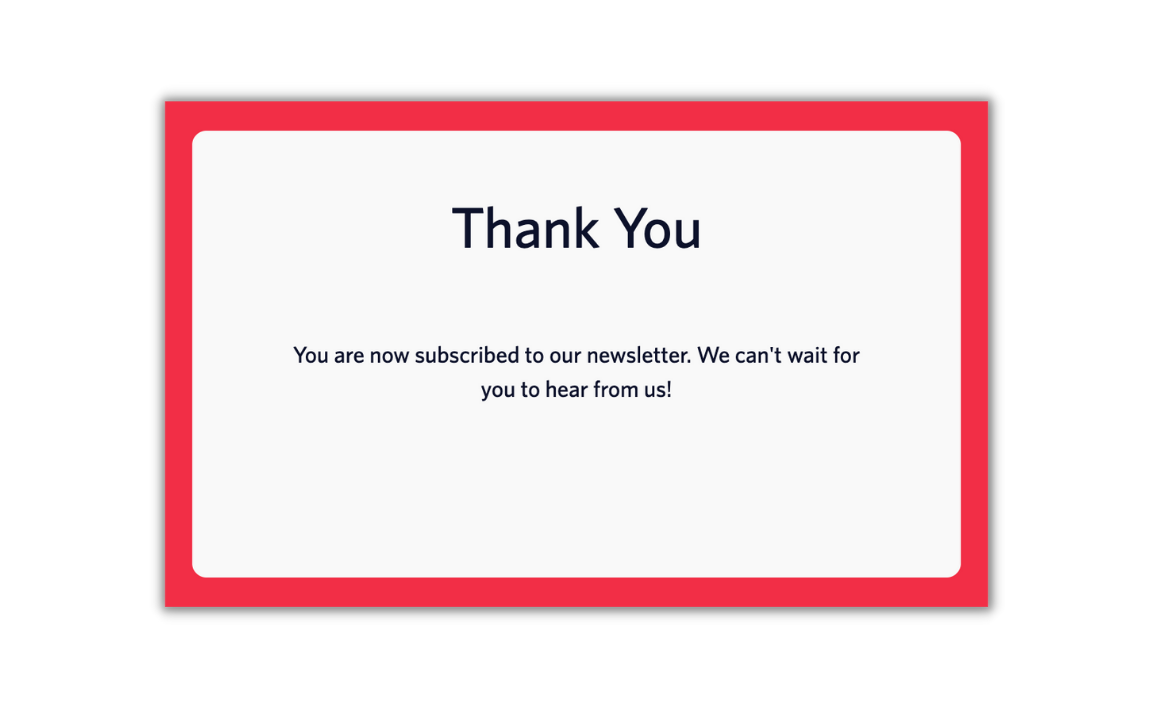
Now that the confirmation process is implemented, let's test it out. Save the file and click on the confirmation link you received after signing up to the newsletter. You’ll receive the following confirmation message on the /confirm route:
Head back to the SendGrid Contacts section where you’ll notice your existing contact has been added to the Newsletter Subscribers list.
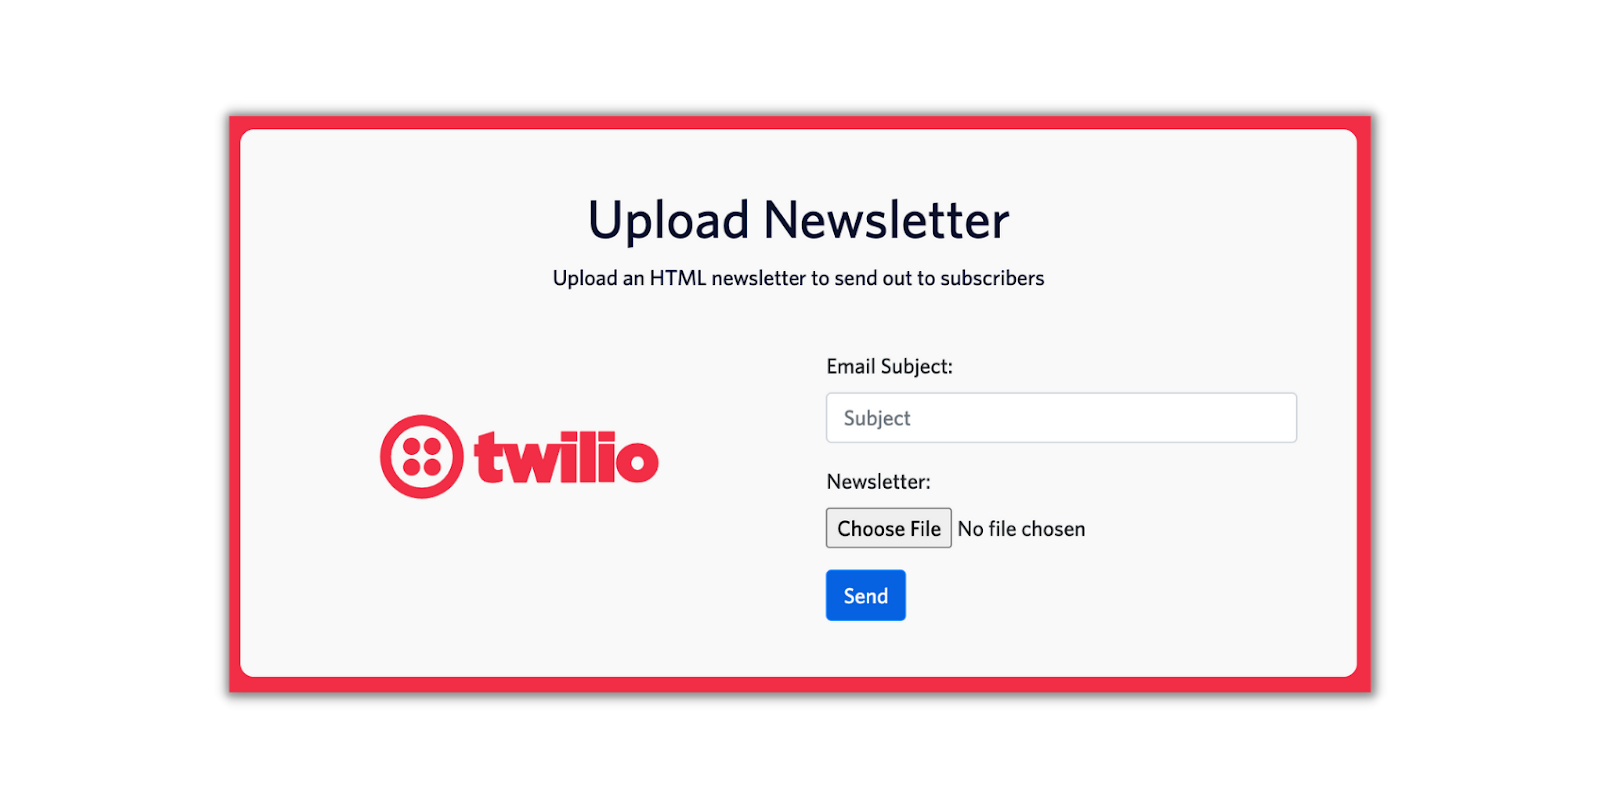
Send out newslettersNow that users have a way of signing up to your newsletter, you’ll need a way to send out the content they signed up for. The /upload route will display a form with two inputs:
- A textbox for the subject line of the newsletter email
- An HTML file upload for the newsletter
On submission the input data will be sent out in the POST request where the backend will send out the newsletter to every contact in the newsletter subscribers list.
In the routes section of the index.js file, update the GET and POST methods of the /upload route with the highlighted code:
The GET method will display the form.ejs template and fill in the template variables from the uploadPage object. The POST method will grab the subject line, and the HTML file from the POST request body and will send out the HTML newsletter to every subscriber on the list, using the sendNewsletterToList() function.
All newsletter emails should have the option for users to unsubscribe, which is generally placed at the bottom of the email. The sendNewsletterToList() function also appends an unsubscribe link to the email (similar to the confirmation link) that requests the /delete route with each user's email and confirmation number in the query string.
Scroll down to the helper functions and variables section and insert in the following code:
The uploadPage object holds the title, subtitle, and form for the form.ejs template. The sendNewsletterToList() function takes in the request data (which holds the subject line and other data needed to create the unsubscribe link), the HTML newsletter and a listID.
The data will be processed by first querying all the contacts in the list through the Search Contacts endpoint. It will then iterate through each contact, create a unique unsubscribe link, and will send out the newsletter to them with the link appended to the email using the Mail Send endpoint.
Don't forget to change the SENDER_EMAIL to your verified email.
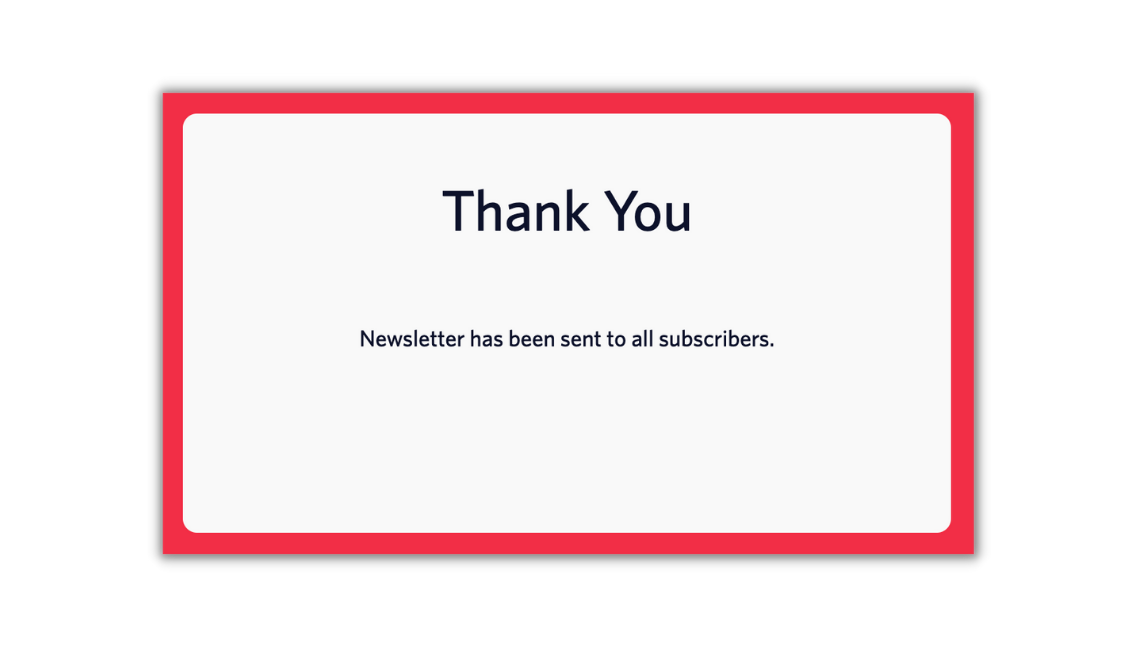
Save the file and head to the /upload route (http://localhost:3000/upload) to test it out. Fill out the form and use an HTML file of your choice to upload (click here if you’d like a sample one):
After clicking Send, it will take a bit for the server to process the incoming data and to send out the email. You’ll know your email has been sent out once you receive the following confirmation message:
Handle unsubscribes
The last requirement for this project is to handle unsubscribes with the /delete route. This will be requested whenever the user clicks on the unsubscribe link at the bottom of the email. The process of this route will be similar to the /confirm route in that the contact will be deleted from the list instead of being added.
Head to the GET method of the /delete route and update it with the following highlighted code:
Just like /confirm route, this method will grab the user's contact details from SendGrid and check to see if both confirmation numbers match. If they match, the contact will be removed from the list through the deleteContactFromList() function. If it does not match, it'll throw and catch the error. In both cases, the message.ejs view will be displayed on the front end with their respective message.
The last helper function that needs to be implemented from the above code is the deleteContactFromList() function. Head down to the helper functions and variable section and add it anywhere within it:
This function takes in the list ID and the SendGrid contact ID from the contact which will be used to call the Remove Contacts from a List endpoint to delete the user from the given list.
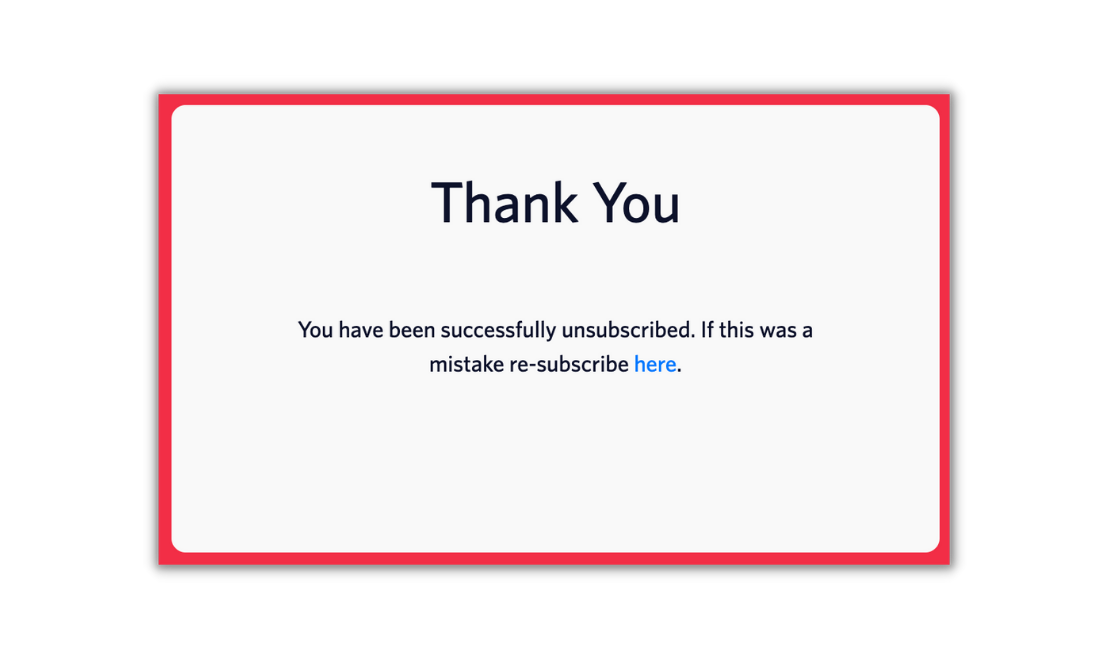
Save the file and click on the unsubscribe link at the bottom of the newsletter email in your inbox. You will be redirected to the /delete route, and you will see the following message confirming your unsubscribe request:
If you head back to the Contacts section on SendGrid and refresh, you’ll notice your contact has been removed from the Newsletter Subscribers list, but is still saved within the All Contacts list.
What's next?
Congrats! You’ve just built a basic full-stack application that allows you to sign-up, confirm, unsubscribe, and send out uploaded newsletters to subscribers all through the SendGrid API.
Want to customize your application even more? Add another view to manage all of your contacts and lists in one place. Or maybe, if you’re wanting to stylize your newsletter, you can add a view to create and manage SendGrids Email Designs using the Designs API. And if you’re wanting another way to connect with your audiences, check out this tutorial on how to Build a Contact Form in Node.js with SendGrid.
Although what you have just created is far from SendGrid’s advanced Email Marketing platform, you have built a basic newsletter application that can be customized to fabricate the right newsletter system for you.
Dhruv Patel is a Developer on Twilio’s Developer Voices team. You can find Dhruv working in a coffee shop with a glass of cold brew or he can either be reached at dhrpatel [at] twilio.com or LinkedIn.

Related Resources
Twilio Docs
From APIs to SDKs to sample apps
API reference documentation, SDKs, helper libraries, quickstarts, and tutorials for your language and platform.
Resource Center
The latest ebooks, industry reports, and webinars
Learn from customer engagement experts to improve your own communication.
Ahoy
Twilio's developer community hub
Best practices, code samples, and inspiration to build communications and digital engagement experiences.