Implementing Eureka and Zuul for Service Discovery and Dynamic Routing in JavaScript Microservices Running on Node.js
Time to read:
April 22, 2019
Written by

Building your JavaScript applications as a collection of microservices give you a number of advantages. Your applications can be more modular, uniform, and testable as you build them and they can be more robust, scalable, and available when you deploy them to the production environment. Including a service discovery registry and dynamic routing capabilities will help you achieve scalability and availability in the production.
This post will show you how to integrate service discovery and intelligent routing into a Node.js application built with a microservices architecture. You'll see how you can do this with two Netflix open source projects, Eureka and Zuul, that run in the Java SE Runtime Environment.
The Netflix Eureka server provides service discovery. This gives your application's services the ability to find other services without knowing where they are hosted or the full URL required to reach them, so you don't have to provide complete URLs for each service that needs to reach another service.
The Netflix Zuul service provides dynamic routing. Using Zuul in your app enables your services to use the information from the Eureka service directory to reach other services.
Because both Eureka and Zuul are Java applications they can be implemented with Spring Boot, part of the Spring Framework for Java. With Spring Boot you can package Java applications in Java Archive (.jar) file that can be run in the Java SE Runtime Environment. This enables you to easily deploy your Node.js server in a container along with Eureka and Zuul.
Spring has built configurations for common usage scenarios in the Spring Cloud Netflix, including Service Discovery with Eureka and Intelligent Routing with Zuul. The .jar files are built with Apache Maven using Project Object Model (pom.xml) files for Eureka and Zuul available as part of the Spring Guides repository on GitHub.
Prerequisites
To accomplish the programming tasks in this post you will need the following:
- Node.js and npm (The Node.js installation will also install npm.)
- Java SE Runtime Environment
To learn most effectively from this post you should have the following:
- Working knowledge of JavaScript and Node.js
- Some exposure to the HTTP protocol
There is a companion repository for this post available on GitHub.
Build the basic JavaScript distributed system
If you have completed the project from the first post in this series, Building JavaScript Microservices with Node.js, you can continue with the code you wrote for that post: the Node.js project for this post is built on that code base. If you are familiar with building JavaScript microservices, or want to start fresh, you can get the code from GitHub.
Clone the project by executing the following command-line instructions in the directory where you would like to create the root project directory:
Register services with Eureka
The existing application is a simple system with two services and hardcoded URLs. What if you want to add more instances of heroes-service? How could threats-service determine which one to use? Should you hardcode two URLs?
There's a better way. With Eureka you can register your services so other services don't have to rely on hardcoded URLs to find them, even when there are multiple instances of a service running on different servers in different locations.
Zuul will provide the intelligent routing needed to reach the services listed in the registry so you don't need to create and maintain a complex and brittle routing system.
The architecture you are going to implement is illustrated in the following diagram:
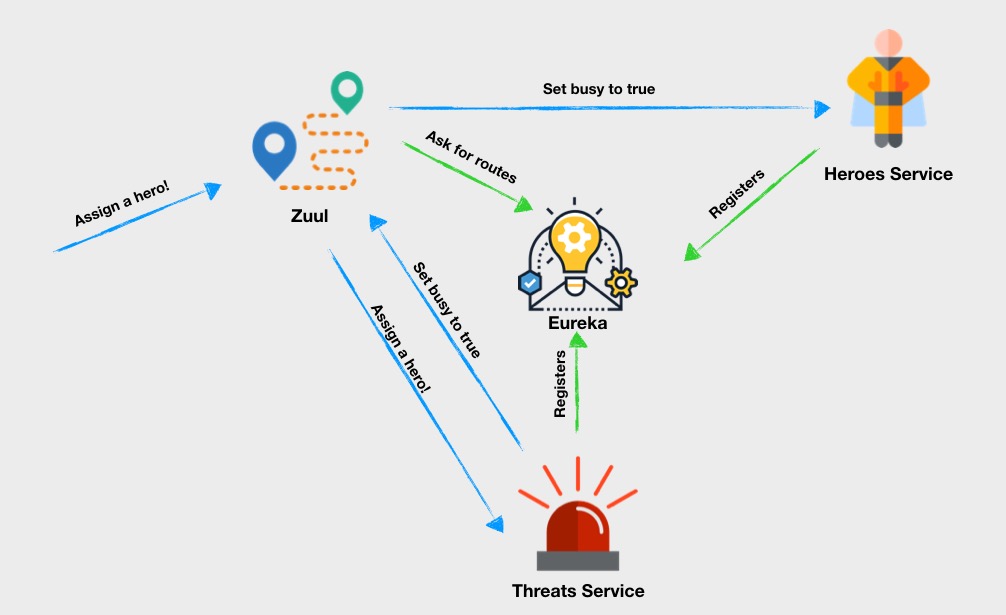
There will be two kinds of communication flow in the completed application. First, there will be a continuously running sequence represented by the green lines. Whenever service is running it registers with Eureka and sends a heartbeat, informing Eureka that it is up and running. Zuul will poll Eureka for all available services and map them to specific routes.
The second kind of flow, represented by the blue lines, occurs when the system receives a request:
- A request is made to assign a hero to a threat!
- Zuul, based on information obtained from Eureka, provides this request to the desired service, threats-service,
- The threats-service sends Zuul a request to “tell the hero service to set the designated hero's status to ‘busy’”.
- Zuul forwards that request to the heroes-service.
Download the following Java archive files and place them in your project's root directory:
eureka-service-0.0.1-SNAPSHOT.jar (42.6 MB)
zuul-0.0.1-SNAPSHOT.jar (39.6 MB)
Take a look at the Eureka user interface by executing the following command-line instruction in the root directory of your application. Windows users should execute the instruction in a Windows Command Prompt (cmd.exe) window, not a PowerShell window.
Navigate to the Eureka application at http://localhost:8761 with your favorite browser.
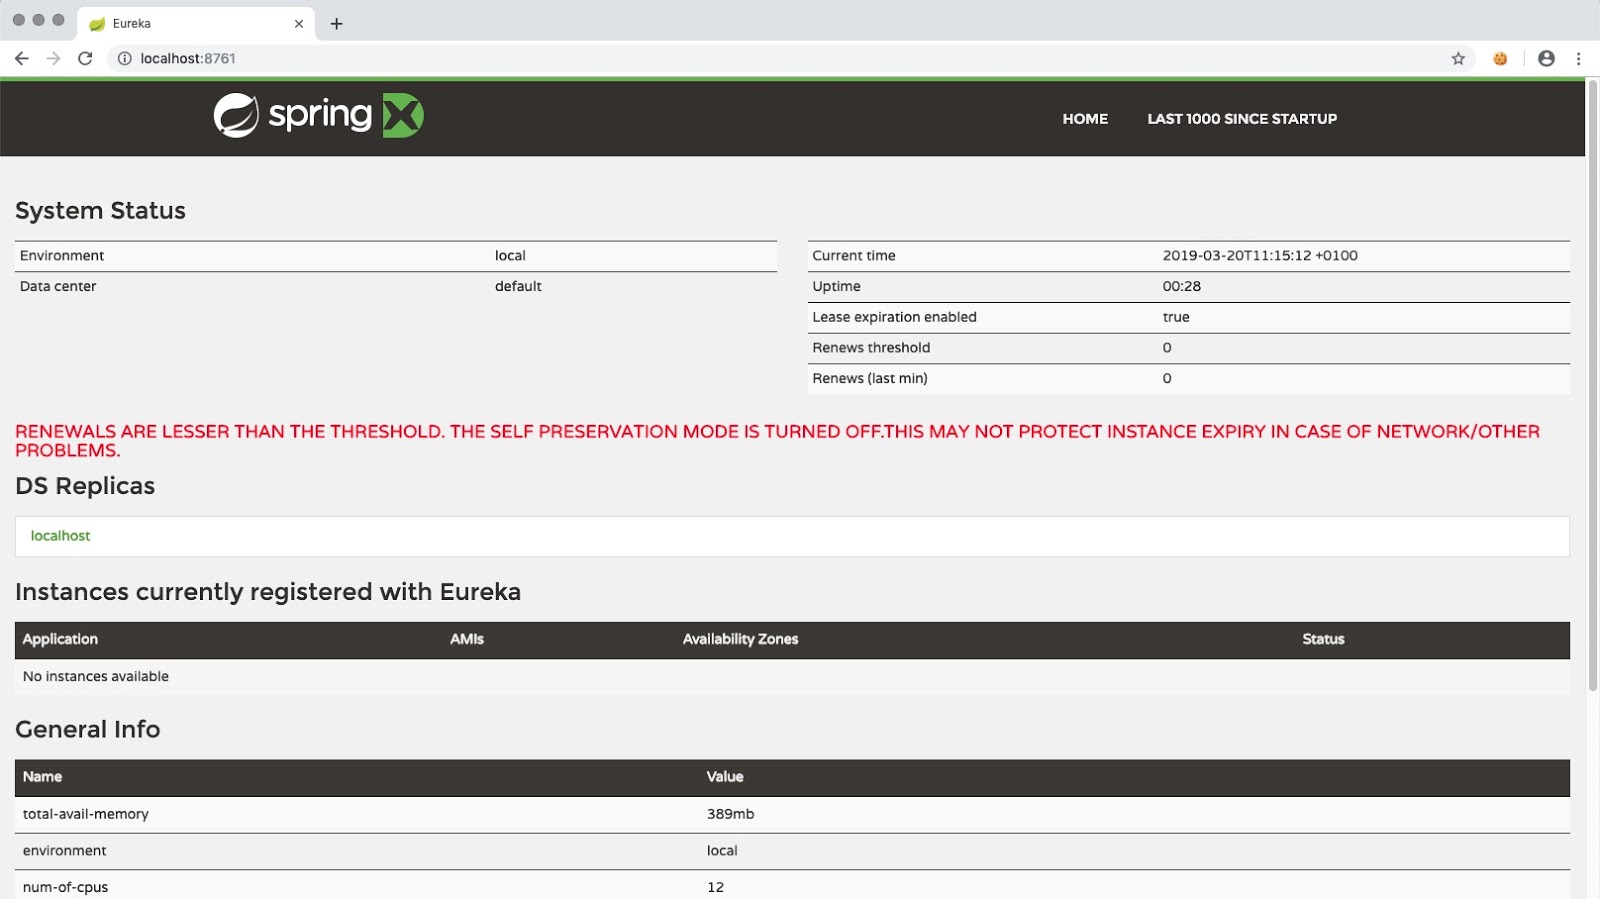
By default, the Eureka service is running on port 8761. This can be changed by using the --server.port parameter; but don't do this unless you have a good reason, like a port conflict.
Register a service instance in Eureka using a RESTful API
Although services can be configured with Eureka using the Spring Framework, Eureka also has a RESTful API that can be used with non-Java applications. To register a new service you can perform a POST request against the http://localhost:8761/eureka/apps/my-service endpoint. This can be done with a curl command, as demonstrated below.
In the root directory for the application, create a eureka-curl-payload.json file and insert the following JSON data:
The value for app, shown as "my-service", is the handle used for the service name. All the included data elements are required to register a service with Eureka.
Execute the following curl command-line instruction in the root directory of the application:
After executing this request you should see the following in the terminal output:
Also, my-service should be listed in the Instances currently registered with Eureka table at http://localhost:8761, as shown below:
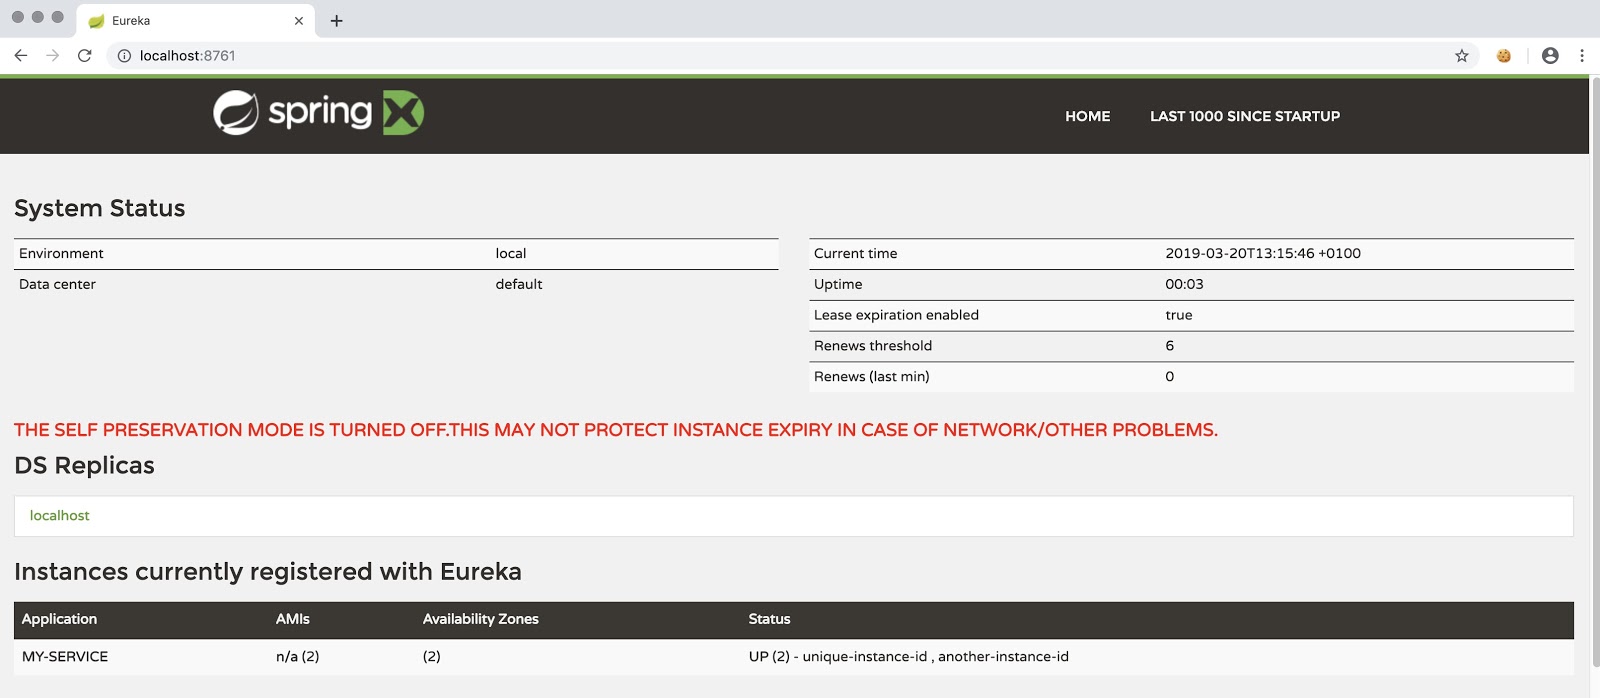
Note that you may not see your service listed if you don't refresh the browser tab quickly after changing the contents of the JSON file. The Eureka application is configured by default to automatically unregister clients if they don’t send a heartbeat request within 60 seconds. If this happens to you, resend the curl request.
Leave the console window open and leave Eureka running. You'll be needing both again.
Here's an explanation of the information Eureka needs to properly register a service instance:
hostname – hostname of the service
app – name of the service (must be equal name from the URI)
vipAdress – Virtual hostname
instanceId – unique id of the service instance
ipAddr – IP address of the machine where the instance is running (Use 0.0.0.0 to use the hostname instead of an IP address.)
status – status of the service (UP, DOWN, STARTING, OUT_OF_SERVICE, UNKNOWN)
port – a JSON object containing information about the port on which service instance is running
dataCenterInfo – a property required when running Eureka in the Amazon Web Services environment. It should be set to ‘cloud’ when running on AWS.
Register the Node.js application in Eureka
You are ready now to implement a registration mechanism in the case study project. Because you are going to use the same mechanism in both the heroes-service and threats-service services, you can create a separate npm project which will be used by both services to register themselves with Eureka.
Create a /eureka-helper directory at the same level as the /heroes and /threats directories.
Change to the /eureka-helper directory and create a eureka-helper.js file.
In the /eureka-helper directory, initialize the npm project and install the necessary dependencies by executing the following command-line instructions:
Insert following JavaScript code in the /eureka-helper/eureka-helper.js file:
The eureka-helper project exposes the registerWithEureka method, which performs the HTTP POST request you tried while testing Eureka. When the method gets a positive response it starts sending a heartbeat to Eureka to keep it from unregistering the service, as noted above. This is done in the setInterval method:
Now you can call the registerWithEureka method from each of the services.
Modify the /threats/threats.js file so the last three lines of code are as follows:
Modify the /heroes/heroes.js file so the last three lines read as follows. Note that one of the arguments for registerWithEureka is different:
Open a console window in the /heroes directory and execute the following command-line instruction to start the service. Windows users should use a command (cmd.exe) window, not PowerShell:
The output should look like the following:
Leave this console window open. You'll eventually have five console windows open, so you may want to start arranging your desktop now so you can see them along with your browser tabs if you have sufficient space.
Open another console window in the /threats directory and start the service with the following command-line instruction:
The output should look like the following:
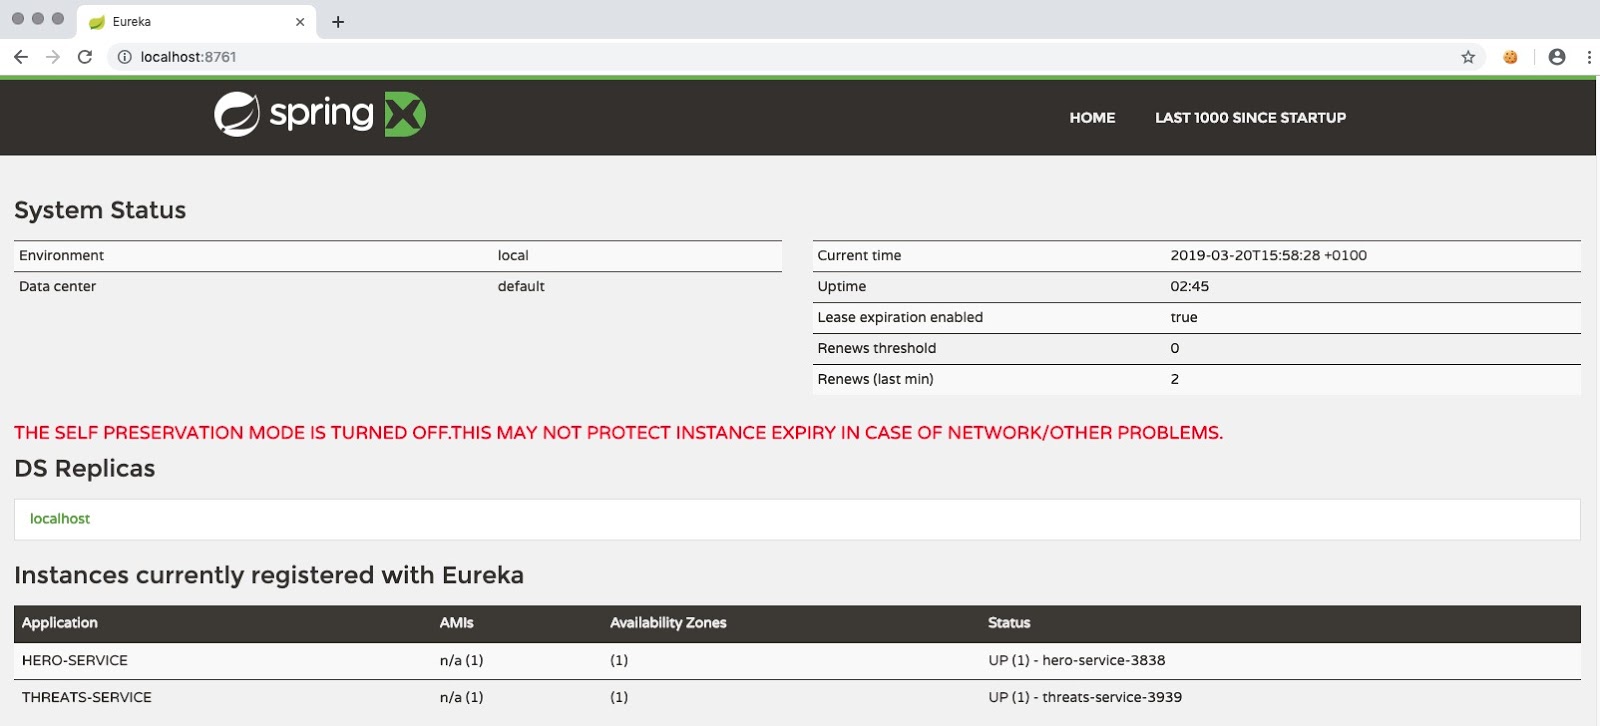
In your browser, look at the tab for Eureka (http://localhost:8761) and verify both of the services are listed under Instances currently registered with Eureka, as follows:
If you haven't been following along with the coding and you want to catch up to this step using the code from the GitHub repository, execute the following commands in the directory where you’d like to create the project directory:
Find services with Zuul
Now that the services are registered with Eureka they can be located with Zuul's dynamic routing capabilities.
Open a new console window (this will be the fourth command window you'll have open) in the root directory of the application.
Start the Zuul service by executing the following command-line instruction in a new console window. This will be the fifth console window you'll have open:
This command will start Zuul on HTTP port 8080. By default, Zuul will look for the Eureka service at http://localhost:8761. If you've changed the port for Eureka you can override Zuul's default settings by using inline arguments, as follows, where the first port number is Zuul's and the second is Eureka's:
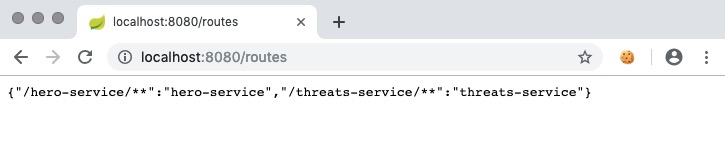
Open a new browser tab and navigate to http://localhost:8080/routes (or the port to which you've assigned Zuul, if you've changed it). You should see list of routes registered in Zuul as follows:
Leave the Zuul service running.
Use Zuul to find heroes-service
Zuul is running, but threats-service needs to be changed to use Zuul to find the heroes-service; threats-service is currently using a hardcoded URL, which is not very scalable. Changing the service to use Zuul is easy.
In the console window in which you're running threats-service, stop it and leave the window open.
Find the following line in the threats/threats.js file:
Change it so that it points to the port on which Zuul is running, followed by the name of heroes-service as it was registered in eureka-helper/eureka-helper.js:
Save the file and restart threats-service.
Verify Eureka and Zuul are working
You now have a service directory and dynamic routing in place in your application. You can see it in action by executing a post command that assigns a specific "hero" to a specific "threat", which marks the hero as busy saving the world from that particular peril.
You can use Postman, curl, PowerShell Invoke-WebRequest, or your browser. If you'd like to use curl, open a console window and execute the following command-line instruction:
Note that you'll need to change the port number if you changed the port number on which you're running Zuul.
If the service is working correctly you should see results similar to the following console output from curl:
In the console window for heroes-service you should see output similar to:
Congratulations! You now have a more scalable and robust microservices application!
If you want to catch up to this step using the code from the GitHub repository, execute the following commands in the directory where you’d like to create the project directory:
Summary
In this post you learned how to use service discovery in Eureka. You saw how to delegate responsibility for different tasks to separate applications and to communicate between services. Both applications communicate with each other by exposed REST APIs. Each manipulates only the data for which it is responsible and can be maintained, extended, and deployed without involving the other service. Both applications are accessible under the same domain, localhost:8080. To access them you need only add their designated handles to the URL.
Additional Resources
Architectural Styles and the Design of Network-based Software Architectures, Roy Thomas Fielding, 2000 – Fielding’s doctoral dissertation describes Representational State Transfer (chapter 5) and other architectural styles.
Microservices – Although flawed, the Wikipedia article is a good starting place for finding more information about microservices architecture and implementation.
Node.js reference documentation
Spring Cloud NetflixSpring Cloud Netflix project " … provides Netflix OSS integrations for Spring Boot apps through autoconfiguration and binding to the Spring Environment and other Spring programming model idioms."
Maciej Treder is a Senior Software Development Engineer at Akamai Technologies. He is also an international conference speaker and the author of @ng-toolkit, an open source toolkit for building Angular progressive web apps (PWAs), serverless apps, and Angular Universal apps. Check out the repo to learn more about the toolkit, contribute, and support the project. You can learn more about the author at https://www.maciejtreder.com. You can also contact him at: contact@maciejtreder.com or @maciejtreder on GitHub, Twitter, StackOverflow, and LinkedIn.
Related Resources
Twilio Docs
From APIs to SDKs to sample apps
API reference documentation, SDKs, helper libraries, quickstarts, and tutorials for your language and platform.
Resource Center
The latest ebooks, industry reports, and webinars
Learn from customer engagement experts to improve your own communication.
Ahoy
Twilio's developer community hub
Best practices, code samples, and inspiration to build communications and digital engagement experiences.