Beat the Rush on Exclusive Twitter Deals with Node.js and Twilio SMS
Time to read: 13 minutes
December 18, 2017
Written by

I just couldn’t get online fast enough. You may know the feeling: someone or some business you follow posts a sale on Twitter and by the time you get online, you have either missed the tweet or the sale has ended. You could enable SMS notifications and get every tweet texted to you in a timely fashion, but this really doesn’t help as you start to tune out the texts when the volume exceeds several tweets within a short period of time. What if you could make an app that sends you an SMS notification only when the tweet matches a sale you are actually looking for?
This is where the Twilio SMS API comes to the rescue.
In my case, I am a big fan of Wes Bos (@wesbos). Wes is a developer who produces quality and fun online courses for learning web development, particularly in a JavaScript environment. Mr. Bos tweets constantly, and is really good at interacting personally with his followers. But he also produces custom, quality laptop stickers, for a low cost. The problem is that, while he has increased his batch size each sale, I have been unable to get online in time to buy before they were all sold out. With his high tweet rate and humongous number of followers I knew I needed to use my coding skills to get ahead.
By listening on his Twitter stream for a particular keyword via the Twitter REST API, I conceived a hack that would check his stream every several minutes and text myself if during that period he posted on stickers.
Let’s build this together.
Getting Started
In order to follow along with this post, the following is required:
- a Twilio account (Sign up for free) and an SMS-enabled Twilio phone number
- a Twitter developer account (Login to Twitter via apps.twitter.com)
- The latest stable release of Node.js (download here) and git installed (here)
- An mLab account (Free 500MB) for MongoDB
- Heroku account for deployment (Signup Here)
Obtaining a Twilio Number
Twilio is not that expensive to set up. In fact, you can sign up and get your API key for free and be gifted a small trial balance just to try it out. If you use up your trial balance, upgrading is very inexpensive for small projects. For a local number in the US, it’s only $1/month, and SMS messages are cheap. In my case, since I had used up my trial balance, I upgraded my account and loaded $20 back in July 2017, and as of mid-November, I still have $15.71 in my account. I knew going in this would be a very inexpensive way to do some good ol’ fashioned Twitter stalking.
Setting up your Node environment.
Let’s get started with the application.
Creating Your Project and Installing Twilio
On the command line create a new folder, and go into it:
To be able to install all the packages we need, we have to initialize the folder for npm.
From the command line, run npm init, setting server.js as the value of ‘main’ when prompted. After this process is complete, install the Twilio Node.js package
Installing Additional Dependencies
This project requires additional dependencies to allow data persistence with MongoDB, datetime formatting with Moment.js, access to the Twitter API, and storing environment variables with dotenv. Note, you can install multiple npm packages at once.
While you’re still on the command line, create the following files: .gitignore, .env, Procfile, and server.js.
We need to make sure we don’t check certain files into source control so add the following to .gitignore.
Within .env we will store our environment variables for use during development. We must make sure we do not let our Twilio API key, or any other API keys become publicly accessible anywhere for any reason.
Finally, Procfile is used by Heroku after deployment for reading this application as a worker, that is, having no front-end on the web.
Simply add this single line in your Procfile:
Handling Environment Variables
We’ll use Environment Variables to securely pass our API keys and other secrets to the application. Again, we don’t want this information publicly accessible lest someone steals our keys for their own nefarious purposes. In this case, we’re going to store our keys in .env to be imported into server.js. When we deploy, we can either use the Heroku dashboard or heroku-cli package to store these variables for your application. Read more about Environment Variables in this excellent article by Dominik Kundel.
From Twilio, after you purchase your number, from the Twilio Console, you will be able to view both your Account SID and your Auth Token. Inside of .env, add the following lines, of course omitting the angle-brackets I have provided in the example below:
Note: for both your personal and Twilio number, for the US, include 1 followed by the 10 digit number. No spaces, parentheses, dashes or other punctuation – a plus sign followed by 11 numerical digits.
For Twitter, go to https://apps.twitter.com/, sign-in and create a new app. Give it a name and description. Since there is no front end for this app, use a placeholder value for “Website”, like ‘https://www.twilio.com‘, and leave blank “Callback URL”. After creating your application, click on the ‘Keys and Access Tokens’ tab. Then click “Generate a Token” and you now have access to what you will add to .env:
Finally, for MongoDB, let’s set up a free development server through MLAB.
If you haven’t already, go to http://www.mlab.com and set up an account.
After creating your account and verifying your email address, you can get access to a free 500MB server by clicking on the “Create New” Button under the heading “MongoDB Deployments.”
Then, choose “AWS” Cloud Provider and the “Sandbox” plan type, which will allow you to choose your geographic region after hitting continue. At this point, enter the name of your database as twitter-stalk. You are just a few seconds from a free 500GB cloud-hosted MongoDB database.
After the database is created, you will see a green checkmark next to your database instance.
Once you see this checkmark, click on the name of your newly created database to take you to the management screen for this particular database.
On the database screen, you will see a warning that you need a database user to use the database.
The second tab in the middle of the page is the Users tab. Click here and you will see an option to Add database user in the bottom right.
Set your username to admin and enter a secure password of your choice. You will need this password in a moment.
Note the URI for accessing your database. Set up an ‘admin’ user and give this user a secure password. Once you are taken back to the database page, scroll to the top of the page you will see the following instruction: To connect using a driver via the standard MongoDB URI
Copy the uri example below this prompt and in .env, add the following:
Coding the App
We will create three functions: one to call the Twitter API and add new tweets to the database, another to get the last tweet from the database, and finally one to send an SMS message. For this tutorial, we’ll be using the Twitter REST API since we only need to check for tweets every so often.
Open up server.js in your code editor and let’s begin!
Coding the Application
Importing Environment Variables
The dotenv package imports any variables we have saved in our .env file. We want to import these variables if and only if we are in a development environment. We are excluding our .env file from git source control, so for production, we will import our environment variables a different way, which will be discussed later.
On the first line of server.js, add the following block of code:
Initializing Twilio, Twitter and MongoDB Clients
Having loaded our environment variables, now we can use them in our application. Add the following to server.js to initialize our Twilio, Twitter, and MongoDB clients:
For both the twilio and twitter packages, you are importing a function which you can call directly by passing in your keys as parameters. Twilio takes two parameters, your Account SID and your Auth Token. Twitter takes a single object with contains all four of the keys you saved earlier.
For MongoDB, we need to do a little more. For now, set up the URI for the connection:
Adding Moment Package and Assert Module
Moment allows you to format timestamps consistently across environments. We’ll use it here for storing a Unix timestamp. Assert will allow us to do error checking on our MongoDB connection and kill our app if we can’t connect to the DB.
Writing Our Functions
Our app only needs a couple of functions to operate. Before creating our main app engine, we’ll create and test sending SMS messages with Twilio.
What I love about Twilio is it’s simplicity. Twilio gives us a promised-based method for sending SMS texts whose basic structure is as follows: client.messages.create({}).then().catch()
All we need to do is fill in the details to match our application:
What is this function doing?
The messages.create method takes a single argument, an object with our text data. Twilio does all the magic to send an SMS text to whatever number you pass it as long as it is being sent from a valid Twilio number (with an available balance).
Later, we’ll pass the entire tweet to the message. If it goes through, we’ll log the message id and a timestamp. And of course, we’ll receive a text.
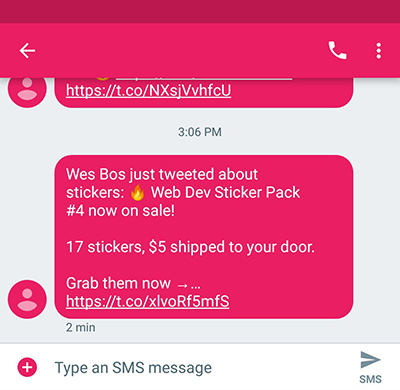
Let’s test it!Once you have added the code-block above, save server.js. Then from the command line, run node server. You should receive a text-message with the text ‘Wes Bos just tweeted about stickers’ very shortly.
After testing your call to the Twilio SMS API, we can start building the engine that will connect all three services, MongoDB, Twitter and Twilio.
We need all three services with this application so that we can control the volume of messages and limit the amount of time our app is spending connected to the Twitter API. Web traffic is expensive and we are doing this on the cheap.
Connecting to MongoDB
After testing the code, once again open server.js in your text-editor, and on last line, insert the following:
The connect method takes the URI we crafted earlier and returns to us the database we will reference in our application. We’ll call our collection of tweets just that, tweets. We have to pass our collection into our (still unwritten) appEngine function so we can store and retrieve tweet data.
Creating the App Engine
What must the app engine do? It must call the Twitter API, detect if @wesbos has tweeted about stickers, and text us this information. We are calling the Twitter REST API, so every time we do it is possible that we will get duplicate results from one call to the next. How can we keep from getting duplicate results?
Every tweet object has an id_str. The value of 0 (zero) represents the earliest possible tweet id. And the number only increases with time and tweets, it never goes down. This means if we store the most recent tweets, we can search for tweets that have occurred since that time. When we get a result from the API call, we will store the tweets in our database and send an SMS with tweet text.
This function takes only one argument, the collection. On the collection I’m going to use the findOne MongoDB function, sort in descending order by the tweet id_str, and limit the results to 1. The id_str is like a timestamp in that the higher the number, the more recent the tweet.
Note the ternary operator used for determining the value of lastTweetId. If the value of tweet is null or the tweet happened to be missing an id_str, then we could not read tweet.id_str without throwing a type error. The ternary operator returns a value of 0 if either invalid value comes back.
Once we have found the last tweet ID, if any, we use it to call the Twitter Search API. We call get on the twitterClient passing the search API path and an object of options for the search. We will specify we want to search for tweets from @wesbos, excluding retweets and search on a single term ‘stickers’. We will also limit our search to tweets since the last tweet id we retrieved from our database.
If there are any statuses, we will text the first returned tweet using the Twilio API call we tested earlier, and then insert all the statuses into our database.
Now we are ready to copy the Twilio code-block from above and paste it into our appEngine function. We will tweak the function ever so slightly to send the body of the tweet with the body of our text as well. We just have to make sure the the API call is successful and that it returns new tweets.
Here’s what the final product will look like:
How Do We Get There?
Inside the code block of the twitterClient.get() callback function, we use two conditional statements: one to catch any Twitter connection errors, and the second conditional statement to verify the response includes new tweets.
Next, we cut and paste the twilioClient.messages.create function inside the second conditional code block, but we change body to include the text of the tweet. (Make sure you remove the original call to twilioClient.messages.create, or you’ll get a text every time you start the script.)
So we get:
We use moment.now() to track the Unix timestamp in our logs every time we send a message so we have a record we can check later.
But for our app to work we also have to store all of the most recent tweets so we only get texted when we actually receive a new tweet.
We do this with the MongoDB collection function insertMany(). We don’t need to worry about data schemas at this scale, so we will just insert all the received statuses.
Now let’s run the application. First, open up a second terminal or command prompt to start up your MongoDB database by running mongod, then in your project folder start the notifier with node server. You should see a success message when it connects to MongoDB, and receive a text from Twilio when @wesbos tweets about stickers while the application is running.
You can keep this running on your own machine, but it’s probably better to deploy this to a server so you can get Twilio texts in real time. Here’s how to deploy it to Heroku.
Deploying to Heroku
Download and install the Heroku CLI.
Inside your project folder, initialize Git from the command line by running git init.
Connect to Heroku
After you have installed the Heroku CLI and have initialized your repository, run the following commands:
You will be prompted to enter your email address and the password you set up with your Heroku account.
Heroku will create a random name for your application, which you can change later in the Heroku Dashboard. It will also add the remote origin for your application.
Add Environment Variables to Production
For each of the environment variables we stored in .env for our development environment, we have to add to our production environment in Heroku.
From the command line, run the following command, replacing the keys and values to match the values we stored earlier. You can add all your environment variables with one command by separating the key/value pairs with a space. Also, omit any quotation marks from before or after your values:
Test Your Environment Variables
Make sure all your variables are stored utilizing the command:
Add, Commit and Push
Run the following git commands in succession:
This will stage all your files to be committed to source-control.
This commits your changes at this point. You can always rollback your code to this point of development in the future if needed. The -m command allows you to add a comment to this commit. Since this is our first commit, we will just comment ‘initial commit’.
This command will run for several seconds. On your screen you will see the process of creating your node application on Heroku and eventually you will be told the process is Done!. At this point, you app is live on the web and you will receive text messages periodically whenever Wes Bos tweets about stickers.
If you want to see this work right away, instead of using Wes Bos’s Twitter handle, use your own and then tweet something with the word stickers in the body of your tweet. You will get an SMS message in seconds. Just be sure to change it back later so you can get your own pack of laptop stickers from Wes Bos.
Does it Work?

My app served me well. I finally got some stickers from the man, the myth, the legend, Wes Bos. I received texts every so often as the topic of stickers would be broached, but I almost immediately got the announcement that stickers were up for sale, and I bought some of the first 100 packs to be sold. Now that I’m all set with a couple of sweet sticker packs, I’m happy to share my technique with you -> https://github.com/wesleylhandy/bos-stalker
Did this help you score some stickers of your own? I’d love to hear from you!
Twitter: @wesleylhandy
Github: https://github.com/wesleylhandy
LinkedIn: https://www.linkedin.com/in/wesleylhandy/
Email: wesleylhandy@gmail.com

Related Resources
Twilio Docs
From APIs to SDKs to sample apps
API reference documentation, SDKs, helper libraries, quickstarts, and tutorials for your language and platform.
Resource Center
The latest ebooks, industry reports, and webinars
Learn from customer engagement experts to improve your own communication.
Ahoy
Twilio's developer community hub
Best practices, code samples, and inspiration to build communications and digital engagement experiences.