Build Faster JavaScript Web Apps with Angular Universal, a TransferState Service and an API Watchdog

January 02, 2019
Written by
Maciej Treder
Contributor
Opinions expressed by Twilio contributors are their own

angular-seo.jpg

Search Engine Optimization (SEO) is vital for most web applications. You can build SEO-friendly Angular apps with Angular Universal, but what about the performance and efficiency of such an application? This post will show you how to build fast Angular apps that use client and server resources efficiency while providing server-side rendering (SSR) for SEO purposes.

In this post we will:

  • Create an Angular application
  • Add server-side rendering with Angular Universal
  • Set up an HTTP_INTERCEPTOR with a TransferState service, to prevent duplicate calls to server resources
  • Create a route resolver to protect against slow external APIs.

To accomplish the tasks in this post you will need to install Node.js and npm (The Node.js installation will also install npm) as well as Angular CLI. cURL for macOS, Linux, or Windows 10 (included with build 1803 and later) and Git are referred to in the instructions but are not required.

To learn most effectively from this post you should have the following:

  • Working knowledge of TypeScript and the Angular framework
  • Familiarity with Angular observables and dependency injection

There is a companion project for this post available on GitHub. Each major step in this post has its own branch in the repository.

Create the Angular project

Every Angular project begins with installation and initialization of the packages. Type the following at the command prompt in the directory under which you would like to create the project directory:

ng new angular-universal-transfer-state --style css --routing true --directory angularApp

When the project is initialized, navigate to its directory:

cd angular-universal-transfer-state

And run the application by typing:

ng serve

You should see following output in the console:

** Angular Live Development Server is listening on localhost:4200, open your browser on http://localhost:4200/ **

Date: 2018-10-29T08:58:37.685Z
Hash: cb54e4608cfb1115882b
Time: 7682ms
chunk {main} main.js, main.js.map (main) 10.7 kB [initial] [rendered]
chunk {polyfills} polyfills.js, polyfills.js.map (polyfills) 227 kB [initial] [rendered]
chunk {runtime} runtime.js, runtime.js.map (runtime) 5.22 kB [entry] [rendered]
chunk {styles} styles.js, styles.js.map (styles) 15.9 kB [initial] [rendered]
chunk {vendor} vendor.js, vendor.js.map (vendor) 3.29 MB [initial] [rendered]

After opening the URL provided in the command output, http://localhost:4200, you should see the following in your browser:

Add server-side rendering with Angular Universal

Type the following at the command prompt to install the Angular Universal module:

ng add @ng-toolkit/universal

We can check to see if Angular Universal is working correctly by running our app and performing a curl request on it:

npm run build:prod;npm run server
curl http://localhost:8080

If you don’t want to use curl you can open the URL in a browser and inspect the page source. The results, as follows, should be the same.

Ellipsis (“...”) in the code below indicates a section redacted for brevity.

<!DOCTYPE html><html lang="en"><head>
  <meta charset="utf-8">
  <title>angular-universal-i18n</title>
  <base href="/">

  <meta name="viewport" content="width=device-width, initial-scale=1">
  <link rel="icon" type="image/x-icon" href="favicon.ico">
<link rel="stylesheet" href="styles.3bb2a9d4949b7dc120a9.css"><style ng-transition="app-root">

</style></head>
<body>
  <app-root _nghost-sc0="" ng-version="7.0.4"><div _ngcontent-sc0="" style="text-align:center">
<h1 _ngcontent-sc0=""> Welcome to angular-universal-i18n! </h1>
...
</div><h2 _ngcontent-sc0="">Here are some links to help you start: </h2>
<ul _ngcontent-sc0="">
<li _ngcontent-sc0=""><h2 _ngcontent-sc0="">
<a _ngcontent-sc0="" href="https://angular.io/tutorial" rel="noopener" target="_blank">Tour of Heroes</a></h2>
</li>
<li _ngcontent-sc0=""><h2 _ngcontent-sc0="">
<a _ngcontent-sc0="" href="https://github.com/angular/angular-cli/wiki" rel="noopener" target="_blank">CLI Documentation</a></h2>
</li>
<li _ngcontent-sc0=""><h2 _ngcontent-sc0="">
<a _ngcontent-sc0="" href="https://blog.angular.io/" rel="noopener" target="_blank">Angular blog</a></h2>
</li></ul></app-root>
<script type="text/javascript" src="runtime.ec2944dd8b20ec099bf3.js"></script>
<script type="text/javascript" src="polyfills.c6871e56cb80756a5498.js"></script>
<script type="text/javascript" src="main.f27bf40180c4a8476e2e.js"></script>

<script id="app-root-state" type="application/json">{}</script></body></html>

You can run the following commands to catch up to this step in the project:

git clone https://github.com/maciejtreder/angular-universal-transfer-state.git
cd angular-universal-transfer-state
git checkout step1
cd angularApp
npm install 
npm run build:prod
npm run server

Create an external API

Most applications perform calls to one or more API, whether on the application’s own server or on a 3rd party host. Our application will make calls to a service we will create and run on the Node.js server at a port address (8081) that is different than both the application’s port (4200) and the server-side rendering port (8080).

Before creating the service we’ll build a simple Node.js application with two endpoints which we will consume inside the application using the service. Create an externalApi directory outside of the angular-universal-transfer-state application’s directory structure. In that directory create a file externalApi.js (so the relative path would be: ../externalApi/externalApi.js) and place the following code in it:

const express = require('express');

const app = express();

app.get('/api/fast', (req, res) => {
  console.log('fast endpoint hit');
  res.send({response: 'fast'});
});

app.get('/api/slow', (req, res) => {
  setTimeout(() => {
      console.log('slow endpoint hit');
      res.send({response: 'slow'});
  }, 5000);
});

app.listen(8081, () => {
  console.log('Listening');
});

Because we are using the Express web framework for Node.js for serving content from this application, we need to initialize it as a npm project and install dependencies. Create a package.json file in the externalApi directory and place following content inside:

{
  "name": "angular-universal-transfer-state",
  "version": "0.0.0",
  "scripts": {
    "start": "node externalApi.js"
  },
  "private": true,
  "dependencies": {
    "express": "^4.16.4"
  },
  "devDependencies": {}
}

Initialize the npm application and install dependencies by running the following command in the externalApi directory:

npm install

Call the External API

Now we are going to create a service that will consume the endpoints from the externalApi we just created. Generate it by typing following command in the console in the angular-universal-transfer-state/angularApp directory:

ng g s custom --spec false

Place the CustomService implementation inside src/app/custom.service.ts:

import { Injectable } from '@angular/core';
import { HttpClient } from '@angular/common/http';
import { Observable } from 'rxjs';

@Injectable({
 providedIn: 'root'
})
export class CustomService {

 constructor(private http: HttpClient) {}

 public getFast(): Observable<any> {
   return this.http.get<any>('http://localhost:8081/api/fast');
 }

 public getSlow(): Observable<any> {
   return this.http.get<any>('http://localhost:8081/api/slow');
 }
}

We need to import a HttpClientModule in our application because we are injecting a HttpClient service into CustomService. Replace content of the src/app/app.module.ts file with the following code:

import { NgtUniversalModule } from '@ng-toolkit/universal';
import { CommonModule } from '@angular/common';
import { NgModule } from '@angular/core';

import { AppRoutingModule } from './app-routing.module';
import { AppComponent } from './app.component';
import { FastComponent } from './fast/fast.component';
import { SlowComponent } from './slow/slow.component';
import { HttpClientModule } from '@angular/common/http';

@NgModule({
declarations: [
  AppComponent,
  FastComponent,
  SlowComponent
],
imports: [
  CommonModule,
  NgtUniversalModule,
  AppRoutingModule,
  HttpClientModule
]
})
export class AppModule { }

Create two components that will display responses from our service. First, one for the fast endpoint:

ng g c fast -m app -s -t --spec false

Place following code inside src/app/fast/fast.component.ts:

import { Component, OnInit } from '@angular/core';
import { CustomService } from '../custom.service';
import { Observable } from 'rxjs';

@Component({
selector: 'app-fast',
template: `
  <p>
    Response is: {{response | async | json}}
  </p>
`,
styles: []
})
export class FastComponent {

   public response: Observable<any> = this.service.getFast();
   constructor(private service: CustomService) { }
}

And second, one for the “delayed” slow endpoint:

ng g c slow -m app -s -t --spec false

Place the following code inside src/app/slow/slow.component.ts:

import { Component } from '@angular/core';
import { CustomService } from '../custom.service';
import { Observable } from 'rxjs';

@Component({
 selector: 'app-slow',
 template: `
   <p>
     Response is: {{response | async | json}}
   </p>
 `,
 styles: []
})
export class SlowComponent {

 public response: Observable<any> = this.service.getSlow();
 constructor(private service: CustomService) {}
}

Application Routing

Replace the code in the src/app/app-routing.module.ts file with:

import { NgModule } from '@angular/core';
import { Routes, RouterModule } from '@angular/router';
import { FastComponent } from './fast/fast.component';
import { SlowComponent } from './slow/slow.component';

const routes: Routes = [
 {path: '', redirectTo: 'fast', pathMatch: 'full'},
 {path: 'fast', component: FastComponent},
 {path: 'slow', component: SlowComponent}
];

@NgModule({
 imports: [RouterModule.forRoot(routes)],
 exports: [RouterModule]
})
export class AppRoutingModule { }

Place navigation links in the src/app/app.component.html:

<div style="text-align:center">
 <h1>
   Welcome to {{ title }}!
 </h1>
 <a routerLink='/fast'>fast</a>&nbsp;
 <a routerLink='/slow'>slow</a>
</div>

<router-outlet></router-outlet>

Use the following commands if you want to catch up to this step in the project:

git clone https://github.com/maciejtreder/angular-universal-transfer-state.git
cd angular-universal-transfer-state
git checkout step2
cd externalApi
npm install
cd ../angularApp
npm install 

DRY(C): Don’t Repeat Your Calls

What we have so far is an Angular application that successfully performs calls to an external API. Thanks to Angular Universal, it’s also search engine optimized and responses from those calls are displayed in the server-side rendered build.

But there is one pitfall. Let’s perform some investigation around the API calls.

In one console window, run externalApi.js in the externalApi directory:

node externalApi.js

In another console window, build and run the application in the angular-universal-transfer-state directory:

npm run build:prod
npm run server

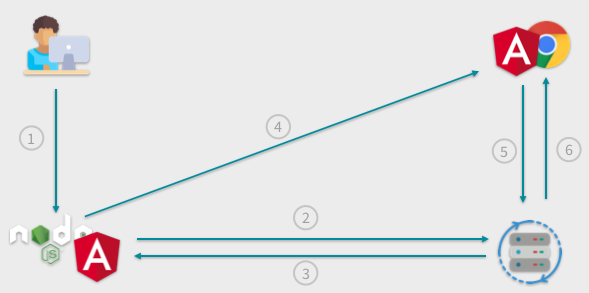
Navigate to the application at http://localhost:8080 with your favorite browser. The home page view is rendered and data from the external API is retrieved. Let’s take a look what’s going on in the console window where externalApi is running):

node externalApi.js 
Listening
fast endpoint hit
fast endpoint hit

As you can see, we performed two calls to our API, hitting the fast endpoint twice. How it could that be, when we opened the website only once?

That happens “thanks to” server-side rendering. Here is the sequence of events:

  1. User requests page from Node.js
  2. Node.js makes a call to the externalApi fast endpoint while serving Angular to the client,
  3. The externalApi fast endpoint returns a response and Node.js adds it to the generated HTML
  4. HTML and Angular JavaScript are sent to the browser
  5. Angular bootstraps in the browser and performs a call to the externalApi fast endpoint again
  6. The externalApi fast endpoint response is returned to the browser and is placed in the application view.

The process can be viewed in the following illustration:

Node.js diagram

Do you think it’s not super efficient? I agree with you.

Transfer State Service

We will improve the efficiency of our app by creating the TransferState service, a key-value registry exchanged between the Node.js server and the application rendered in the browser. We will use it through an HTTP_INTERCEPTOR mechanism which will reside inside the HttpClient service and which will manipulate the requests and responses.

Type following command to generate the new service:

ng g s HttpInterceptor --spec false

Replace the contents of src/app/http-interceptor.service.ts with this code:

import { Injectable, Inject, PLATFORM_ID } from '@angular/core';
import { HttpInterceptor, HttpRequest, HttpHandler, HttpEvent, HttpResponse } from '@angular/common/http';
import { Observable, of } from 'rxjs';
import { tap } from 'rxjs/operators';
import { TransferState, makeStateKey, StateKey } from '@angular/platform-browser';
import { isPlatformServer } from '@angular/common';

@Injectable({
 providedIn: 'root'
})
export class HttpInterceptorService implements HttpInterceptor {
 constructor(private transferState: TransferState, @Inject(PLATFORM_ID) private platformId: any) {}

 public intercept(request: HttpRequest<any>, next: HttpHandler): Observable<HttpEvent<any>> {

   if (request.method !== 'GET') {
     return next.handle(request);
   }

   const key: StateKey<string> = makeStateKey<string>(request.url);

   if (isPlatformServer(this.platformId)) {
     return next.handle(request).pipe(tap((event) => {
       this.transferState.set(key, (<HttpResponse<any>> event).body);
     }));
   } else {
     const storedResponse = this.transferState.get<any>(key, null);
     if (storedResponse) {
       const response = new HttpResponse({body: storedResponse, status: 200});
       this.transferState.remove(key);
       return of(response);
     } else {
       return next.handle(request);
     }
   }
 }
}

We put a lot of code here. Let’s discuss it.

Our service implements the HttpInterceptor interface, so we need to implement a corresponding method:

public intercept(request: HttpRequest<any>, next: HttpHandler): Observable<HttpEvent<any>>

This method will be called whenever any API call is performed on the HttpClient service.

For simplicity in our demonstration, we want to use the TransferState registry only for GET calls. We need to check to see if a call matches that criteria:

   if (request.method !== 'GET') {
     return next.handle(request);
   }

If it does, we generate a key based on the request URL. We will use the key-value pair to store or retrieve the request response, depending whether the request is being handled on the server side or browser side:

   const key: StateKey<string> = makeStateKey<string>(request.url);

To differentiate between the server and the browser we are using the isPlatformServer method from the @angular/common library together with the PLATFORM_ID injection token:

   if (isPlatformServer(this.platformId)) {
       //serverSide
   } else {
       //browserSide
   }

In the server-side code we want to perform the call and store its response in the TransferState registry:

  if (isPlatformServer(this.platformId)) {
    return next.handle(request).pipe(tap((event) => {
      this.transferState.set(key, (<HttpResponse<any>> event).body);
    }));

In the browser-side code we want to check to see if the response for a given call already resides in the registry. If it does, we want to retrieve it, clear the registry (so future calls can store fresh data), and return the response to the caller (CustomService in this case). If the given key doesn’t exist in the registry we simply perform the HTTP call:

  else {
    const storedResponse = this.transferState.get<any>(key, null);
    if (storedResponse) {
      const response = new HttpResponse({body: storedResponse, status: 200});
      this.transferState.remove(key);
      return of(response);
    } else {
      return next.handle(request);
    }
  }

We can provide the HTTP interceptor in the src/app/app.module.ts by replacing the existing code with the following:

import { NgtUniversalModule } from '@ng-toolkit/universal';
import { CommonModule } from '@angular/common';
import { NgModule } from '@angular/core';

import { AppRoutingModule } from './app-routing.module';
import { AppComponent } from './app.component';
import { FastComponent } from './fast/fast.component';
import { SlowComponent } from './slow/slow.component';
import { HttpClientModule, HTTP_INTERCEPTORS } from '@angular/common/http';
import { HttpInterceptorService } from './http-interceptor.service';

@NgModule({
        declarations: [
                AppComponent,
                FastComponent,
                SlowComponent
        ],
        imports: [
                CommonModule,
                NgtUniversalModule,
                AppRoutingModule,
                HttpClientModule
        ],
        providers: [
                {
                          provide: HTTP_INTERCEPTORS,
                          useClass: HttpInterceptorService,
                          multi: true
                }
        ]
})
export class AppModule { }

We need to import two new modules which contain the TransferState service into our application. Include ServerTransferStateModule in the server-side module by replacing the existing code in src/app/app.server.module.ts with the following:

import { AppComponent } from './app.component';
import { AppModule } from './app.module';
import {NgModule} from '@angular/core';
import {ServerModule, ServerTransferStateModule} from '@angular/platform-server';
import {ModuleMapLoaderModule} from '@nguniversal/module-map-ngfactory-loader';
import { BrowserModule } from '@angular/platform-browser';
import { NoopAnimationsModule } from '@angular/platform-browser/animations';

@NgModule({
  bootstrap: [AppComponent],

  imports: [
      BrowserModule.withServerTransition({appId: 'app-root'}),
      AppModule,
      ServerModule,
      NoopAnimationsModule,
      ModuleMapLoaderModule,
      ServerTransferStateModule
  ]
})
export class AppServerModule {}

Include BrowserTransferStateModule in the browser-side module by replacing the code in  src/app/app.browser.module.ts with the following code:

import { AppComponent } from './app.component';
import { AppModule } from './app.module';
import { NgModule } from '@angular/core';
import { BrowserModule, BrowserTransferStateModule } from '@angular/platform-browser';

@NgModule({
     bootstrap: [AppComponent],
     imports: [
            BrowserModule.withServerTransition({appId: 'app-root'}),
            AppModule,
            BrowserTransferStateModule
     ]
})
export class AppBrowserModule {}

The code in the src/main.ts file also needs to be changed. We need to bootstrap our app in a slightly different way to make the TransferState registry work properly; we need to bootstrap our app when the DOMContentLoaded event is emitted by the browser. Replace the existing code with the following:

import { AppBrowserModule } from '.././src/app/app.browser.module';
import { enableProdMode } from '@angular/core';
import { platformBrowserDynamic } from '@angular/platform-browser-dynamic';

import { environment } from './environments/environment';

if (environment.production) {
 enableProdMode();
}


document.addEventListener('DOMContentLoaded', () => {
 platformBrowserDynamic()
   .bootstrapModule(AppBrowserModule)
   .catch(err => console.log(err));
});

Test the TransferState service

Recompile the application and check how many calls are made to the back end.

Build and run the server:

npm run build:prod
npm run server

If you have stopped the externalApi process for any reason you should restart it now.

Navigate to the second component, http://localhost:8080/slow, using the browser’s address bar. Doing this will perform the call against the server rather than running the local code (the Angular SPA) inside the browser, as clicking on the link on the home page would do.

Examine the output in the console window for the externalApi process. It should look like the following, in which the first two fast endpoint responses are from the previous test and the last line is the result of the current test:

Listening
fast endpoint hit
fast endpoint hit
slow endpoint hit

Mission complete! The response retrieved by the back end is passed to the browser within the TransferState registry.

An alternative HTTP interceptor

As an alternative to creating the custom HTTP_INTERCEPTOR, you can use the standard TransferHttpCacheModule from the @nguniversal library. This makes implementation more convenient, but it also imposes a constraint: you can’t make any changes to the standard library, so you would not be able to add functionality like the API watchdog we are going to create in a forthcoming step.

To implement the standard transfer cache, install the dependency:

npm install @nguniversal/common

And import TransferHttpCacheModule module into src/app/app.module.ts by replacing the contents with the following code:

import { NgtUniversalModule } from '@ng-toolkit/universal';
import { CommonModule } from '@angular/common';
import { NgModule } from '@angular/core';

import { AppRoutingModule } from './app-routing.module';
import { AppComponent } from './app.component';
import { FastComponent } from './fast/fast.component';
import { SlowComponent } from './slow/slow.component';
import { HttpClientModule } from '@angular/common/http';
import { TransferHttpCacheModule } from '@nguniversal/common';

@NgModule({
 declarations: [
   AppComponent,
   FastComponent,
   SlowComponent
 ],
 imports: [
   CommonModule,
   NgtUniversalModule,
   AppRoutingModule,
   HttpClientModule,
   TransferHttpCacheModule
 ]
})
export class AppModule { }

All other steps remains same. If you want to catch up to this step, run:

git clone https://github.com/maciejtreder/angular-universal-transfer-state.git
cd angular-universal-transfer-state
git checkout step3
cd externalApi
npm install
cd ../angularApp
npm install 

Implement a performance watchdog

There is one more thing which we need to consider. As you probably noticed, loading http://localhost:8080/slow takes a lot time. It’s definitely not SEO-friendly. While this is because we introduced a time delay for demonstration purposes when we created the external API, there are many real world examples of APIs that respond slowly or not at all.

We are going to solve this issue by using a RouteResolver in the call to the SlowComponent.

Generate it by entering following command in the console window you’re using to build and run the app:

ng g s SlowComponentResolver --spec false

And replace the code in src/app/slow-component-resolver.service.ts with the following:

import { Injectable, Inject, PLATFORM_ID } from '@angular/core';
import { Resolve } from '@angular/router';
import { Observable, timer } from 'rxjs';
import { isPlatformBrowser } from '@angular/common';
import { CustomService } from './custom.service';
import { takeUntil } from 'rxjs/operators';

@Injectable({
 providedIn: 'root'
})
export class SlowComponentResolverService implements Resolve<any> {

 constructor(private service: CustomService, @Inject(PLATFORM_ID) private platformId: any) { }

 public resolve(): Observable<any> {
   if (isPlatformBrowser(this.platformId)) {
     return this.service.getSlow();
   }

   const watchdog: Observable<number> = timer(500);

   return Observable.create(subject => {
     this.service.getSlow().pipe(takeUntil(watchdog)).subscribe(response => {
       subject.next(response);
       subject.complete();
     });
     watchdog.subscribe(() => {
       subject.next(null);
       subject.complete();
     });
   });
 }
}

Examine this code a little bit. We have a resolve method that we need to implement because we are implementing the Resolve interface. Inside the method we are checking to see if the code is executing on the browser or server. If the code is being executed in the browser it waits for the call as long as necessary by executing the call:

   if (isPlatformBrowser(this.platformId)) {
     return this.service.getSlow();
   }

If the code is being executed in the Node.js server an observable, watchdog, is created using the timer method from the rxjs library. The timer method creates an observable which emits a value only once after given amount of time in milliseconds:

   const watchdog: Observable<number> = timer(500);

We use this observable with the takeUntil method, piped to the request call. If the observable emits a value before the API sends a response it pushes null to the component. Otherwise it pushes the API response.

   return Observable.create(subject => {
     this.service.getSlow().pipe(takeUntil(watchdog)).subscribe(response => {
       subject.next(response);
       subject.complete();
     });
     watchdog.subscribe(() => {
       subject.next(null);
       subject.complete();
     });
   });
 }

We need to update the application’s routing to use this resolver. Replace the contents of  src/app/app-routing.module.ts with the following:

import { NgModule } from '@angular/core';
import { Routes, RouterModule } from '@angular/router';
import { FastComponent } from './fast/fast.component';
import { SlowComponent } from './slow/slow.component';
import { SlowComponentResolverService } from './slow-component-resolver.service';

const routes: Routes = [
{path: '', redirectTo: 'fast', pathMatch: 'full'},
{path: 'fast', component: FastComponent},
{path: 'slow', component: SlowComponent, resolve: {response: SlowComponentResolverService}}
];


@NgModule({
 imports: [RouterModule.forRoot(routes)],
 exports: [RouterModule]
})
export class AppRoutingModule { }

Update the “slow” component to use the Route Resolver by replacing the code in src/app/slow/slow.component.ts with the following:

import { Component } from '@angular/core';
import { ActivatedRoute } from '@angular/router';

@Component({
selector: 'app-slow',
template: `
  <p>
    Response is: {{response | json}}
  </p>
`,
styles: []
})
export class SlowComponent {

public response: any = this.router.snapshot.data.response;
constructor(private router: ActivatedRoute) {}
}

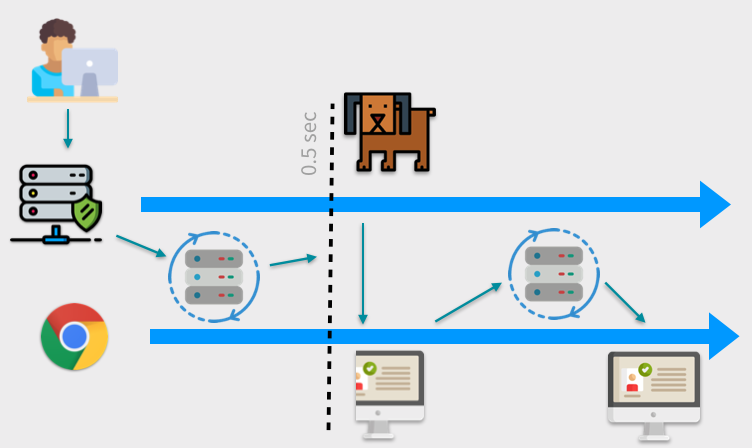
Rebuild application and check how long it takes to render the slow component now.

Much better! If the call takes longer than 0.5 seconds we abandon it and perform it again in the browser. That’s exactly what we were looking for.

In the following illustrations you can see a scheme of how our new architecture works.

When the API responds quickly the response is handled by the server:

Server to browser diagram

And when the API doesn’t reply before the watchdog is activated we send the browser partially rendered HTML and repeat the call:

Server to browser to server diagram.

As an alternative approach, if you don’t want to setup a watchdog mechanism globally, you can do it by providing it inside the HTTP_INTERCEPTOR.

If you want to catch up to this step, run:

git clone https://github.com/maciejtreder/angular-universal-transfer-state.git
cd angular-universal-transfer-state
git checkout step4
npm install 
npm run build:prod
npm run server

Summary

Today we covered an important challenge: improving the performance and efficiency of applications that implement server-side rendering. We did this in two ways: with the TransferState service we are able to limit calls made to potentially slow APIs. We also implemented a watchdog mechanism to abandon long-running API calls which can adversely impact the total time a server needs to render a view. Both these techniques help improve the performance of Angular websites, which increases user satisfaction and helps the site score better in search engine ranking.

If you want to learn more about Angular Universal techniques, check out my other posts on the Twilio blog Getting Started with Serverless Angular Universal on AWS Lambda and Create search engine friendly internationalization for Angular apps with Angular Universal and the ngx-translate module.

The Git repository, for the code used in this post can be found here: https://github.com/maciejtreder/angular-universal-transfer-state 

I'm Maciej Treder, contact me via contact@maciejtreder.com, https://www.maciejtreder.com or @maciejtreder on GitHub, Twitter and LinkedIn.