Connect Twilio Flex Digital Channels to Google Dialogflow CX
Time to read:
December 21, 2021
Written by
Reviewed by

By the end of this blog post, you should be able to connect to your Dialogflow CX bot with any digital channel in Twilio Flex. We’ll focus on SMS here, but the same concepts can be applied for any digital channel.
Prerequisites
Before we can get started, you’ll have to create – or log into – a few accounts. We’ll also install Twilio’s CLI to speed development along.
- If you haven't yet, set up a Twilio account
- Set up your Google Cloud project
- Create a project
- Enable billing
- Enable the API (choose "No, I'm not using them" under "Are you planning to use this API with App Engine or Compute Engine?")
- Set up a Service Account and create a key file by navigating to the Key tab on your newly created Service Account page (json)
- Set up a Twilio Flex Project (click here to create a new one)
- Install the Twilio CLI and Serverless Toolkit. Ensure that you log in using your Flex project credentials!
Dialogflow CX Agent Setup and Testing
Create the agent
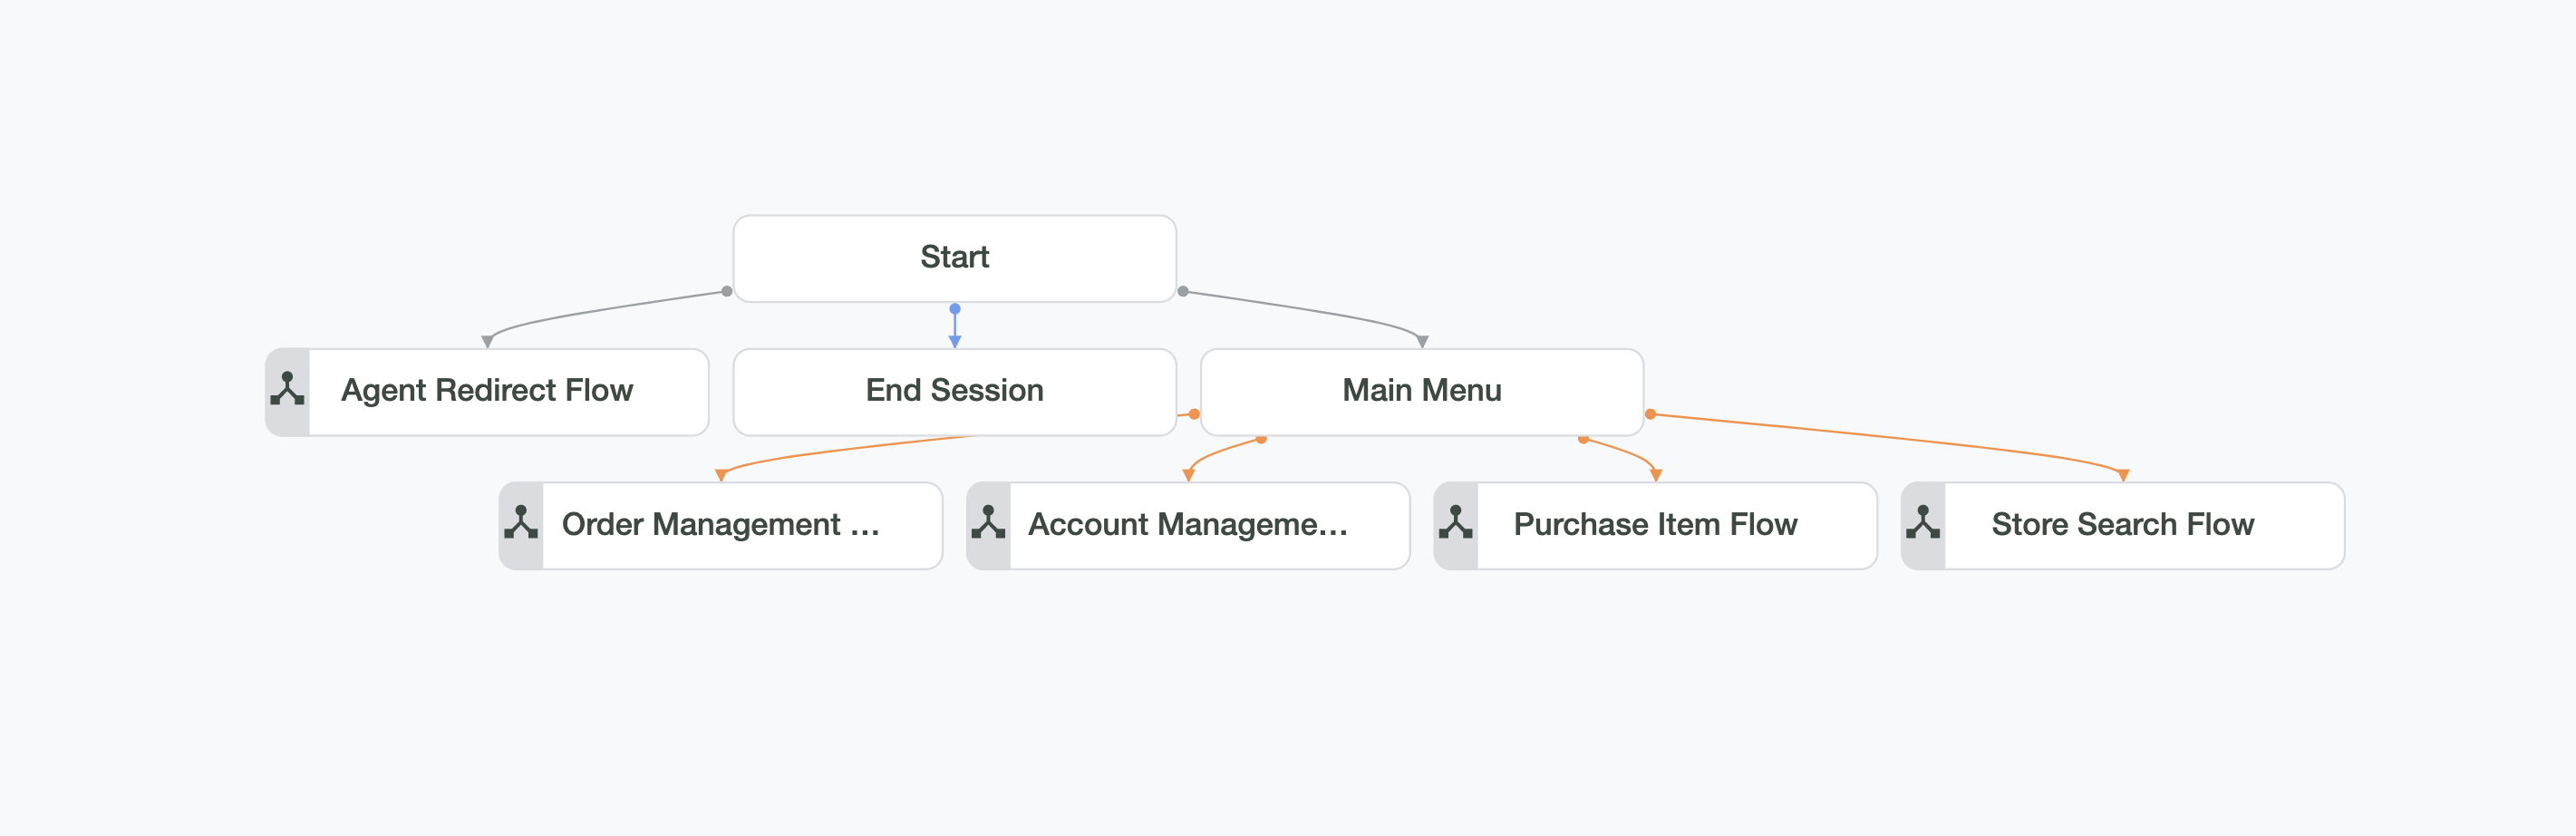
For this exercise, we’re going to use a pre-built agent which handles order and account management rather than building a bot from scratch. This pre-built agent has many best practices built in including an “I want to speak with a human” emergency exit path. Prebuilt agents | Dialogflow CX
Import the Order and Account Management agent. Once complete, you should end up with something like this:
Test the agent
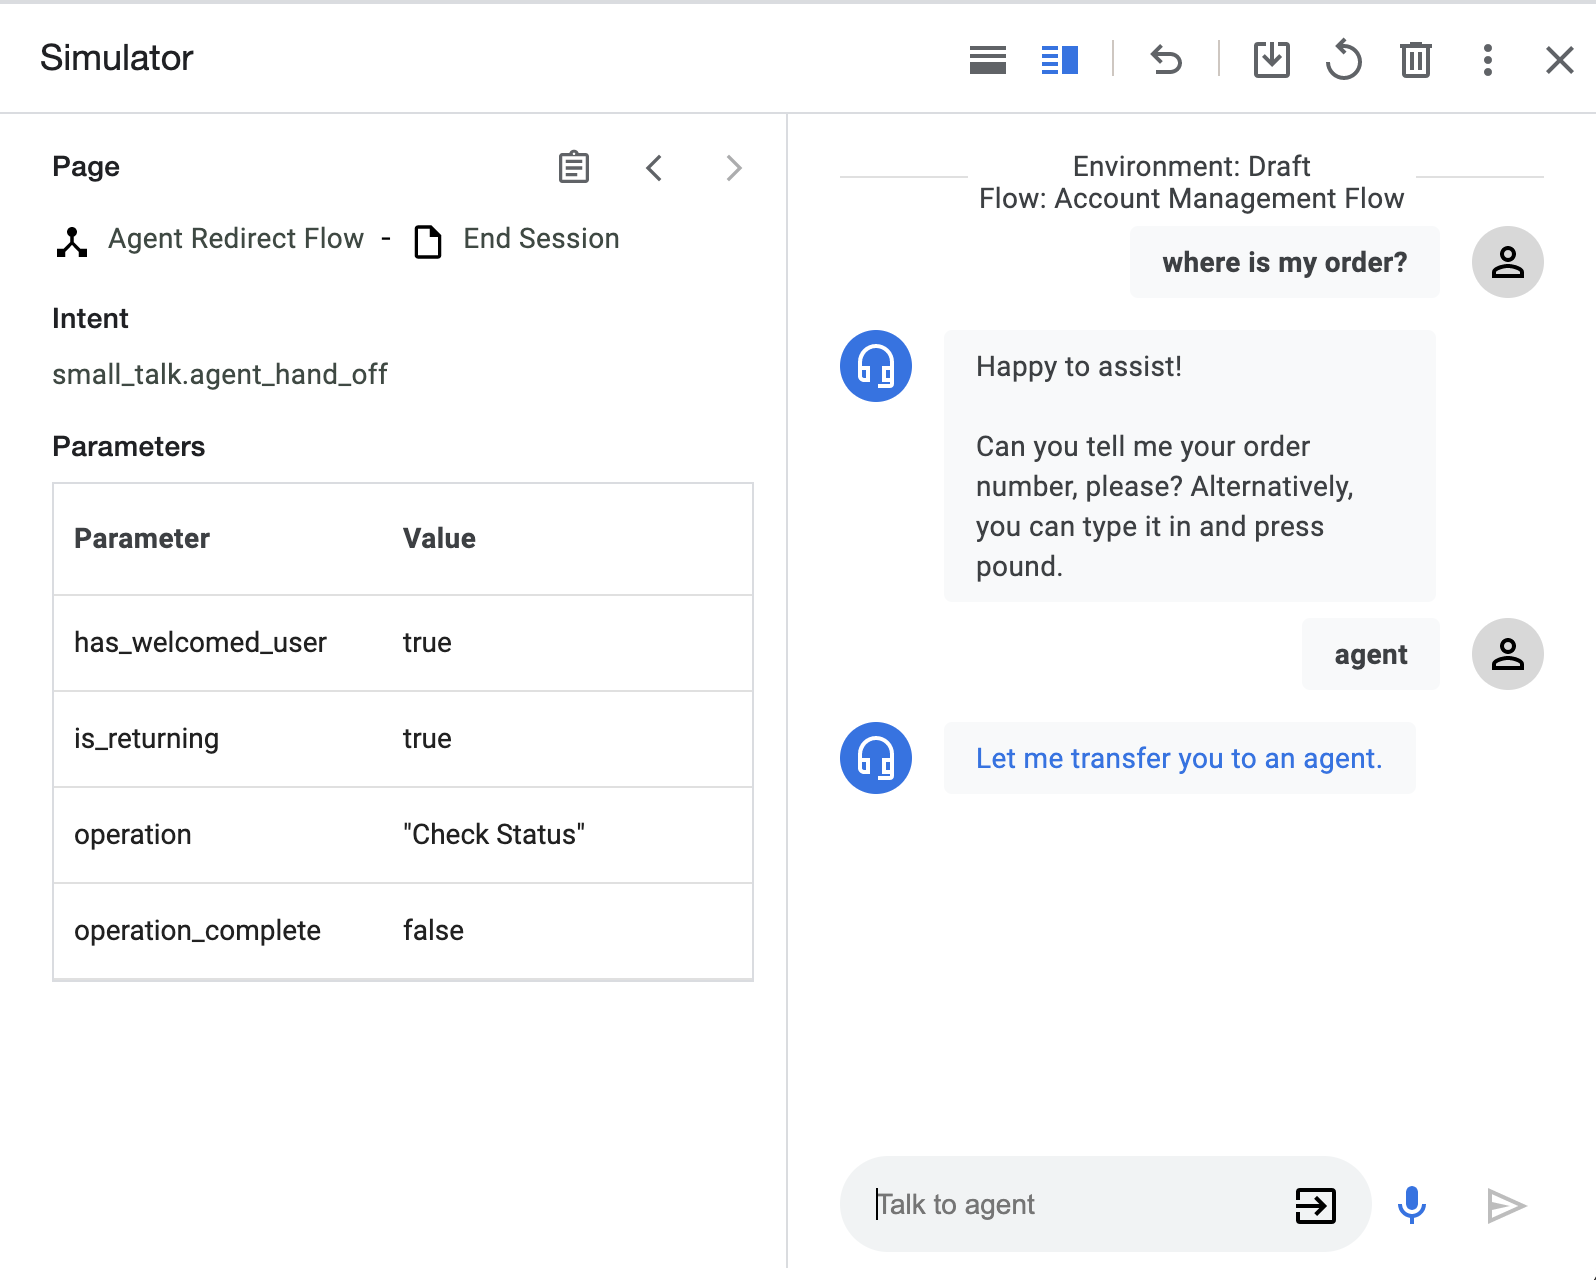
Dialogflow CX also has a built-in Simulator that allows you to test how the bot responds and builds test cases that can be re-executed later.
- Click the Test Agent button (top right of the page) to open the Simulator
- Enter where is my order? on the message text field. You should get a prompt asking for an order number.
- Instead of answering with a random number, enter agent
- You should be told you are being transferred to a human.
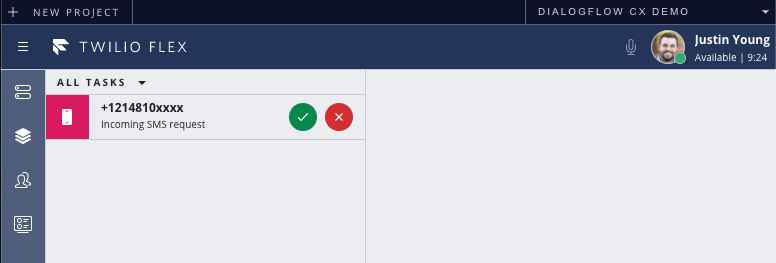
Test the default Flex inbound SMS behavior
Before you proceed with integrating Dialogflow, you should test the default SMS experience for Flex if you haven’t already.
https://www.twilio.com/docs/flex/tutorials/built-in-channels#respond-to-sms-in-flex
That was magical, but how did that work?
Let’s quickly walk through a dramatic oversimplification of everything that just happened.
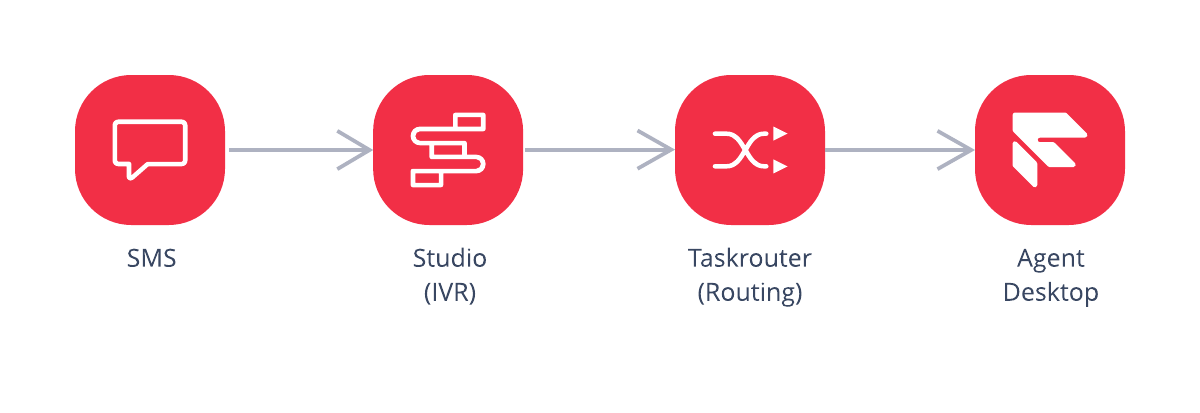
- Twilio received your SMS, and routed it to Studio.
- The Studio flow provided for new Flex projects passes the message to an Flex Agent using the `SendMessageToAgent` widget. This widget creates a Task in TaskRouter and specifies the Workflow which it should pass the Task through. The workflow is responsible for determining which agent should handle the Task. You can see the widget by going to the Studio Dashboard, and then clicking on Messaging Flow.
- The TaskRouter workflow included in Flex Projects uses a single queue called Everyone that everyone (surprise!) can take tasks from. Since you were likely the only person online and available, Taskrouter decided that you should handle this inbound message, and assigned the Task to you!
- The Flex Agent Desktop listens for events in TaskRouter that are relevant to the person that logged in. When Taskrouter assigned the task to you, the Flex Agent Desktop presented you the ability to accept or reject the Task, and also the Chat UI to handle the SMS. Sweet!
As you noticed, there was absolutely no IVR functionality in the test above. Your SMS went straight to an agent. Since we want IVR functionality which can hopefully deflect some of our inbound interactions, we’ll be focused on making the flow within Studio smarter!
Studio Hello World
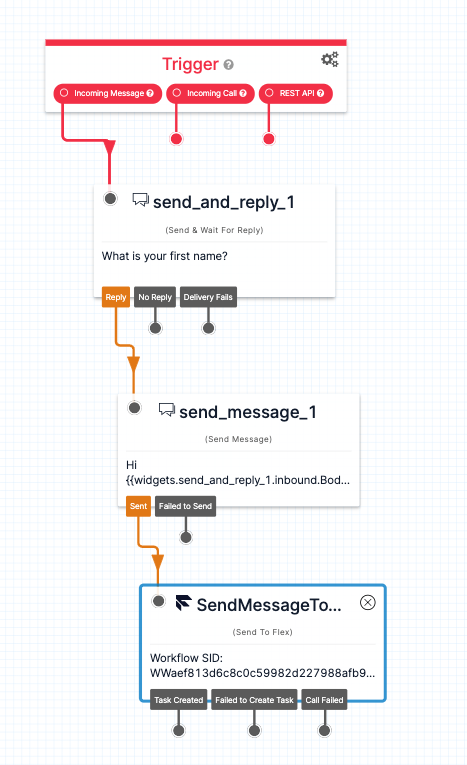
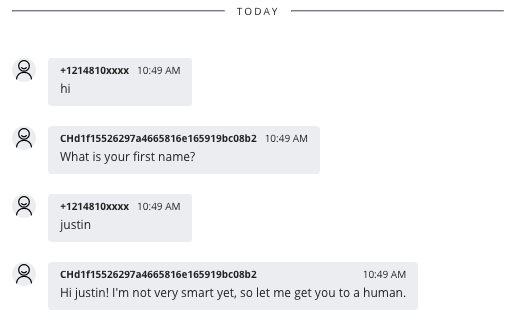
Let’s introduce you to some basic Studio concepts before we get too crazy. Let’s pretend we just wanted to gather our customer’s name, then tell that person we’ll get them an agent before passing them on.
- Navigate to Studio and click the Messaging Flow.
- Drag a Send & Wait for Reply widget onto the canvas. We’ll use this to ask for the person’s name.
- Next, drag a Send Message widget onto the canvas. We’ll use this to tell the customer we’re getting them to an agent. In this widget, we’ll actually repeat the customer’s name back to them (just to show how this works). The widget above is named send_and_reply_1, so in this widget I’ll reference the reply received by the previous widget in the text that I send out. We’re able to do this (and a lot more) with the Liquid Template Language.
Hi {{widgets.send_and_reply_1.inbound.Body}}! I'm not very smart yet, so let me get you to a human. - Now just reconnect the dots so your flow looks the image below and click Publish
Lastly, send in another text message to your Flex Phone Number and watch the magic happen!
You should get some automated replies, and when you finally get to an agent, the agent can see all of your previous bot messages! Awesome sauce!
Now that you understand the fundamentals of how to work with Studio, let’s turn it up to 11.

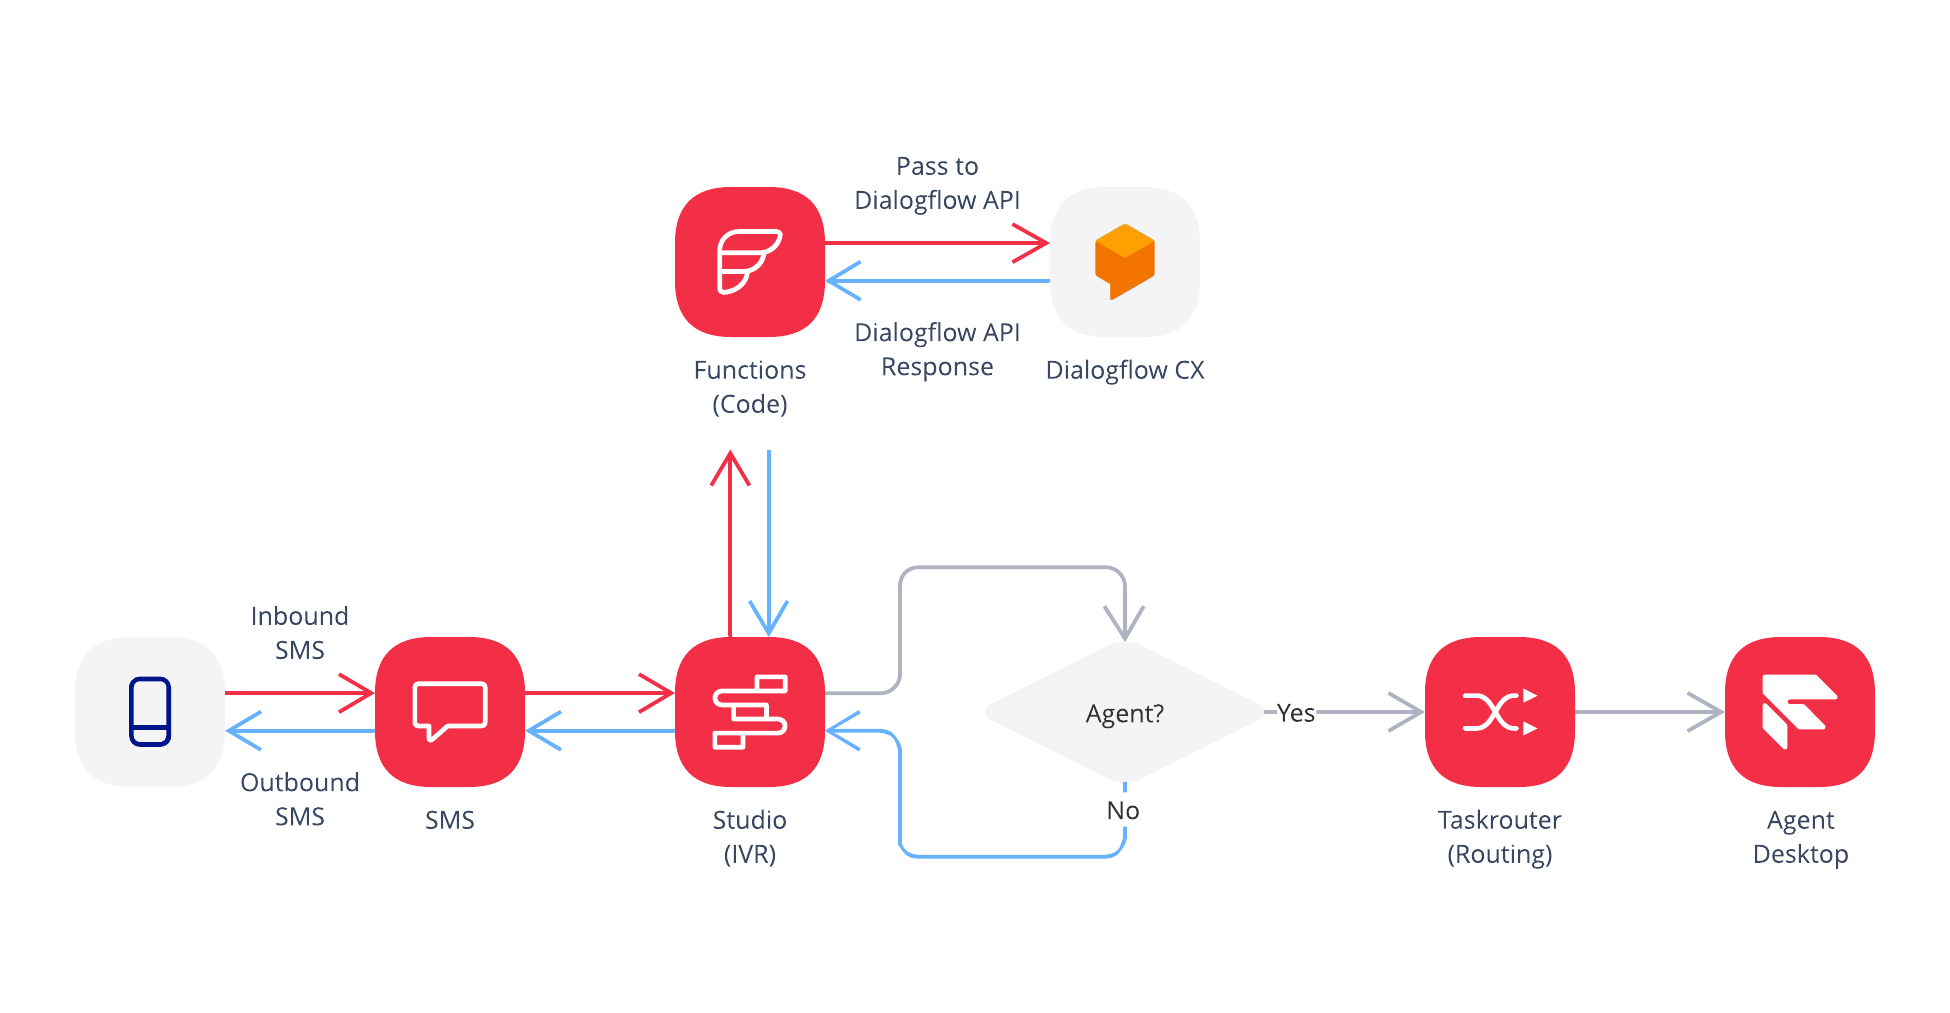
We know we need to call the Dialogflow CX API, but you can’t write code in Studio, so how in the heck is this going to work? Twilio Serverless to the rescue! We can use Twilio Functions (Node.js code) and Twilio Assets (file storage) which are both hosted on Twilio to integrate with the Dialogflow APIs. To make things even better, Studio has a built-in widget to let you call your Functions, and then progress to other widgets in your flow.
Deploy Functions and Assets
We need a few parameters from Google before we get started, so open the URL to your agent, and extract the following pieces of information:
https://dialogflow.cloud.google.com/cx/projects/<project-id>/locations/<location>/agents/<agent-id>/prebuilt
Now let’s build a Serverless Project using the Twilio CLI. This command will build a scaffolding of a Serverless Project.
Next, complete the following steps:
- Copy your Google Service Account Credentials Key File (json) into the /assets directory, then rename it to
service-account-key.private.json - Add the following keys to your .env file and set their values
DIALOGFLOW_CX_LANGUAGE_CODE=enDIALOGFLOW_CX_PROJECT_ID=<project-id>DIALOGFLOW_CX_LOCATION=<location>DIALOGFLOW_CX_AGENT_ID=<agent-id>
- Open the dialogflow-cx folder in your favorite code editor
- Use npm to install
@google-cloud/dialogflow-cx - Create a new file called
dialogflow-detect-intent.protected.jsin the/functionsdirectory - Add the following content to
/functions/dialogflow-detect-intent.protected.js(hover over the top right corner of the code block below to see the copy button)
Next, we want to test this function locally before deploying to Twilio.
Once everything starts, you should get the following confirmation in your terminal:

Now open up your browser and navigate to the url for /dialogflow-detect-intent and append a url encoded query string with a key = “utterance”, and a value of “where is my order?”.
You should see a massive JSON response in your browser. Success!!!
If it’s hard to understand the data model because it looks minified, definitely check out JSONView. Now that we know we can successfully test locally, let’s push this to Twilio.
Run the following command in your terminal:
Once this is complete, hop over to the Functions Services in your Twilio Console and you should see your service deployed.
Set up the Studio Flow
Now that our integration into Dialogflow is handled, let’s look at the flow we need to design in Studio.
To handle this process, we’ll need to build in some looping logic into our Studio flow to ensure that a customer can ask more than 1 question, or flow through a more complicated data collection process. We also need a way to know we should stop looping and exit to go to an agent.
We essentially need to build this:
Rather than creating a new Studio flow and rewiring your number, or modifying the current Studio flow piece by piece, you can easily update a Studio flow’s JSON manually through the Console. Go back to the Messaging Flow for your Flex account, and click on the Trigger widget, then click Show Flow JSON.
Replace the flow JSON with the code at this link.
Next, click save and after a few seconds, you should see a flow that looks very different. There are two widgets that we need to update to point to the appropriate variables in your account.
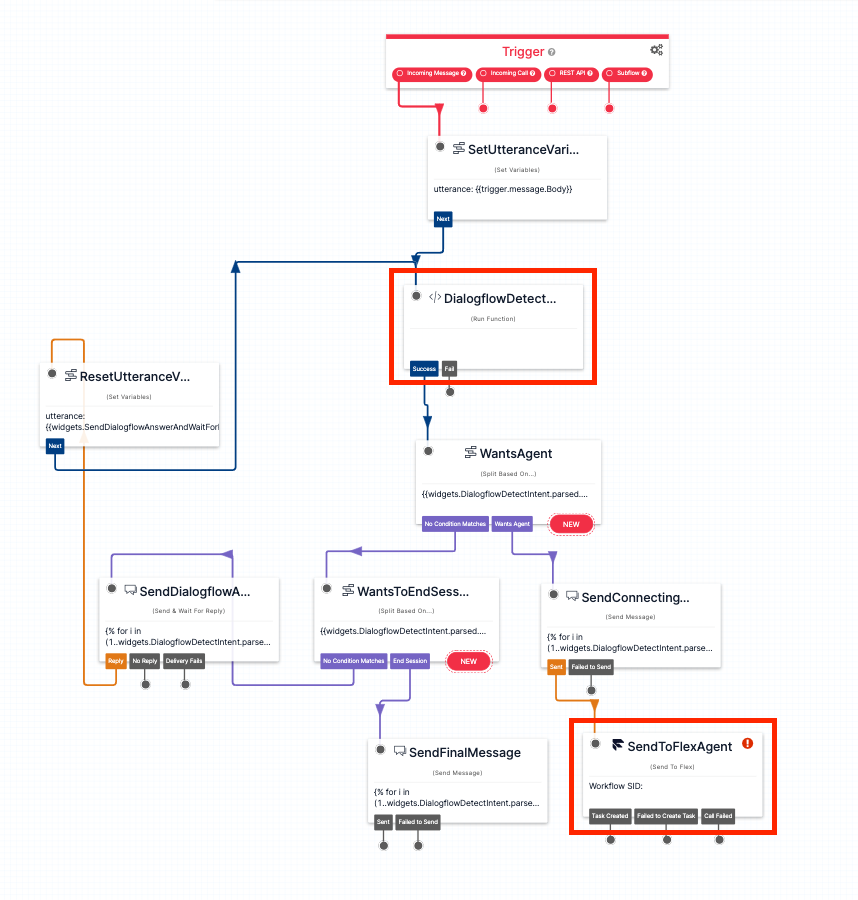
Navigate to the DialogflowDetectIntent widget and set the Service, Environment, and Function parameters.
Then navigate to the SendToFlexAgent widget and update the Workflow to Assign to Anyone, and set the Channel to SMS.
Next, do one final Publish of your Studio flow and enjoy talking to your Dialogflow CX bot over SMS!
Closing
Congratulations, you’re now set! Have fun working on your Dialogflow bot, and setting up an appropriate message flow for modern times. In the future, we’ll release another blog post on how to wire up Dialogflow CX to voice!
Justin Young is a Twilio Contact Center Specialist. He has been building and consulting in the Contact Center space for 18+ years with a focus on digital transformation and automation. He is a husband, father of 4, and coaches youth sports in his "spare time".


Related Resources
Twilio Docs
From APIs to SDKs to sample apps
API reference documentation, SDKs, helper libraries, quickstarts, and tutorials for your language and platform.
Resource Center
The latest ebooks, industry reports, and webinars
Learn from customer engagement experts to improve your own communication.
Ahoy
Twilio's developer community hub
Best practices, code samples, and inspiration to build communications and digital engagement experiences.