Generating Nintendo Music Over the Phone in Python with Magenta and Twilio
Time to read:
October 04, 2019
Written by

Artificial creativity is amazing, and I am always blown away by what people accomplish with neural networks. Lots of developers have used Python libraries like Magenta to create awesome music.
I used Magenta to train a neural network on a bunch of classic Nintendo music, and I thought it would be fun to hack around with that and make a Twilio phone number you can call to hear computer-generated NES music. If you're in the US, try calling (424) 398-8637 (424-39-TUNES) to hear!
Let's walk through how to build a phone number that plays computer generated music using Magenta.
Installing dependencies
First we need to install Magenta, which can be done using pip. Make sure you create a virtual environment before moving forward. I am using Python 3.6.5, but Magenta is compatible with both Python 2 and 3.
Run the following command to install Magenta in your virtual environment, it's a pretty big library with a good amount of dependencies so it might take a bit of time:
This will give you access to both the Magenta and TensorFlow Python modules for development, as well as scripts to work with all of the models that Magenta has available. For this post, we're going to be using Magenta's polyphony recurrent neural network model.
To install the other dependencies run the following command:
We're going to be using the Twilio python library to handle incoming phone calls, Flask as our web framework, and RQ as a task queue for generating the music asynchronously without slowing down the web requests.
In order for RQ to work, you'll also need to install Redis on your machine. That can be done with the following commands using wget:
Run Redis in a separate terminal window on the default port with the command src/redis-server from the directory where it's installed.
We have all our Python dependencies, but we also need to make sure a program called Fluidsynth is installed. Once the NES MIDIs are generated, this is what we'll use to convert them to audio to play over the phone.
This can be done with Homebrew by running brew install fluidsynth or on Ubuntu with:
Handling incoming Twilio phone calls with Flask
Since we're trying to create a computer-generated Nintendo music hotline, let's start by writing some code to handle phone calls. In the root directory of your project, create a file called app.py and add the following code to it:
This a Flask app with two routes. /call handles incoming Twilio phone calls by generating TwiML with a VoiceResponse which will answer the call by saying "Please wait while we generate some new Nintendo music for you" and then hold for 100 seconds before hanging up. Later on we are going to add some code to generate music and to asynchronously update the phone call to play the music once it's done, but we'll leave it like this for now.
/uploads is a route that takes a filename and serves it as static content. This is where we are going to serve the generated .wav files from later on. Create a directory somewhere in your project where you want to keep all of the sound files generated by your code, and update the value of UPLOAD_FOLDER to point to that directory.
Run your Flask app with python app.py from the directory your code is in, and visit http://localhost:5000/call to see something similar to this screenshot. I inspected the elements on the page to show the TwiML our /call route is serving.

Setting up your Twilio phone number
Before being able to handle phone calls, you’ll need a Twilio phone number. You can buy a phone number here (it’s free if you’re using the number to test your code during development).
Your Flask app will need to be visible from the internet in order for Twilio to send requests to it when phone calls come in. We will use ngrok for this, which you’ll need to install if you don’t have it. In your terminal run the following command:
If you’ve just installed ngrok and that previous command didn’t work, you might have to run ./ngrok http 5000 from the directory that the ngrok executable is in. Now we just need to point a phone number at our app. You should see a black screen with a forwarding URL on it.
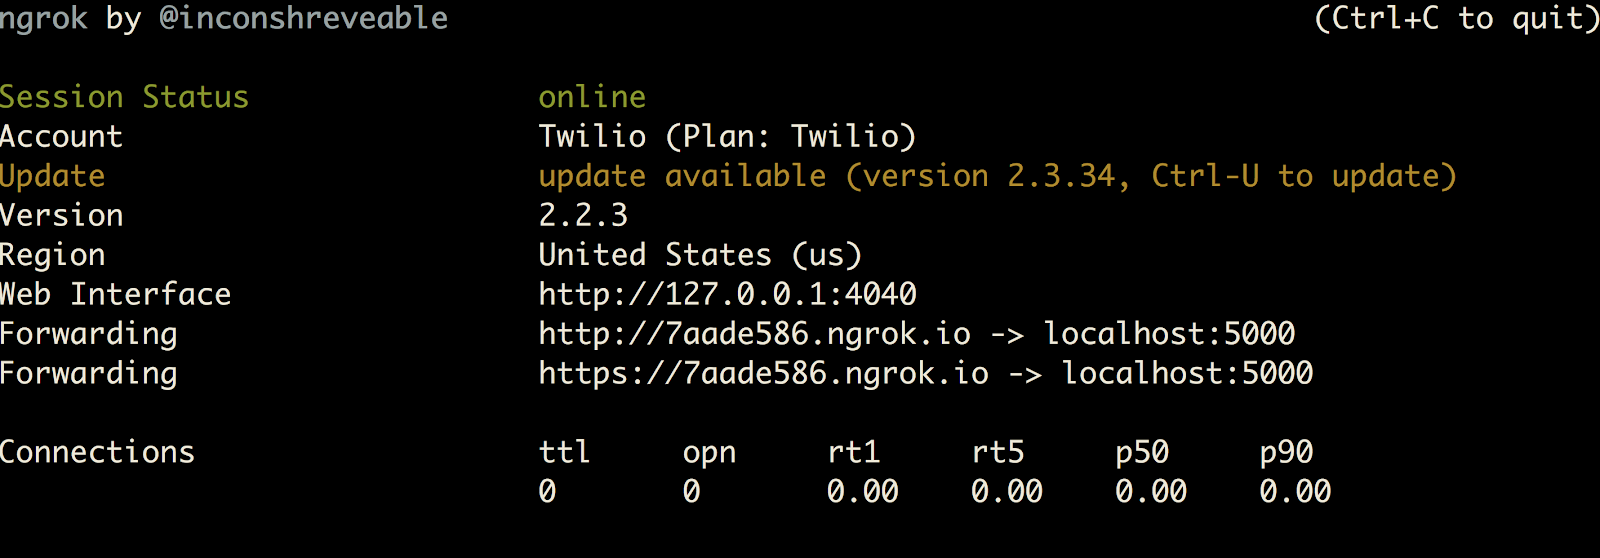
Open the phone number configuration screen in your Twilio console. Scroll down to the “a call comes in” field, and paste the URL ngrok generated for you with a /call at the end. It should look something like this:
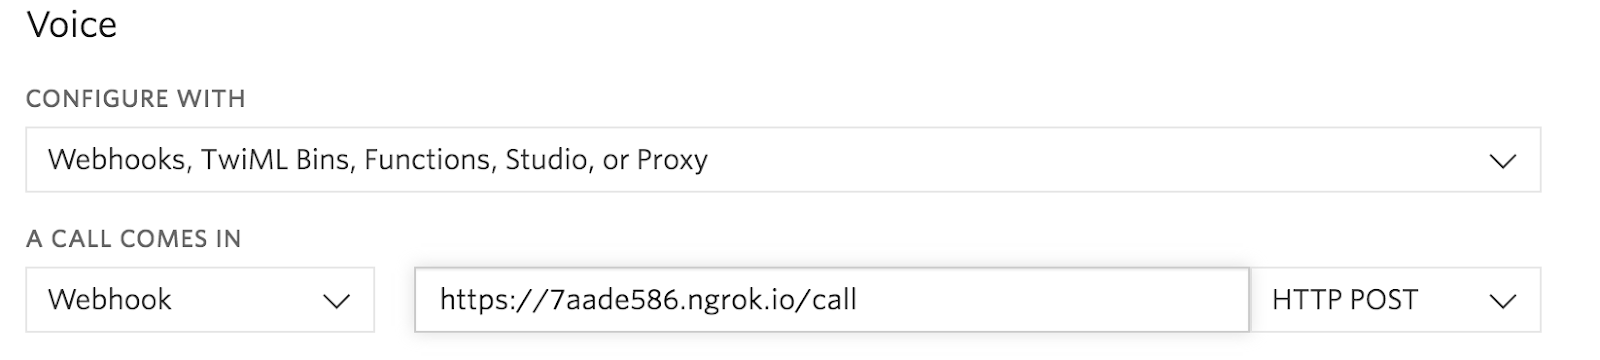
This means that whenever someone calls your Twilio phone number, Twilio will send an HTTP POST request to the /call route of your Flask app, which is running on port 5000 behind your ngrok URL. Make sure you remember to hit save at the bottom of the page!
With your Flask app running, call your Twilio phone number to hear the robot voice. You can hang up afterwards since nothing else will happen for now.
Generating Nintendo music with Magenta
You have a Twilio phone number answering phone calls, so now it's time to write some code to generate Nintendo tunes! I already trained a model on a set of 1285 songs from NES games that you can use. Grab the bundle file here, and save it to the same directory as app.py.
With this bundle file, you'll be able to use Magenta to generate MIDI files, but in order to play them over the phone they need to be converted to audio files. We are going to use Fluidsynth to convert the MIDI files to audio using this Famicom soundfont which will make them sound like old Nintendo games.
Create a file called music_generator.py and add the following code to it:
This code is running a subprocess to execute the polyphony_rnn_generate shell script that Magenta provides you, and then taking the MIDI file produced by that script and converting it to audio with another subprocess running a Fluidsynth terminal command.
Replace the variables at the top of the file with paths to where you want the MIDIs to be generated, where you saved the Famicom soundfont, and where you saved the NES RNN model that you downloaded.
Open a Python shell and run the following Python code to test it out:
This should generate a sound file called test.wav in the directory where you ran the code. Open it to see what it sounds like! If you received an error, you might need to install a different version of the TensorFlow module.
Adding music generation to your Twilio phone calls
Now that we have code to generate music and code to handle phone calls, we need to bring the two together.
Open up app.py and replace the contents with the following code, where the changes are highlighted:
In this updated code, we're adding the Redis Queue logic to the phone call route. When a phone call is received, we're queueing up an asynchronous task to execute the code from music_generator.py to create new Nintendo music, and then responding to Twilio's webhook request with the same TwiML as before.
We're also adding another route to handle the logic of playing the new music that was generated. After the music generation is finished, we want to asynchronously update the call that is in progress and tell it to play the song instead of continuing to pause. The filename of the song is the call_sid and it will be in the directory you specify in the UPLOAD_FOLDER variable.
Now all that's left is to update the code in music_generator.py to update the TwiML that is running the phone call once the music is finished being created. Replace its contents with the following code, with the changes highlighted again:
We're now making a call to the Twilio REST API to update the phone call that kicked off the task of generating music. After the generated MIDI is converted to audio, this line of code tells Twilio to redirect the TwiML flow of the call to a new URL. Don't forget to replace your ngrok URL in the code for the APP_URL variable, and to make sure the others have the right values as well!
You'll also need to set the environment variables TWILIO_ACCOUNT_SID and TWILIO_AUTH_TOKEN with the credentials from your Twilio Console. The Twilio Client() object will automatically check these values.
We're almost ready, but before testing the app out, you're going to need to kick off an RQ Worker process. Open another terminal window and run following command:
If you receive any errors, make sure the correct virtual environment is activated and that you also have a Redis server running (src/redis-server from the directory where Redis is installed).
With all of that done, run python app.py again to kick off your Flask app, and try calling to see if you hear any Nintendo music. It might take a bit of time to generate the music depending on how good your computer is, but that's why we are doing it asynchronously!
Ready for more adventure?
Now that you have a Twilio phone number that plays Nintendo music generated from my model, you can try training your own! If you want a larger set of classic Nintendo tunes to train on, check out the NESMDB project. Or you can have fun and try a whole different set of data entirely. Whatever you decide to do, I hope you have as much fun with this as I have.
I can't wait to see (and hear) what you build. Feel free to reach out for any questions or to show off any cool artificial creativity related projects you work on or find out about:
- Email: Sagnew@twilio.com
- Twitter: @Sagnewshreds
- GitHub: Sagnew
- Twitch (streaming live code): Sagnewshreds


Related Resources
Twilio Docs
From APIs to SDKs to sample apps
API reference documentation, SDKs, helper libraries, quickstarts, and tutorials for your language and platform.
Resource Center
The latest ebooks, industry reports, and webinars
Learn from customer engagement experts to improve your own communication.
Ahoy
Twilio's developer community hub
Best practices, code samples, and inspiration to build communications and digital engagement experiences.